The Fenergo Salesforce App - Configuration User Guide
The following document details required configuration in the Salesforce Application.
Fen-X Logs
Under the Fen-X console admin users can access log records related to Fen-X for Salesforce app. For a user’s activity to generate logs they need to be assigned the Fenx Logger Log Creator permission set.
Data Model Mapping and Sync
The Fenergo Salesforce app supports a common data model mapping. This allows for automatic data sync from Salesforce to Fenergo SaaS and Fenergo SaaS to Salesforce.
The mapping allows for fields on the Salesforce account to be mapped to fields on the entity in Fenergo SaaS. The fields on related items, on the account in Salesforce, such as contacts or address may be mapped to fields on data groups in Fenergo SaaS.
The mapping also supports mapping to Fenergo SaaS access layers.
If installing the application into a new Salesforce environment. The mapping config will contain an example to illustrate the formatting of the config.
Fenergo SaaS to Salesforce
Data sync between Fenergo SaaS and Salesforce is triggered when a Verify Entity task is completed as part of defined Fenergo SaaS journey.
When a Verify Entity task is completed it will automatically update the fields, as mapped from Fenergo SaaS to Salesforce, on the account. There are two separate mapping files for Company and Individual specifically for Fenergo SaaS to Salesforce sync.
This allows for the mapping to differ between the sync from Salesforce to Fenergo SaaS and Fenergo SaaS to Salesforce.
Please note it is not possible to map to Fields and datagroups that are in a conditional Policy when mapping from Salesforce to Fenergo SaaS. Only fields and datagroups from the Global policy can be mapped. If you have fields from a conditional policy, the current recommended workaround is to move these fields/datagroups to the global policy.
When mapping from a condtional policy when syncing data back Fenergo SaaS to Salesforce, you can map fields and data groups when the data sync occurs following the Verify Entity task completion.
Data Mapping Example
The below steps provide details on how to implement the mapping for the Salesforce to Fenergo SaaS sync. There are separate mapping files for Company and Individual specifically for Salesforce to Fenergo SaaS sync. This allows for the mapping to differ between the sync from Salesforce to Fenergo SaaS and Fenergo SaaS to Salesforce.
-
Navigate to Fenergo Console
-
Go to Fenergo Configuration and find App Settings
-
Scroll down to Mappings
The following fields are validated when the user clicks on the Save button:
- Salesforce to Fenergo Company Account Mapping Entity
- Salesforce to Fenergo Individual Account Mapping Entity
- Fenergo to Salesforce Entity Mapping Company Account
- Fenergo to Salesforce Entity Mapping Individual Account

Salesforce to Fenergo SaaS Mapped Example
The below provides an example of the config of the Salesforce to Fenergo SaaS mapping. A description of the properties is provided in the section below.
{
  "type": "Company",
  "mappingStructureVersion": "2",
  "accessLayer": {
    "geographic": "Enterprise",
    "businessRelated": "Business"
  },
  "salesforceToFenxSingleDataTypeFieldMappings": [
    {
      "fenxDatabaseFieldName": "legalEntityName",
      "value": "<Schema.SObjectField>Name</Schema.SObjectField>"
    },
    {
      "fenxDatabaseFieldName": "registrationNumber",
      "value": "<Schema.SObjectField>RegistrationNumber__c</Schema.SObjectField>"
    }
  ],
  "salesforceToFenxDataGroupCollections": [
    {
      "dataGroupId": "756002c3-27e5-44a9-be99-cfc8c6d1239d",
      "dataGroupName": "contacts",
      "salesforceObjectApiName": "Contact",
      "relationshipPathToAccount": "AccountId",
      "salesforceToFenxDataGroupFieldMappings": [
        {
          "fenxDatabaseFieldName": "businessTitle",
          "value": "<Schema.SObjectField>Title</Schema.SObjectField>"
        },
        {
          "fenxDatabaseFieldName": "firstName",
          "value": "<Schema.SObjectField>FirstName</Schema.SObjectField>"
        },
        {
          "fenxDatabaseFieldName": "email",
          "value": "<Schema.SObjectField>Email</Schema.SObjectField>"
        }
      ]
    }
  ]
}
Property Description
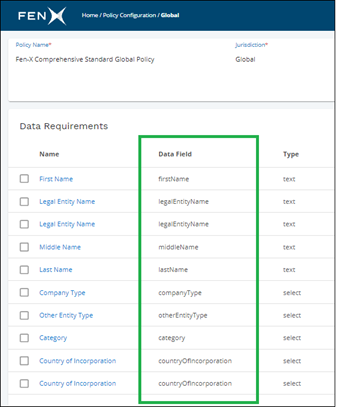
- fenxDatabaseFieldName - This can be found on the data requirement under policy.
- Schema.SObjectField (under salesforceToFenxSingleDataTypeFieldMappings) - Field on the account object.
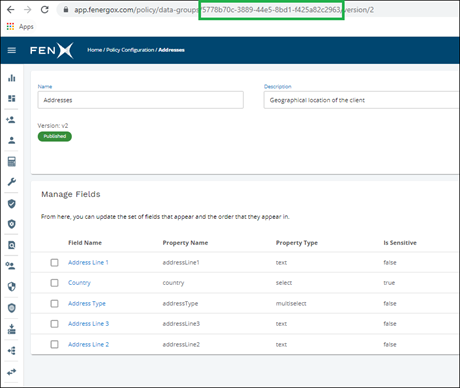
- dataGroupId – Database id given to a group in Fenergo SaaS. This can be found on the URL having clicked into view a data group (Policy Configuration > Data Group Name). DataGroupId
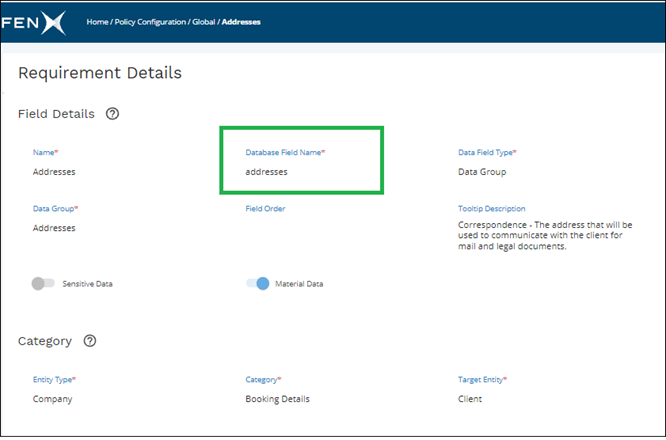
- dataGroupName – Database name given to a group assigned to a policy. This can be found by clicking into a policy, searching for the group under the data requirement and then clicking into the requirement details.
Mapping Salesforce Values to Fenergo SaaS Values
Where data models do not match between Salesforce and Fenergo SaaS, a custom vlookup is required to map values. E.g In Salesforce you may have a country value of UK and in Fenergo SaaS it maybe United Kingdom. This functionality works for single select fields, multi selct fields and text fields allowing a value to be mapped to the appropriate value in Fenergo SaaS. VLookup functionality is now also supported for Datagroup fields during entity creation. This ensures datagroup values such as Country or State are matched and translated when sent from Salesforce to FenX.
To map a value from Salesforce to Fenergo SaaS, create a new vLookup file. In the example below we are going to use a field called industry and have named the lookup SalesforceToFenxIndustryMapping.
- Navigate to the App Settings.
- Custom VLookups are validated when the user clicks on the Save button.

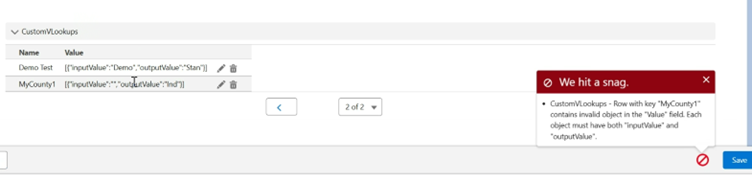
A separate lookup is required for each field that is mapped. Input value is the Salesforce value. Output is the Fenergo SaaS value.
To use this, as part of your Salesforce to Fenergo SaaS mapping, update your mapping to include the reference to the customVLookupMetadataRecordName.
{
 "fenxDatabaseFieldName": "registrationBody",
 "value": "<Schema.SObjectField>Industry</Schema.SObjectField>",
 "customVLookupMetadataRecordName": "SalesforceToFenxIndustryMapping"
}
Fenergo SaaS to Salesforce Mapped Example
{
  "mappingStructureVersion": "2",
  "accessLayer": {},
  "fenxToSalesforceSingleDataTypeFieldMappings": [
    {
      "fenxDatabaseFieldName": "legalEntityName",
      "salesforceFieldAPIName": "Name"
    },
    {
      "fenxDatabaseFieldName": "countryOfIncorporation",
      "salesforceFieldAPIName": "CountryOfIncorporation__c"
    },
    {
      "fenxDatabaseFieldName": "industry",
      "salesforceFieldAPIName": "Industry",
      "customVLookupMetadataRecordName": "FenxToSalesforceIndustryMapping"
    }
  ],
  "fenxToSalesforceToDataGroupCollections": [
    {
      "dataGroupId": "bc61d52b-59a3-4fb2-8762-e2326fb95b47",
      "salesforceObjectApiName": "Contact",
      "relationshipPathToAccount": "AccountId",
      "fenxToSalesforceDataGroupFieldMappings": [
        {
          "fenxDatabaseFieldName": "firstName",
          "salesforceFieldAPIName": "FirstName"
        },
        {
          "fenxDatabaseFieldName": "lastName",
          "salesforceFieldAPIName": "LastName"
        }
      ]
    }
  ]
}
Vlookup for Datagroup Fields Example
User has a 'Country' field in an 'Addresses' DataGroup in Salesforce. They are looking to apply vLookup to the Country field, such that when a user selects a dropdown value of 'USA', it is translated to 'United States of America' when it is displayed in Fenx.
{
  "type": "Company",
  "mappingStructureVersion": "2",
  "accessLayer": {
    "geographic": "<Schema.SObjectField>AccessLayerGeographic__c</Schema.SObjectField>",
    "businessRelated": "<Schema.SObjectField>AccessLayerBusinessRelated__c</Schema.SObjectField>"
  },
  "salesforceToFenxSingleDataTypeFieldMappings": [],
  "salesforceToFenxDataGroupCollections": [
    {
      "dataGroupId": "b772c3a2-248a-432c-9b23-b984b586ae56",
      "dataGroupName": "addresses",
      "salesforceObjectApiName": "Address__c",
      "relationshipPathToAccount": "Account__c",
      "salesforceToFenxDataGroupFieldMappings": [
        {
          "fenxDatabaseFieldName": "addressLine1",
          "value": "<Schema.SObjectField>Street__c</Schema.SObjectField>"
        },
        {
          "fenxDatabaseFieldName": "country",
          "value": "<Schema.SObjectField>Country__c</Schema.SObjectField>",
          "customVLookupMetadataRecordName": "SalesforceToFenxCountryMapping"
        }
      ]
    }
  ]
}
[

   {
      "inputValue":"USA",
      "outputValue":"United States of America"
   }
]
Mapping Fenergo SaaS Values to Salesforce Values
Where data models do not match between Salesforce and Fenergo SaaS, a custom vlookup is required to map values. E.g In Salesforce you may have a country value of UK and in Fenergo SaaS it maybe United Kingdom. This functionality works for single select fields, multi selct fields and text fields allowing a value to be mapped to the appropriate value in Fenergo SaaS.
To map a value from Salesforce to Fenergo SaaS, create a new vLookup file. In the example below we are going to use a field called industry and have named the lookup SalesforceToFenxIndustryMapping.
Please view images above in previous section for more information on this
A separate lookup is required for each field that is mapped. Input value is the Salesforce value. Output is the Fenergo SaaS value.
To use this, as part of your Salesforce to Fenergo SaaS mapping, update your mapping to include the reference to the customVLookupMetadataRecordName.
{
  "fenxDatabaseFieldName": "industry",
  "salesforceFieldAPIName": "Industry",
  "customVLookupMetadataRecordName": "FenxToSalesforceIndustryMapping"
}
Mapping of Individuals from Company Accounts
While this is now possible, it is not advised and goes against Salesforce best practice. Our recommendation is always for customers to use the individual account object in Salesforce to capture individuals.
If this is not possible for customers and are already using the company account object, then the following can be completed to map individuals captured using company account object and mapping these to individual entity in Fenergo.
- Create a new Checkbox field on the Account Object.
- Add the API Field to the custom metadata file 'NotAdvised-Person A/C Override'
Additional Notes:
- Name the field as you prefer; the name does not affect this functionality.
- The checkbox field can be a formula field of type checkbox also.
- If the checkbox is checked (TRUE), the system identifies it as an Individual Record and applies the Individual mapping.
- If the checkbox is unchecked (FALSE), it's considered a Company Record, and the Company mapping is used.
- By specifying the checkbox field's API name in the metadata, you instruct the Fenergo Salesforce app to ignore the IsPersonAccount field and base its logic solely on this checkbox.
- It is up to the customer to decide how to check the box (manual, automated, formula field, etc)
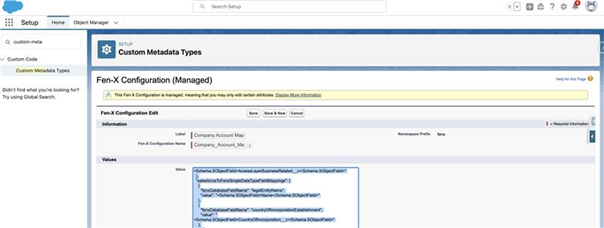
At this point, the Company Account Mapping needs to be in place to initiate Journeys in Fenergo SaaS. Navigate to Setup > Custom Metadata > Fen X Configuration > Company account mapping > Edit
{
  "type": "Company",
  "mappingStructureVersion": "2",
  "accessLayer": {
    "geographic": "Enterprise",
    "businessRelated": "Business"
  },
  "salesforceToFenxSingleDataTypeFieldMappings": [
    {
      "fenxDatabaseFieldName": "legalEntityName",
      "value": "<Schema.SObjectField>Name</Schema.SObjectField>"
    }
  ],
  "salesforceToFenxDataGroupCollections": []
}
Validate Mapping
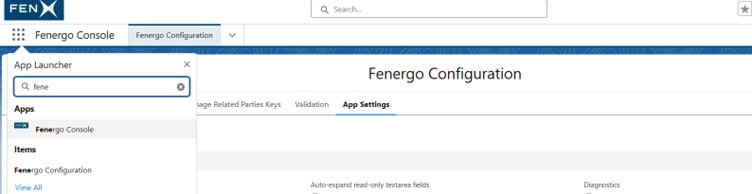
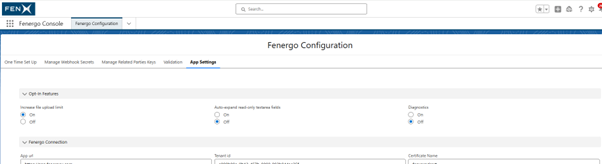
- Navigate to App Launcher
- Search for Fenergo Console

- Navigate to Fenergo Configuration
- Click on the App Settings tab and have the following settings

The following fields are validated when the Save button above is clicked:
- Salesforce to Fenergo Company Account Mapping Entity
- Salesforce to Fenergo Individual Account Mapping Entity
- Fenergo to Salesforce Entity Mapping Company Account
- Fenergo to Salesforce Entity Mapping Individual Account
Chatter Post Message Configuration
The Salesforce app provides the ability for automatic chatter notifications to be captured against the account in Salesforce dependent on events triggered in Fen-X. The events applicable are;
- Journey Started
- Journey Completed
- Task Started
- Task Completed
- Task Reassignment
- Journey Cancelled
The messages will appear on the chatter feed on the account as indicated below. On task reassignment if the user provides a comment this will be included in the Chatter message.

The below provides an example of the Chatter message configuration. The version number updates as enhancements are added with version 3 being the current version number.
The configuration is defined via Setup > Custom Metadata Types > Manage Records (Fen-X Configurations) > Selecting the applicable Chatter Post Message.
{
  "ChatterConfigurationVersion": "3",
  "journeyTypesToBeIncludedForChatterNotification": ["COB"],
  "message": "{0} Task in Journey {1} for Account {2} has been Completed",
  "isEnabled": true,
  "accountfieldAPINamesHavingUserIdForTagging": ["OwnerId", "InterestedPerson__c"]
}
Each message type can be enabled or disabled via the Fen-X Configuration in Salesforce and the text modified.
The configuration of the chatter message allows for the listing of Salesforce fields from which the recipients (user ids) are to be automatically tagged and for the filtering event types (chatter notification) by Fen-X Journey Types. Please use the Internal Identifier from the journey builder in Fenergo to filter by journey type.
Each message will follow the following format
- ChatterConfigurationVersion – This should be version 3
- journeyTypesToBeIncludedForChatterNotification - Please use the Internal Identifier from the journey builder in Fenergo to filter by journey type.
- Message – The message to display in the chatter feed
- isEnabled – Set to true or false if you want to enabled or disabled this chatter message
- accountfieldAPINamesHavingUserIdForTagging – Additional salesforce account fields that can be added to the message. A common example would be account ID/account Owner
Note: When using version 3 of the chatter messaging files, you do not need to update the Enabled Chatter Post custom metadata files to true or false. These are used for older versions of chatter messages.
- Enable Journey Cancelled Chatter Post
- Enable Journey Completed Chatter Post
- Enable Journey Started Chatter Post
- Enable Task Completed Chatter Post
- Enable Task Reassign Chatter Post
- Enable Task Started Chatter Post
Message Definition
Within the message definition, values derived from Fen-X are captured between { }. The below lists the values for each message type.
-
Journey Started / Journey Completed / Journey Cancelled
- Journey Name
- Account Name
-
Task Started / Task Completed
- Task Name
- Journey Name
- Account Name
-
Task Reassigned
- Task Name
- Username
- Account Name
- Journey Name
Chatter Message Examples
{
  "ChatterConfigurationVersion": "3",
  "journeyTypesToBeIncludedForChatterNotification": ["COB", "Offboarding"],
  "message": "{0} from Fen-X for Account {1} has been started",
  "isEnabled": true,
  "accountfieldAPINamesHavingUserIdForTagging": ["OwnerId"]
}
{
  "ChatterConfigurationVersion": "3",
  "journeyTypesToBeIncludedForChatterNotification": ["COB v2", "COB", "COB1"],
  "message": "{0} from Fen-X for Account {1} has been completed",
  "isEnabled": true,
  "accountfieldAPINamesHavingUserIdForTagging": ["OwnerId"]
}
{
  "ChatterConfigurationVersion": "3",
  "journeyTypesToBeIncludedForChatterNotification": ["COB", "COB1", "COB_1", "Offboarding"],
  "message": "{0} from Fen-X for Account {1} has been started",
  "isEnabled": true,
  "accountfieldAPINamesHavingUserIdForTagging": ["OwnerId"]
}
{
  "ChatterConfigurationVersion": "3",
  "journeyTypesToBeIncludedForChatterNotification": ["COB"],
  "message": "{0} Task in Journey {1} for Account {2} has been started",
  "isEnabled": true,
  "accountfieldAPINamesHavingUserIdForTagging": ["OwnerId"]
}
{
  "ChatterConfigurationVersion": "3",
  "journeyTypesToBeIncludedForChatterNotification": ["COB", "LEM"],
  "message": "{0} Task in Journey {1} for Account {2} has been Completed",
  "isEnabled": true,
  "accountfieldAPINamesHavingUserIdForTagging": ["OwnerId"]
}
{
  "ChatterConfigurationVersion": "3",
  "journeyTypesToBeIncludedForChatterNotification": ["COB", "COB1"],
  "message": "Task {0} has been reassigned to {1} for {2} as part of {3}",
  "isEnabled": true,
  "accountfieldAPINamesHavingUserIdForTagging": ["OwnerId"]
}
Fenergo Comments for Salesforce
Using fenergo comments functionality, a fenergo user can post a comment to Salesforce chatter.
For a comment to post to chatter, the fenergo user has to add the following hashtag #Salesforce when posting a comment on an entity or journey.
The configuration of additional Salesforce fields and account owners is managed via the Fenx To SF Comment Chatter Post Message metadata file.
{
  "ChatterConfigurationVersion": "3",
  "isEnabled": true,
  "accountfieldAPINamesHavingUserIdForTagging": ["OwnerId"]
}
Future enhancements to this and comments functionality will be added based on client feedback.
Salesforce Custom Journey Wrapper
This allows clients to continue using the Salesforce app > Journey Component if they choose to use Fen X API's to sync data from Salesforce to Fen X, Create journeys/entities etc instead of the New Request functionality available in the OOTB Salesforce App.
Clients would leverage the Fen-X Salesforce app by injecting Fen-X entity ID’s into the journey component of the app such that the app could then continue to display journeys and allow the Salesforce user to interact with these journeys.
Clients can also place the journeys component on opportunities/ contacts/Groups etc. if they choose to.
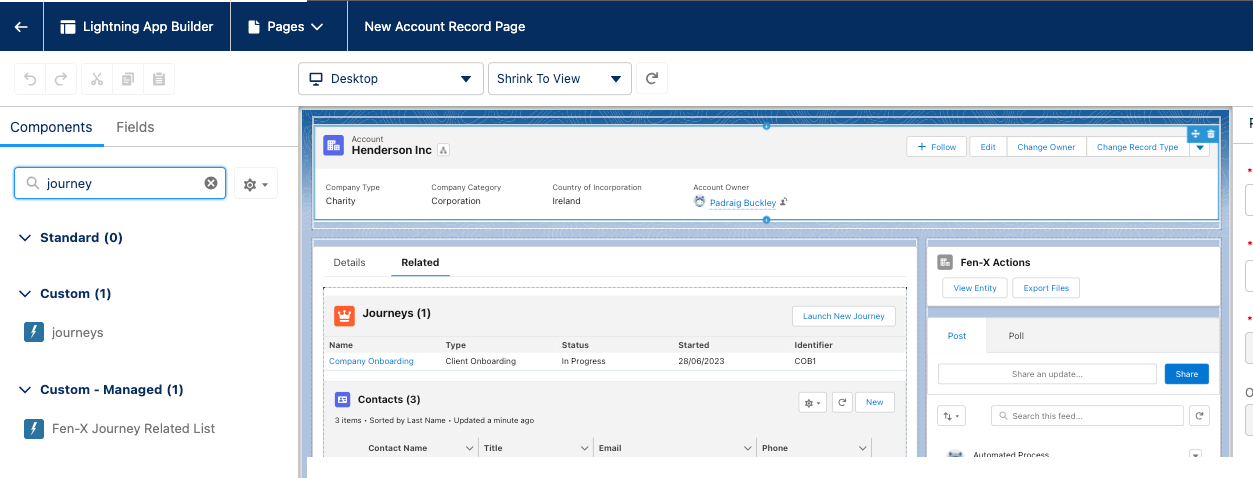
To achieve this, Clients can create there own custom aura component. The launch New Journey button can be hidden from the journey component using the hideJourneyActions parameter. This allows the client to hide the button if they want to handle the journey launching via a custom solution.
- Hides the "Launch Journey" button when the parameter hideJourneyActions is set to true.
- Doesn’t hide "Launch Journey" button when the parameter hideJourneyActions is set to false.
See below for an example of passing a Fen X ID to the Journeys component and hiding of the Launch New Journey actions button.
The code below is for sample purposes only and is not supported. This is the responsibility of the clients dev team to implement and manage this code.
<aura:component implements="flexipage:availableForAllPageTypes">
  <aura:attribute name="fenxEntityId" type="String"></aura:attribute>
  <aura:handler name="init" value="{!this}" action="{!c.myAction}" />
  <fenx:jRelatedList fenxEntityId="{!v.fenxEntityId}" hideJourneyActions="{!v.hideJourneyActions}" />
</aura:component>
({
  myAction: function (component, event, helper) {
    component.set("v.fenxEntityId", "c10e1786-b671-4a0f-ad7f-b4f097ecda1d");
    component.set("v.hideJourneyActions", "true");
  },
});
To add this custom component to an account, edit the page that the client wants to place the Fen X journeys component.
Allow New Request Screen to be Launched on a Custom Event
In certain account setup steps, the completion of the New Request screen is a logical step for a front office to complete as part of account setup. To make this intuitive and reduce user error, allow clients to configure the New request screen as part of their process.
Clients can determine where they want to launch the New Request Modal e.g. On completion of a certain action in Salesforce
To trigger the launch of the Fenergo New Request Modal, the Fen-X Account Lightning Page Actions component is required to be on screen
The client will need to develop logic to determine when the New request Modal should be triggered.
We have used the standard Lightning Message Channel which Salesforce provides to achieve this. Here is a link to the official Salesforce documentation.
Example:
Here is an example of a custom button added to the Account Page and allows the New Request modal to be launched. Below is an example of how this could be achieved and is for illustation purposes only.
import { LightningElement, wire } from "lwc";
import { publish, MessageContext } from "lightning/messageService";
import OPEN_FENX_NEW_REQUEST_MODAL from "@salesforce/messageChannel/fenx__OpenNewRequestModal__c";

export default class ClientApp extends LightningElement {
  @wire(MessageContext) messageContext;

  handleOpenNewRequestModal() {
    publish(this.messageContext, OPEN_FENX_NEW_REQUEST_MODAL);
  }
}
<?xml version="1.0" encoding="UTF-8" ?>
<LightningComponentBundle xmlns="http://soap.sforce.com/2006/04/metadata">
    <apiVersion>52.0</apiVersion>
    <isExposed>true</isExposed>
    <targets>
        <target>lightning__RecordPage</target>
    </targets>
    <targetConfigs>
        <targetConfig targets="lightning__RecordPage">
            <objects>
                <object>Account</object>
            </objects>
        </targetConfig>
    </targetConfigs>
</LightningComponentBundle>
<template>
  <lightning-button
    label="Open New Request Modal"
    title="Open New Request Modal"
    onclick={handleOpenNewRequestModal}
    class="slds-var-m-left_x-small"
  >
  </lightning-button>
</template>
Client Offboarding and ReOnboarding
For more detailed information on configuring Client Offboarding and ReOnboarding Journeys, please visit: Client Offboarding
A Client Offboarding Journey must have the Complete Client Offboarding task type as the final activity in order for the offboarding to successfully offboard. This system task includes the Verify Entity process; therefore, the Verify Entity task should not be added as part of an offboarding journey.
A Client ReOnboarding Journey must have the Complete Client ReOnboarding task to successfully re-onboard a client or selected jurisdictions. This system task also includes the Verify Entity process; therefore, the Verify Entity task should not be added separately as part of a reonboarding journey.
Enforcement of Unwrapping Rules in Salesforce Related Party Task
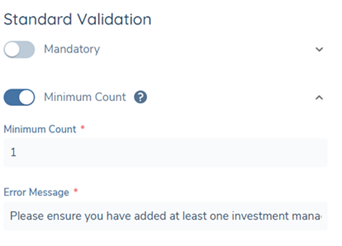
This feature ensures that Salesforce users complete all mandatory Ownership & Control requirements in the Related Party task by enforcing rules through the use of toggles. All of these requirements are configurable to allow for different needs. For more information on this features functionality, please refer to the Using the Salesforce Functional User Guide.
These requirements are configured in the Ownership & Control Requirements section of Policy.

The Mandatory toggle will not work successfully alone, it must be coupled with one of the other requirements (Mandatory or Add All) to ensure that a certain number of necessary parties are added.
The error message for each toggle is also configurable as shown below:
Configuring the Related Party Data & Documents Task
The Related Party Data & Documents task must be configured alongside the existing Related Parties task in a journey.
For more information on how to configure this task in Fenergo, please visit Configuring the Related Party Adapted Experience.
Data Task Enhancements
Configuring Auto Expand for Read-Only Text Areas:
This improvement enables Salesforce administrators to control whether Text Area fields auto-expand or not by enabling the Auto Expand Read Only Text Areas toggle in the Fen X Configuration.
To enable this opt-in feature:
- Navigate to App Launcher (Nine dots in top left corner of Salesforce).
- Search “Fen X Configuration”.
- Click on the App Settings tab in Salesforce.
- Locate the Auto Expand Read Only Text Areas setting.
- Set the toggle to True.
All read-only Text Area fields in a data task will then auto-expand to display their full content without scrollbars.
When set to false (default), Text Area fields will retain a fixed height and a scrollbar will appear when the content exceeds the field's visible area.
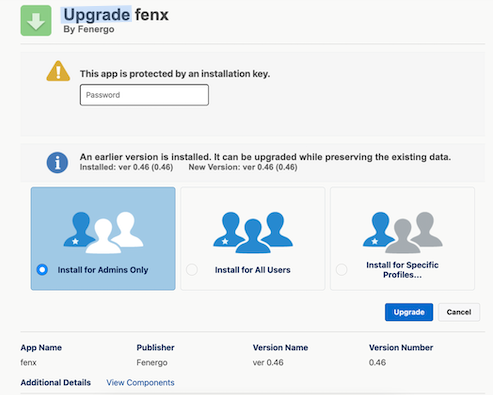
How to Manually install the latest version of the Salesforce App
Updates to the Salesforce Fen X app are automatically deployed to all clients.
In the event that manual installation of latest version of the app is required, the latest version of the app can be requested from a member of the product team or via a SaaS Request.
Multiple Fenergo tenants - Single Salesforce Org
Follow the below steps to configure multiple fenergo tenants to a single Salesforce org.
Setting Up a Tenant in Salesforce
-
Create a Tenant Record
- Open the App Launcher.
- Search for “Tenants”.
- Click New to create a new Tenant record.
- Fill in the required fields:
- Name Note: This is the label of your tenant tab.
- TenantId__c
- Click Save.
-
Set Up Tenant Configurations
- Open the Tenant record you just created.
- Go to the Related tab.
- Find Tenant Configurations.
- Click New to add configurations.
ImportantDo NOT create the following configuration types, as they are not needed:
(Deprecated)(Internal Only)AutoexpandReadOnlyTextareasDiagnosticsIncreaseFileUploadLimitMaskLogs
-
Check Multi-Tenant Feature in Accounts
- Open any Account record.
- If the multi-tenant feature is enabled in your Salesforce environment, then the below screen will appear.

Example Scenario:
Assume you have 2 Named Credentials:
IrelandJapan
Now, there will be two records of Tenant Configuration.
The Named Credential API Name field in each Tenant Configuration should exactly match the Named Credential’s name:
IrelandJapan
Multiple Salesforce Orgs - Single Fenergo Tenant
To configure multiple Salesforce orgs to a single fenergo tenant, please install the app on both orgs and follow the steps outlined in the installation guide.
Important points to be aware of
-
Webhook limits
- A webhook is required to be setup for each Salesforce org. There is a limit of 10 webhooks currently supported in Fenergo
-
New Request
- Each Salesforce org can link an account to a single Fenergo entity
- Restricting this linkage is not possible through our Salesforce app. Project teams need to investigate implementing access layers and security permissions.
-
Launch New Journey
- If an entity is linked to both Salesforce orgs, new journeys can be initiated in both.
- Users can view data in a journey unless access layers are enforced.
-
Custom Metadata Configuration
- Configuration needs to be applied to each Salesforce tenant.
-
Data Sync Fen X -> SF
- Updates will be sent to each Salesforce org.
- If a linked account is identified, the Salesforce account will be updated.
- If no linked account is identified, no update will occur.
-
Post Chatter Message
- Updates will be sent to each Salesforce org.
- If a linked account is identified, a Chatter message will be posted.
- If no linked account is identified, no Chatter message will be posted.
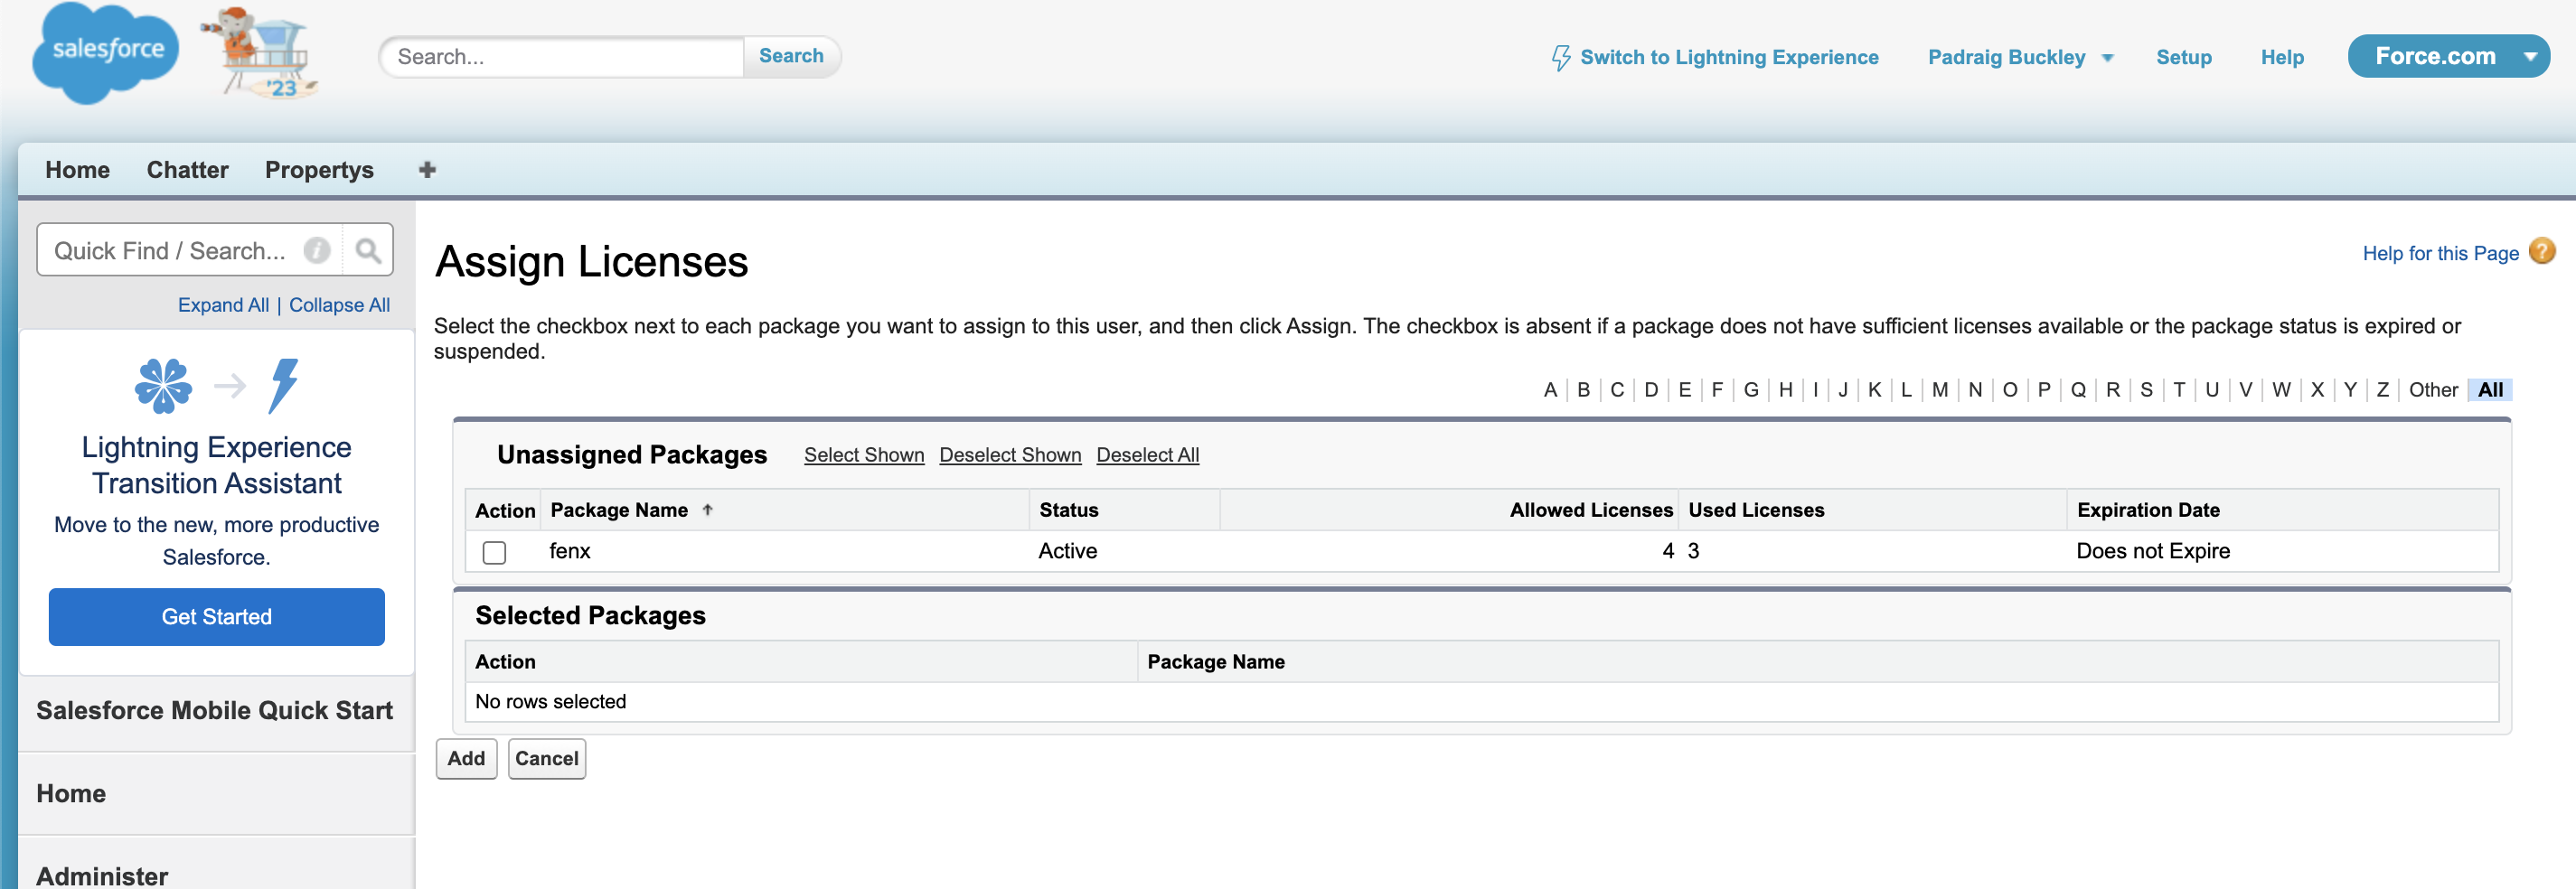
Assigning a Fen X License in Salesforce
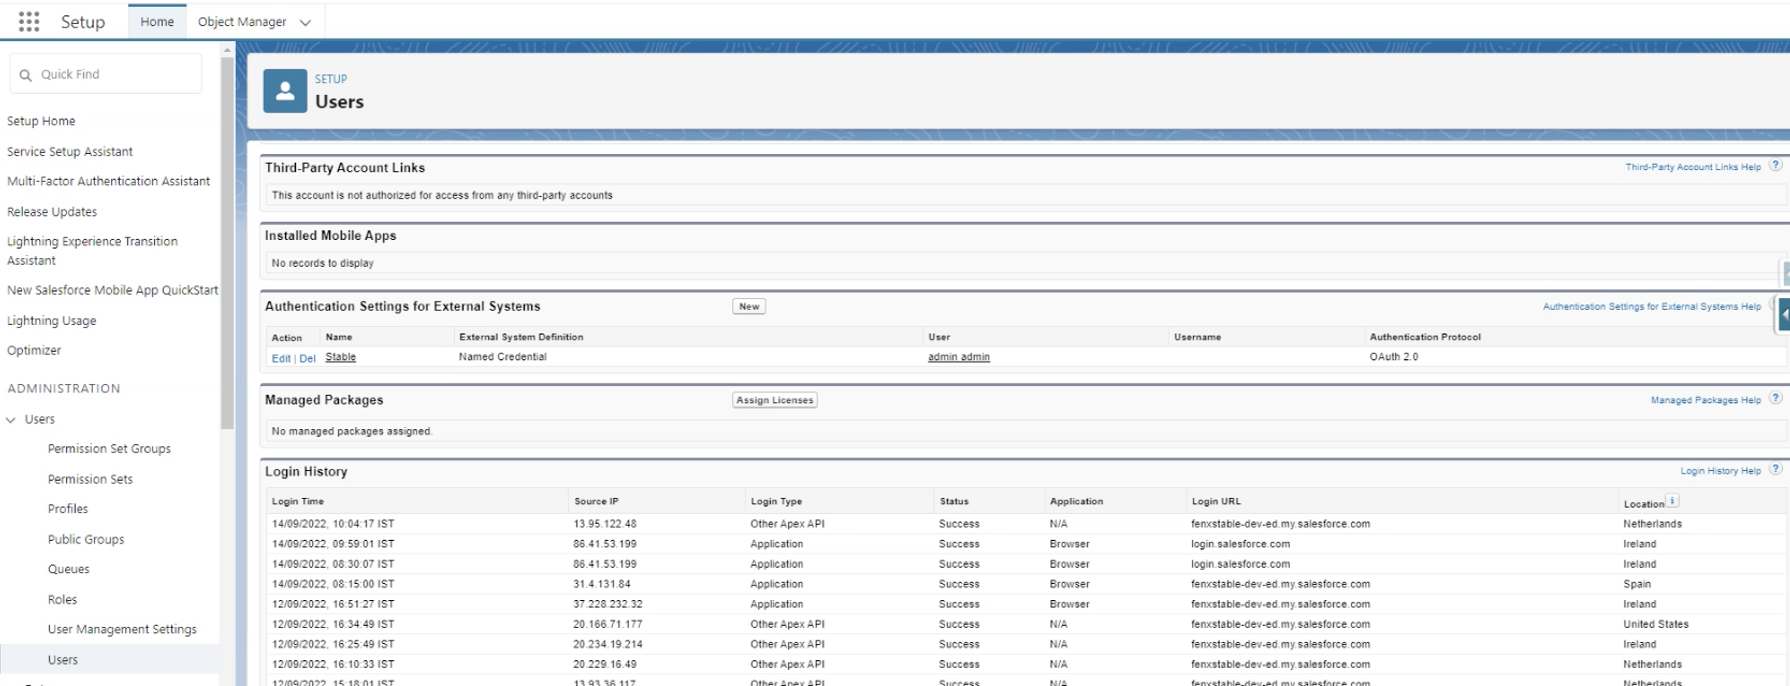
Any time the Salesforce – Fen X app is installed, a license needs to be assigned to each user. To manually assign a license to a user, repeat the following steps
-
Navigate to Setup area in Salesforce
-
Scroll to Users in the Left Nav

-
Scroll to Managed Packages
-
Click Assign License
-
On the Assign License screen, select fenx package checkbox.
tipIf there are no license remaining, a SaaS Request is required to increase the number of available licenses.
The number of licenses will be agreed with Fenergo during the Sales process.
Salesforce App Permissions
- FenX Admin: This controls access to FenX configuration area
- FenX Standard: This is the basic permission that all users need to use the Salesforce for Fenergo app.
- FenX Webhook: The site guest user requires this permission for webhooks to work
The following permissions are not required and can be ignored by clients:
- FenX Logger Admin
- FenX Logger End User
- FenX Logger Log Creator
- FenX Log Viewer
Troubleshooting using apex logs
-
Go to Setup > Custom Settings
-
Manage the Logger Settings

-
Edit

-
Define the log level
 danger
INFO should be the default value, not recommended to change this in PROD, but in lower environments its very useful to set the level to DEBUG to troubleshoot.
After reproducing the issue you would like to debug go to check the new logs

Display all logs, order by date so its easy to check the latest logs, look for the entry where the total errors is more than 0. The logs that appear before this one are very helpful to troubleshoot the error, they describe what app did just before the error so this information is very valuable. Clicking on the log number it will take you to the log entries.

Example:
| Time | Logs | Relevant? |
|---|---|---|
| 14:25 | Log-009 (2 log entries, 1 error message displayed) | YES |
| 14:25 | Log-008 (14 log entries) | YES |
| 14:24 | Log-007 (24 log entries) | YES |
| 14:05 | Log-006 (5 log entries) | NO, log entries not relevant for troubleshooting the issue as they were created 20 minutes before the error |
Total: 2+14+24 log entries relevant to analyse.
Webhook Events
- Entity Data Draft Verified - This allows for data to be synced from Fenergo back to Salesforce on completion of the verify Entity task
- Journey Instance Started - This sends a chatter notification to indicate a journey has started
- Journey Instance Completed - This sends a chatter notification to indicate a journey has completed
- Journey Task Started - This sends a chatter notification to indicate a task has started
- Journey Task Completed - This sends a chatter notification to indicate a task has completed
- Journey Task Reassigned - This sends a chatter notification to indicate a task is reassigned
- Journey Instance Cancelled - This sends a chatter notification to indicate a journey has been cancelled
- Comments Comment Posted - This sends a chatter notification when a comment is posted in Fenergo with #salesforce included in the comment
Finding Linked Entities in Salesforce
To find out which entity is linked to a Salesforce account, follow these steps. Ensure that the Salesforce user has the Fen X Standard Permission.
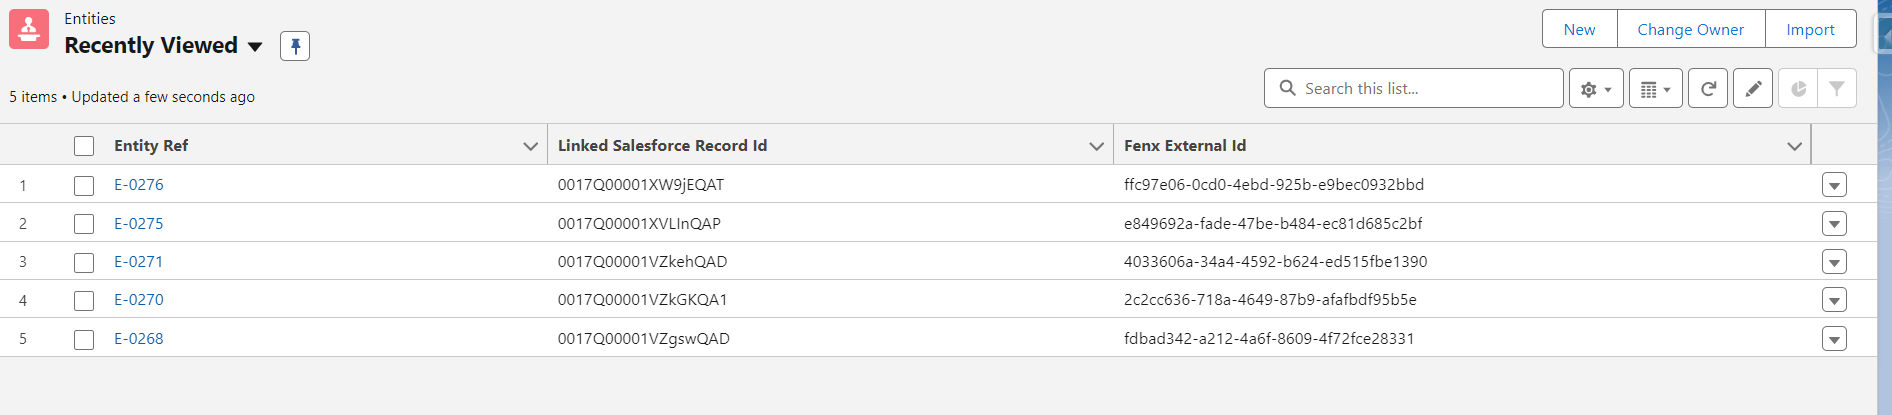
Option 1: Using the Entities Object
-
Navigate to the Entities object.
-
This will return the list of entities where the user can search or filter the list based on the Salesforce account ID or Fenergo Entity ID.
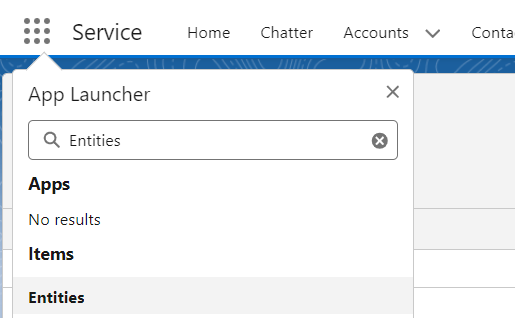
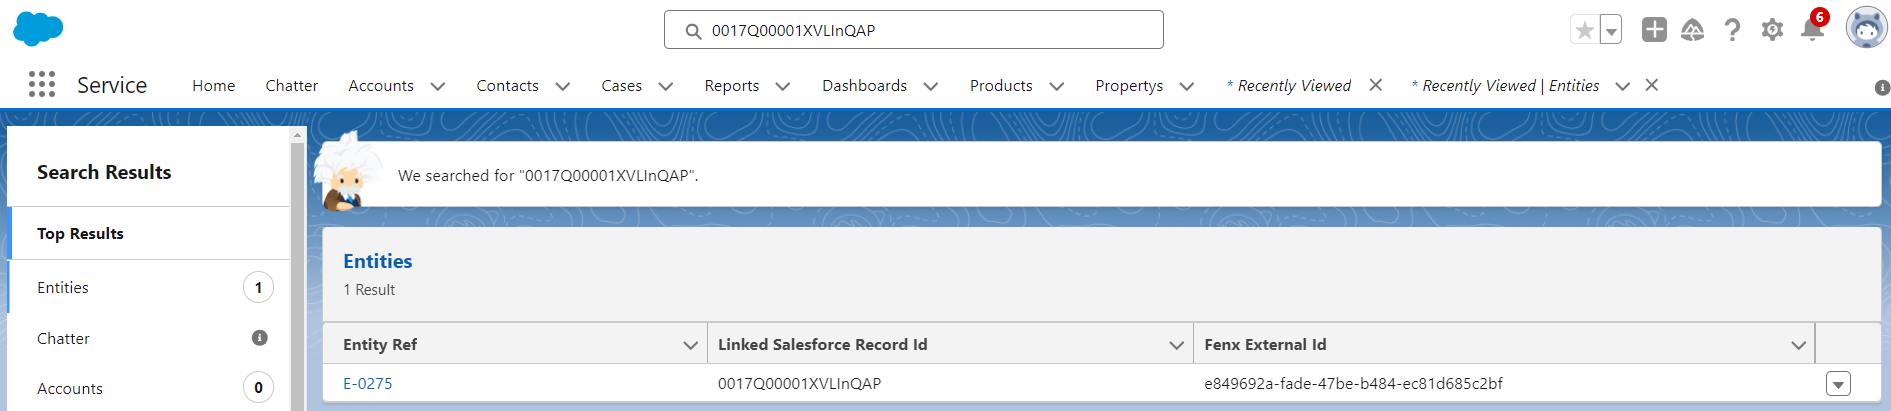
Option 2: Using Global Salesforce Search
-
Alternatively, the user can use the global salesforce search and input the salesforce Account ID or Fenergo Entity ID and navigate to the Entities in the Search result.
Option 3: Programmatic Query
- The client can also query the Entities object fenx__Entity__c if they want to retrieve this information also in a programmatic way.
Expose Journey Component for Client Use
Previously, the journey component that renders detailed journey view including task interaction was not publicly exposed. Now, the client can embed the component in an area of their choice in Salesforce e.g. SF Case, Contacts etc. by following the steps below.
Technical Details:
- Component Affected: lwc component journey
- lwc component name: journey
- New parameter: journeyIdentifier
How It Works:
- Exposed Component: Clients can now use the journey component in their own implementations.
- When the journeyIdentifier parameter is passed, the component retrieves the specific journey details from FenX.
- If the journeyIdentifier is provided, the component renders the journey with tasks, which are now displayed as modals rather than in the page.
<aura:component implements="flexipage:availableForAllPageTypes">
  <aura:attribute name="journeyIdentifier" type="String"></aura:attribute>
  <aura:handler name="init" value="{!this}" action="{!c.myAction}" />
  <fenx:journey journeyIdentifier="{!v.journeyIdentifier}" />
</aura:component>
({
  myAction: function (component, event, helper) {
    component.set(
      "v.journeyIdentifier",
      "44b52cc6-eeee-488d-ae5c-a20cf972abc0"
    );
  },
});
Global Apex Endpoints
Global Apex endpoint to create a Journey from Backend
This allows clients to programmatically launch journeys without relying on our Salesforce UI to create new journeys. A new global apex method is exposed to initiate a journey directly from the backend. The method will return the journey instance id.
Technical Details:
Method and parameters that need to be passed:
String fenx.FenxGlobal.launchNewJourney(
  String fenxEntityId,
  String journeyTypeFilterName,
  String businessRelatedAccessLayers,
  String geographicAccessLayers
)
Example: fenx.FenxGlobal.launchNewJourney('d3ad64a4-338c-434a-9076-107b3cc7b769','Product','Enterprise','Global');
Note: The above example uses the fenergo entity guid, “d3ad64a4-338c-434a-9076-107b3cc7b769".
Use Case: Clients can now call this method to trigger a journey launch. The client should provide the entity ID, journey type, and access layers (both business and geographic), and the journey will be launched automatically.
Global Apex endpoint to create an Entity in Salesforce
Given an account id (the Id field of the account standard object record), this endpoint allows clients to:
- Programmatically sync data from a Salesforce account to the Fenergo managed package custom objects, following the mapping configuration
salesforceToFenxMapping. - Create an entity record in Salesforce.
The method returns the entity Id field of the created entity record.
Relationship:
The fenx__entity__c managed custom object links a Salesforce account (fenx__Linked_Salesforce_Record_Id__c) to a Fenergo entity (fenx__Fenx_External_Id__c).
Example record:
| Id | fenx__Fenx_External_Id__c | fenx__Linked_Salesforce_Record_Id__c |
|---|---|---|
| a03J7000002AMBGIA4 | 929c7964-269c-4f2e-bde6-933d3c9e0655 | 001J7000008xWCqIAM |
Technical Details:
Method and Parameters:
Id fenx.FenxGlobal.mapInitiateCustomerDataModelToFenxDataModel(
    Id accountId
)
Example: fenx.FenxGlobal.mapInitiateCustomerDataModelToFenxDataModel('001J7000008xWCqIAM');
Global Apex endpoint to create an Entity in Fenergo
This endpoint allows clients to programmatically create an entity in Fenergo given an entity id (the Id field of the entity custom object record).
Technical Details:
Method and Parameters:
void fenx.FenxGlobal.createEntityInFenXFromFenxDataModel(
    Id salesforceEntityId
)
Example: fenx.FenxGlobal.createEntityInFenXFromFenxDataModel('a03J7000002AMBGIA4');
Error Handling:
"No Journeys found" is a possible business error indicating no Journey matches the given data.
What does this mean?
For example, if Fenergo only has 1 Journey configuration for country of incorporation = 'Egypt':
If no value is passed for country of incorporation or a value other than 'Egypt' is provided, this error will be raised by Fenergo as there is no matching Journey.
Sending Required Data:
The data is picked up via the mapping engine. The mapping configuration allows mapping Salesforce account fields to Fenergo fields.
{
  "fenxDatabaseFieldName": "countryOfIncorporation",
  "value": "<Schema.SObjectField>CountryOfIncorporation__c</Schema.SObjectField>"
}
- countryOfIncorporation: Fenergo field key
- CountryOfIncorporation__c: Salesforce account field containing the value
For more information about Salesforce to Fenergo mapping: Salesforce Functional User Guide
The data that was mapped by the method "mapInitiateCustomerDataModelToFenxDataModel" can be found here:
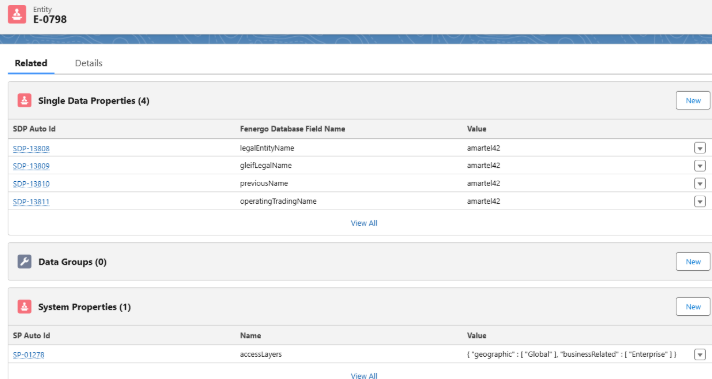
If the required data is not here then method createEntityInFenXFromFenxDataModel will fail with the error we saw at the beginning: "No Journeys found"
Global Apex endpoint to sync Fenergo data model to Client data model
This method accepts a list of entity ids (Id field of the entity custom object record) and syncs data from Fenergo custom objects to Client objects following the mapping configuration fenxToSalesforceMapping.
Technical Details:
Method and Parameters:
void fenx.FenxGlobal.mapFenxSalesforceDataModelToClientDataModal(
    Set<Id> salesforceEntityIds
)
Example: fenx.FenxGlobal.mapFenxSalesforceDataModelToClientDataModal(new Set<Id>{ 'a03J7000002AMBGIA4'});
Global Apex endpoint to upload document to Fenergo entity
This method uploads a document to a Fenergo entity. This requires content document id, a fenergo entity id, fenergo document type, a file name, and a map of any additional required fields.
Technical Details:
Method and Parameters:
void fenx.FenxGlobal.uploadContentDocumentToFenxEntity(
    Id contentDocumentId,
    String fenxEntityId,
    String documentType,
    String fileName,
    Map<String, Object> customPropertyValueByPropertyName
)
Example: fenx.FenxGlobal.uploadContentDocumentToFenxEntity('0692X00000ABCDE', '000000-1111111-222222-3333-444', 'Type', 'Bill', new Map<String, Object>());
Additional Notes that apply across all methods
Resolving "You have uncommitted work pending" Error
Cause: Salesforce does not allow DML operations and callouts in the same transaction.
Solution: Use a future method for asynchronous processing.
Salesforce documentation: Future Methods
Example: Calling Methods with Future Callouts:
public class CalloutService {

    @future(callout=true)
    public static void makeCallout(Id entityId) {
        fenx.FenxGlobal.createEntityInFenXFromFenxDataModel(entityId);
    }
}
Execution:
Id salesforceAccountId = 'Here goes the account id';
Id entityId = fenx.FenxGlobal.mapInitiateCustomerDataModelToFenxDataModel(salesforceAccountId);
CalloutService.makeCallout(entityId);
Assigning a Fenergo SaaS License in Salesforce
Any time the Fenergo Salesforce app is installed, a license needs to be assigned to each user. To manually assign a license to a user, complete the following steps:
- Navigate to Setup area in Salesforce.
- Scroll to Users in the Left Nav.
- Scroll to Managed Packages.
- Click Assign License.
- On the Assign License screen, select fenx package checkbox. Note: If there are no license remaining, a a SaaS Request is required to increase the number of available licenses. The number of licenses will be agreed with Fenergo during the Sales process.
Optional Configuration
Remove Logs Periodically
To set up a job to automatically remove the logs from the Salesforce app, which are created by Fenx app, please follow following steps:
Scheduling Job
- This job will run daily and delete the logs to free up the space in the Salesforce
- Goto Setup > Search for Scheduled Jobs
- Click on Scheduled Apex
- Job Name (Log Batch Purger)
- Apex Class (search for this class: LogBatchPurgeScheduler)
- Schedule Using (Schedule Builder)
- Schedule Apex Execution
- Frequency (Weekly) check the checkboxes for all the days
- Start (current date)
- End (31/12/2099 / according to your need)
- Preferred Start Time (01:00)
- Click on Save
By default, the job will delete the records which are older than 14 days, if you want to reduce the retention days from 14 to some other then please follow below steps:
Goto Setup > Search for Custom Settings Click on Logger Settings > Click on Manage > Edit Change Default Number of Days to Retain Logs