Financial Analysis
Financial Analysis is a feature built to capture and manage an applicant’s financial position. Specifically, the purpose of Financial Analysis is to evaluate a customer’s activities and other finance-related transactions to determine their performance and suitability to service credit facilities.
Getting Started
-
Navigate into Policy Configuration and configure a new Data Group for Financial Analysis (e.g. Assets). As part of this data group, add a select dropdown field as the primary datakey, which will represent the “Financial Item Type”(e.g. Motor Vehicle, Property). Add a “periodReference” numeric field to control the period reference validation and any other data fields which will be metadata for the financial items (e.g. Vehicle Registration, Address).
-
Navigate into a Policy Configuration and create new a data requirement “ Assets” to link the newly created “Assets” Data Group. Select the policy category for the data requirement for Actuals/Scenarios/Summary (e.g. “Financial Analysis Details”). Save the data requirement against the target entity of client/related party. (“Financial Analysis Details”) for both Actuals and Scenarios. Note: the category selected must the same category that is configured for the Financial Analysis Task in Journey Builder.
-
Navigate to Journey Builder, and to the journey where the financial analysis task is required. Add a task type of “Financial Analysis” which will facilitate the capture of the financial analysis details. Add the “Financial Analysis Details” requirement category that has been configured for Actuals/Scenarios/Summary and is required to be displayed on this task. Add client/related party/deal under target entity (dependent on the need to capture a financial analysis for them).
-
Add “Verify Financial Analysis” to verify the financial analysis task after the Financial Analysis task.
-
Trigger the journey with the financial analysis task to ascertain if it has been configured as expected and the “Assets” financial group will display on the task for for Actuals, Scenarios and Summary.
-
To configure the financial periods and further advanced configuration, follow the steps in this guide for further details.
Serviceability Calculations Functionality
Serviceability refers to the ability of someone to make repayments on a loan, according to the size of the loan and the applicant’s income and expenses. The calculations to inform this is through the medium of the Allocations grid and through the lever of transferring funds between the entities captured in the task.
All related parties/deals (including any Joint Financial Analysis) will be available for selection in the Allocations grid dropdown and reflected in the horizontal tabs. For each related party there will be two allocation types available for selection in the dropdown. The “Less Allocation to" is subtracting from the entity and therefore is a negative value whereas the “Add allocation from” is adding to the entity and therefore is a positive value (the allocation options will not appear for the allocation of funds between an individual of the Joint Financial Analysis and the Joint Financial Analysis itself). However, the values added directly to the allocation grid against the “Less Allocation to” will not appear to have negative values but the calculations are being dynamically triggered so that correct amount for the entity is represented in the “Surplus/Deficit”. Once an Allocation type is selected for a related party and added to the Allocations grid, then it will be unavailable for re-selection unless it is removed from the grid.
Financial Analysis Scenario Functionality
If a user has configured a business category for Scenarios in journey builder, then the user will see a new tab appear next to Actuals. This purpose of the Scenarios tab is to enable the user to create required projections based on the Actuals financial data that has been inputted. For instance, if the period of FY2020 to FY2023 has been captured, then the scenarios tab could be used to forecast how the financials will trend for from FY2023 onwards. Upon clicking into the Scenarios tab, the user will see the financial groups as per the business category configured against the task.
The Scenarios tab will give the option to the user to copy across financial data used in the Actuals in a new period or to start new periods completely afresh. This action is triggered via the plus icon next to each financial group. A modal will subsequently appear and will enable the user to name the period and select from which financial groups and which periods to copy across the financial data in Actuals. The “Enable Corresponding Periods” switch within the modal will be defaulted on and this functionality allows the user to not have to individually select periods across the financial groups e.g. in the instance 2020 was to be selected for all financial groups. The addition of the new period will be applied to all financial groups and up to a maximum of five periods is currently supported. Deletion of each column in a financial group or across all financial groups can be triggered via accessing the vertical ellipses near the period heading. Furthermore, a user can also re-order columns and move them to the left or right via accessing the vertical ellipses near the period heading.
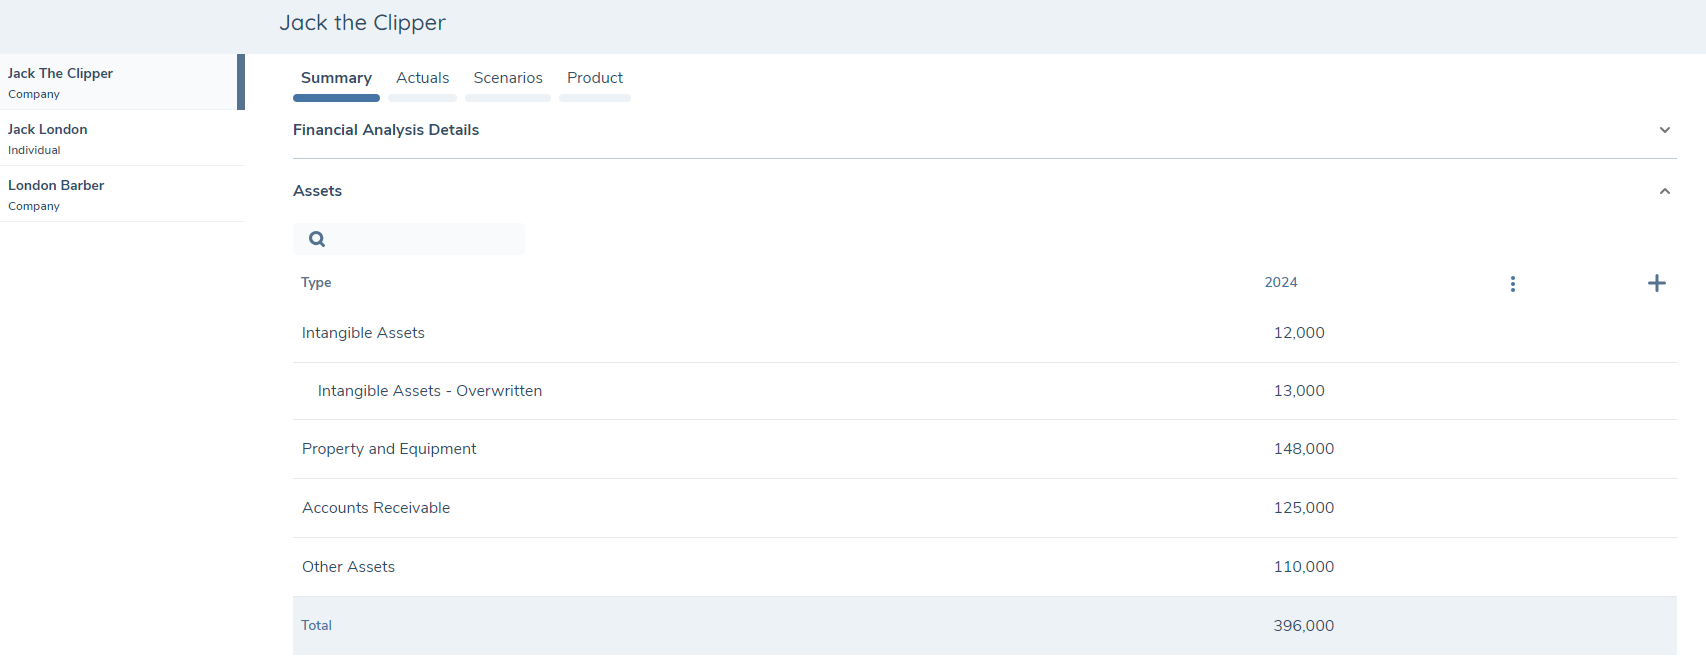
Financial Analysis Summary Functionality
The Summary tab will enable the user to reference the financial data in the Actuals and Scenarios tab. This action is triggered via the plus icon next to each financial group. A modal will subsequently appear and will enable the user to name the period and select from which financial groups and which periods to reference in the Summary tab. The “Enable Corresponding Periods” switch within the modal will be defaulted on and this functionality allows the user to not have to individually select periods across the financial groups e.g. in the instance 2020 was to be selected for all financial groups. The addition of the period in the Summary tab will be applied against their respective financial group(s) and up to a maximum of ten periods are currently supported. If a financial item is added/modified/deleted in the Actuals/Scenarios tab then this is dynamically reflected in the Summary tab. The deletion of each column in a financial group can be triggered via accessing the vertical ellipses near the period heading.
Additionally, adjustments can be reflected for each financial item that appears within the Summary tab. Adjustments are made at the users discretion against financial items as they may be not be reflective of the current state. An adjustment can be triggered to appear directly below a specific financial item through the plus icon that appears on hovering over a financial item. The user can then define the type of adjustment(as free-text or as a dropdown) and the respective value/s for the periodrefernce/s, as well as delete the adjustment if required. If the multi-adjustments switch has been enabled in the journey builder, then a maximum of ten adjustments under a specific financial item can be created.
Financial Analysis for Related Parties Functionality
If there are entities in scope, a left-hand navigation panel will appear which will allow the user to capture their respective Financial Analysis. Up to thirty entities(including the main entity) can have their financial analysis captured in the task and they will appear in alphabetical order in the left-hand navigation panel. If there isn't multiple entities in scope, the Financial Analysis task will not have the left-hand navigation appear.
Financial Analysis for Deals Functionality
If there are deals in scope, a left-hand navigation panel will appear which will allow the user to capture their respective Financial Analysis. Up to fifteen deals can have their financial analysis captured in the task and they will appear below the main entity in the left-hand navigation panel. The “name” datakey in the Deals task will be used to define the name of the Deal appearing in the left hand navigation within the Financial Analysis Task.
Joint Financial Analysis Functionality
If Joint Financial Analysis has been enabled, then an Add Joint button will appear above the left hand navigation when there is more than one entity’s financial analysis to be captured. In selecting the entities that comprise of the Joint Financial Analysis, only an Entity Type of Individual can be chosen and the entities are restricted to only being apart of a single Joint Financial Analysis within the task. The Joint Financial Analysis, similar to the Financial Analysis for Related Parties, will appear in the left hand navigation and a maximum of fifteen can be created. Unlike other Financial Analysis(s) appearing in the left hand navigation, once a Joint Financial Analysis is created it can be deleted via the delete icon.
Financial Analysis Autosave Behaviour
Autosave is applied when the user navigates to another Financial Analysis in the left hand navigation panel within the same Financial Analysis task (if applicable). The save is applied against the entity that was previously in-focus and this is reflected by the icon against it (in the left hand navigation) changing from “save-in-progress” to “save successful”. If the save is not successful due to invalid data, then a modal will appear notifying the user that they are able to proceed to another Financial Analysis in the task however, the data has not been saved. If enabled in Journey Builder, a periodic autosave occurs approximately every 20 seconds subsequent to a user’s edit action.
Financial Analysis Validation Behaviour
If mandatory metadata is incomplete for a financial item, then a blue icon will appear next to it. The metadata modal will allow saving data if there are mandatory field values missing. This is to allow the user to partially save financial analysis data and revisit it before completing the task. The modal save functionality will trigger all other validations (e.g. value limit) and will not allow the user to save invalid values.
The save functionality on the task applies to the entity in focus and will not restrict the saving of data even if there are missing mandatory metadata/period references not fufilled/minimum financial items not yet captured. The save functionality will trigger other validation errors and not allow the user to save invalid values (e.g. whole numbers only).
The complete functionality on the task will trigger all validations (mandatory or otherwise) and for all entities/sections.
View Product Summary Table
There is an option to view Product Summary Tab in the Financial Analysis Task. The user must select the Product Summary Category for the product summary view, and maximum 15 data requirements from selected categories will be shown. The category can either be an existing one from the product task within the same journey, or it can be a newly created category specifically for the product summary. Users must ensure that the datakeys within the category are present in the product task, so that any values entered can be captured and shown in the product summary.
The product summary grid won't show fields with trigger conditions, select linked lookups or those created in a non-global policy(the global product policy MUST be used). Additionally, it cannot support two fields with the same datakey within the selected category. The recommended configuration is to ensure that all fields have unique datakeys within a category created in global policy.
The data requirements will be sorted by the category order first, then the requirement order. The first requirement will be used to group the products in the product summary grid. If a product doesn’t have a value for the selected grouping requirement, it won't appear in the list.
Users have the option to activate the Product Summary Total Row, which aggregates the value of each number or calculated field data requirements in scope in a total row. Note: the first two columns of the grid don’t have the total at the bottom, so it’s suggested to set up the numeric field starting from the third column onwards in the grid.
To view the Product Summary table in the Financial Analysis task, the user needs to make sure they have the Product Access & Search and Product Requirement Scope permissions. Given the user has enabled the Product Summary Tab for the task in the Journey Builder, the tab with the product summary table will be displayed in the Financial Analysis Task. The products will be grouped based on the first data requirements within the first category selected for the product summary table.
The Product tab shows all products onboarded in the current journey, and verified products in the other journeys.
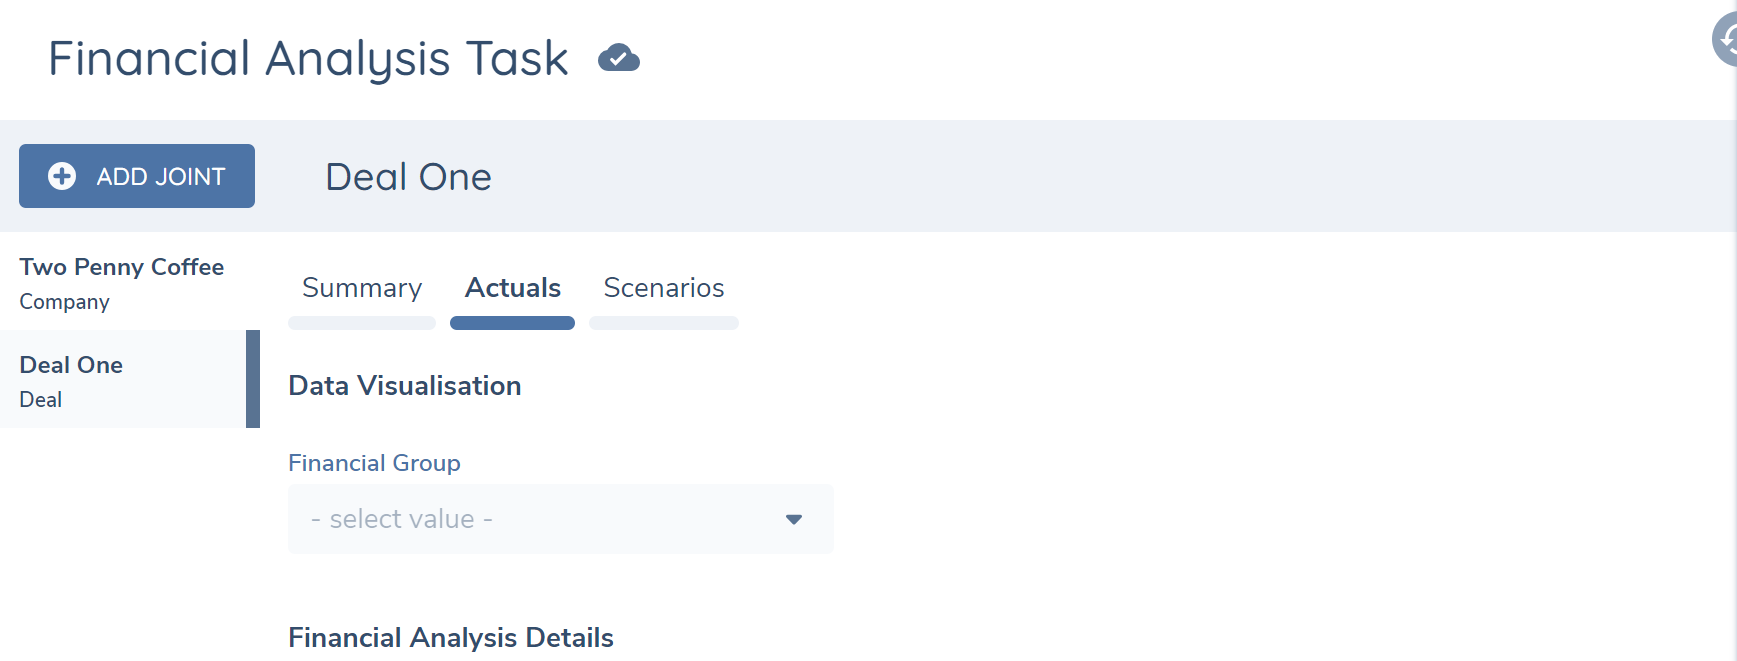
Financial Analysis Data Visualisation
Users have the ability to configure a data visualisation to appear within the Financial Analysis task, if it has been enabled in Journey Builder. This visualisation will appear on the Actuals, Scenarios and Summary tab. The user can select a specific financial group under the “Financial Group” select dropdown and the user will then be able see a visual representation of the financial items (including the total row and adjustments if applicable) in the form of a line chart.
Financial Analysis Task CSV Report Download Functionality
If a user has the permission of “Financial Analysis Report Access” (which is configured in the Security Configuration area of the Fenergo Platform) and the user has completed the financial analysis task, then a “Download Report” button will appear next to the audit drawer. If a user then clicks on this button, then a CSV file of the data will be downloaded for the user to view.
The CSV file downloaded will match exactly what is on the screen (noting that adjustments will be indented) and reflects the financial data per entity/deal the user is currently tabbed into.
Financial Analysis Task Audit Functionality
Task level audit can be accessed by clicking on the Audit Icon on the right-hand side pane whilst inside the Financial Analysis Task (provided the user has audit permissions enabled). Audit is supported for the Acutals/Scenarios/Summary tab.
When the Audit Icon is clicked, the Audit drawer opens out. There will be no audit details captured until a financial item is saved or completed.
When the user has made an update, the financial groups that are affected are displayed, as well as, other high level audit information such as ‘Last Updated By’ and ‘Last Updated’.
The User then has the option to view further audit information by clicking on the dropdown icon beside the ‘Financial Group” name. This will expose information pertaining to any user actions in changing the field type and its associated metadata and Period References.
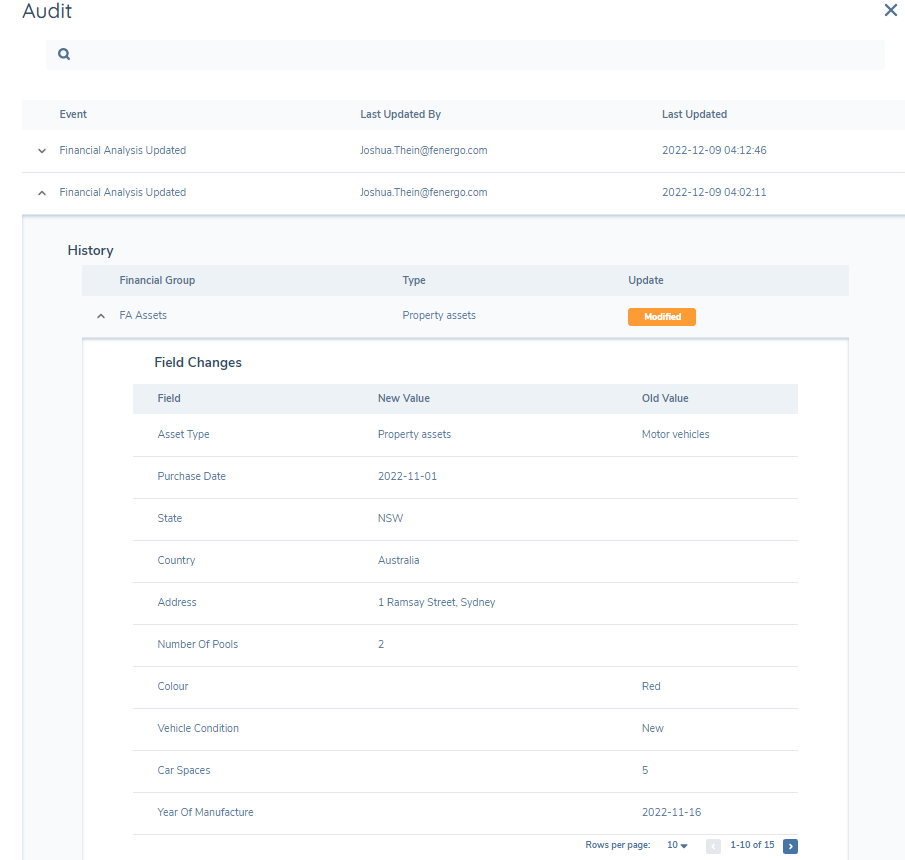
Search functionality exists at the top of the Audit screen, similar to audit at the Entity and Journey level.
Financial Analysis Deferral Functionality
If a user has enabled the ability to defer a financial analysis in journey builder, then the user will see a toggle next to the entities/deals in the financial analysis task. The purpose of this functionality is to enable users to focus on specific entities/deals in the task. This is especially pertinent when there are multiple entities/deals that are scoped into the financial analysis task.
Within the task the user will have the ability to click on the toggle to change the default state of “Selected” to “Unselected”. Upon the status being changed to “Unselected” then the financial data against the entity/deal will be read-only. If a user wishes to change the status back to “Selected” then they have the option to do so and will be able to edit the financial data.
Financial Analysis Combined View Functionality
If a user has configured a business category for Scenarios only (or Scenarios and the Products tab) in journey builder, then the user will see the Scenarios tab relabelled as “Financial Analysis” in the task. The purpose of this functionality is to present users who have a preference to see all their data merged in a singular view.
Within the task, the user will still have the ability to copy other columns that have been imported into the task or create new custom blank columns (to a maximum of ten). Furthermore, when the user does this action, it will apply against all the financial groups. The reverse of this is also true in that the delete of a column will also apply to all the financial groups in the task.
Similarly, adjustments can be reflected for each financial item that appears in the “Financial Analysis” tab. Adjustments are made at the users discretion against financial items as they may be not be reflective of the current state. An adjustment can be triggered to appear directly below a specific financial item through the plus icon that appears on hovering over a financial item. The user can then define the type of adjustment(as free-text or as a dropdown) and the respective value/s for the periodrefernce/s, as well as delete the adjustment if required.
Considerations
-
Capturing Financial Analysis Actuals will have a single Period Reference value for each period.
-
Currently, periods are pre-configured for Actuals – there is no user ability to manually add another period whilst in the journey for this tab.
-
Currently, for the Scenarios tab, there is no ability to bulk delete the periods (only delete per financial group).
-
Curently, for the Scenarios tab, there is no ability to add individual periods (period additions apply to all the financial groups within the tab).
-
Creation of periods in scenarios can occur at anytime when the task is in-progress and copying across the Actuals will be reflect in the period created.
-
Currently, if a financial group is configured for Actuals & Summary (but not Scenarios), then the financial group name in the Summary tab will have "Actuals" added at the end of the label in order to reflect that only Actuals data is reflected in the financial group.
-
Currently, if a financial group is configured for Scenarios & Summary (but not Actuals), then the financial group name in the Summary tab will have "Scenarios" added at the end of the label in order to reflect that only Scenarios data is reflected in the financial group.
-
Currently, the Financial Analysis Import task applies to both Actuals and Scenarios.
-
Currently, maximum count validations for the Financial Groups are not supported in the Financial Analysis task.
-
Currently, only one Commentary Group can be linked to a single business category and the Financial Analysis Import task doesn't apply to the Commentary Group.
-
Currently, the order of the Commentary Group will default to be appear below the Financial Groups.
-
The Commentary Groups that appear in the Financial Analysis Sections e.g. Summary/Actuals/Scenarios are unique and the behaviour applied for copying/referencing data across tabs for financial groups don’t apply to the Commentary Groups.
-
A related party task should not be re-opened, once it has been verified, to attempt to change the related parties that appear in the Financial Analysis task (if related parties for Financial Analysis has been enabled in journey builder).
-
Currently, only single select dropdowns are supported for the Financial Analysis Item type. Linked select dropdowns are not supported at this point for the Financial Analysis Item type.
-
The user is unable to edit the Financial Analysis task unless it is in-progress.
-
Currently, Serviceability Calculations will only display on the Actuals tab.
-
Currently, Serviceability Calculations must use the main entity for it to function and should be only have one allocation grid per financial analysis task.
-
Currently, maker/checker functionality is not supported for Financial Analysis.
-
Currently, ordering of the Joint Financial Analysis in the left hand navigation and the product tab within it is not supported.
-
Currently, data persistence requires matching schemas and is using the latest version.
-
Currently, for data persistence between two tasks in the same journey, if the first task is re-opened, the data persistence of the original data in task two is only supported once (from which point afterwards the data from task 2 starts to persist data from task 1).
-
Currently, in merging a financial group in the Joint Financial Analysis, the first entity in the modal selection is prioritised in choosing the label name/financial group attributes.
-
Currently, the custom task provider does not support a Joint Financial Analysis.
-
The same label name should not be duplicated in a financial group when using the Custom Period Label Configuration.
-
Financial Analysis Pre-Population can be configured for both Actuals or Scenarios.
-
Currently, data visualisation only supports line charts to appear.
-
Currently, the Financial Analysis CSV Report Download functionality does not support the Summary Tab. Additionally, any commentary fields will display data keys in the report (instead of the label name).
-
Currently, financial data from the Import Financial Analysis task is re-imported only when new data is available, not every time the task is re-opened.
-
Currently, the credit scoping rules for financial analysis ensures that up to 80 entities are "in-scope" before the scoping rules are applied to the 80 entities (e.g. there are 100 entities and the rule is to scope in only the entities which have the type of "Company". If there are entities which are "Company" that are NOT in the first 80, then they will not have the scoping rules applied to filter them into the task).
-
If a financial item has been selected and/or period references are inputted in the top row but if the “Add” button is not selected before the user “saves” or “completes”, that specific data will not be captured.
Troubleshooting
If the financial group on the task is not visible/working as expected
-
Check that the data group task is a multi-cardinal data group
-
Check that you have correctly configured the data requirement in policy
-
Check the trigger conditions configured
-
Check business categories configured in the task and in the data requirements
-
Check the financial analysis task is in-progress
-
Check that the primary datakey has been configured correctly in the data group as a single select drop-down
If the period reference validation is not working as expected
-
Check the spelling of the period reference datakey to be exactly “periodReference” and the field type is numeric for a validation against the entire financial group
-
Check the second column title of the reference data list is an exact match as the data group name for the validation against a specific financial item (ensure there are no spaces as well)
-
Check the latest version of the data groups have been published
If the financial period configuration is not showing/working as expected
-
Check if there are multiple configurations within Financial Analysis Configuration referencing the same financial group
-
Check if there are trigger conditions on the configuration
-
Check the version number of the configuration and if has been published
If the Scenario tab configuration is not showing/working as expected
-
Check the business categories in Journey Builder to see if it is the same
-
Check that the datagroup name (in Policy) for Scenarios is the same as the datagroup name that is used in Actuals (in Policy)
-
Check that the same datagroup itself (in Policy) is used for both the Actuals and Scenarios tab
If the Commentary Group configuration is not showing/working as expected
-
Check that the datakey has been defined as “faCommentary”
-
Check that there is at least one field created within the datagroup used for “faCommentary”
-
Check that the Commentary Group has the same business category as what has been defined in the task within the Journey Builder domain.
If the Serviceability Calculations configuration is not showing/working as expected
-
Check that a related party has been configured before the Financial Analysis task
-
Check that a commentary field hasn’t been configured to show the Allocations grid and that a value of “Yes” exists against it
-
Check that the periods configured for the Allocations grid align with the Financial groups (The start date selected is consistent)
Considerations When Creating/Updating Individual Related Party and Joint Financial Analysis
-
Triggering Financial Analysis Templates on Existing Related Parties
- Create a new draft record by editing the related parties.
- This ensures that the new financial groups come into scope for the existing related parties.
-
Creating a New Jurisdiction for Financial Analysis
- Ensure that related parties are scoped into the new jurisdiction.
- Apply the policy scoping rules to the related party.
- Create a new draft record of the related party by editing the related party details in the journey.
-
Configuring a New Jurisdiction for Joint Financial Analysis
- Note that joint financial groups will only scope in based on verified records of the related party.
- To trigger joint financial groups on existing related parties, run a maintenance journey and verify it before triggering the new journey with financial analysis.
- Alternatively, create new related parties to test the configuration.
Appendix
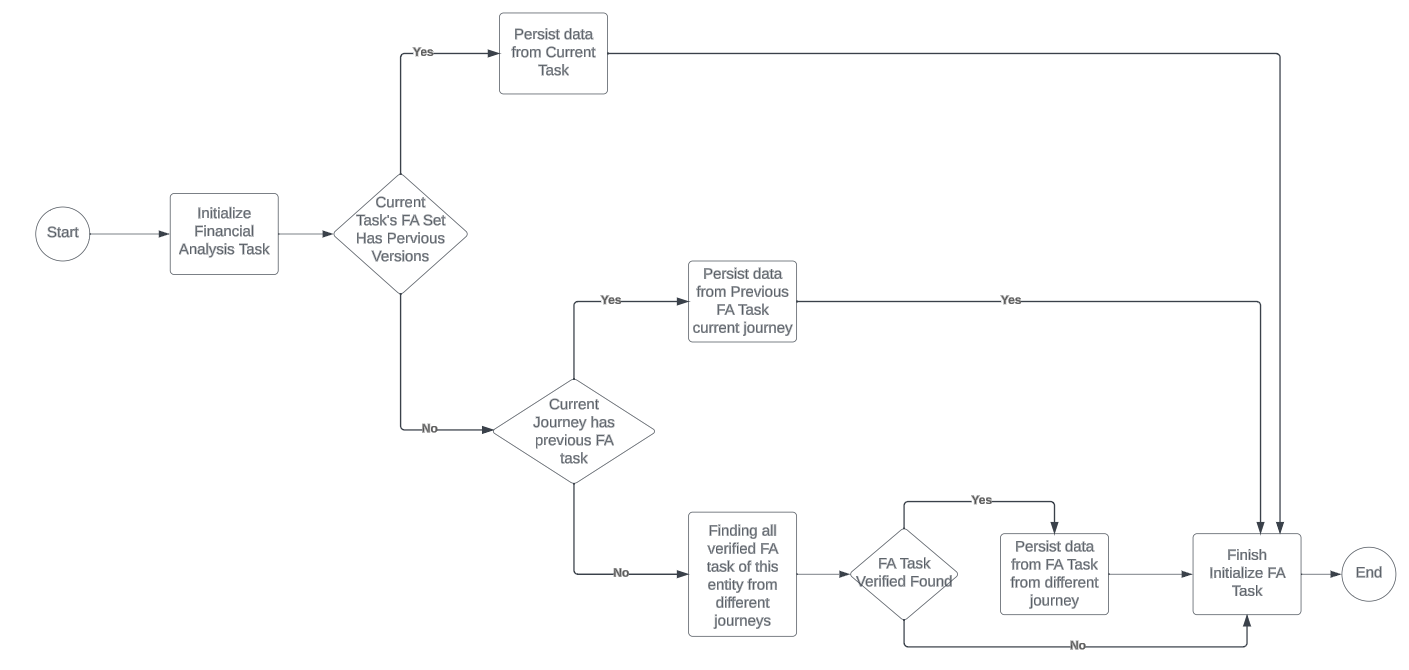
Data Persistence Logic
Configuring the Financial Analysis Feature
Financial Group Configuration
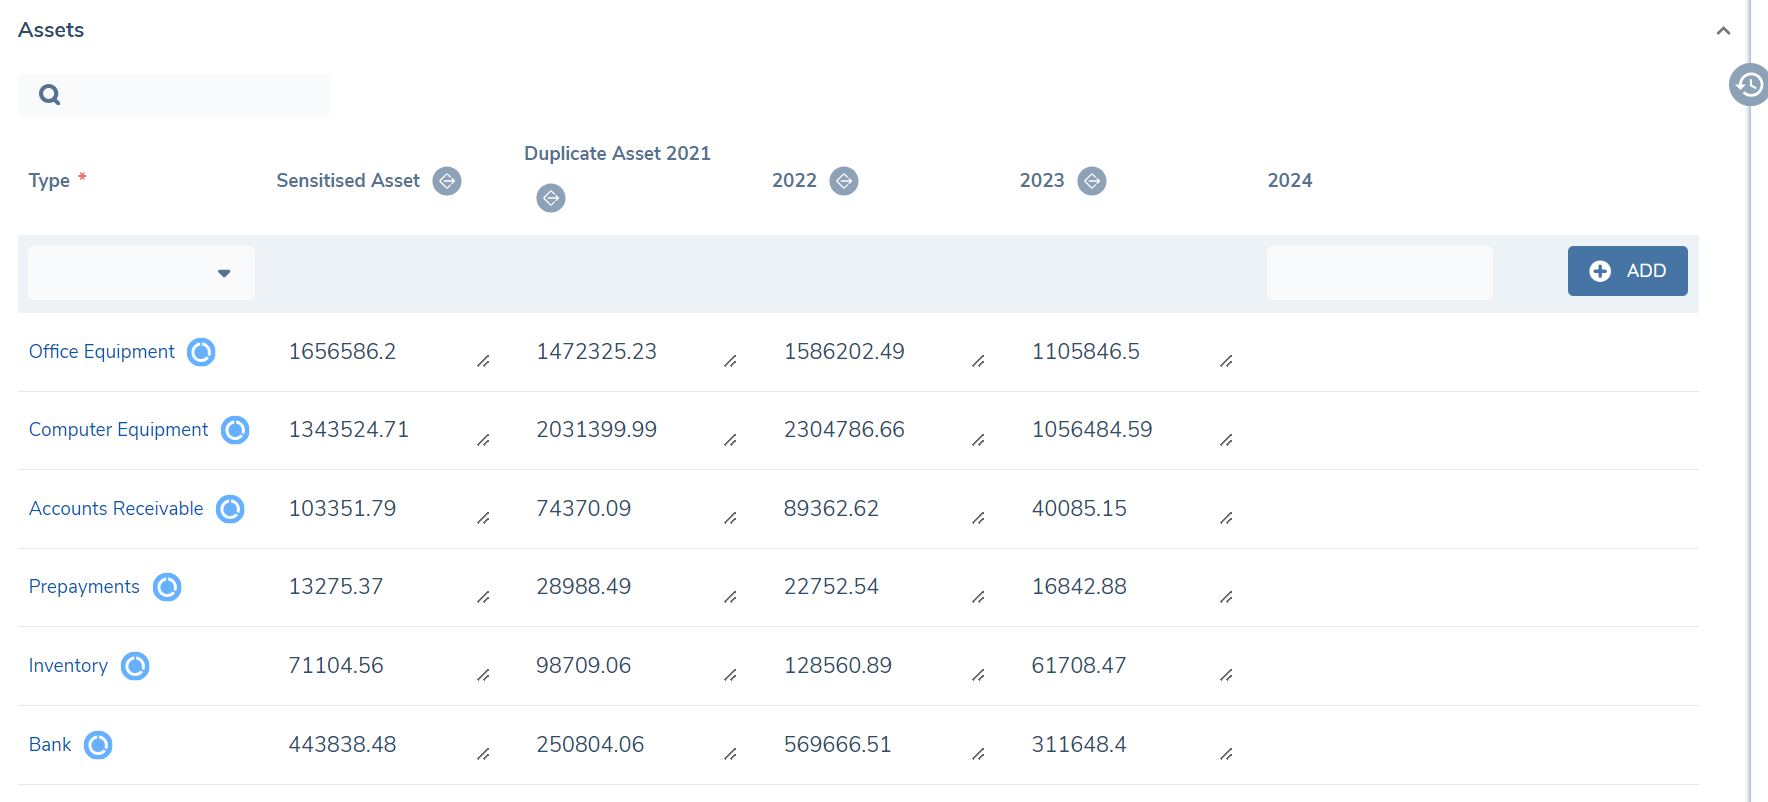
The financial items that appear in a Financial Analysis record is configured through Policy Configuration and the naming conventions of how this task is displayed is shown below:
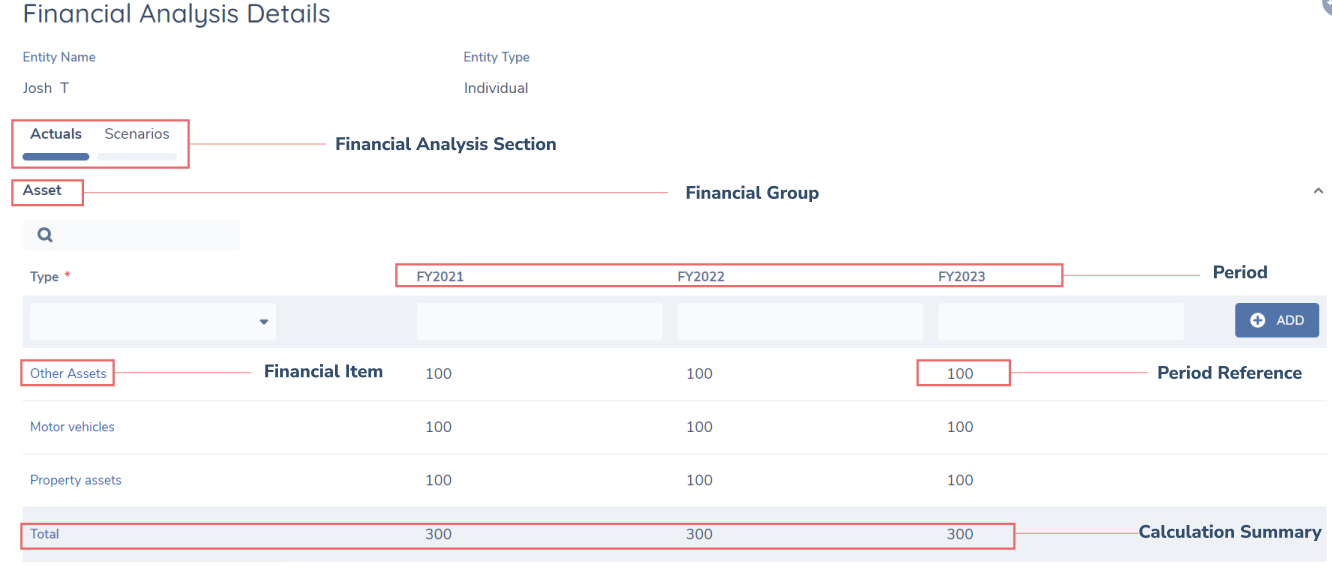
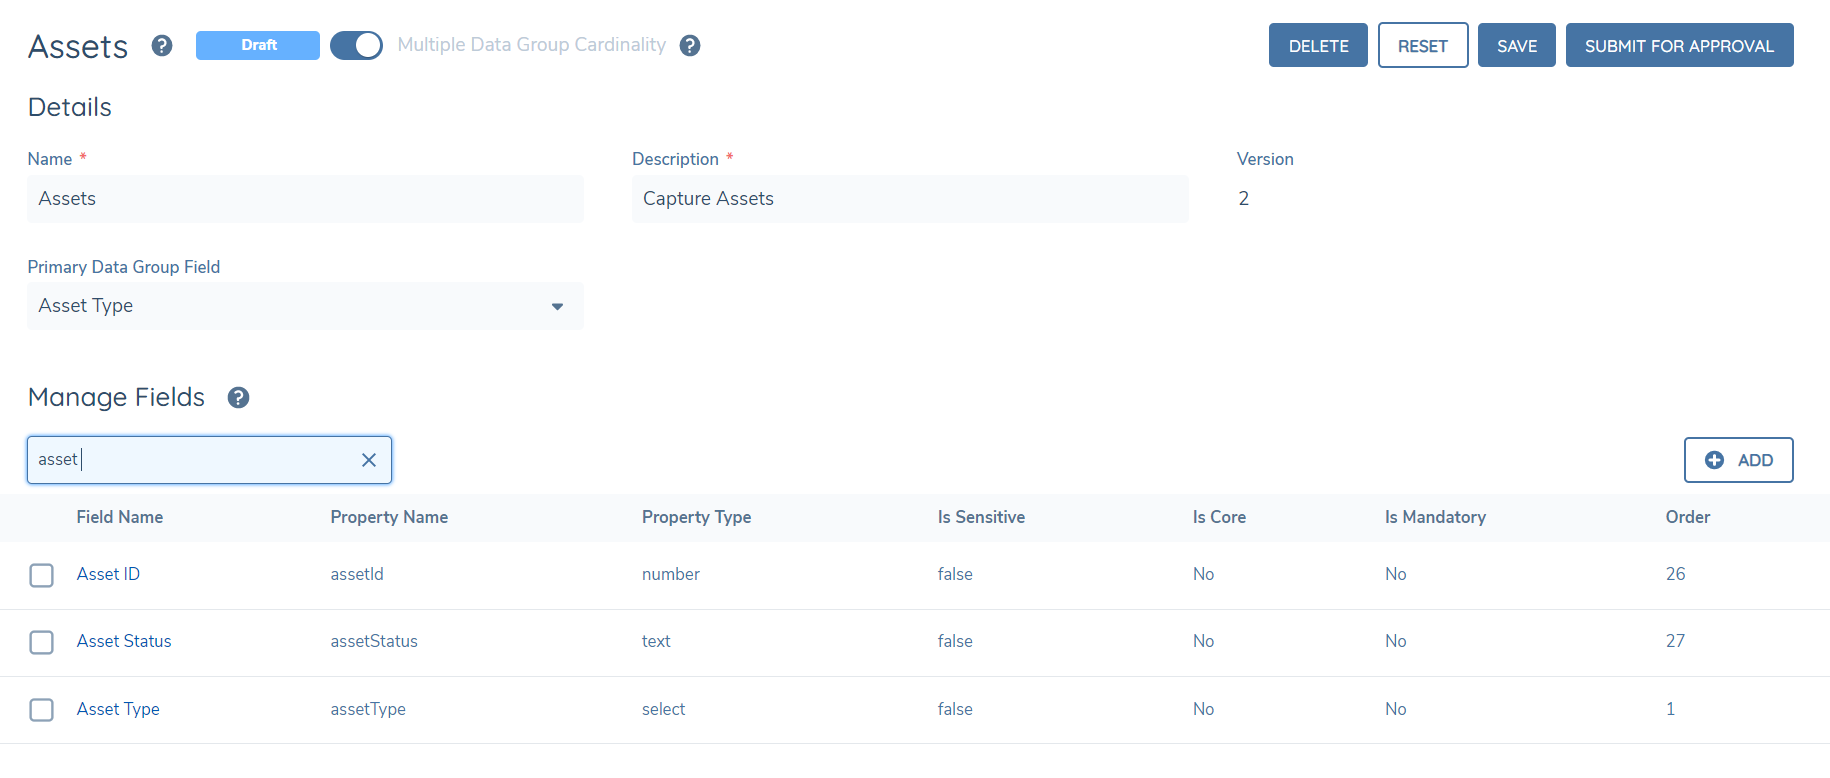
Within policy, multi-cardinal Data Groups are used to define the financial groups (e.g. Assets, Expenses, Liabilities etc).
To configure a new financial group, you need to configure a field in policy requirements with a Type of “Data Group”. This field label will define the Financial Group name (e.g. Assets).
The field ordering of these policy fields will determine the ordering of the financial groups on the task. If there is no field ordering assigned, it will default to an alphabetical order.
How to configure the financial item type:
-
Add a new field within a multi-cardinal data group of type “Single select dropdown”
-
Assign this field as the primary datakey value
-
The list of values in the single select dropdown will define the list for the financial item type list
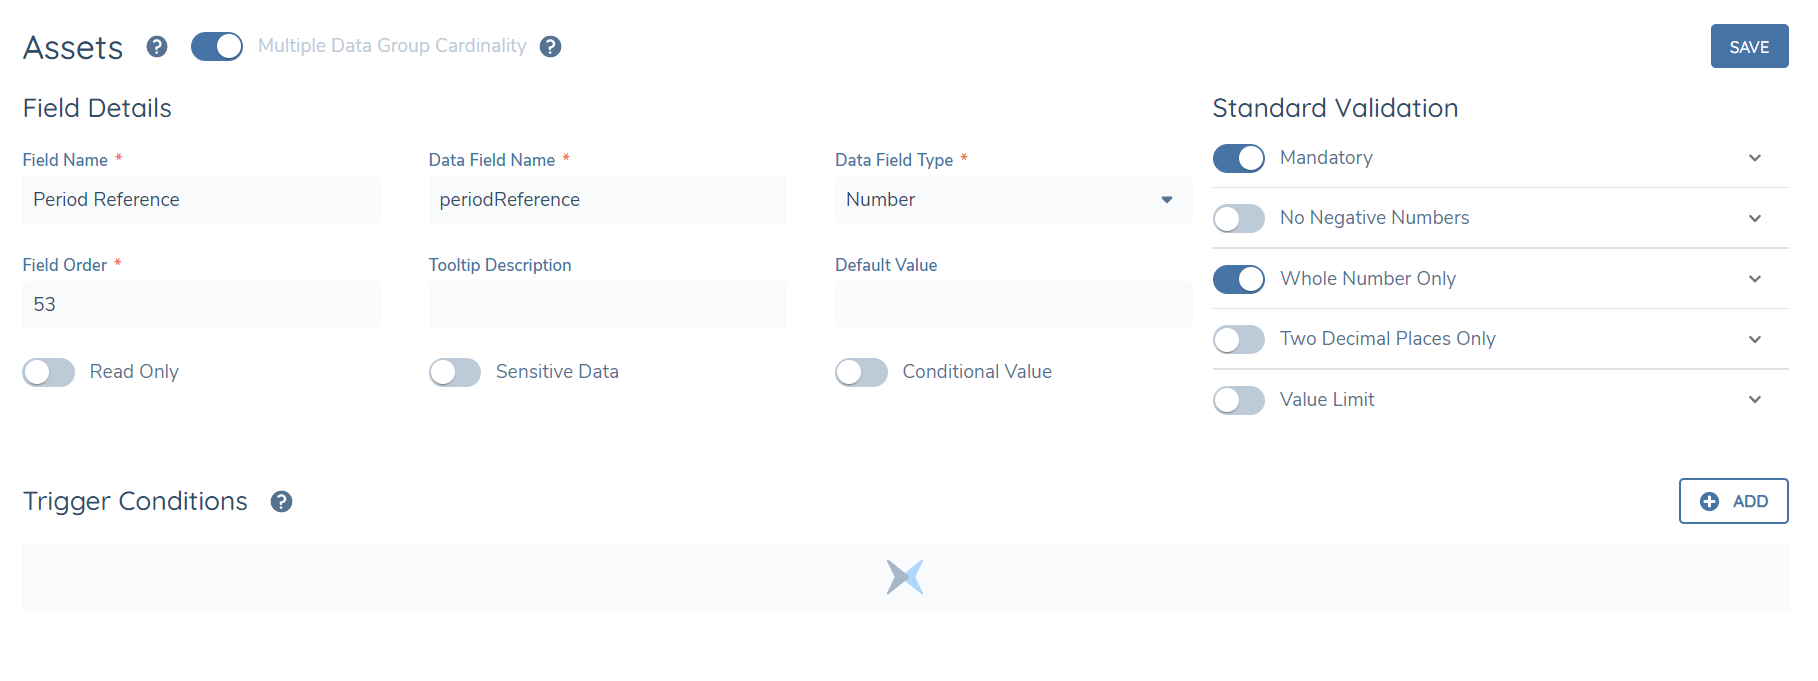
How to configure the period reference for the entire financial group:
-
Add a new field within the data group of type “numeric” that has a datakey of “periodReference”
-
Add validation logic for the numeric field (e.g. mandatory, no negative numbers, whole number only, two decimal points only, value limit…)
-
If there is no period reference key configured, there will no validations set against all the period references in the financial group.
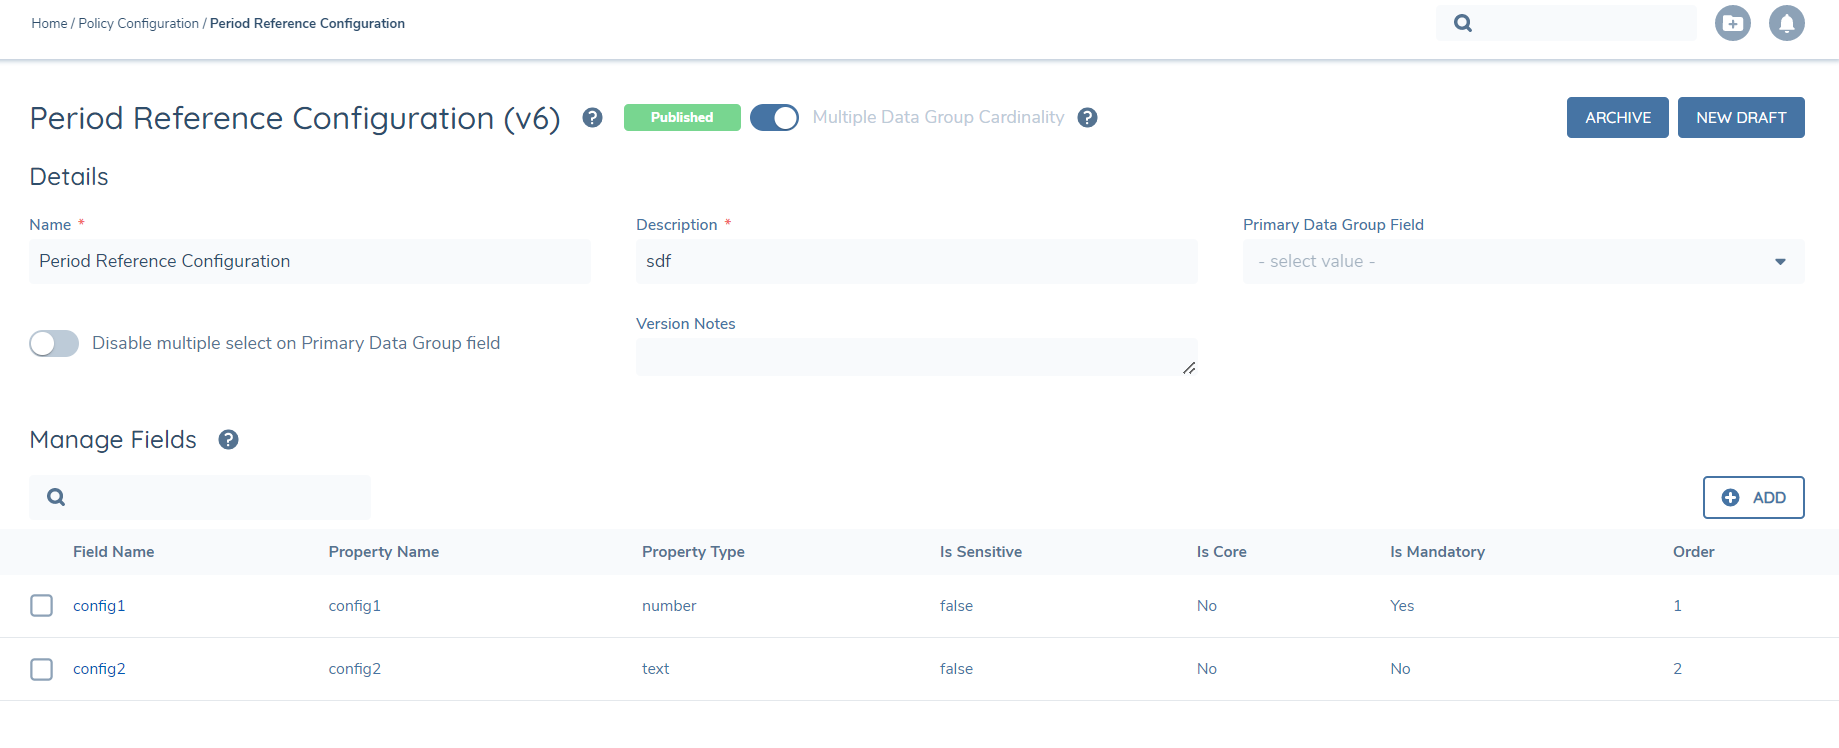
How to configure the period reference for specific financial items:
-
Period references for a specific financial item can be configured with the required numeric validation logic (e.g. mandatory, no negative numbers, whole number only, two decimal points only, value limit…). Additionally, the period references can be configured as a text, date and dropdown type field type along with their associated validations.
-
In Reference Data, navigate to the lookup that is linked to the financial item type. Create a second column of text (e.g. “Period Reference Configuration”). Select which financial item types should have validations applied to by assigning a label against the adjacent cell created via the second column (e.g. “config1”, “config2”).
-
In the data group of “Period Reference Configuration”, save “config1” and “config2” with the desired period reference field type/validation/default value/read only value. (Note: the second column title must be an exact match as the data group name AND the label name must be and exact match as the Data Field Name/s created in the data group. Furthermore, validations for the items must all reference the same validations datagroup.)

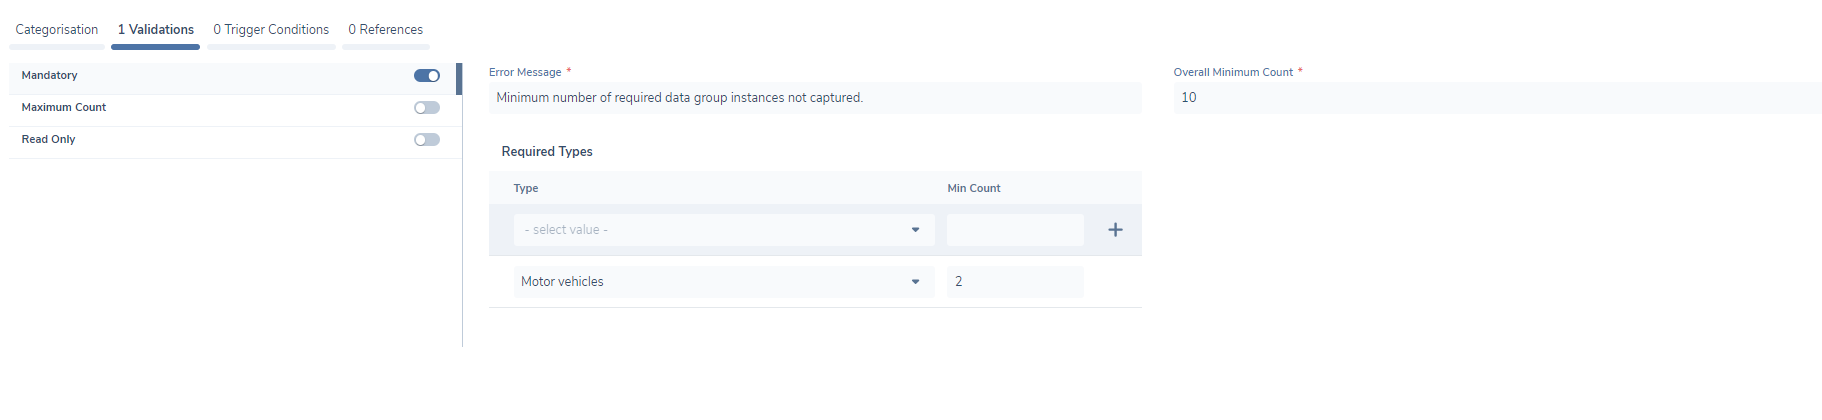
How to configure the pre-population and minimum capture of financial items:
-
Navigate to the data requirement you have configured for the financial group.
-
Enable the “Mandatory” validation.
-
Define the financial items through the “Type” to configure the pre-population within the Financial Analysis task and the minimum number that is required to be captured via the “Min Count”. This will define which financial items (and how many) are pre-populated, as well as, the minimum types to be captured in the event the user removes them in the task. Note: The order in which the financial items are pre-populated will follow the same order as the lookup values (the lookup list order that appears is an exact match from the Reference Data domain).
-
Define if an overall minimum number of financial items need to be captured via the “Overall Minimum Count”.
-
The specific financial itm types that were configured for pre-population/minimum capture will appear underneath the financial group when the user opens the Financial Analysis task. The validation identifier(s), which are chips ontop of the financial group, will appear within the Financial Analysis task when 1. The overall minimum count exceeds the minimum types configured e.g. two motor vehicles are configured to pre-populate within the task but the overall minimum count has been defined as ten 2. If the user removes the pre-populated financial items so that the validation is triggered.
How to configure the financial item metadata & popover:
-
Add fields within the datagroup as per the usual data group configuration
-
These fields will be assigned as metadata against the financial items
-
The fields with the highest 6 field ordering will be shown in the popover when hovering over each financial item.
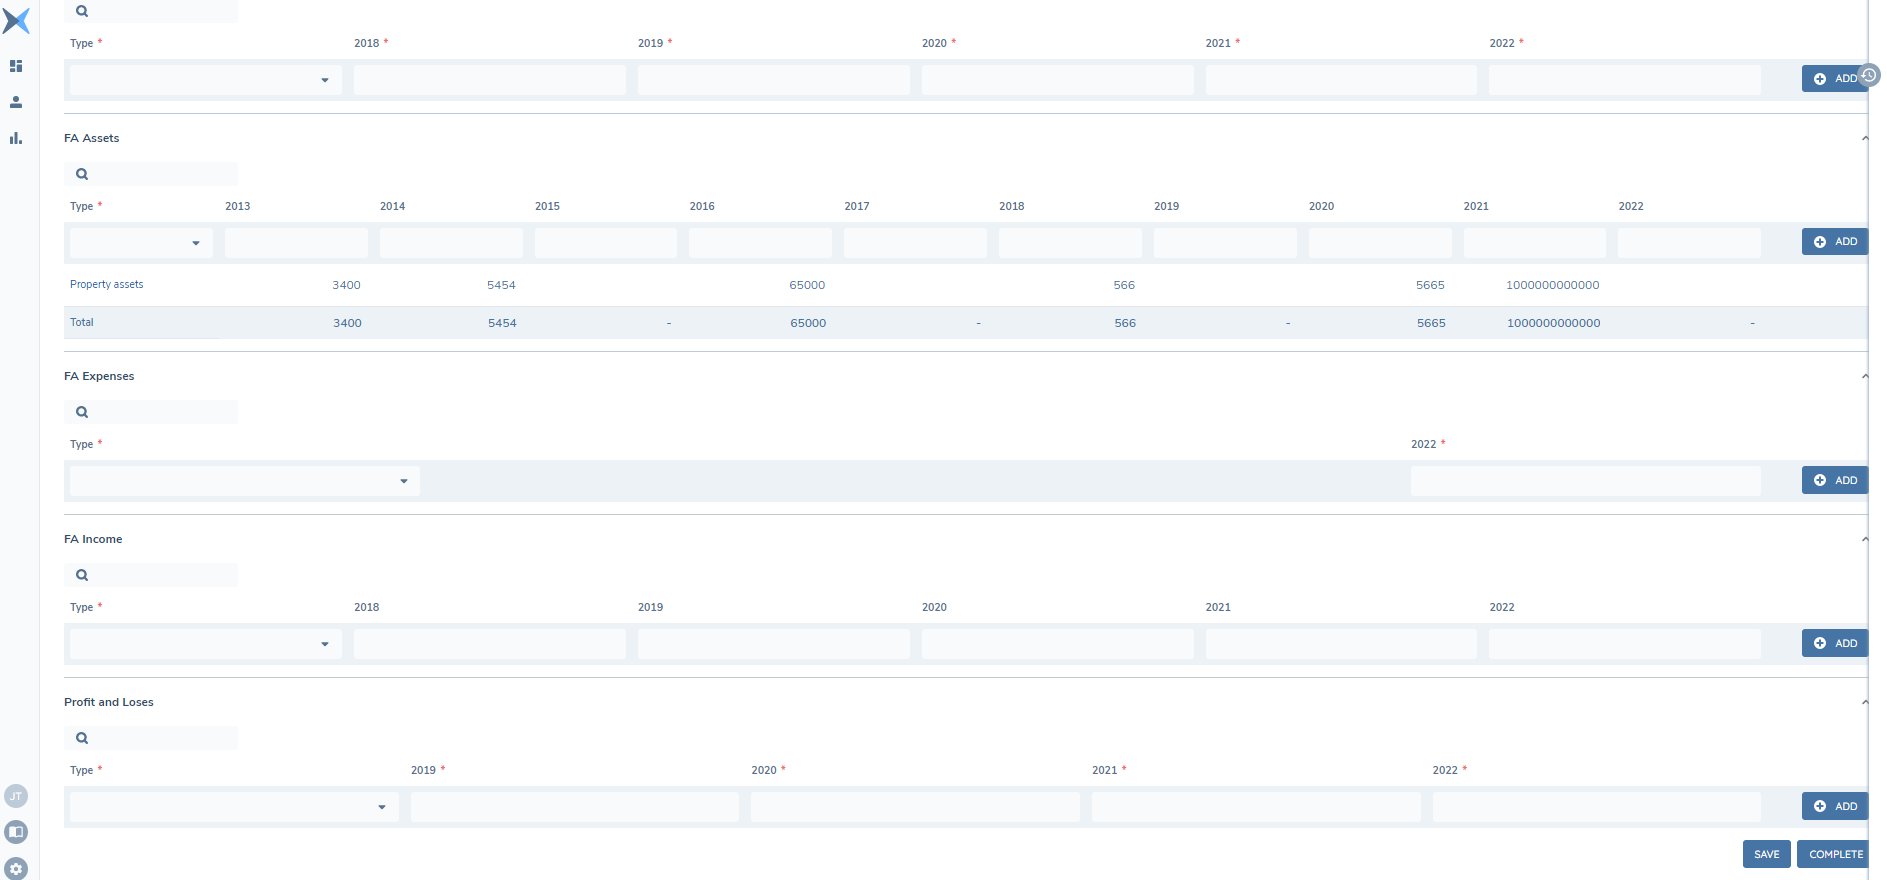
How to configure the summary row:
-
Add a new field within the data group of type “numeric” that has a datakey of “ totalPeriodReference”
-
The summary row (which automatically calculates numeric inputs in each column) will appear in the Financial Analysis task for the configured financial group.
How to configure the financial group for Related Parties:
-
Select the target entity to be Related Party for the financial group in the Data Requirement
-
The related party and it’s associated financial group will appear in the Financial Analysis task (provided it is in-scope of the rules applied by Credit Scoping Rules).
How to configure a unique financial group for a Joint Financial Analysis:
-
Create a data requirement (if not already created) with a datakey of isJointFinancialAnalysis in Policy of a select dropdown and with the options as Yes/No e.g. and configure it under the target entity of Related Party.
-
Create a data requirement for the financial group and create the trigger condition (under the source of Current Entity) of the the configured data requirement as equals to Yes e.g. Is Joint Financial Analysis equals Yes.

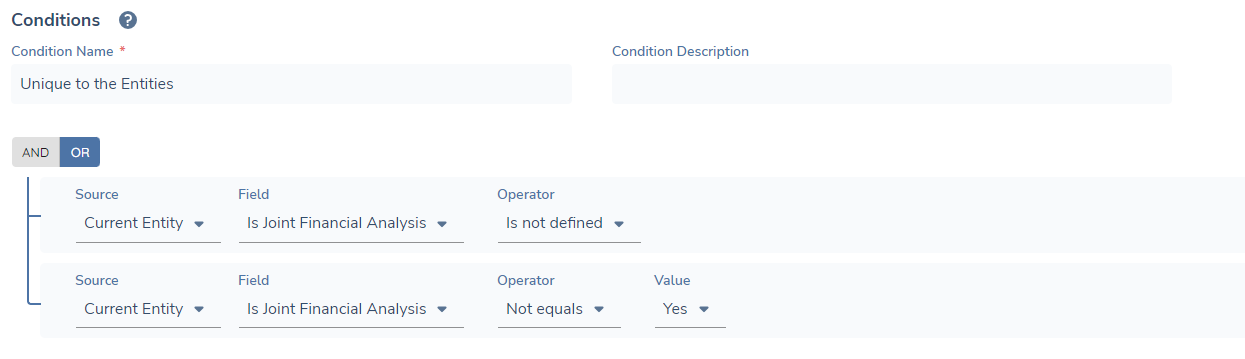
How to configure a unique financial group for entites & have it not appear in the Joint Financial Analysis:
-
Create a data requirement (if not already created) with a datakey of isJointFinancialAnalysis in Policy of a select dropdown and with the options as Yes/No e.g. and configure it under the target entity of Related Party.
-
Create a data requirement for the financial group and create the following trigger condition (under the source of Current Entity) of the configured requirement as "Is not defined" and an "Or" condition of the configured requirement as not equals Yes.
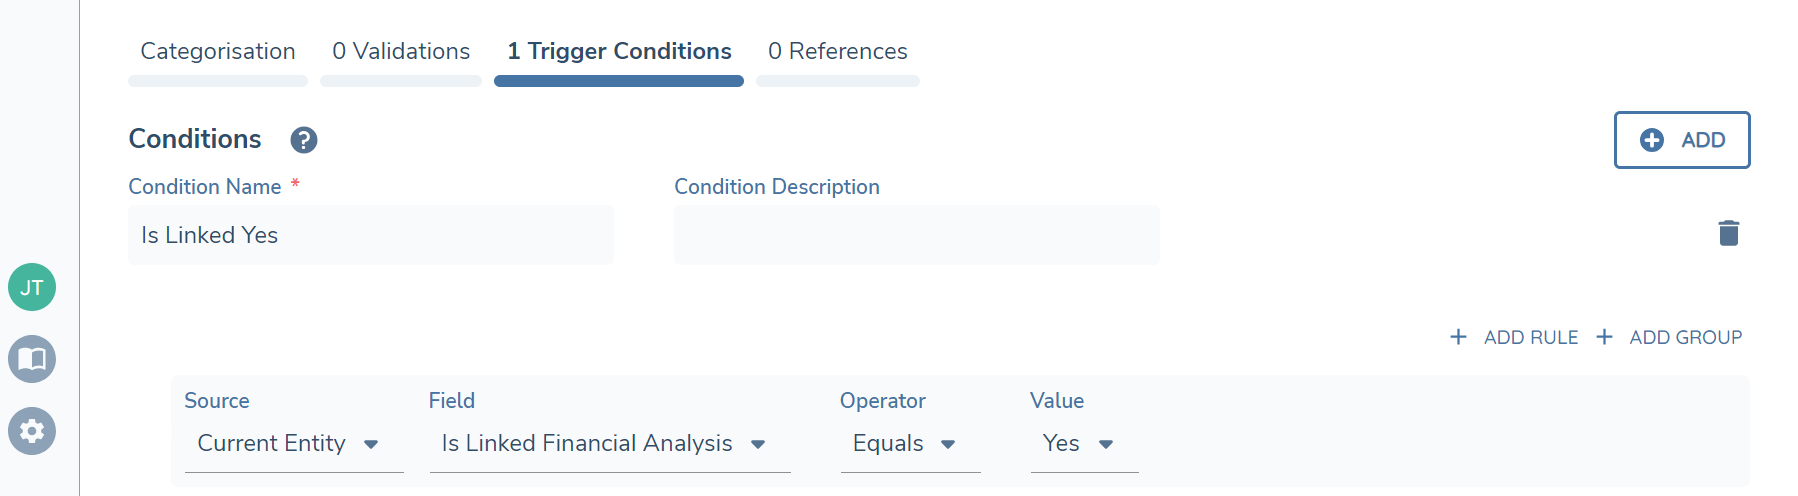
How to configure a “Linked” financial group to appear for an Entity after creating a Joint Financial Analysis:
-
Create a data requirement (if not already created) with a datakey of isLinkedFinancialAnalysis in Policy of a select dropdown and with the options as Yes/No e.g. and configure it under the target entity of Related Party.
-
Create a data requirement for the financial group and create the trigger condition (under the source of Current Entity) of the configured data requirement as equals to Yes e.g. Is Linked Financial Analysis equals Yes.
-
The “linked” financial group will appear against the entity’s financial analysis after a Joint Financial Analysis is created (where the entity is used to create the specific Joint Financial Analysis).
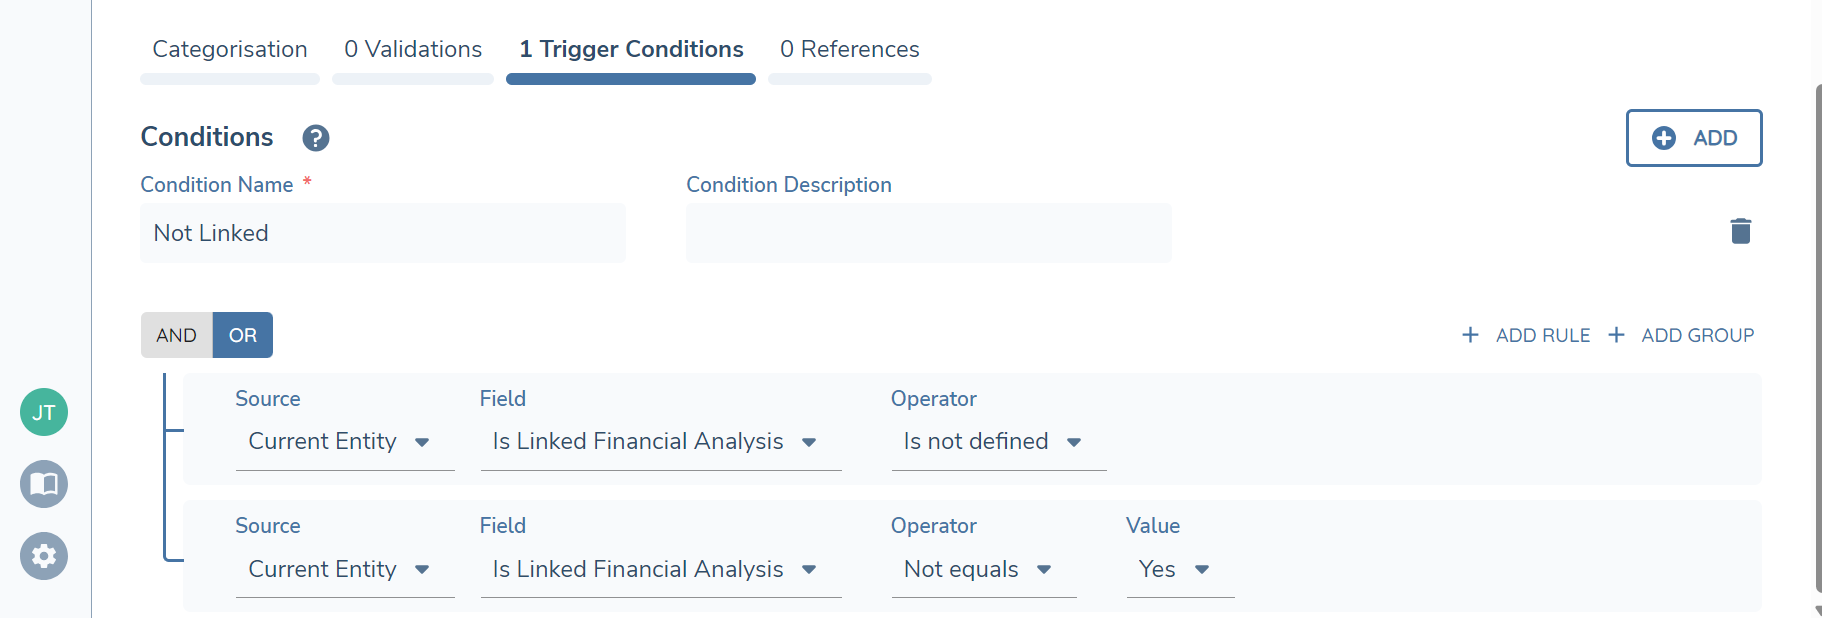
How to configure a “Not Linked” financial group to disappear from the Entity after creating a Joint Financial Analysis:
-
Create a a data requirement (if not already created) with a datakey of isLinkedFinancialAnalysis in Policy of a select dropdown and with the options as Yes/No e.g. and configure it under the target entity of Related Party.
-
Create a data requirement for the financial group and create the following trigger condition (under the source of Current Entity) of the configured requirement as "Is not defined" and an "Or" condition of the configured requirement as not equals Yes.
-
The “Not Linked” financial group will disappear against the entity’s financial analysis after a Joint Financial Analysis is created (where the entity is used to create the specific Joint Financial Analysis).
How to configure the financial group for Deals:
-
Navigate to Deal Requirements
-
Create a Data Requirement e.g. Expenses and configure it against the same category that is being used for the Main Entity e.g. Financial Analysis Details.
-
The deal and its associated financial group will appear in the Financial Analysis Task (provided the Deal is selected in the Target Entity in Journey Builder).
How to configure Adjustments in a Summary Financial Group to appear as a Dropdown:
-
Navigate to Journey Builder
-
Create a separate business category to be used for the Summary Tab
-
Identify a DataGroup that has a Primary Datagroup Field which has been populated. The lookup list that is under the Primary Datagroup Field will inform what adjustment lookup list appears for the adjustment in the task.
-
Create Data Requirements ensuring that the same datakey of the financial group used in Actuals/Scenarios are similarly created against the Summary business category.
-
For the specific Data Requirement/Financial Group created select the identified DataGroup (instead of selecting the same datagroup used for Actuals/Scenarios)
-
Within the task, the user will see a dropdown list for the adjustment for that specific financial group.
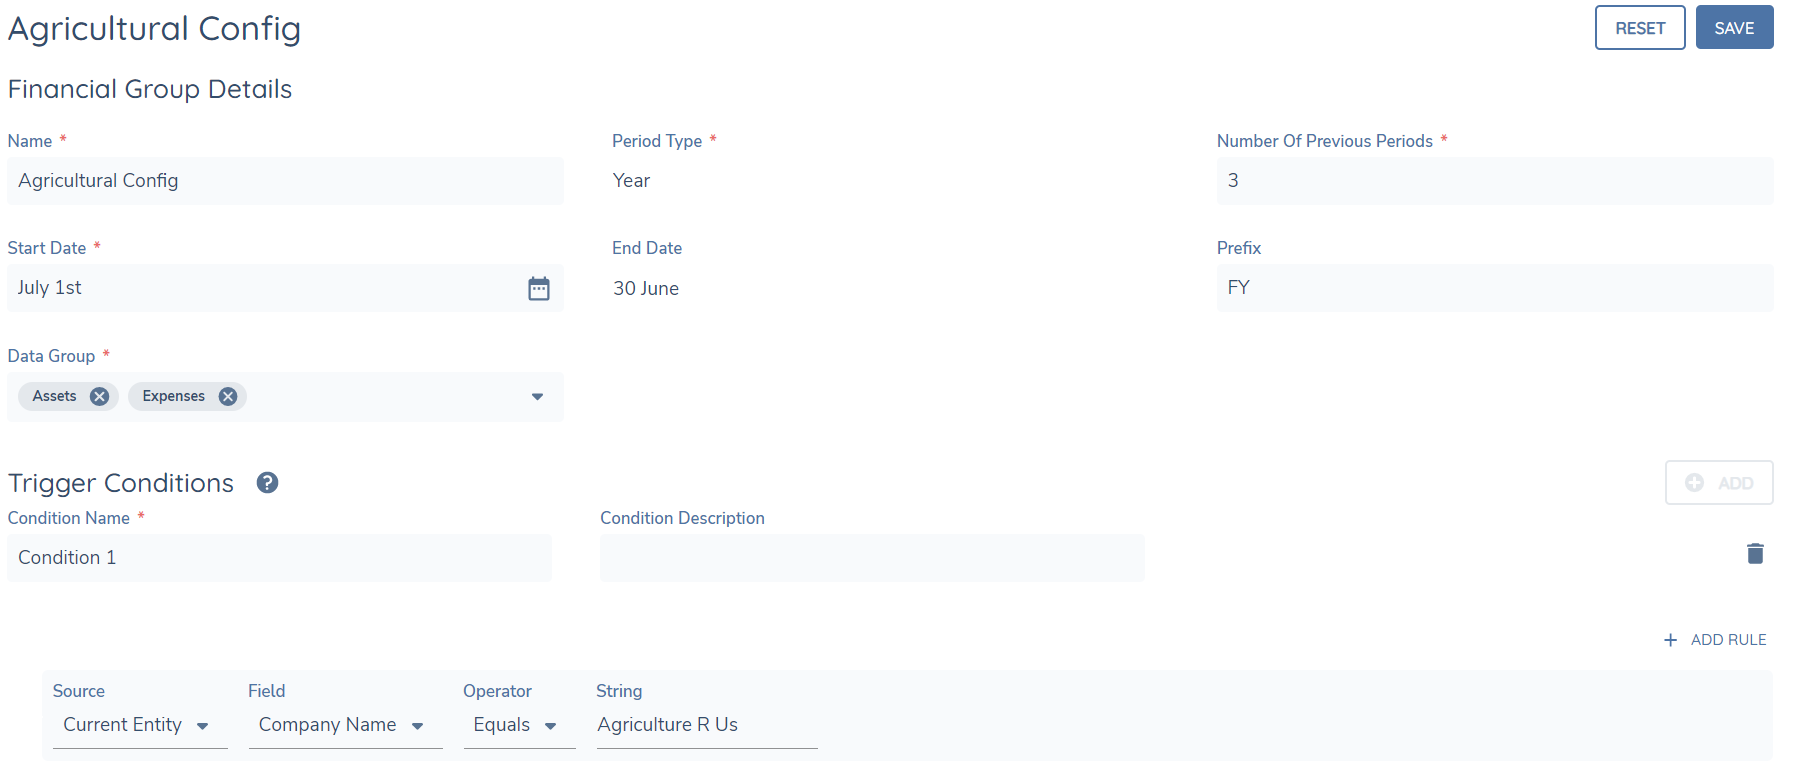
Configuring Periods
Financial periods can be configured to capture period references up to a maximum of 15 previous periods, which would be 16 periods total including the current period. The financial periods can either reference a calendar or a financial year. The financial periods will start from the current year and the exact date defined by the date picker in the configuration.
How to configure the financial period for a financial group:
-
Navigate to Financial Analysis Configuration in the Fenergo SaaS left hand navigation column.
-
Add a Financial Group Configuration.
-
Name the configuration and use the date picker which is used to define the start of a financial or calendar year (February 29 cannot be selected as leap years will have no impact on the period duration). Furthermore, the prefix can be used as an identifier within the task to reflect this e.g. FY.
-
Input a value up to 15 for the “Number of Previous Periods” field. If the user inputs 2 into this field it represents the previous years, excluding the current calendar year, therefore a total of 3 years.
-
Define which financial group/s the configuration should apply to through the “Groups” field and the conditionality of when they should be triggered in the “Trigger Conditions” section. Note: If a financial group is referenced in multiple configurations then the configuration which has the longer period duration will be selected.
Commentary Group Configuration
The data fields that can be configured to appear in the Financial Analysis task also leverages Policy datagroups.
How to configure the commentary group:
-
Create a datagroup and add the relevant fields within the datagroup as per the usual data group configuration
-
Navigate into Policy Configuration and create a new data requirement to link the datagroup and input the desired label Name e.g. Financial Analysis Commentary
-
Ensure that the datakey is “faCommentary” and that the business category selected is consistent with the business category used for the financial analysis task
-
If there is no commentary group datakey configured, there will be no data fields appearing in the Financial Analysis task.
Serviceability Calculations Configuration
Serviceablity calculations are facilitated through the configuration of an Allocations grid. Additonally, serviceability calculations require a Related Parties/Deals task to be configured prior to the Financial Analysis task for it to function.
How to configure the name and periods for the Allocations grid
-
Navigate to the Financial Analysis Configuration in the Fenergo SaaS left hand navigation column.
-
Add a Capacity to Service Configuration.
-
Use the “Name” field to define the title of the allocations grid.
-
Use the date picker which is used to define the start of a financial or calendar year. Furthermore, the prefix can be used as an identifier within the task to reflect this e.g. FY.
-
Input a value up to 15 for the “Number of Previous Periods” field. If the user inputs 2 into this field it represents the previous years, excluding the current calendar year, therefore a total of 3 years.
-
Select the Business Category to align with the category in the Actuals - Policy Category of the Financial Analysis task (within Journey Builder).
-
Define the conditionality of when the allocations grid should be triggered in the “Conditions” section.
How to configure the validations for the Allocations grid
-
Navigate to an existing Capacity to Service configuration.
-
Add standard validation logic (e.g. mandatory, whole number only, two decimal points only, value limit). The No Negative Numbers validation will be defaulted to enabled since this is required for the Serviceability Calculations to function.
-
Add allocations validation logic (Individual Can Send Allocation Only & No Overallocation). The Individual Can Send Allocation Only validation provides the control so that when an entity type is Individual, then the entity won’t be able to receive allocations from other entity types such as Company (The entity can still receive allocations from an Entity type of Individual if the validation is enabled). The Surplus/Deficit Limit provides the control of ensuring that the task cannot be completed whenever an entity has given away more funds than it has to service, thorough setting a range of acceptable values.
-
If there are no validations configured, there will no validations appearing in the Allocations grid.
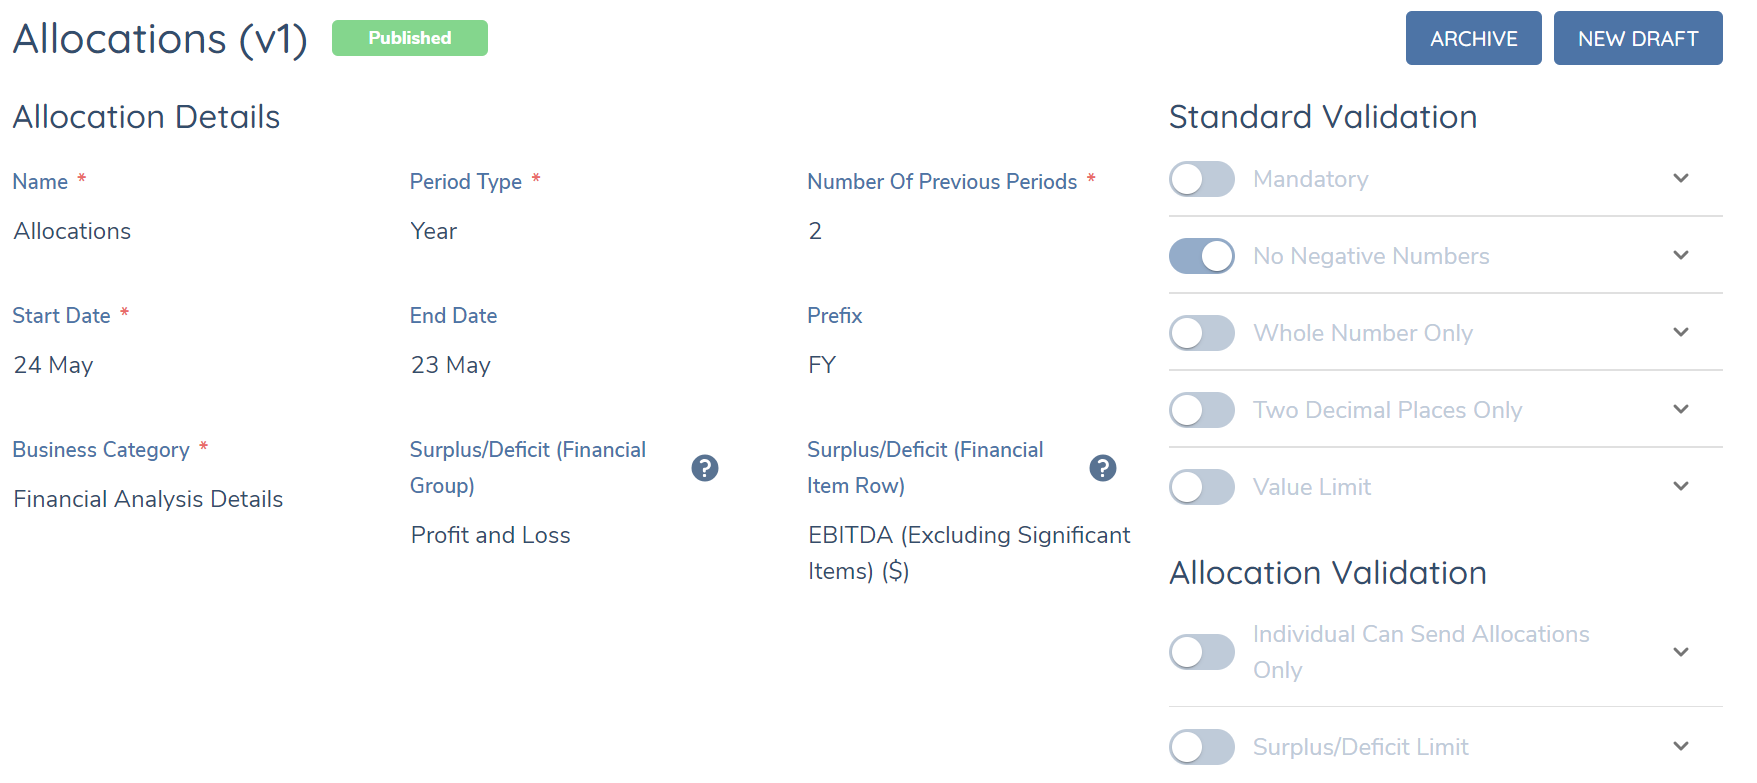
How to link a Surplus/Deficit captured in a Financial Group to the Allocations grid
-
Navigate to an existing Capacity to Service configuration.
-
Select a financial group from the “Surplus/Deficit (Financial Group)”.
-
Select a financial item from the group through the ”Surplus/Deficit (Financial Item Row)”.
-
If the Surplus/Deficit hasn’t been defined for the “Surplus/Deficit (Financial Item Row)”, the Surplus/Deficit will default to 0 in the task.
-
If the Surplus/Deficit has been defined for the “Surplus/Deficit (Financial Item Row)”, then the Surplus/Deficit will dynamically reflect what has been defined against the periodReferences of the financial item.
How to hide/unhide the Allocations grid via a Commentary Field
-
Navigate to an existing Commentary Group which is configured to appear against the Financial Analysis task with the Serviceability Calculations enabled.
-
Add a new Commentary Field of type “select dropdown” using a reference list which contains the value of “Yes” and against the datakey of “ctsAllocationGridAppearance”.
-
When the value of “Yes” is selected in the task, then the Allocations grid will appear.
-
If the specified commentary field isn’t configured, the allocations grid will appear once the task is opened.
How to configure adjustments for the Combined View Functionality
-
Navigate to Journey Builder and enable the adjustments functionality.
-
Create another lookup which will contain the dropdown adjustment options that will display. In the second column the user can configure the validations/financial item type following the same pattern as this section in the user guide.“How to configure the period reference for specific financial items”. Ensure that in this lookup list that the user has “FreeTextAdjustments” included as a Reference Data Value.
-
Create a new linked lookup with the Parent List reflecting the Primary datakey for the financial group. The Child List should be the lookup that has been created with the dropdown adjustment options.
-
Against the Parent List options, the user can configure which adjustment options will appear against each financial item. Alternatively, if the user would like a specific financial item to be a free text adjustment, have the “FreeTextAdjustments” populated against a Parent List option.
Financial Analysis Data Provider Configuration
The system supports the use of one or more Financial Analysis Data Providers, which allows users configure any Custom Providers for use from the Financial Analysis Data Providers page (within Credit Data Sources).
Enabling/Disabling more than one provider can be configured from the main Provider screen by toggling the Active toggle switch. This can also be done from inside any of the Providers Screens through the Active toggle switch.
Journey Configuration
In Journey Builder, the following tasks can be added to any journey where a Financial Analysis record is expected to be created.
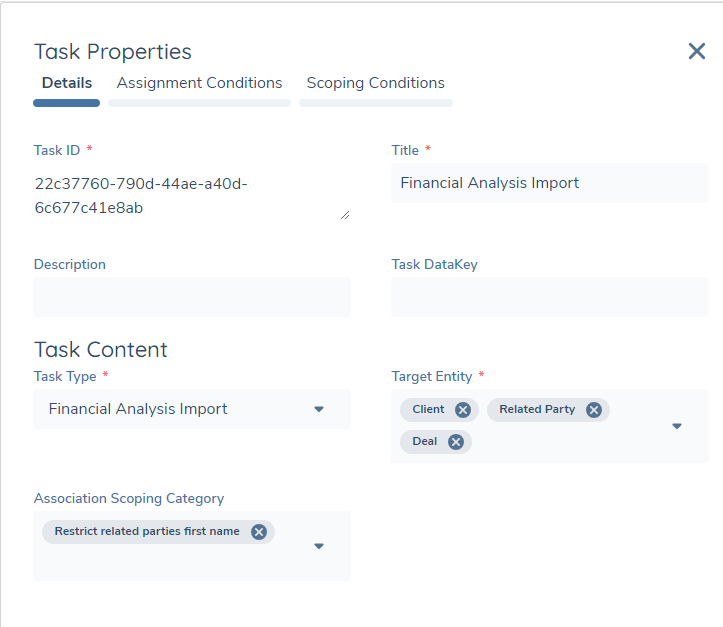
Financial Analysis Import Task
This automated service task should be configured sequentially before the “Financial Analysis Task”. This task will orchestrate the financial analysis import requests to the provider(s) integrated.
The user has the option to request financial import for Client, Related Party and Deal. The target entity types can be configured in the Reference Editor accordingly. Where Related Party are selected, association Scoping Rules can be applied to automatically to determine which entities should be in scope for the financial analysis task. For related parties, the system will apply to a maximum of 80 latest associations in scope based on the association scoping rules, and select the top 30 entities. If no association scoping rule is configured or selected for the task, the system will apply to a maximum of 30 entities (including main entity if selected and related parties sorted by alphabetical order). For Deals the system will select the top 15 Deals. If the user selects Related Party, Client and Deal as the Target Entity, then the import will be applied to all client/related party's/deals in scope in financial analysis task.
There is no user action required to initiate and complete the financial analysis import. The credentials and provider-specific settings are defined via API integrations. Where more than one provider is integrated, the import requests will be passed to each provider and returned asynchronously.
- Once the import requests are returned within the Financial Analysis task there will be a visual indicator either against the financial item or the period to signify what has been imported. The functionality to import data but present it as read-only can be configured through adding a new property inside the targeted financial group called “ReadOnly” and returning a “true” value. Furthermore, the user would need to map this new property to the existing custom adaptor mapping scheme. When the read-only flag is enabled, there will be a visual indicator against the period, the financial item will not be able to be deleted and the period references for the entire period/column will be read-only. When the read-only flag has not been enabled the imported data will be editable and the visual indicator to show this will be against the financial item. Similarly, the user has the ability to customise the period label through a property and map this property to the existing custom adaptor mapping scheme.
Financial Analysis Task
This task can be configured anywhere in a journey and can be configured to appear multiple times in any single journey.
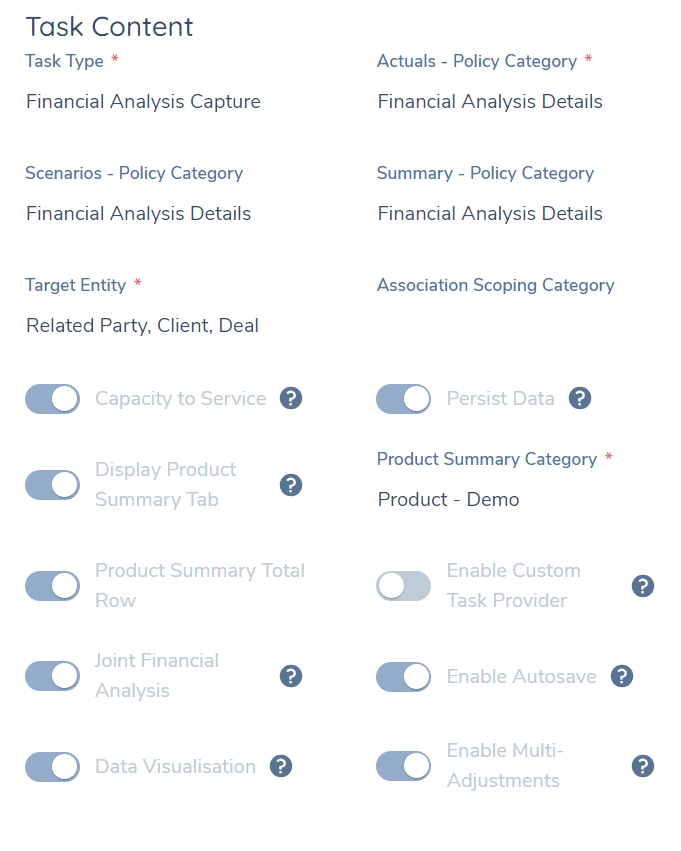
The Persist Data switch will enable data persistence for a financial analysis task when it is re-opened. Furthermore, Financial Analysis data is shared between tasks and/or journeys if the persist data switch has been enabled. Specifically, data is persisted cross-journeys if a Financial Analysis task has been verified in a prior journey whilst if there are multiple Financial Analysis tasks in a single journey, they don’t require to be verified for data persistence to occur. Please see appendix below for further details.
The business categories for both Actuals and Scenarios are configured on the Financial Analysis task. It is highly recommended that the business category for Actuals/Scenarios/Summary are the same (except if the user wants to configure adjustments as a dropdown in which case, the datakeys of the financial groups still should be consistent with what has been defined in Actuals/Scenarios). Within the Actuals tab itself, Serviceability Calculations can be enabled or disabled against the selected task though the toggle. Additionally, the option to view the Product Summary Tab in the task can be configured through a separate toggle as well.
The User has the option to request a Financial Analysis for the Related Party, Client (the main entity) & Deal in the Target Entity Field. If a user selects Related Party/Deal as the Target Entity, then verified related parties/deals from previous journeys and all related parties/deals onboarded/created in the current journey will be triggered in the financial analysis task. If user selects Related Party, Client & Deal as the Target Entity, then all entities/deals will have their respective financial analysis in the same task. The user additionally, can turn on functionality for the creation of Joint Financial Analysis(s). If enabled, then the financial groups that appear in the Joint Financial Analysis are inclusive of all the financial groups that appear for the entities that comprise of it. However, financial groups are merged if they share the same datakey e.g. One assets financial group will appear in the Joint Financial Analysis if the same datakey is used for the assets datagroup created in both individual’s financial analysis.
Futhermore, the user has the option to enable the custom task provider through it's respective switch and additionally has the configurability to label the button (that appears in the task) that triggers a call to the custom provider. The custom task providers are configured in “API Providers” which can be accessed from the system left hand navigation under the Policy Domain.
Verify Financial Analysis task
This automated service task must be configured after the “Financial Analysis Task”. This task will verify all active Financial Analysis tasks that have not been previously verified. Additionally, it will verify the financial analysis for all entities (if there are multiple) within the Financial Analysis task.
Once a Financial Analysis task has been verified, it can be reviewed but cannot be edited.