The Business Rule Manager (Detection Rules)
Rule Manager Overview
Rule Manager enables Fenergo client users to configure AML Transaction Monitoring detection scenarios through a no-code interface. With Rule Manager, you can manage the process of creating a new rule, testing it, promoting it to live production, and demoting it from production.
Getting Started
Rule Manager is accessed from the Management icon in the FenX menu. Navigate to Detection Rules under the Transaction Monitoring section. You require the Compliance Officer role to create, edit, and promote/demote rules.
Rule Manager Home Page
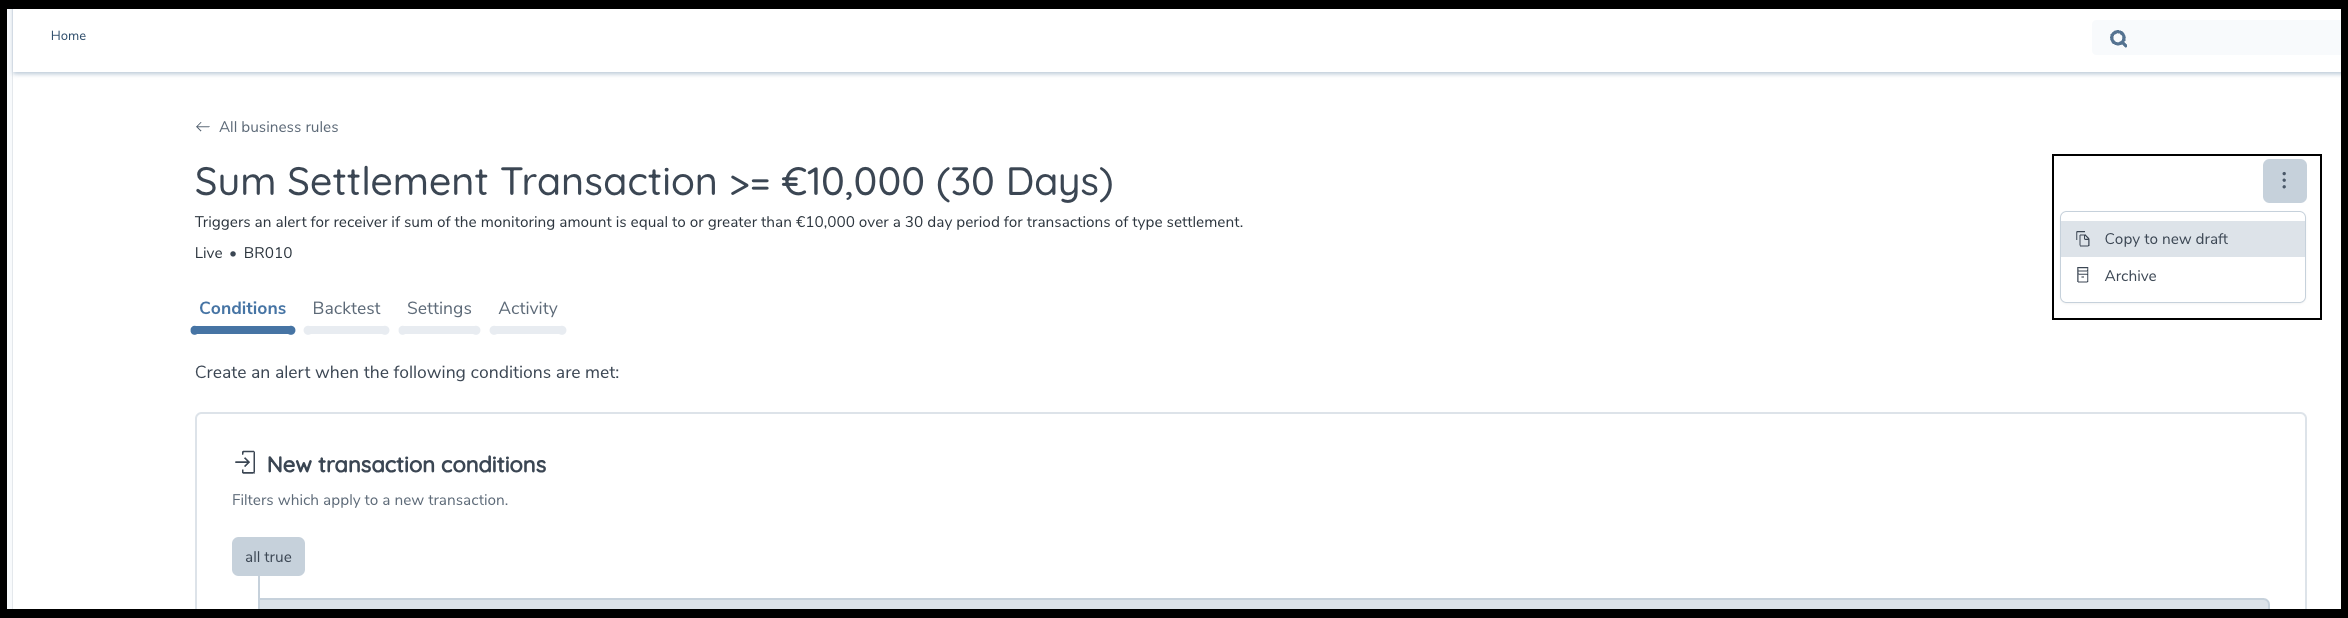
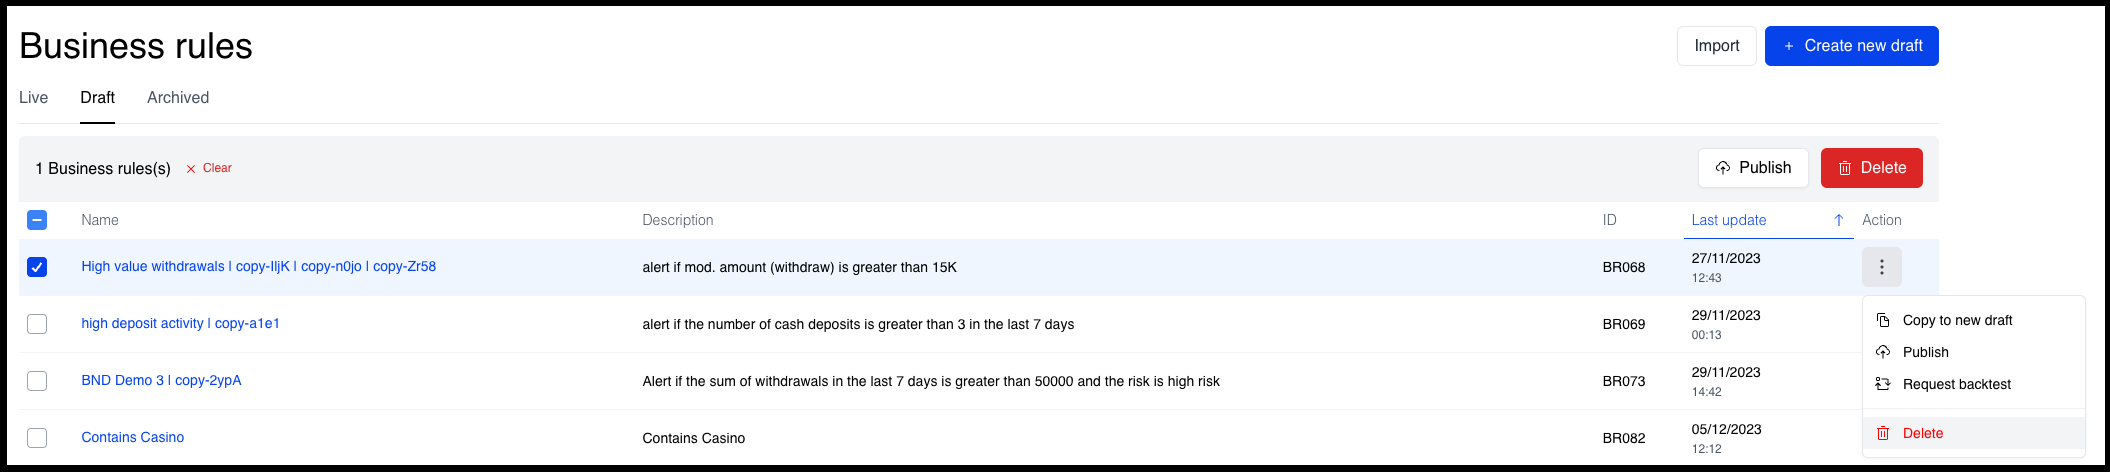
The Rule Builder home page presents a list of all rules in the system organized by status. Rules that are currently in production are shown in the Live tab. These rules actively monitor incoming transactions and generate alerts. Live rules are always locked and cannot be edited. The Draft tab shows rules that are currently being configured. The Archived tab shows rules that were previously in production and have since been demoted. Archived rules are locked and cannot be edited. Both Live and Archived rules can however be viewed to see the configuration, including rule conditions and thresholds. During each tab, users can search for rules, sort by name, description, ID, last updated, and multiselect rules to perform actions such as promote to live or demote to archived status.
Rule Manager supports Client-Configured rules. Fenergo also offers a service to implement complex rules on behalf of its clients. Fenergo-managed rules are created in Python and can be imported into Rule Manager so that compliance users have a complete view of all rules in the system. Fenergo-Managed rules cannot be edited in Rule Manager and are identified with a lock symbol.

Each rule has a Name which is provided by the user when the rule is configured. The rule name can be changed while the rule is in draft mode. For Fenergo-managed rules, the rule name is provided by the user when the rule is imported.
Each rule has a rule Description which is provided by the user when the rule is configured. The rule description can be changed when the rule is in draft mode. For Fenergo-managed rules, the rule description is provided by the user when the rule is imported.
Each rule has a system-generated ID which is unique within each tenant. This attribute is of the format BRnnn and is incremented by 1 as each new rule is created. The Rule ID cannot be edited. It provides traceability from an alert back to the contributing rule that triggered that alert.
Rule Lifecycle Management
Rules are managed through a lifecycle by performing Actions on the rule moving it from Draft to Live to Archive.

The available actions depend on rule status.
| Rule status | Available Actions | Description |
|---|---|---|
| Draft | Backtest | Trigger the backtest service. |
| Publish | Move a rule from Draft to Live | |
| Copy to a new draft | Copy the rule contents into a new draft copy | |
| Delete | Delete the rule from the business rules manager | |
| Live | Copy to new draft | Copy the rule contents into a new draft copy |
| Archive rule | Move a rule from Live to Archive | |
| Create new version | Create another version of a live rule | |
| Archived | Copy to a new draft | Copy the rule contents into a new draft copy |
| Create new version | Create another version of a live rule |
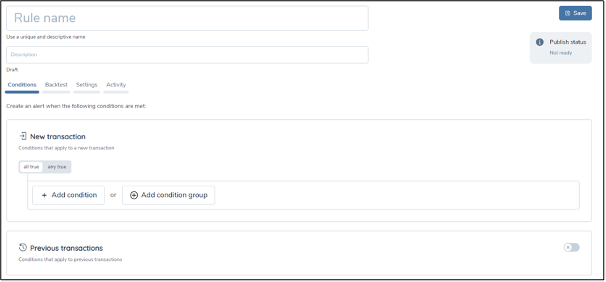
Creating a New Rule
You can create a new rule from the Rule Manager home page by clicking on the Create New Draft button which brings you to the Rule Details page. You can save a partly configured rule and return to complete it later.
These are the steps required to configure a rule:
-
Enter a Rule Name.Rule names must be unique within each tenant and have a maximum length of 100 characters.
-
Enter a Rule Description. Rule descriptions are not required to be unique and have a maximum length of 500 characters.
-
In the Conditions tab, you define the rule logic which specifies the pattern you want to detect. This is explained in more detail in Rule Building Blocks below.
-
Enter the required Settings which determine the main entity for the alert and when the rule should be executed.
-
Fenergo can profile multiple entities in a transaction. For example, you can monitor your firm's customer on one side of a transaction and monitor your customer's counterparty on the other side of the transaction. In the Settings tab, you must choose the Main Entity which will be the subject of an alert that is raised for this rule.
-
Determine if the rule should be run in Real-Time. A real-time rule is executed as soon as a transaction is received through the Transaction API.
-
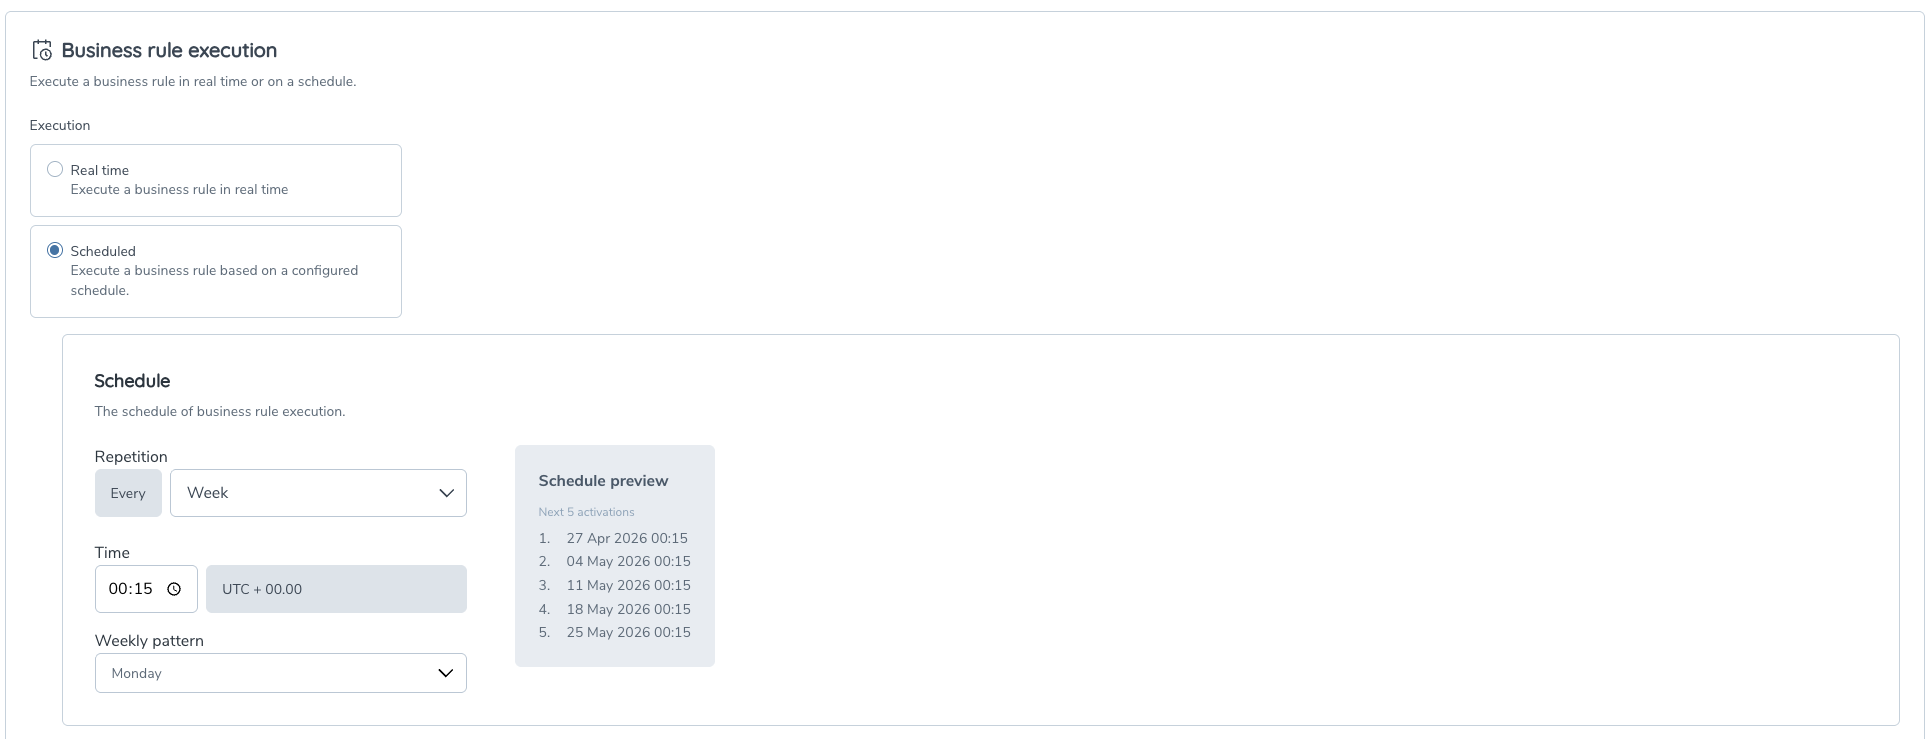
Alternatively, a rule can be Scheduled. A scheduled rule is executed according to a business calendar you specify as follows:
Repetition: Specify when you want the rule to run. Options include daily, weekly, or monthly. Time of Day: Set the time of day when you want the rule to execute. Use the 24-hour time format. The time zone will be pre-determined based on your tenant configuration. Weekly Pattern: If the rule should run on specific days of the week, select the relevant days. You can choose multiple days in a week. Monthly Pattern: For monthly scheduling, indicate the specific dates when the rule should execute.
-
When a rule runs on a scheduled basis, you must decide how many alerts to generate each time the rule conditions are satisfied. There are two options in the Similar Alerts panel.
-
If you select Multiple Alerts, the detection engine will generate an alert each time the rule conditions are satisfied within the time-period.
-
If you select Single Alert, the detection engine will generate just one alert within the time-period. To de-duplicate repeat alerts, you need to select a de-duplication key. Usually, this is the entity id of the entity being monitored.
-
-
Consider a simple rule that checks if an entity’s incoming daily average transaction value is greater than (x) .
-
If the rule is set to run daily at a specified time, let’s say 7 AM. At the time of rule execution, all the transactions that we have stored under the previous (fully completed) day , a time range from [00:00 yesterday till 00:00 today] will be involved for aggregations.
-
In the case of the same rule set up as a per-transaction rule running on a real time basis, the query time range would span the "modification created at" date of the incoming transaction as the "end date-time", and this date-time minus 24 hours (or the look back query period specified in the rule) as the "start date-time".
For example: 29072024T14:00:00 until 30072024T14:00:00 (time of the last incoming transaction)
When a periodic rule is created to compare the same transaction filter across two different periods.
For example: Transactions in the last 7 days against transactions in the last 30 days, then there is an overlapping period where transactions from the last 7 days are also included in the transactions from the last 30 days. This is useful for comparing averages while not being useful for SUMS or COUNTS.
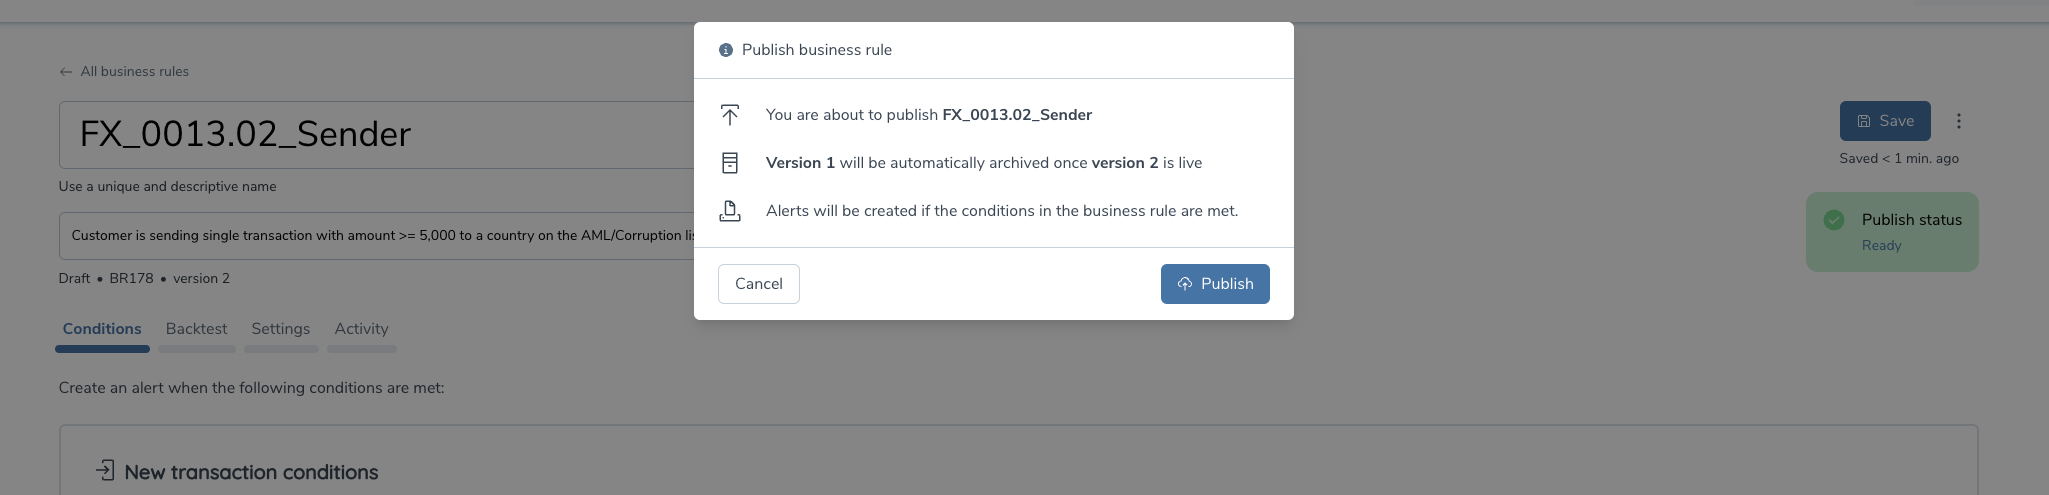
Create new versions of rules
When a rule that is in a 'live/published' state needs to be updated, a new version of the same rule can be created. This step is usually initiated when a threshold value in a ‘live’ rule has to be tweaked to keep the rule in-line with an updated policies or to make small changes in the logic of the rule to optimize the existing rule.

New versions can be created from the details page of a Live rule.

When ‘create new version’ is selected, an editable draft version of the live rule is presented to the user. The user can then proceed to make changes and save the new version.
When the user publishes the new version, the existing live (parent) version is archived automatically, and the new draft assumes the state of the new ‘Live’ version.
- There can only be 1 live version of a rule at a time.
- Version increments are always done by a factor of +1.
- Versions of the same rule will have the same rule ID.
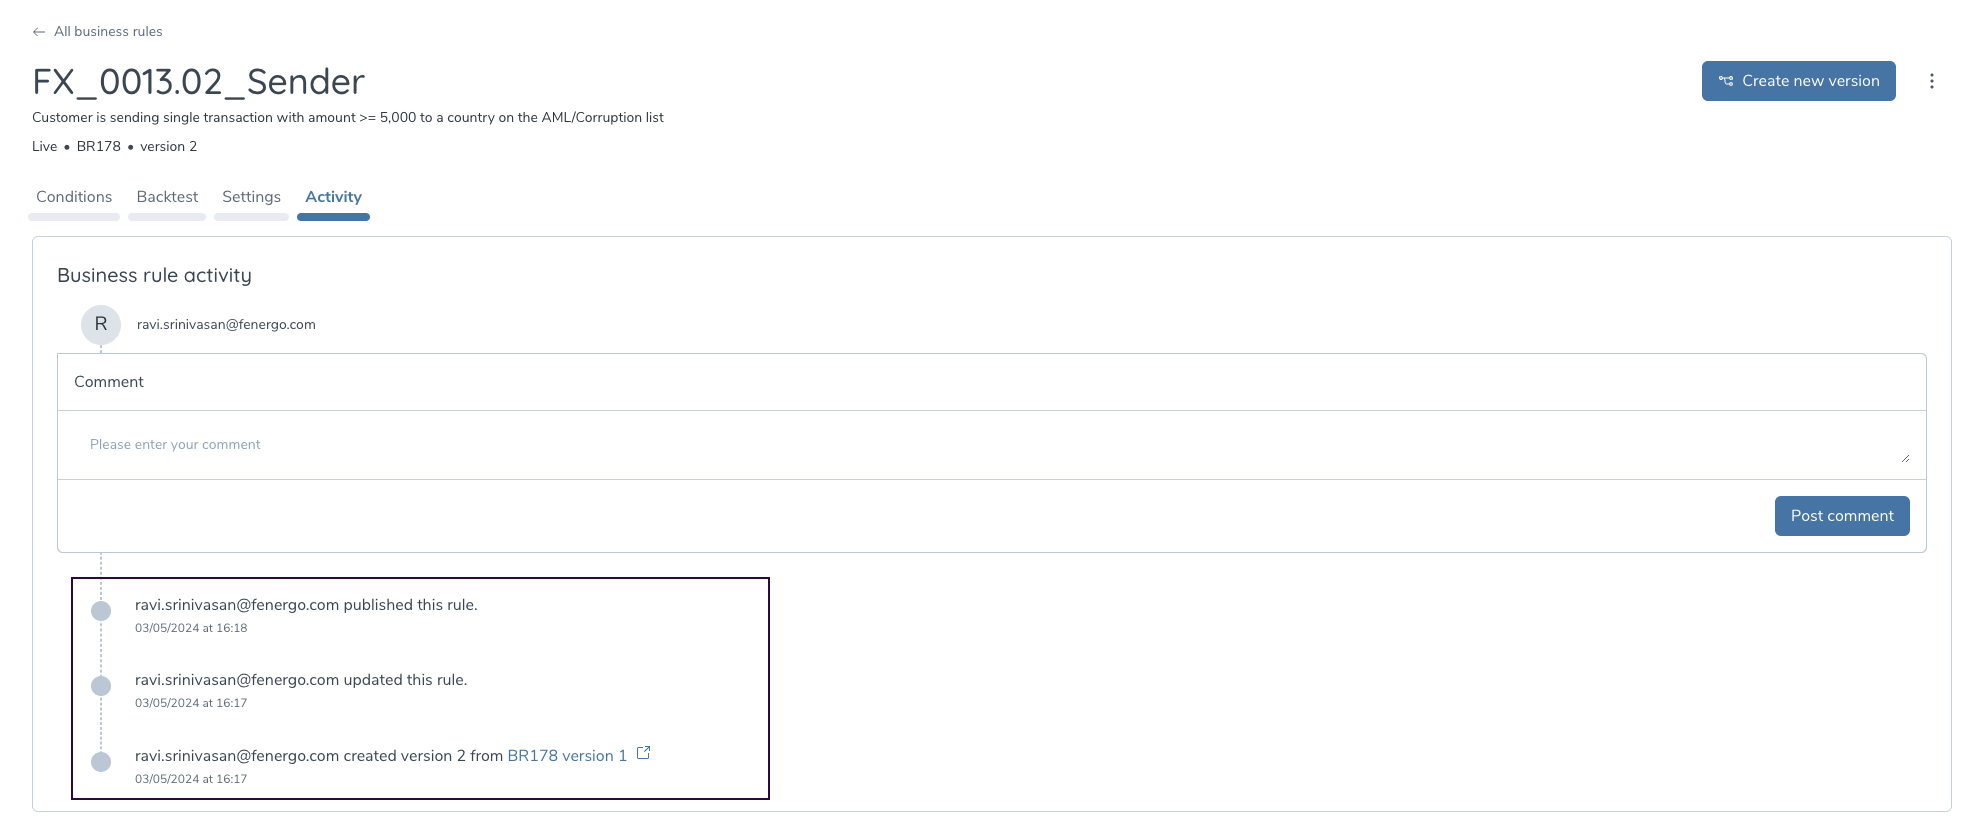
There is a clear lineage established between versions of the same rule to facilitate internal audits. The activity trail of each rule will indicate any links to a previous version.
The previously archived versions of the rule are available in a read-only format to show the state of the rule when it was archived.
The newly created version in the Live state will also be in a read-only format to inform the user the current (and the updated) form of the rule.
Copy to new Draft
To clone the contents of a business rule, use the "Copy to New Draft" feature in the Rule Manager. Find the rule you want to duplicate in the overview page, select it, and choose the "Copy to New Draft" option in the actions overflow. You can also 'copy to new draft from the details page of a rule. Before confirming, double-check the rule settings to ensure they suit the new draft. The system will create a new draft with a new Rule ID with all the original rule's conditions and settings. An activity trail is started automatically to track any changes made. A confirmation message will appear, signaling the successful copy. The user can provide an appropriate name and description for the newly copied draft.
Delete a Draft rule
You can soft delete unwanted drafts from the Rule Manager. Select the rule from the overview page and use the actions overflow menu to delete the selected draft rule. Confirm your choice to delete, and the system will show a success message. This action cannot be undone. Only rules in a draft state can be deleted.
Rule Building Blocks
Rules are implemented in logical building blocks linked together to detect a risk pattern. These building blocks are implemented in the Conditions tab of the Create Rule page. You can create simple rules with few conditions, or complex rules with upto 2 levels of nested rule logic.
Transaction attributes
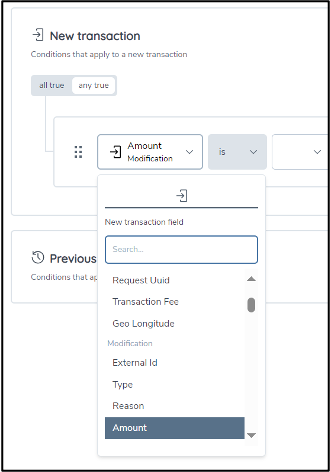
Rule Manager is aware of the transaction data fields mapped into the Fenergo platform through the Transaction API.
When editing a rule, you can use any of the available transaction attributes to implement a detection scenario. These fields are presented in a drop-down list. If you have chosen to map additional custom fields in the API, these will also be available to you.
In a rule, you can compare fields with numerical values (such as transaction amounts) using "is", "is greater than", "is less than", "is at least", and "is at most". You can compare non-numerical fields (such as transaction type, transaction code, transaction country or risk level) using "is", "is not" and "is in list" logic operators. The Rule Manager intuitively presents users with the pre-determined options based on the field that has been selected. Additionally, there is a 'contains' operator to set up filters for 'string' matching. For example: Transaction Description contains "Betting" or "Gambling" or any other.
Single condition
The simplest building block is a single expression that compares two values. The example below is a single condition that identifies an outbound payment by checking the Payment Type field on the transaction.
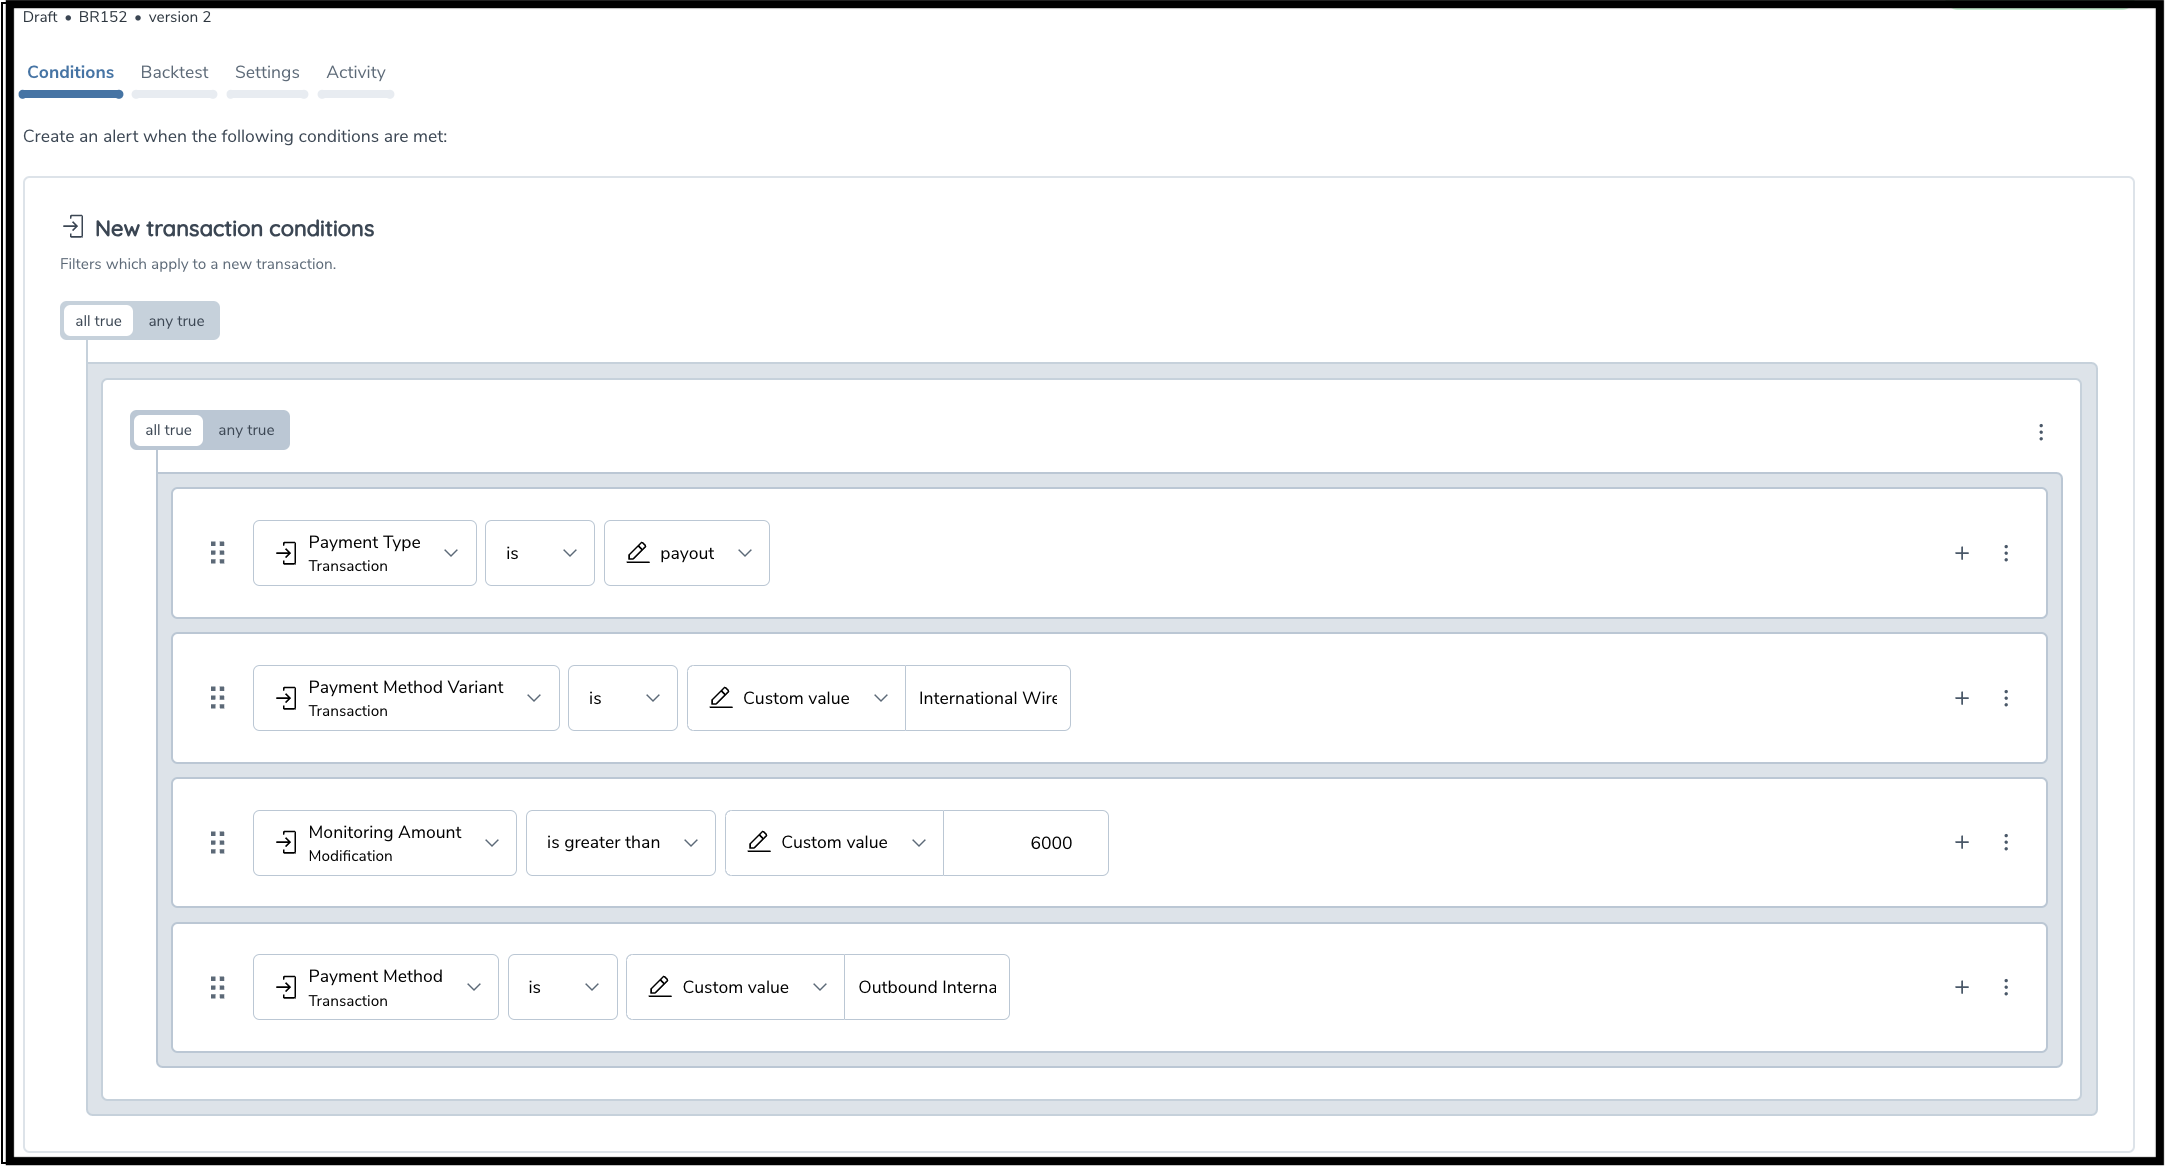
Condition group – all true
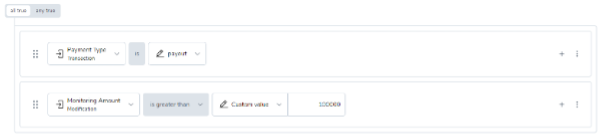
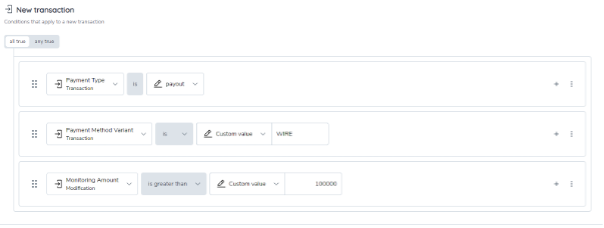
You can combine expressions into a group, denominated by an outline on the user interface, containing all the conditions belonging to that group within its borders. The all true combination requires that each condition must be true for the group condition to evaluate to true. The example below depicts a condition group which identifies any payment greater than 100,000 where the payment type is payout.
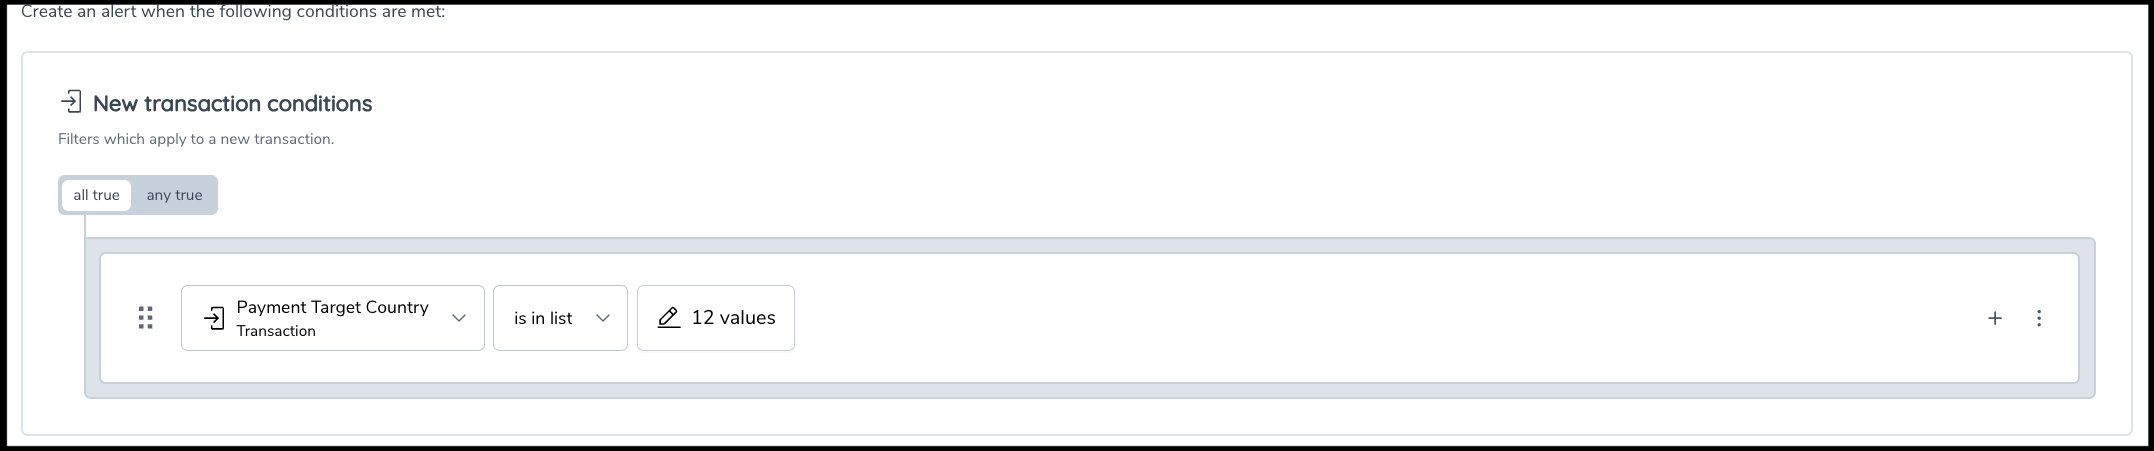
Condition group – any true
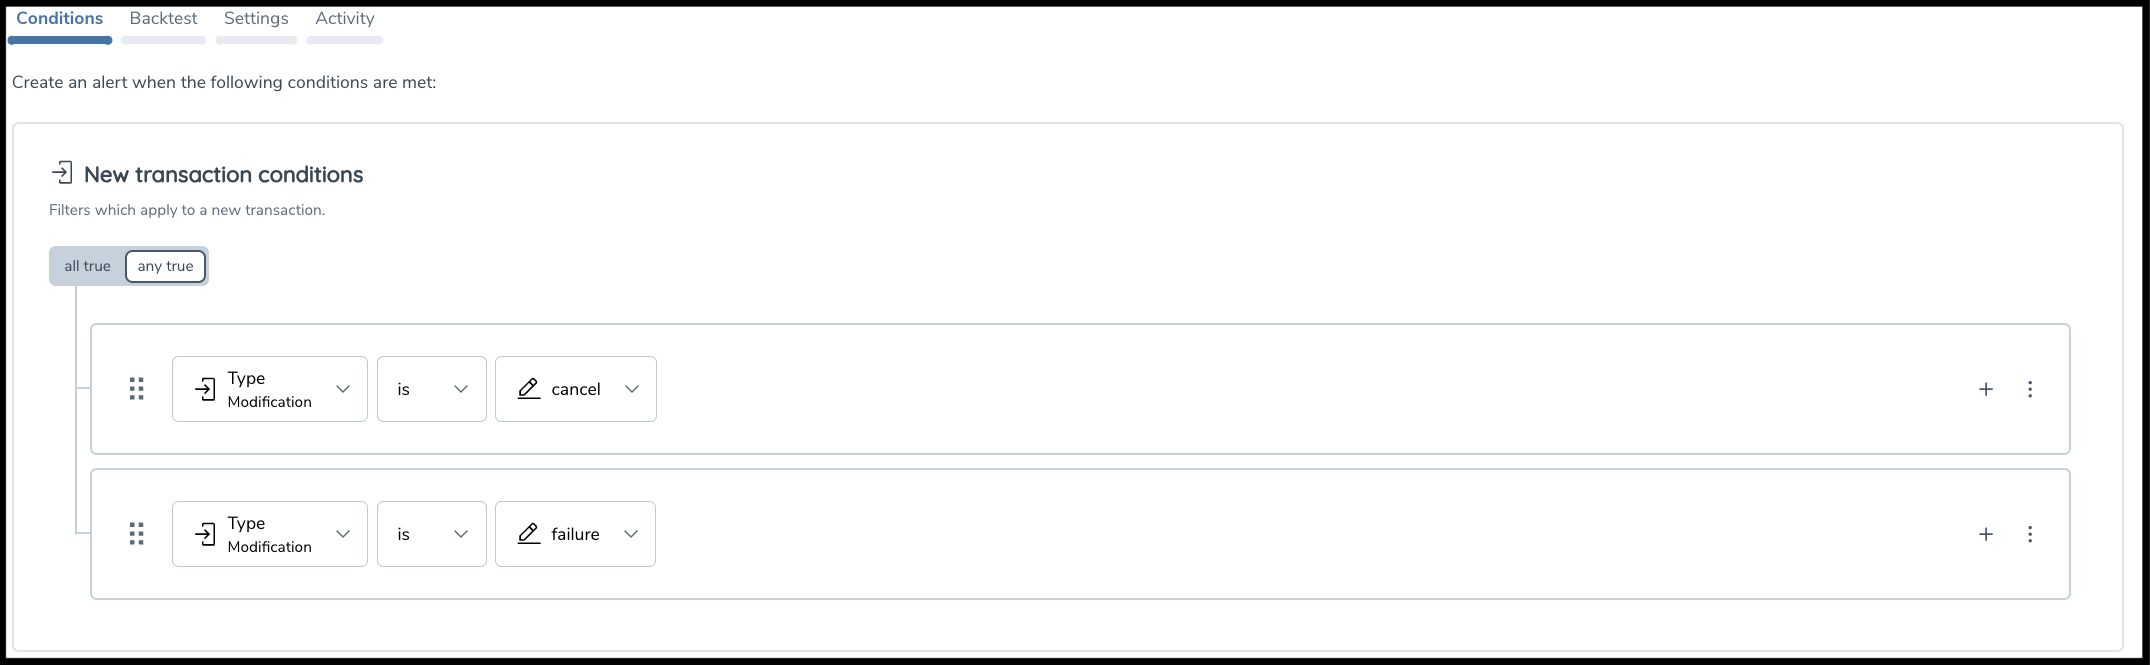
The any true combination requires that any condition individually needs to be true for the group condition to be true. The example below identifies any transaction with a Payment Method Variant of "TXN-TYPE-100" or "TXN-TYPE-200".
In a scenario where a rule is built with multiple conditions nested inside an 'ANY TRUE' group, the rule exits execution i.e., does not generate an alert, only when all the variables in all the conditions inside the 'any true' group have a 'null' or the expected value 'not present'
For example:
- ANY-true: (field x == a; field y == b) -> exit if x is None AND y is None
- ALL-true: (field x == a; field y == b) -> exit if x is None OR y is None
Nested conditions
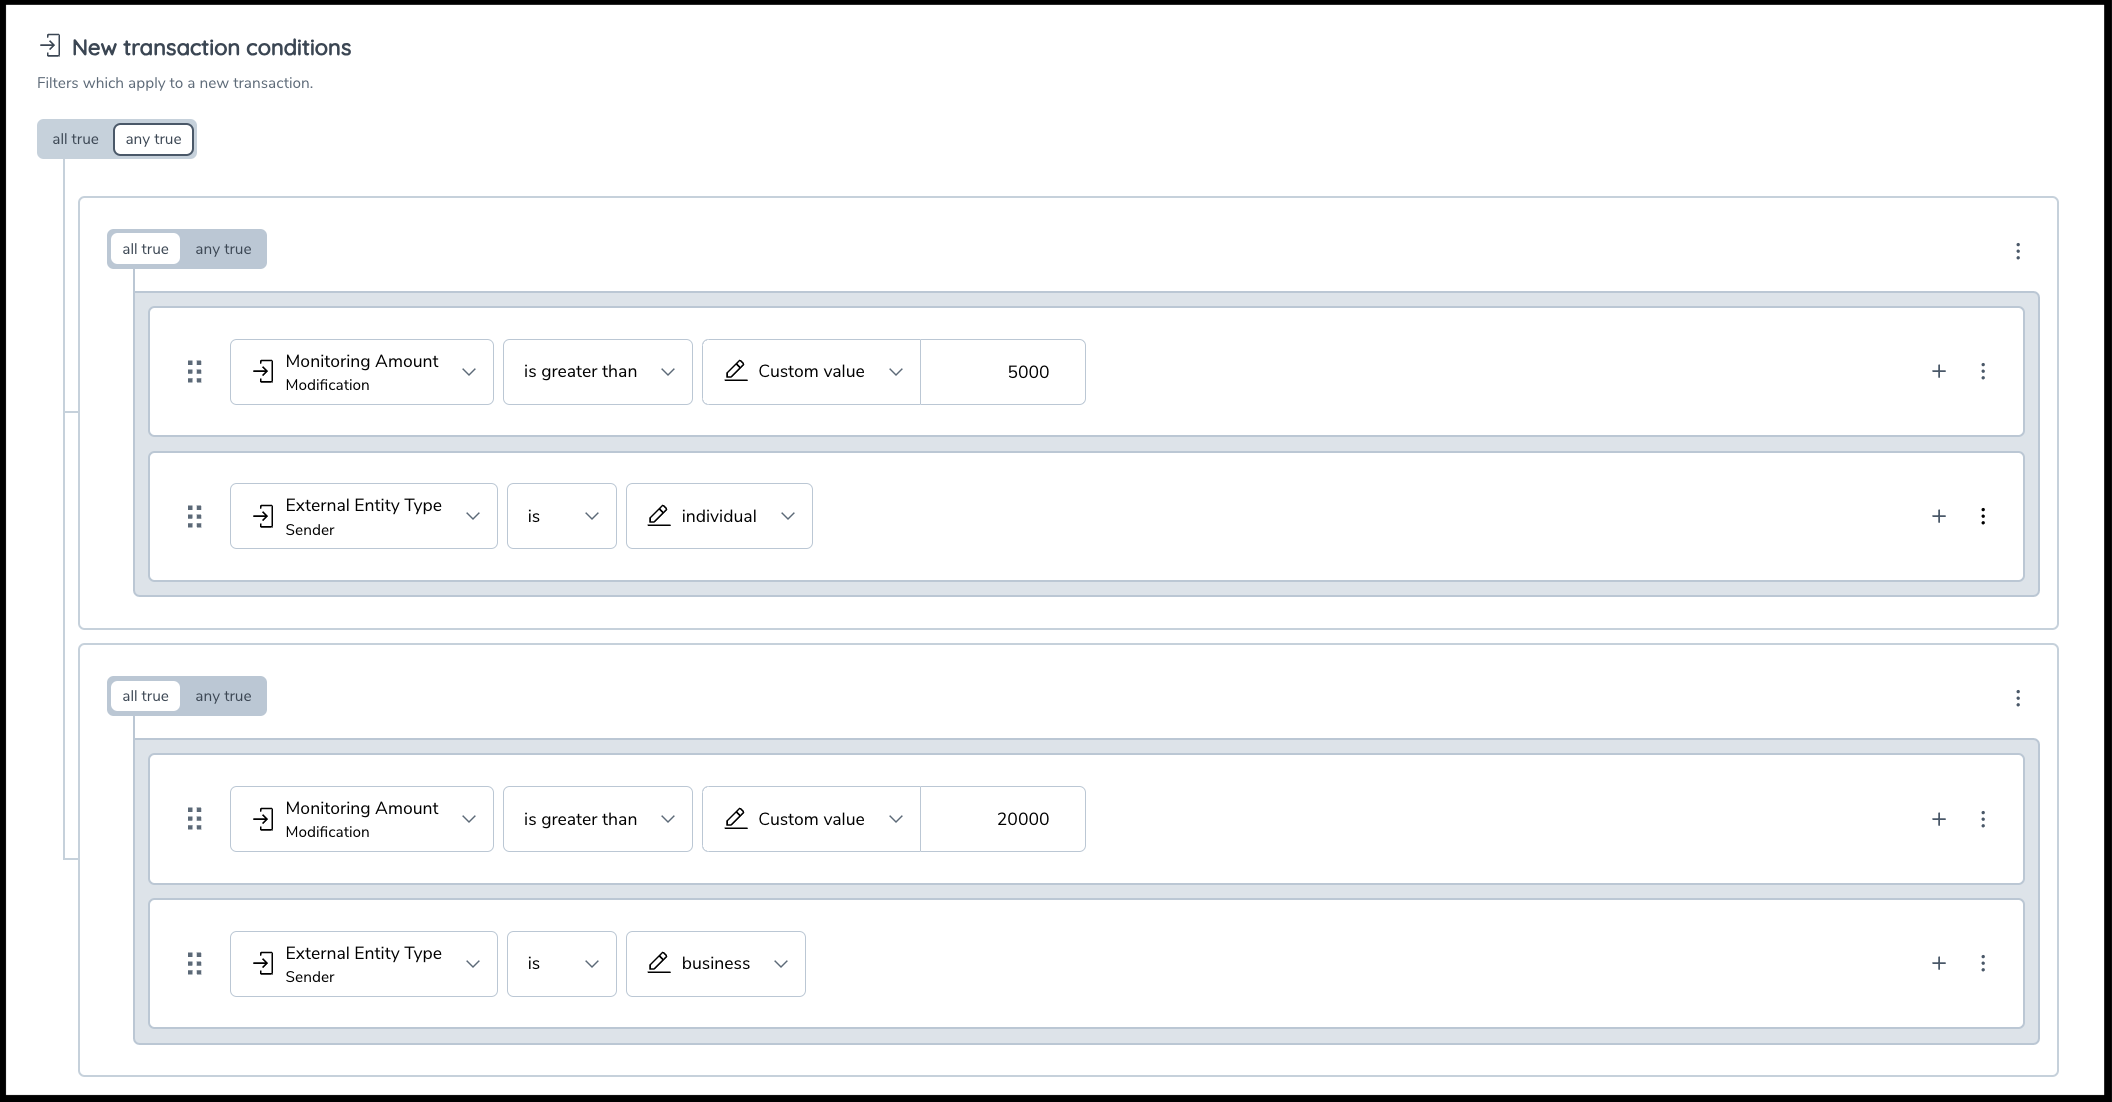
You can create complex rules with up to two nested levels of logic by creating a condition group within another group. The example below identifies transactions for high-risk entities with a value over 50,000 or transactions for medium-risk entities with transaction value over 100,000. You can add multiple levels of nested levels as needed.
Using Lists
Using reference lists in rules
There are two ways to look up a list of values within a rule.
Option 1 — Inline list inside the rule. Select the is in list operator and add the values directly in the list editing panel that appears. Fast for one-off rules, but every rule has to be updated by hand when the values change — limiting from a change-management point of view.
Option 2 — Published reference list (recommended). In the Reference Data editor in CLM, create and publish the list once, then reference it from any rule using the in reference list / not in reference list operator. One master list, many rules. When the list is republished, all live rules pick up the change automatically and a new version is recorded against each rule.
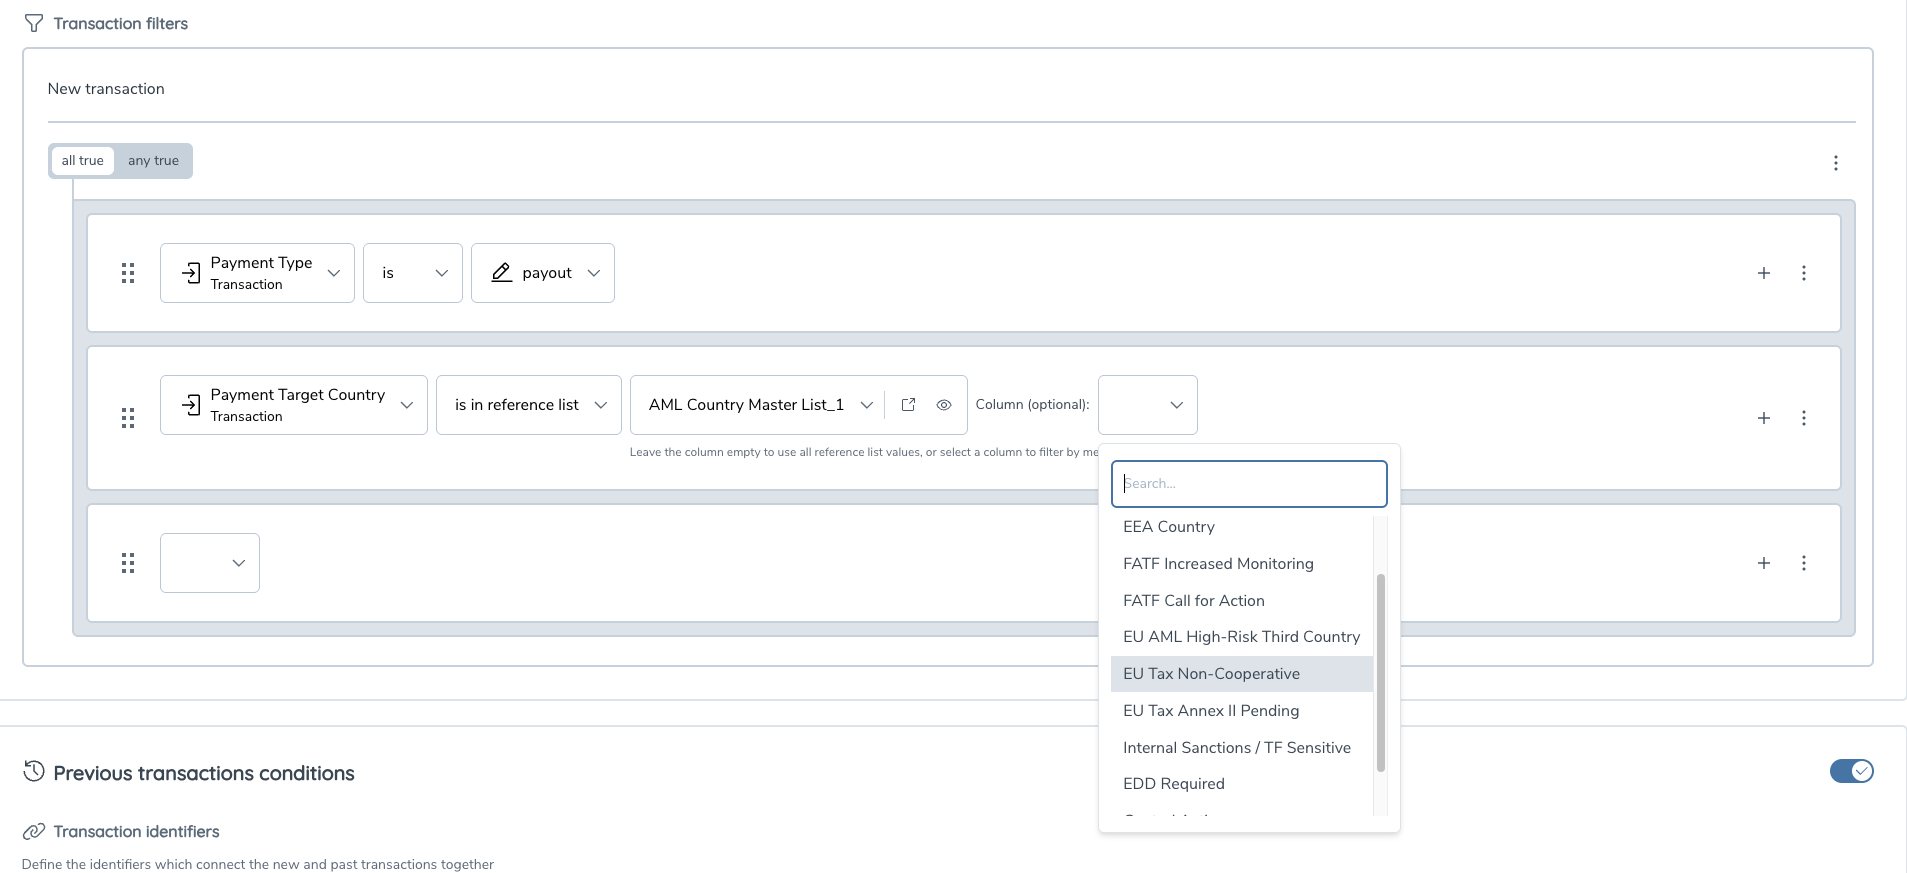
Multi-column reference lists
A published list can now carry multiple columns on a single master list — one row per entity, one column per membership indicator. This replaces the older pattern of maintaining several near-duplicate lists (one per indicator) and keeps changes in a single place.
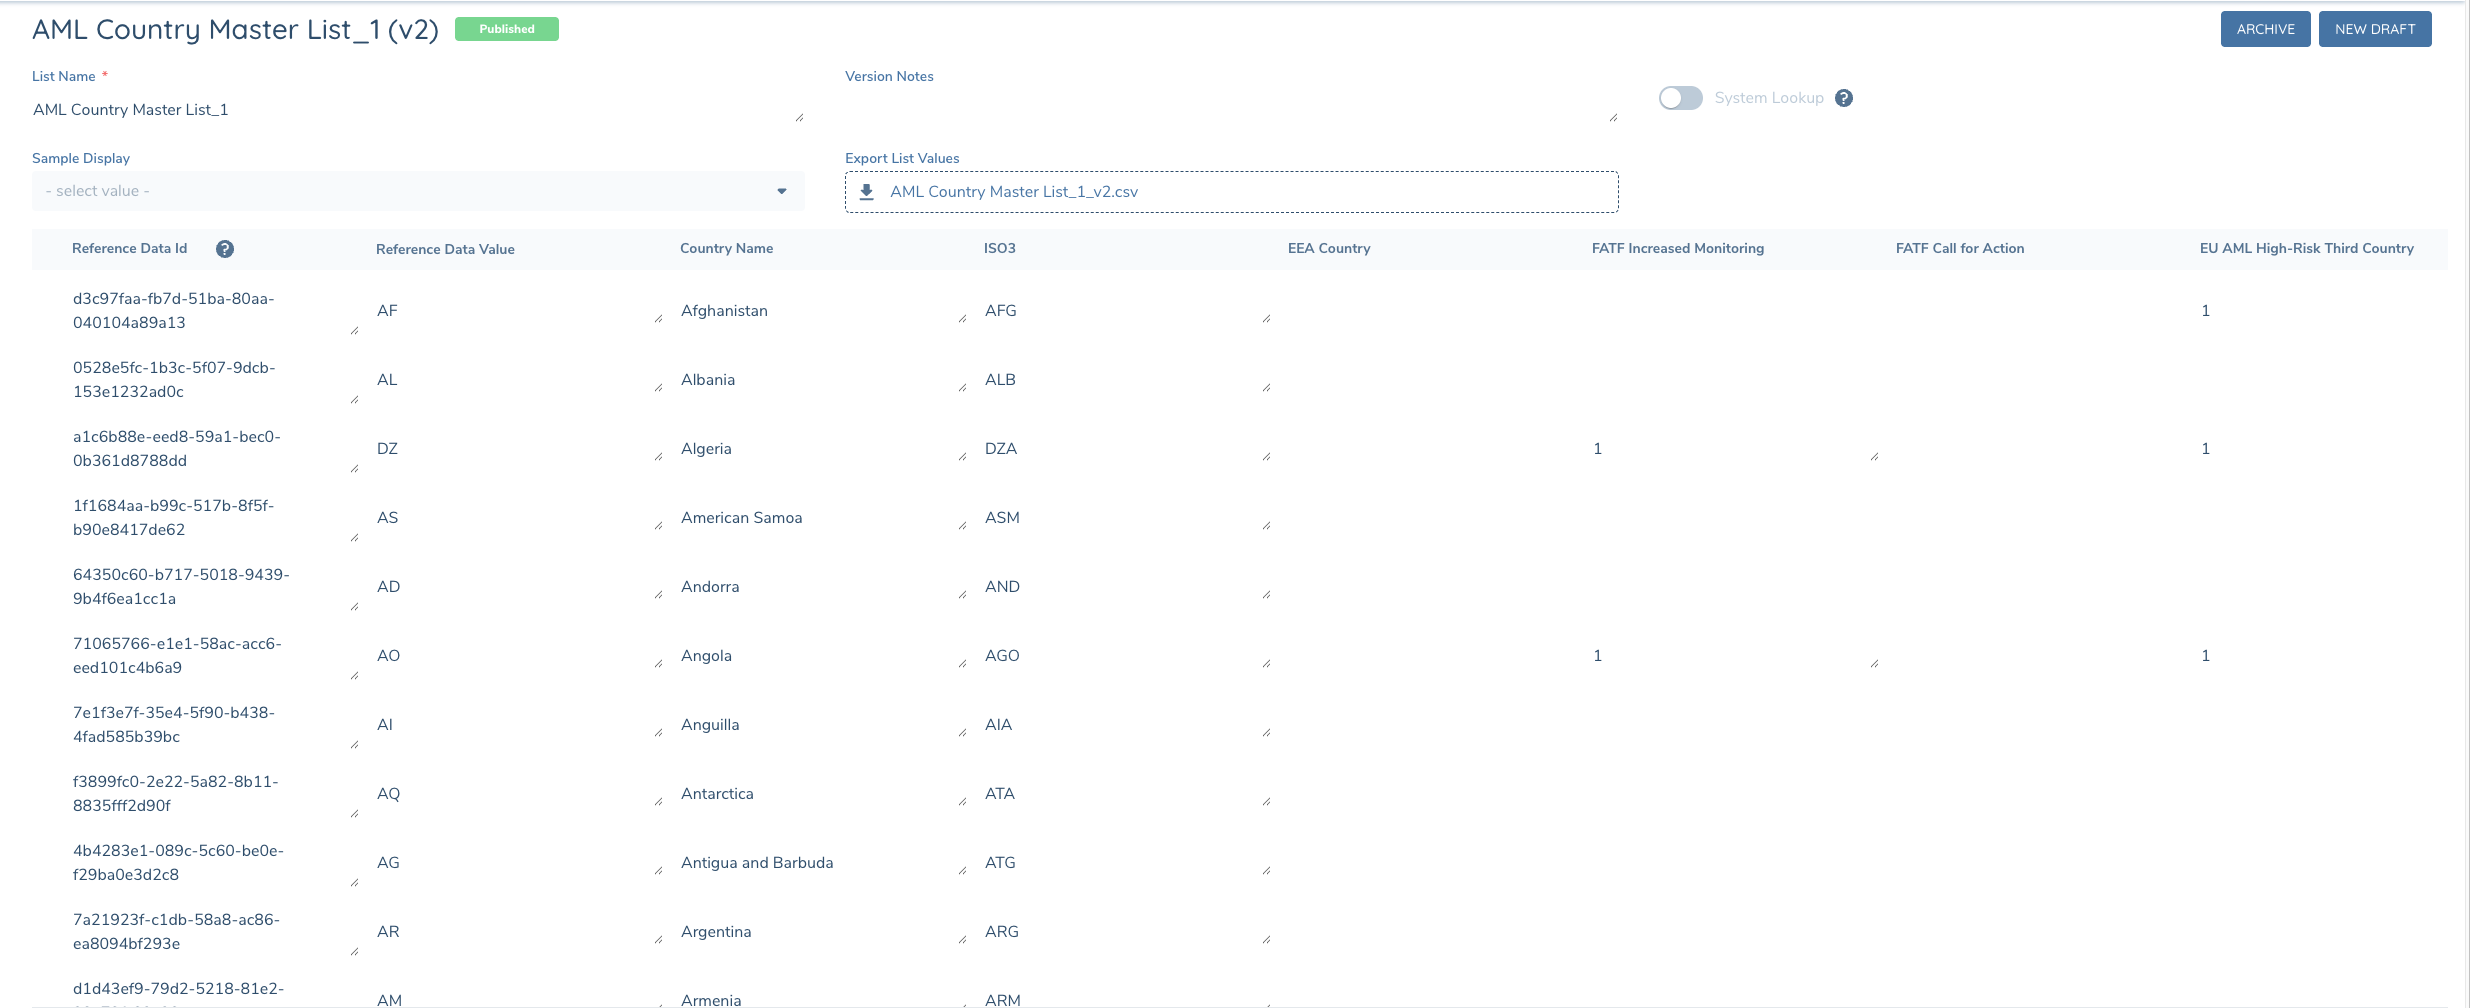
Example — a single AML Country Master List with one row per country and indicator columns for EEA Country, FATF Increased Monitoring, FATF Call for Action, EU AML High-Risk Third Country, EU Tax Non-Cooperative, EDD Required, and so on.
When building a rule:
- Pick the parameter (e.g.
Payment Target Country) and the operatoris in reference list. - Select the published list (e.g.
AML Country Master List_1). - Optionally select a Column. The rule then matches only the rows where that column indicates membership. Leave the column empty to match against the full set of
Reference Data Valueentries.
What counts as a member
A row is treated as a member of the selected column if the cell contains any of the following (case-insensitive): 1, Y, Yes, True, On. Empty cells, 0, N, No, False, and Off are treated as non-members. Use whichever convention is already in your data — no need to standardise.
What is not supported
- One column per condition. A condition filters on a single column. To evaluate multiple columns at once, add additional conditions and combine them with
all true/any true. - No hierarchies. Columns are flat membership indicators; relationships between columns are not interpreted.
- No automatic remap if a column is removed. If a republished list no longer contains the column a rule references, the rule is flagged as incomplete and will not publish until a valid column is selected. The change is recorded against the rule in the activity tab.
Migrating existing rules
Existing rules continue to work unchanged. Inline lists (Option 1) and single-column reference lists retain their current behaviour with no column selector shown. Switching a condition to a multi-column list will reveal the column selector the next time the rule is edited.
Dynamic fields
Apart from the basic transaction and entity fields, the rule builder also offers dynamic fields to be used in various rule conditions. Currently 3 types of dynamic fields are available:
- additional fields: tenant specific fields pertaining to either transaction or entity.
- entity data rule fields: fields representing the outcome of executing the referenced entity data rule during the runtime of a business rule.
- TM KYC Data fields: fields that are part of data groups linked to the TM KYC Data category
Additional fields
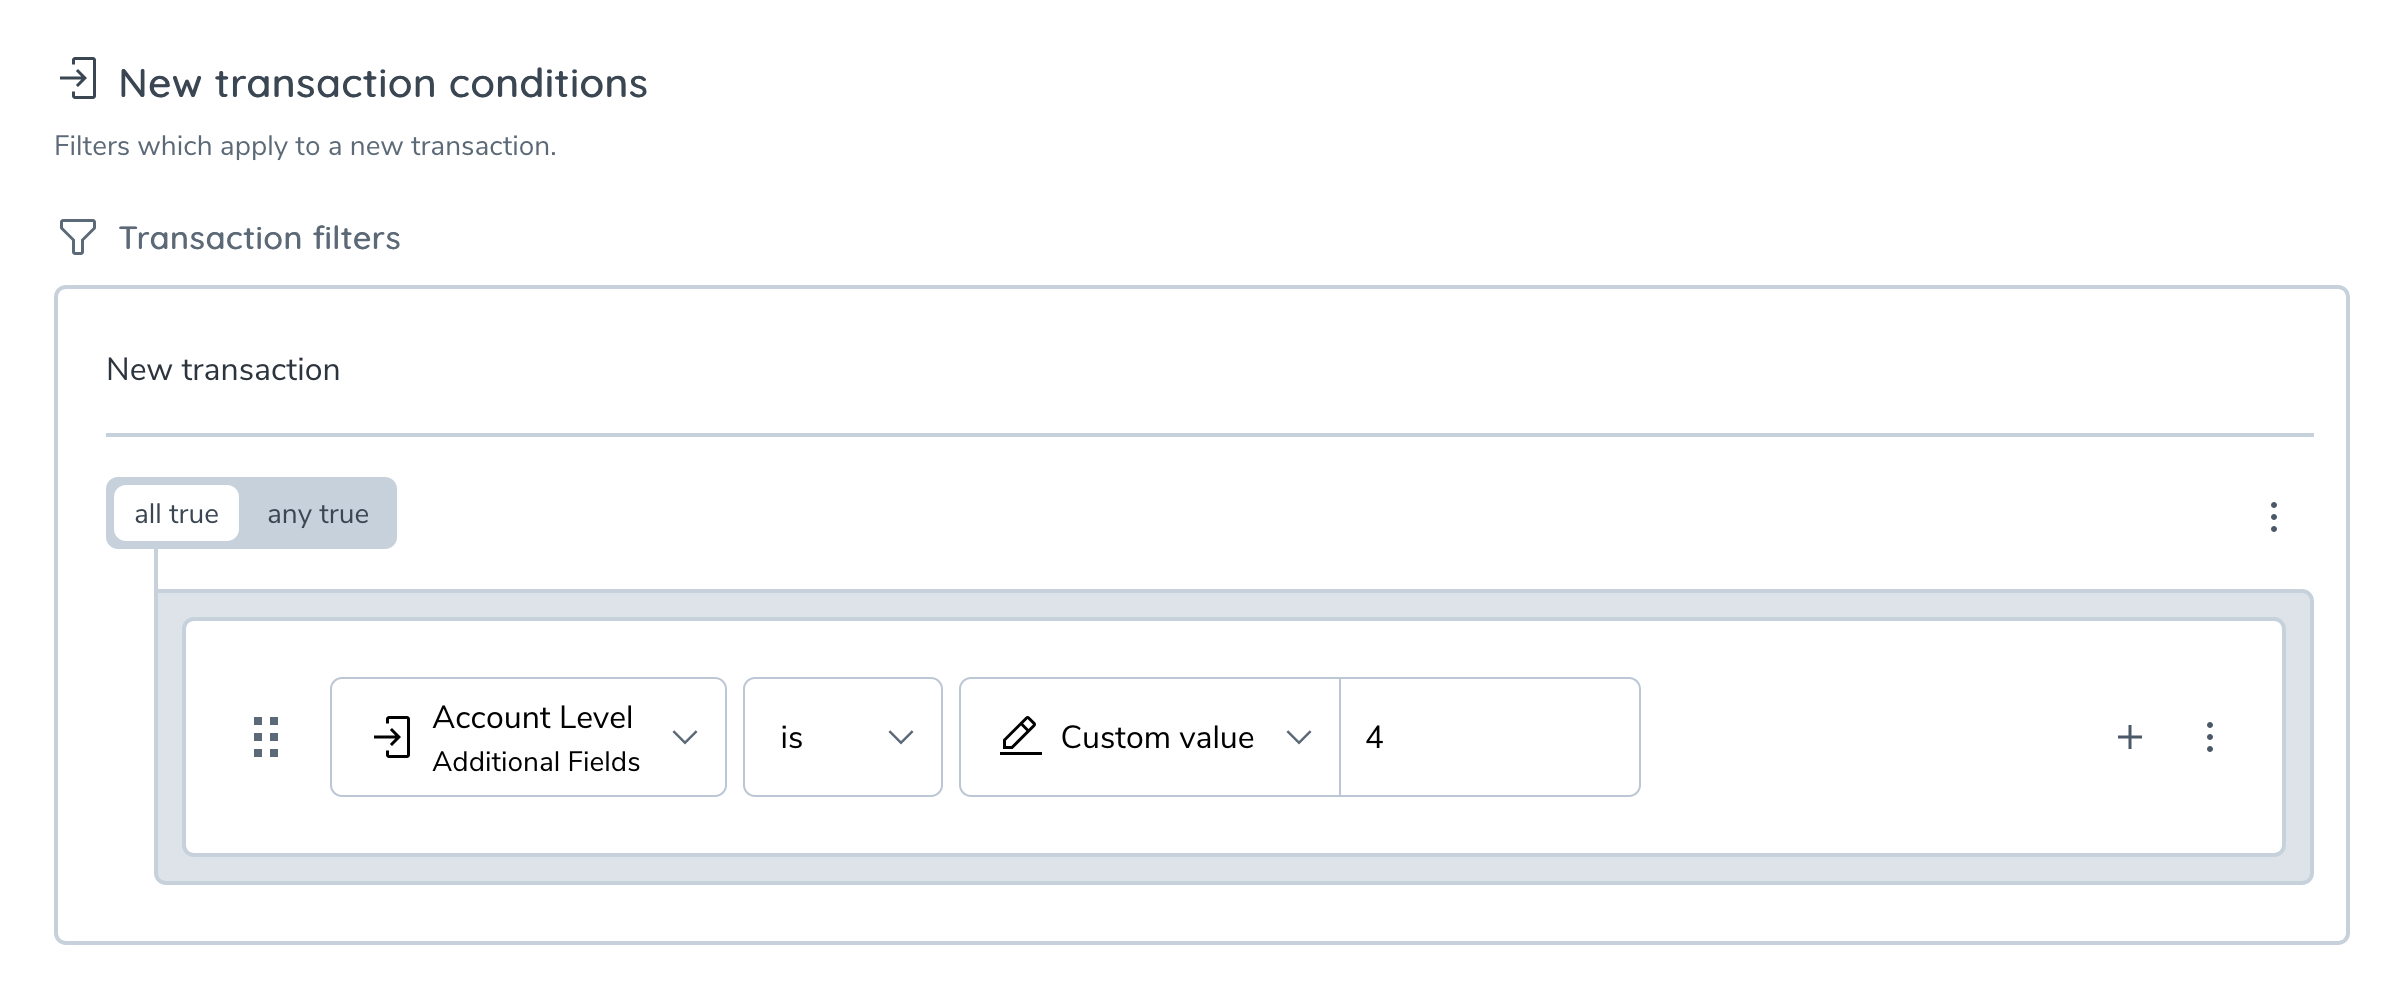
In the case that basic fields are not enough to completely represent a tenant's data model, additional fields can be used to extend the existing transaction and entity models.
The maintanance of additional fields is currently done through our technical consultants. Please reach out to them for requesting new fields, or updates to existing fields.
From the rule builder perspective, additional fields are treated similarly as the basic transaction and entity fields. This means that you can select them as left and/or right-hand operands in new transaction filters, as well as in transaction filters that are apart of the past transaction conditions.
The availability of additional fields in the rule builder depends mainly on the query engine type used by the tenant. At the moment TM offers 2 types of query engine: Elasticsearch and AWS Redshift (experimental)
- For Elasticsearch, new fields will be immediately made available as an option in the rule builder after technical consultants have updated the tenant configuration with the new fields.
- For Redshift, new fields will show up later in the rule builder (with a minimal duration of ~10 minutes), due to also requiring a schema migration for our database after the tenant configuration has been updated.
New additional fields will not trigger historical data migrations no matter what query engine used. This means that business rule executions will only use related field data that is sent after the new fields were added.
Entity data rule fields
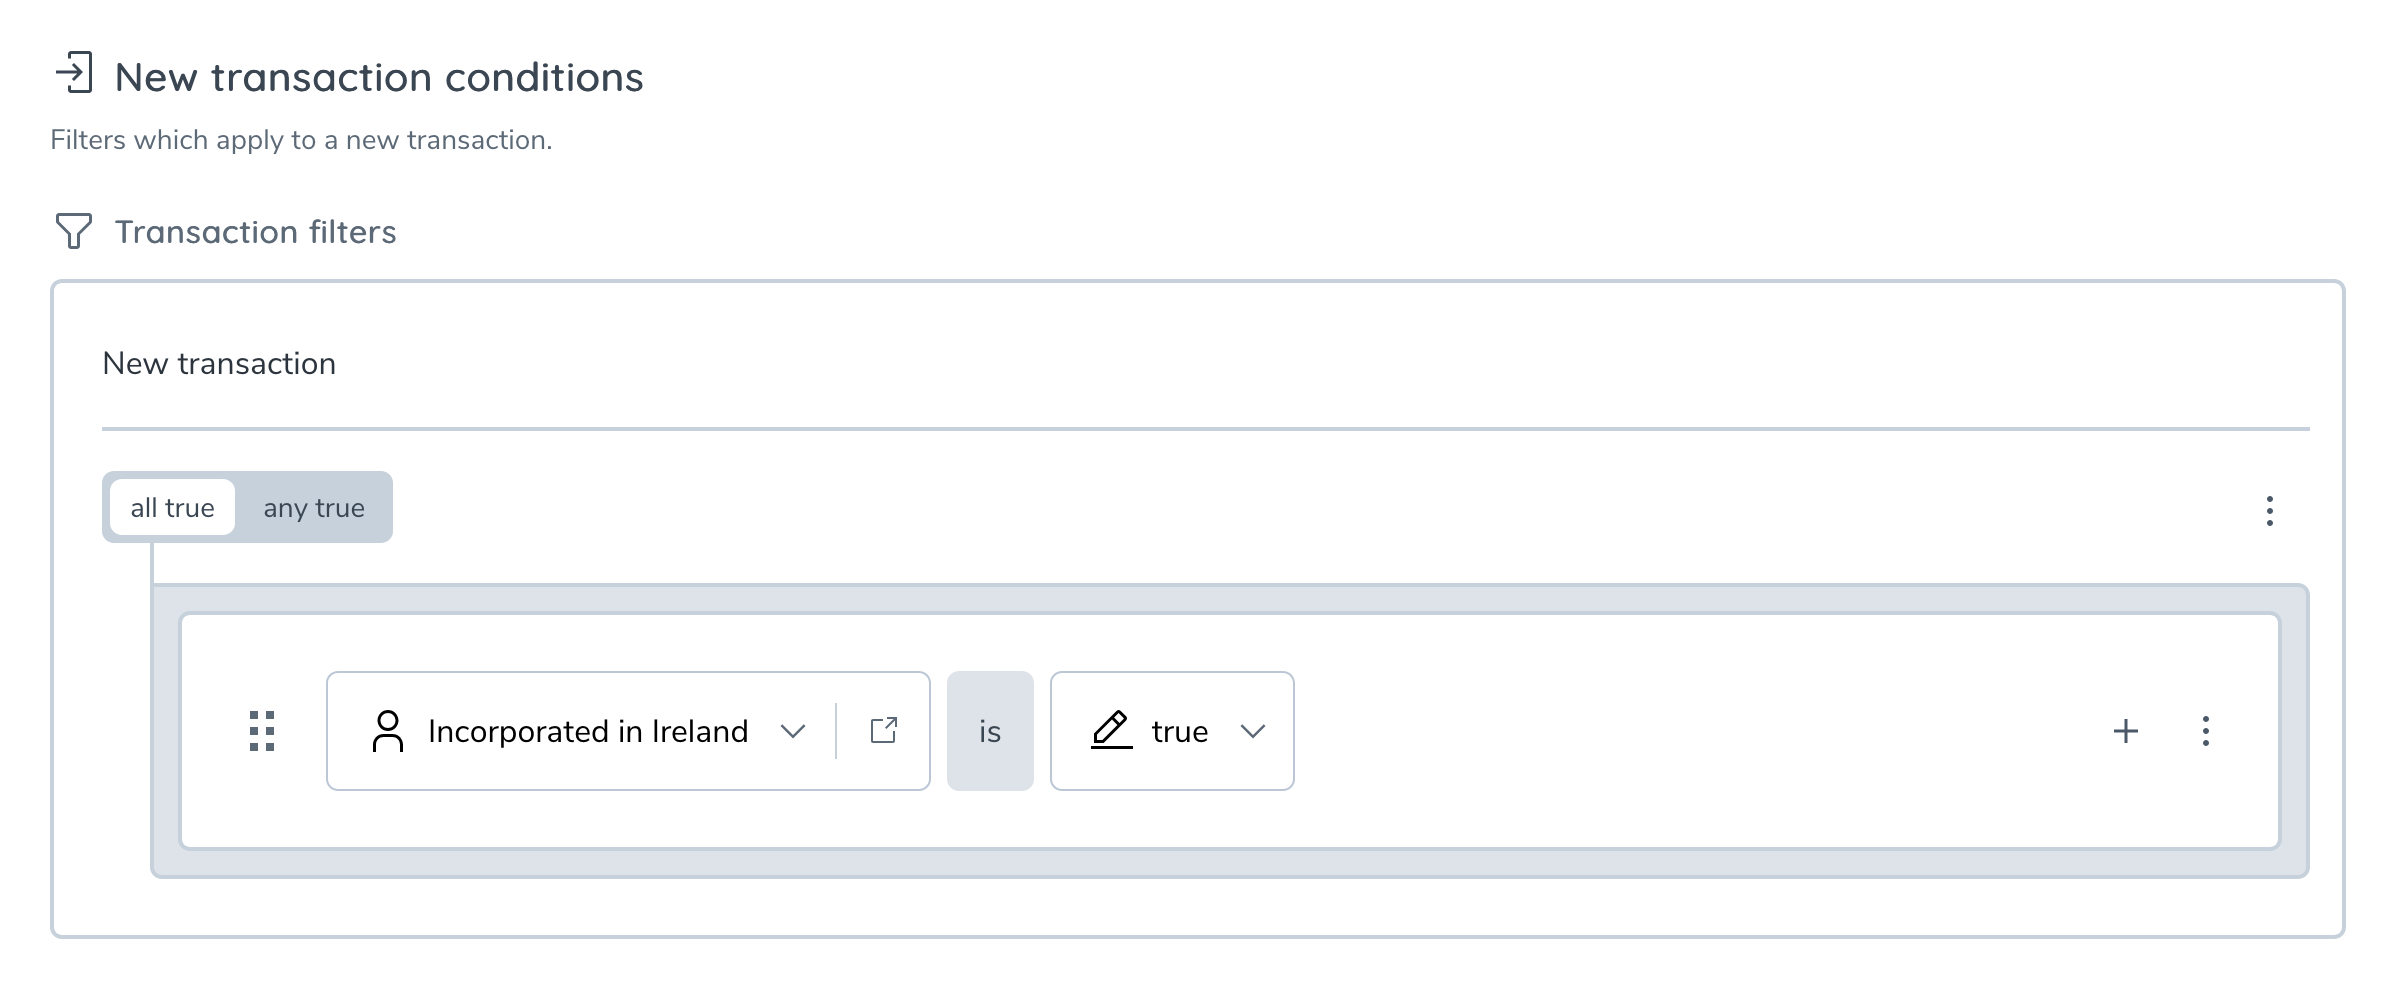
As mentioned above, the entity data rule fields are fields that will contain the evaluations of entity data rules during business rule evaluations. This means that the output can be used in rule conditions, therefor allowing combinations of KYC and TM data to yield alerts. The fields can be incorporated into rule conditions or nested conditions as boolean checks in the new transaction section.
After creating and publishing your entity data rule, the time it takes for the related entity data rule field to show up in the rule builder depends on the query engine type used by the tenant. At the moment TM offers 2 types of query engine: Elasticsearch and AWS Redshift (experimental)
- For Elasticsearch, new fields will be made available in the rule builder after a few minutes, due to internal memory caching needing to refresh.
- For Redshift, new fields will show up later in the rule builder (with a minimal duration of ~20 minutes), due to multiple processes needing to complete before the field is ready for use:
- Similarly to additional fields, a schema migration for our database needs to take place in order for the field to become queryable.
- Additionally, a data migration that will go through all available entities to ensure all historical data is available and ready to be used by business rule making use of the new field going forward.
warning
Depending on the available number of entities, this process can take minutes to hours to complete.
- Lastly, the rule editor will only show entity data rules that are marked as express, i.e. rules that can be pre-evaluated (any rule not using relative date operators or entity fields that are part of the associations domain)
TM KYC Data fields
The TM KYC Data fields represent a special type of field specified on the CLM side that can be referenced within business rules. The TM KYC Data fields can be used to compare transaction aggregation results against, inside of the past transaction section
Similarly to entity data rule fields, new fields will take a moment of time before showing up in the rule manager:
After adding new fields to the related policy configuration (see Managing TM KYC Data fields), the time it takes for the related entity data rule field to show up in the rule builder depends on the query engine type used by the tenant. At the moment TM offers 2 types of query engine: Elasticsearch and AWS Redshift (experimental)
- For Elasticsearch, new fields will be made available in the rule builder after a few minutes, due to internal memory caching needing to refresh.
- For Redshift, new fields will show up later in the rule builder (with a minimal duration of ~20 minutes), due to multiple processes needing to complete before the field is ready for use:
- A schema migration for our database needs to take place in order for the field to become queryable.
- Additionally, a data migration that will go through all available entities to ensure all historical data is available and ready to be used by business rule making use of the new field going forward.
warning
Depending on the available number of entities, this process can take minutes to hours to complete.
Regardless of query engine type, currently only fields with a property type of number are made available in the rule editor
Managing TM KYC Data fields
Fields can be found by first looking for the data requirements that have the category TM KYC Data:
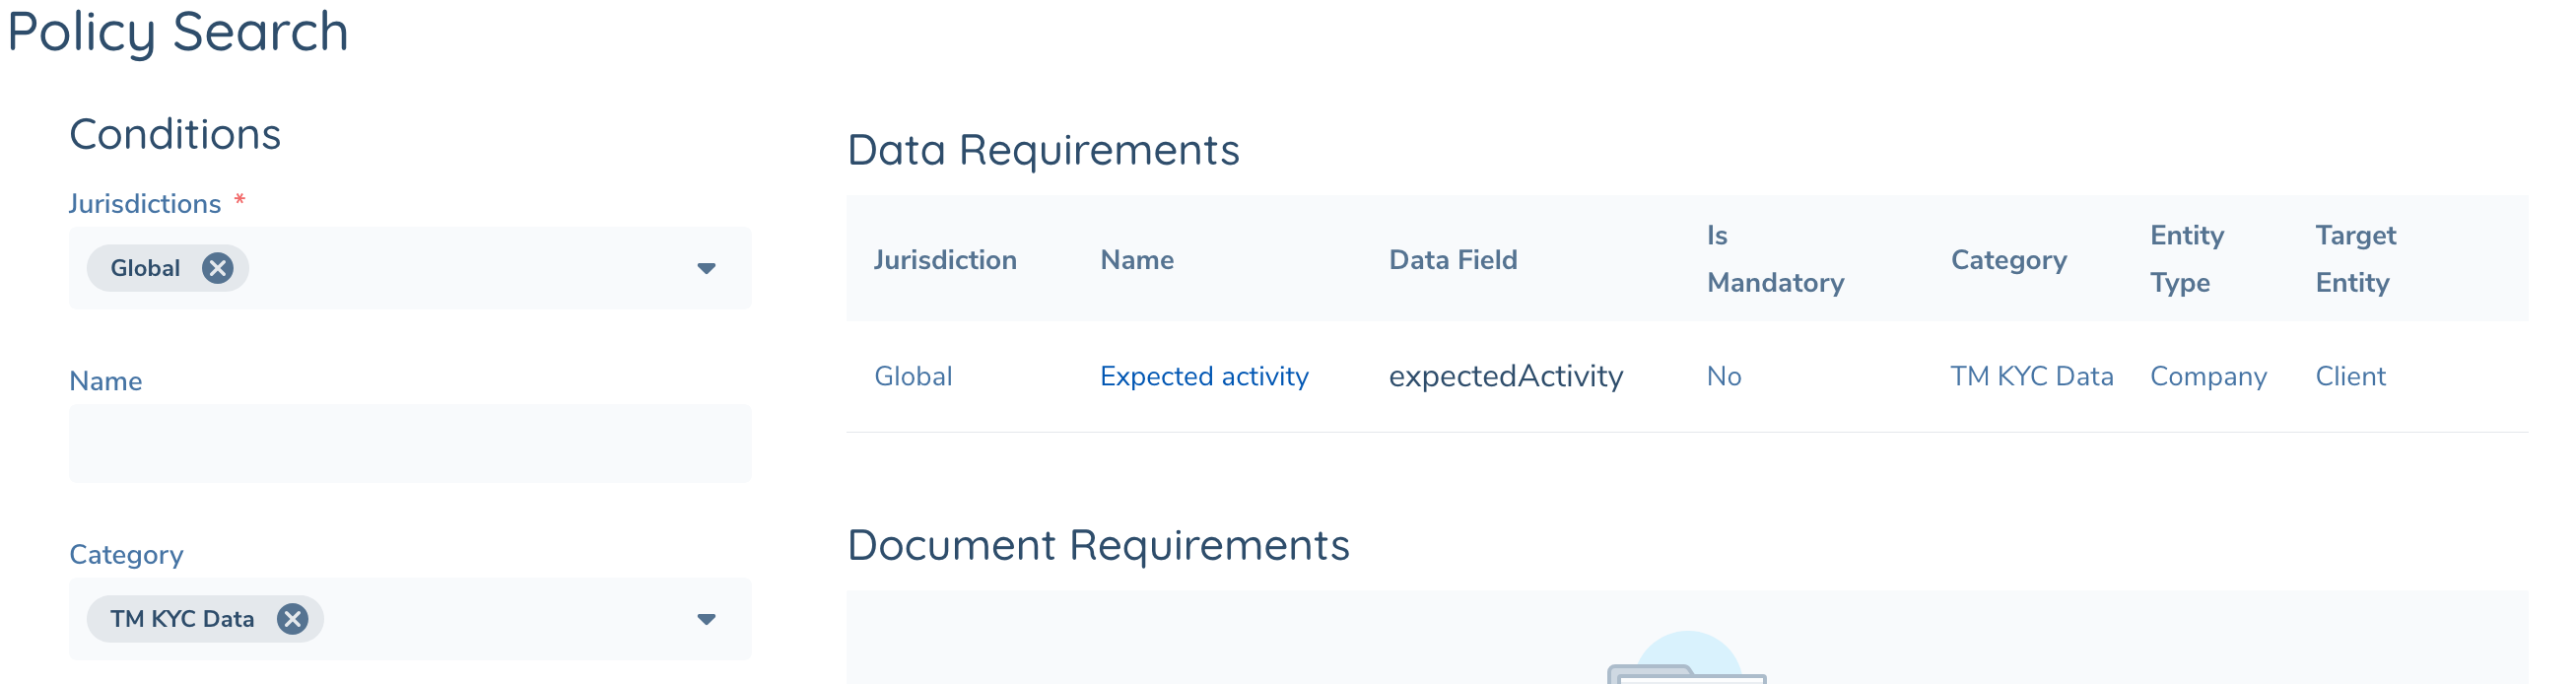
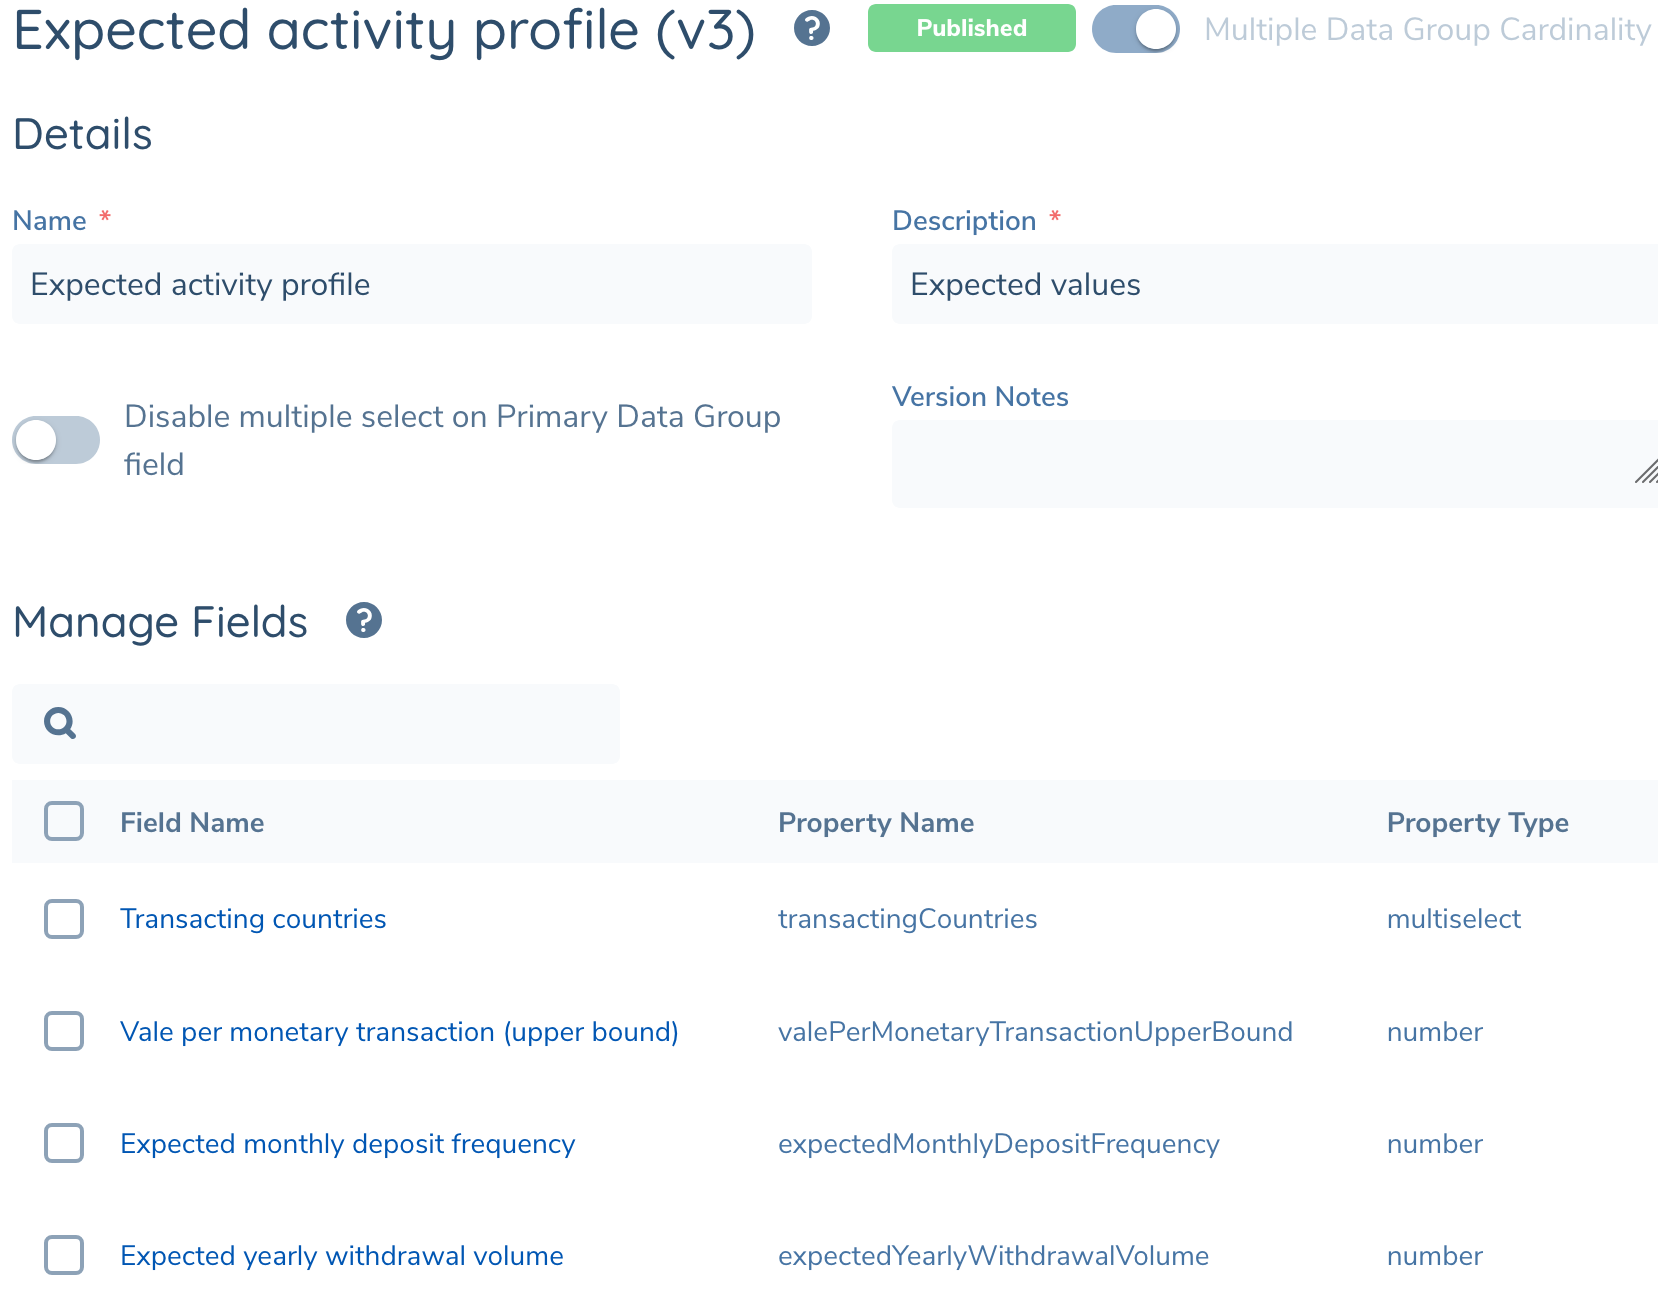
The data requirements will each have a Data Group value, which can be used to locate the related group in the policy configuration page. From there new versions can be created and published that can introduce new fields:
Validation Checks
With Rule Manager, you can implement complex detection patterns. The system will automatically validate each rule as you edit it, highlighting any configuration issues, and explaining how you should resolve them. The validation checks are dynamic and automatically update based on the configuration of the rule. Validation checks are shown in the Publish Status box on the Rule Create page.

When Publish Status is Not Ready, you cannot backtest the rule or promote it to Live. You first need to resolve any configuration issues including certain mandatory steps.
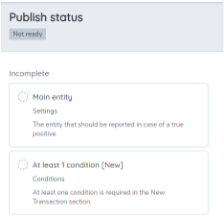
Click on the Publish Status link to understand what issues need attention. These are presented in a checklist.

When you see a validation check for "Connect new with past transactions" , this means that you are expected to correlate (and connect) an attribute value from the New/Incoming transaction to query (or the aggregate that you have built in the previous transaction section).
In most cases, this will be the External ID of the sender(or receiver) in the incoming transaction IS the same as External ID of the sender (or receiver) in the past transaction. When we build this in the rule logic, we are expressing that we are making sure its the same sender (entity) who is the subject of the filtered transactions.
Once a rule is properly configured so that all checks pass, the Publish Status changes to Ready. You can now backtest the rule or promote it to live.
Per-transaction Rules
Per-transaction rules are focused on the current transaction only and do not take previous behavior into account. These are the simplest rules to configure. The rule logic for a per-transaction rule is configured in the New Transaction panel in the Create Rule page. The example below identifies all outbound wire payments where the transaction amount is above 100,000.
Behavioral Rules
Behavioral rules analyze entity behavior by either aggregating volumes or by profiling previous transactions.
Behavior rules involves 3 main steps:
- Defining the ‘New Transaction’ Filtering criteria in the new transaction section.
- Defining Transaction Filters and their criteria in the past transaction section.
- Creating Mathematical expressions to Compare Aggregates in the calculations section.
Step 1: Specifying Transaction Identifiers
Transaction identifiers is a section in the rule builder that allows you to link and correlate transactions based on shared/common data points.
A new section in the past transactions section is available to the user to specify any field that will be the common factor in all new and past transactions during rule execution. Typically, this value will be the external ID of the entity or any specific attribute such as bank account number. When the external ID of the sender (for example) is set as the transaction identifier, then all filtered rows of data will ensure the records are grouped together by the External ID of the sender. This helps to filter out all transactions grouped by the entity ID
We can specify more than one transaction identifier from the list of fields available but its typically set to an ID thats usually unique to an entity. When you set a field, for example, External ID Sender/Individual as the identifier, the logic is to check if the External ID in the past and the new transaction are the same. If they are the same, then its a way to ascertain that it is the same entity who has been involved in all the transactions that have been filtered out by the rest of the rule
If you have specified the external ID as a transaction identifier, there is now no need for you to include the same condition
For example: (External ID / Sender/ Past transactions IS THE SAME AS External ID / Sender / New transaction)
![]()
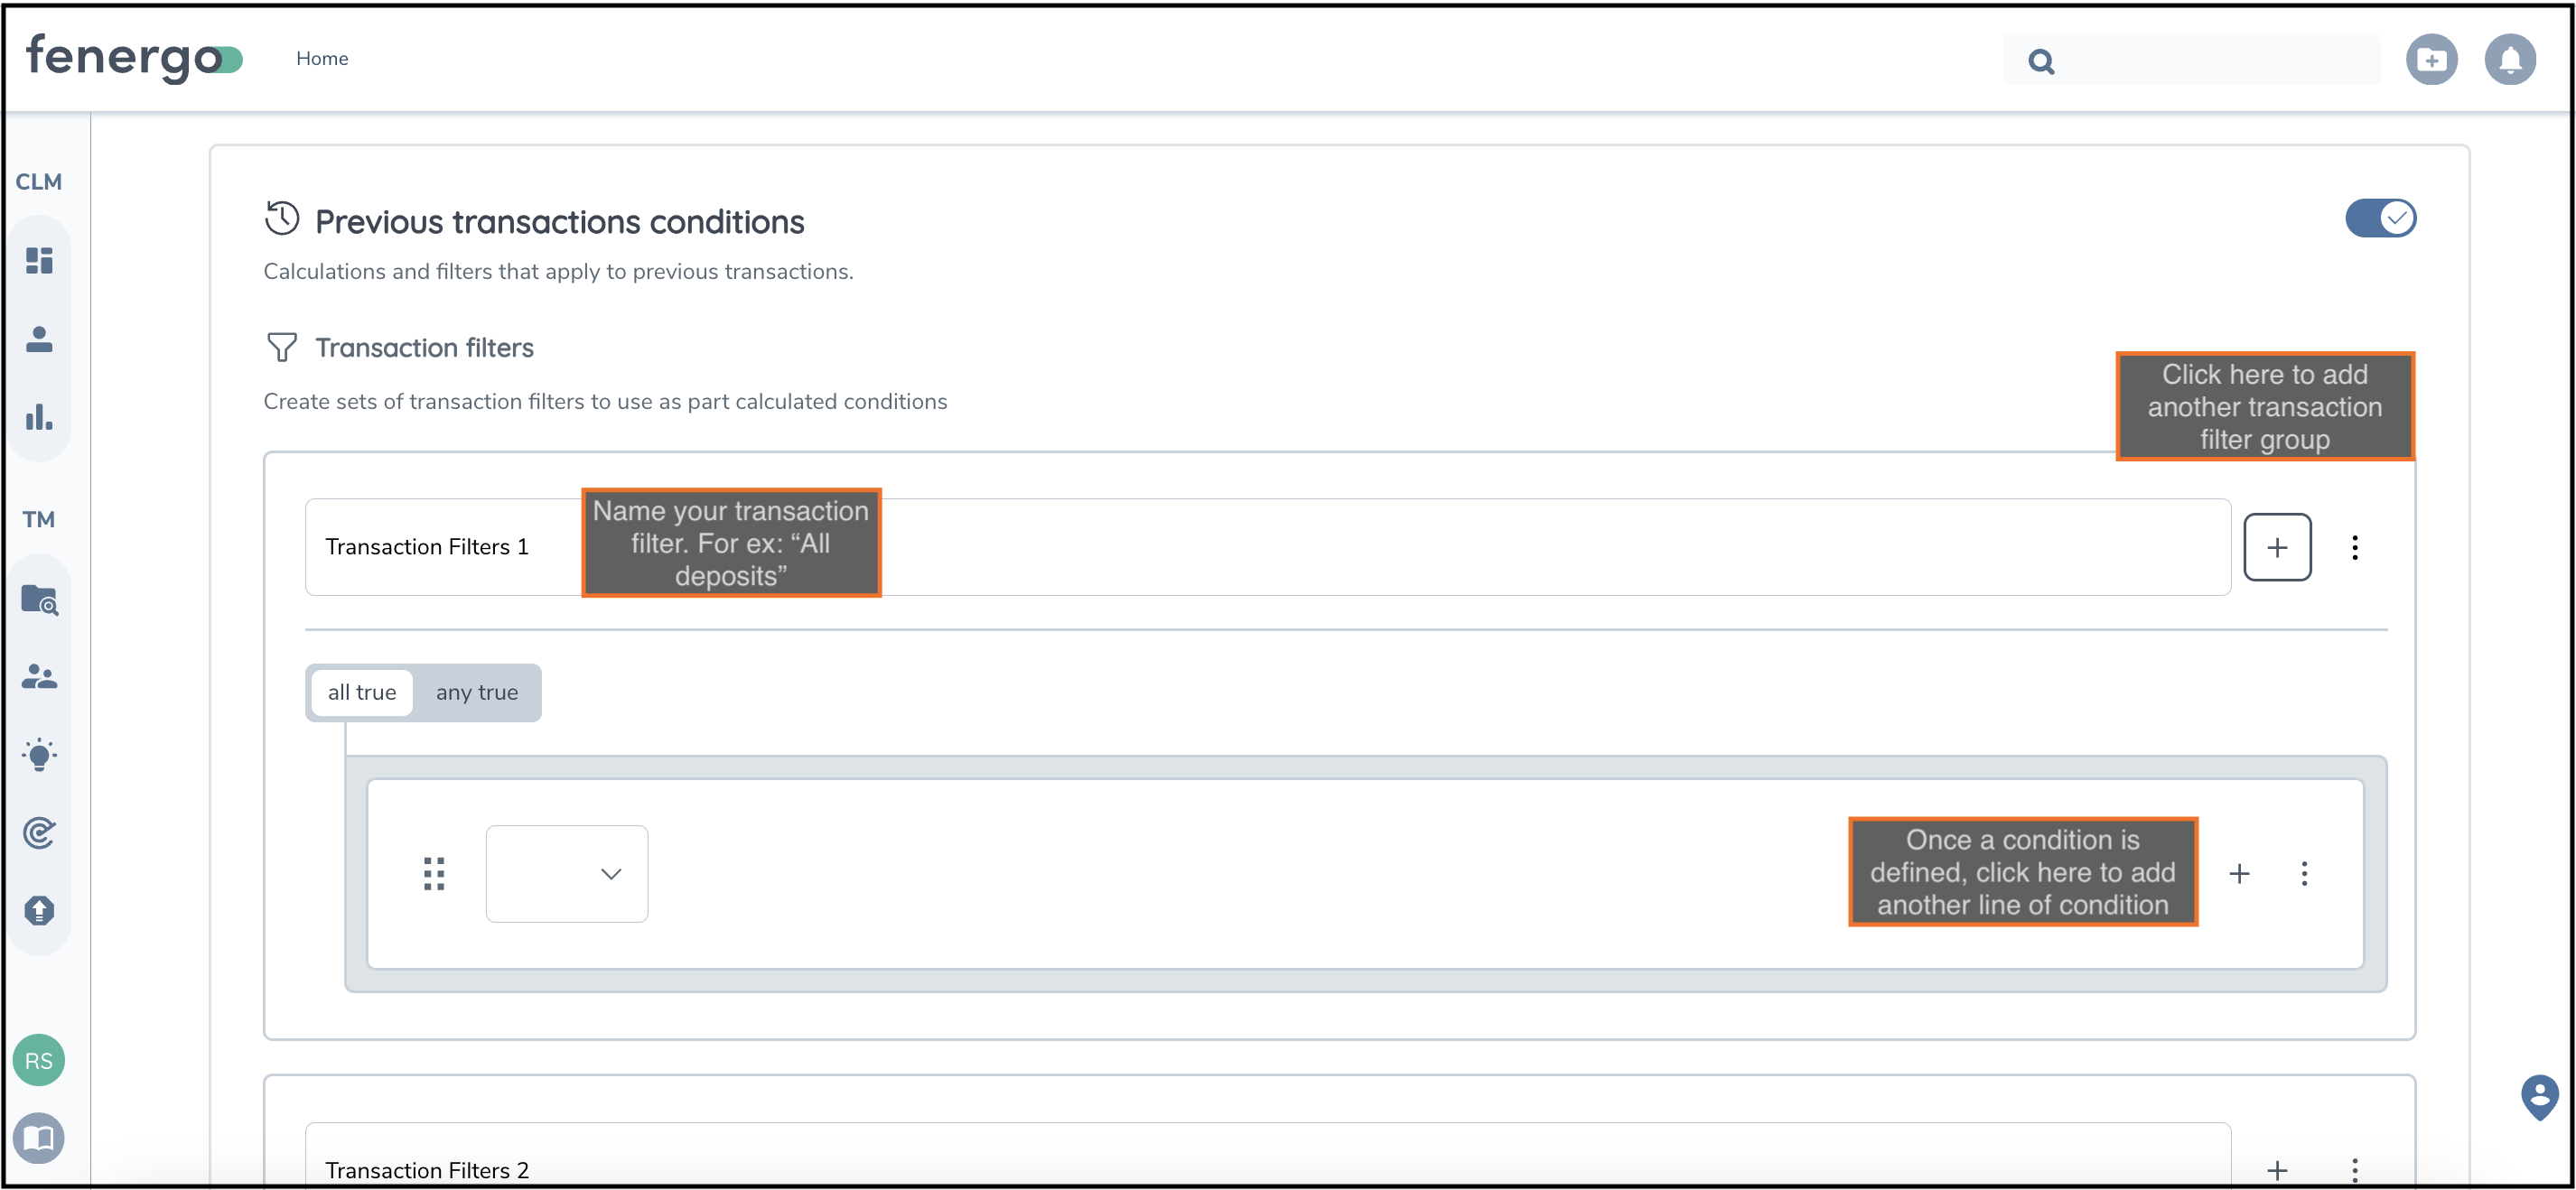
Step 2: Defining Transaction Filters
Transaction filters are custom data filtering criteria that you define to group and analyze transaction data. Here’s how to set them up:
-
Add a Transaction Filter Group: Activate the past transactions section in the rule editor page. The default name for the first transaction filter group is 'Transaction filters 1'. You can add more filter groups as needed (e.g., 'Transaction filters 2', 'Transaction filters 3', etc.).
-
Name Your Filter Group: Give each filter group a custom name that reflects its purpose. For example:
- Transactions to High-Risk Countries: Filters transactions sent to high-risk jurisdictions defined in your list.
- All Captured Transactions: Filters all transactions within the specified time period.
- Other examples can be ‘Refunds’ or ‘Deposits’ or ‘Withdrawals’. They just filter out a specific type of transactions data to be used in further queries.
-
Define each Transaction Filter: Once you have named your filter group, create specific filters/conditions within it. For example, under ‘Transactions to High-Risk Countries’, you might set a filter to include only transactions sent to certain countries.
You can add as many transaction filters that your rule needs. You will need to create correlation criteria in each transaction filter group. Refer Validation checks
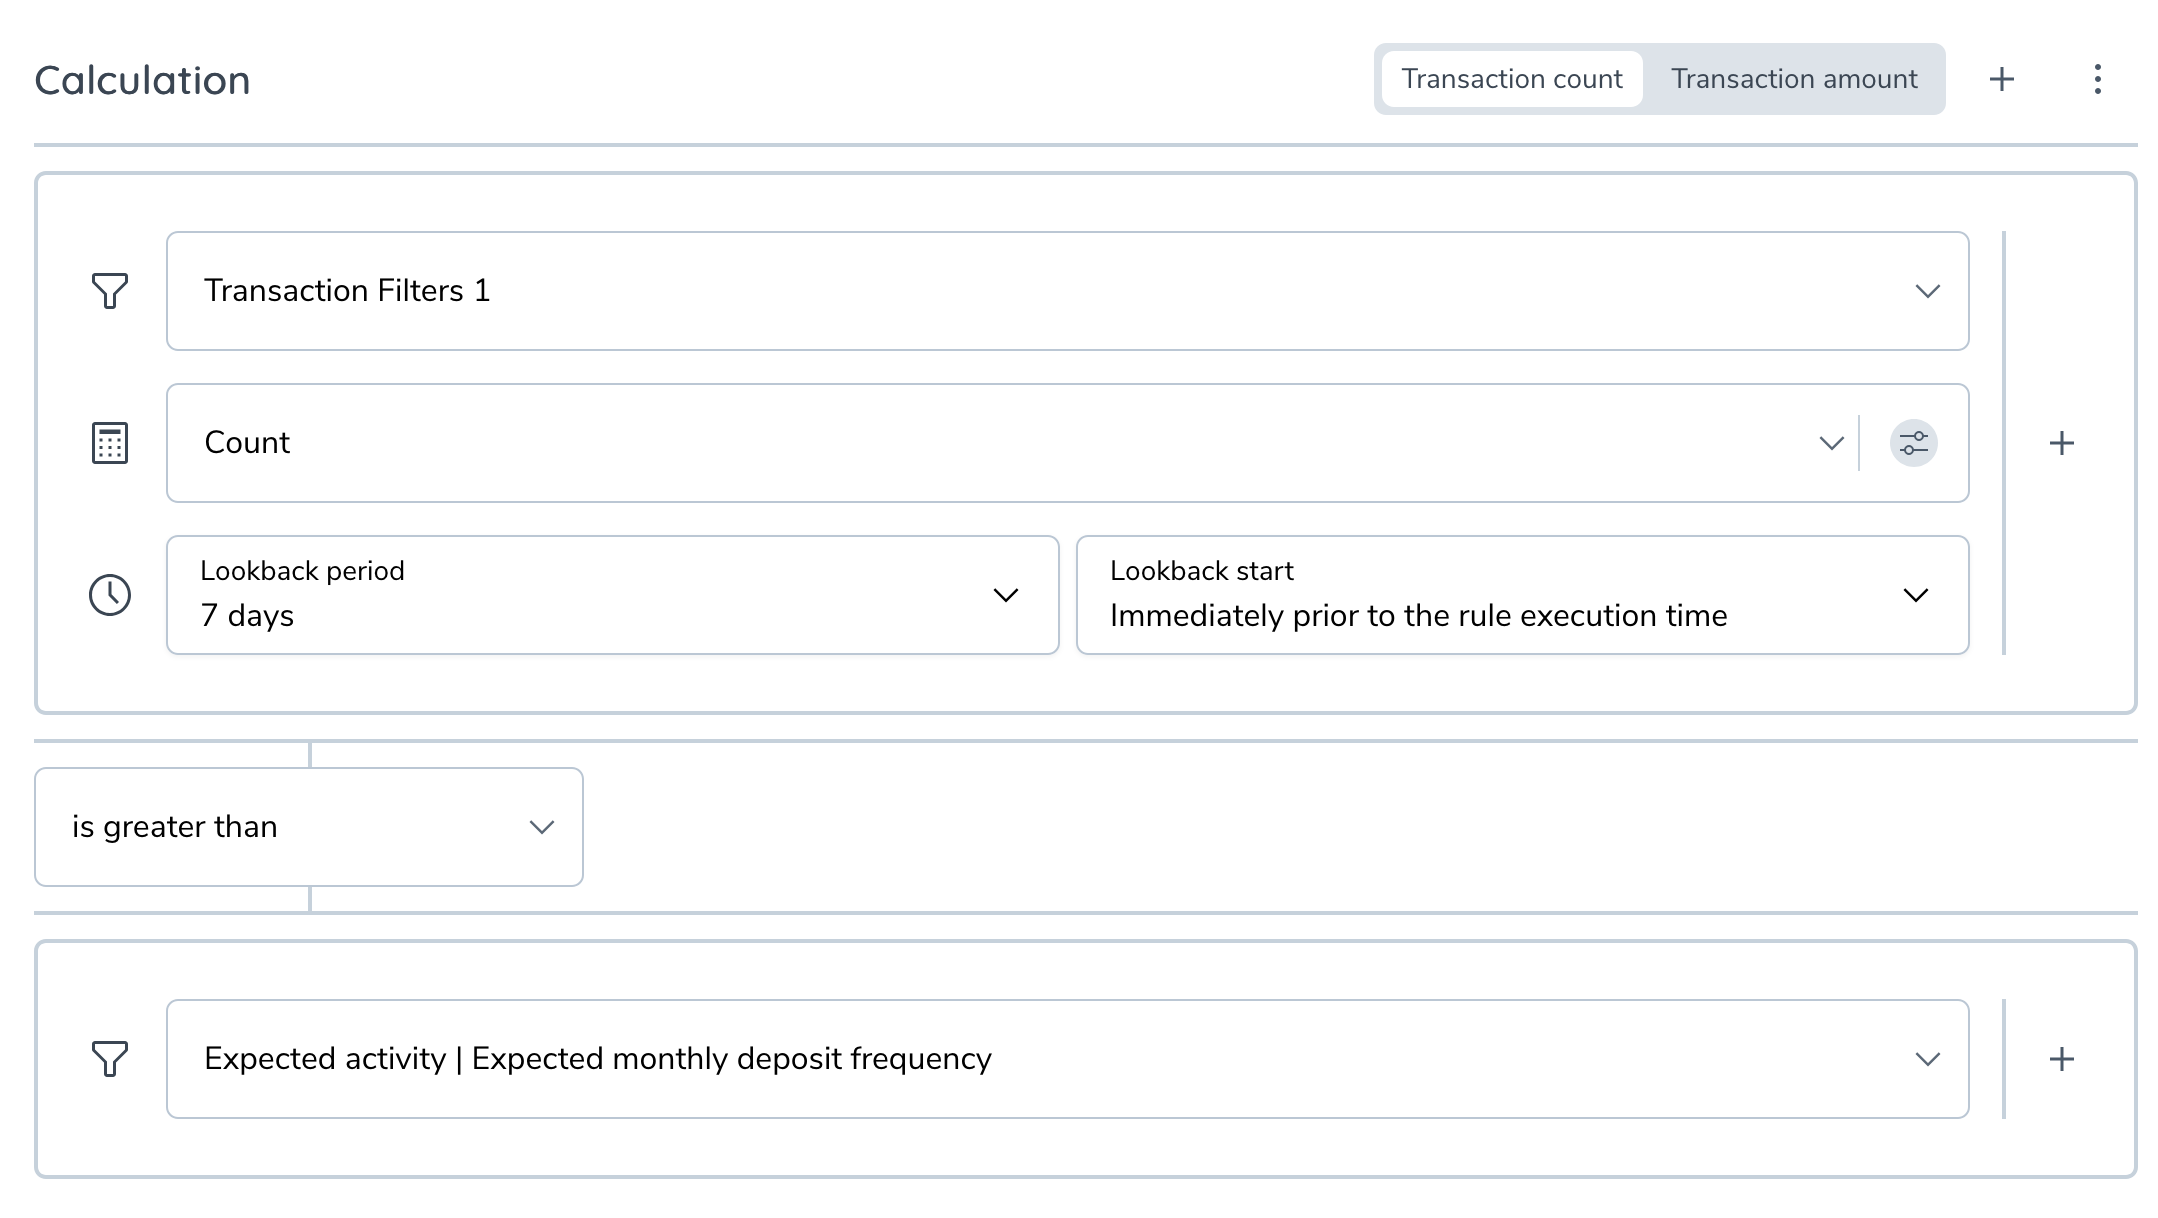
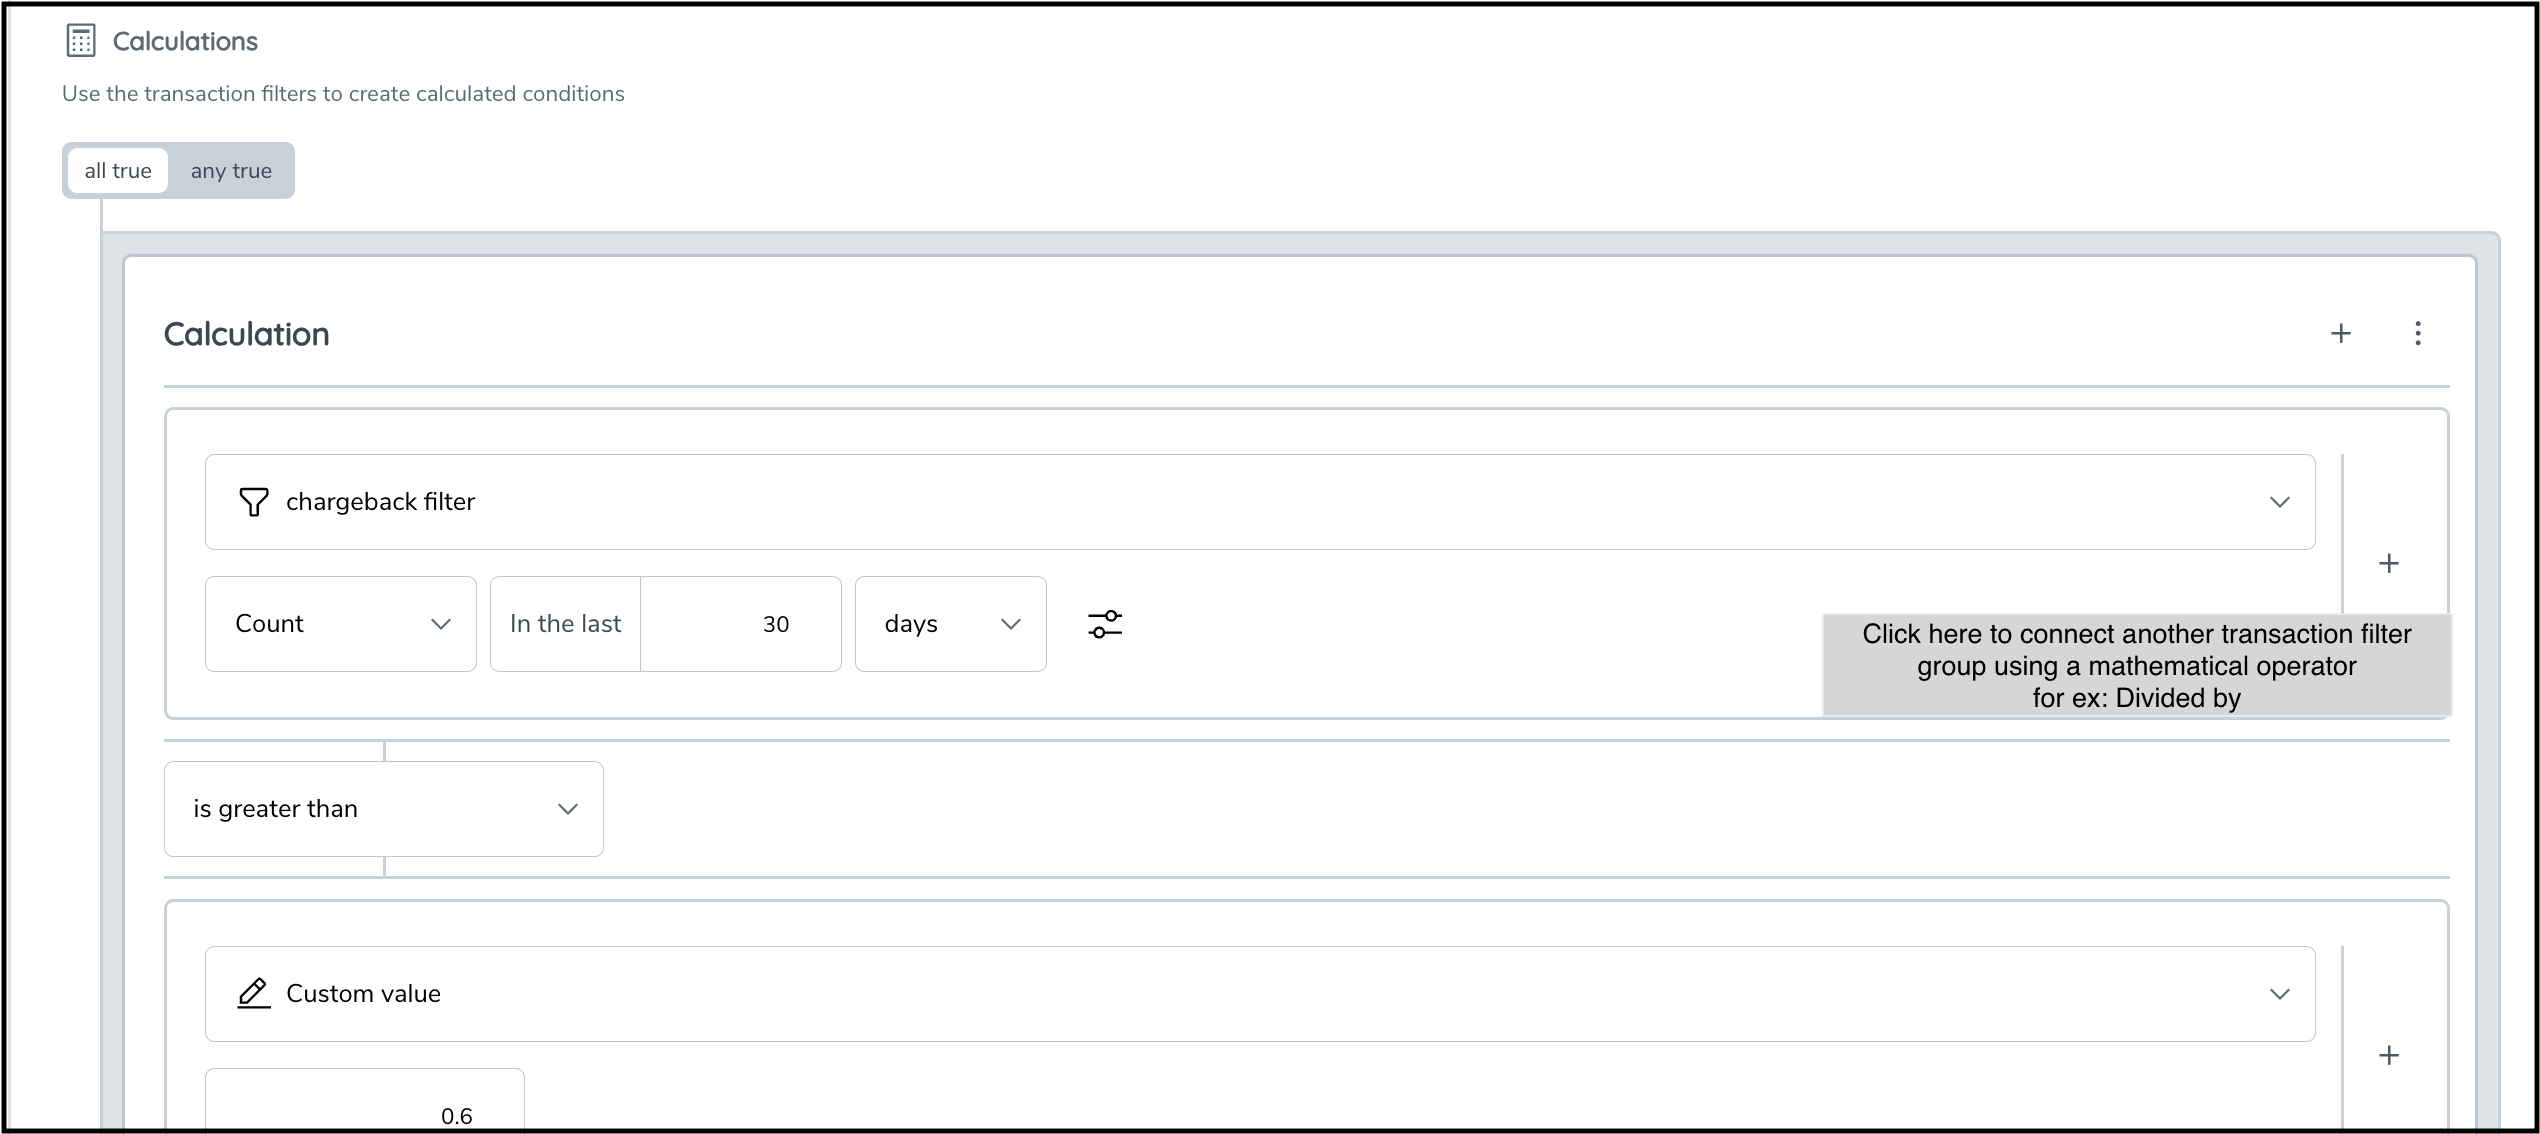
Step 3: Creating Mathematical Expressions to Compare Aggregates
After defining your transaction filters, you can use them as variables in mathematical expressions to create behavior rules. Here’s how:
-
Navigate to the Calculation Section: This section is found under the 'Transaction Filters' area in the rule builder.
-
Select your aggregate variable: Use the named transaction filters you just created as variables in your calculations. For instance:
- Transactions to High-Risk Countries: Represents all transactions sent to high-risk jurisdictions as one aggregate in a given time period.
- All Captured Transactions: Represents all transactions within another time period.
-
Form a Mathematical expression: Use the available operators to set up a rule. The operators include:
- Greater
- Lesser
- Is X greater than
- Is X lesser than
- Equal to
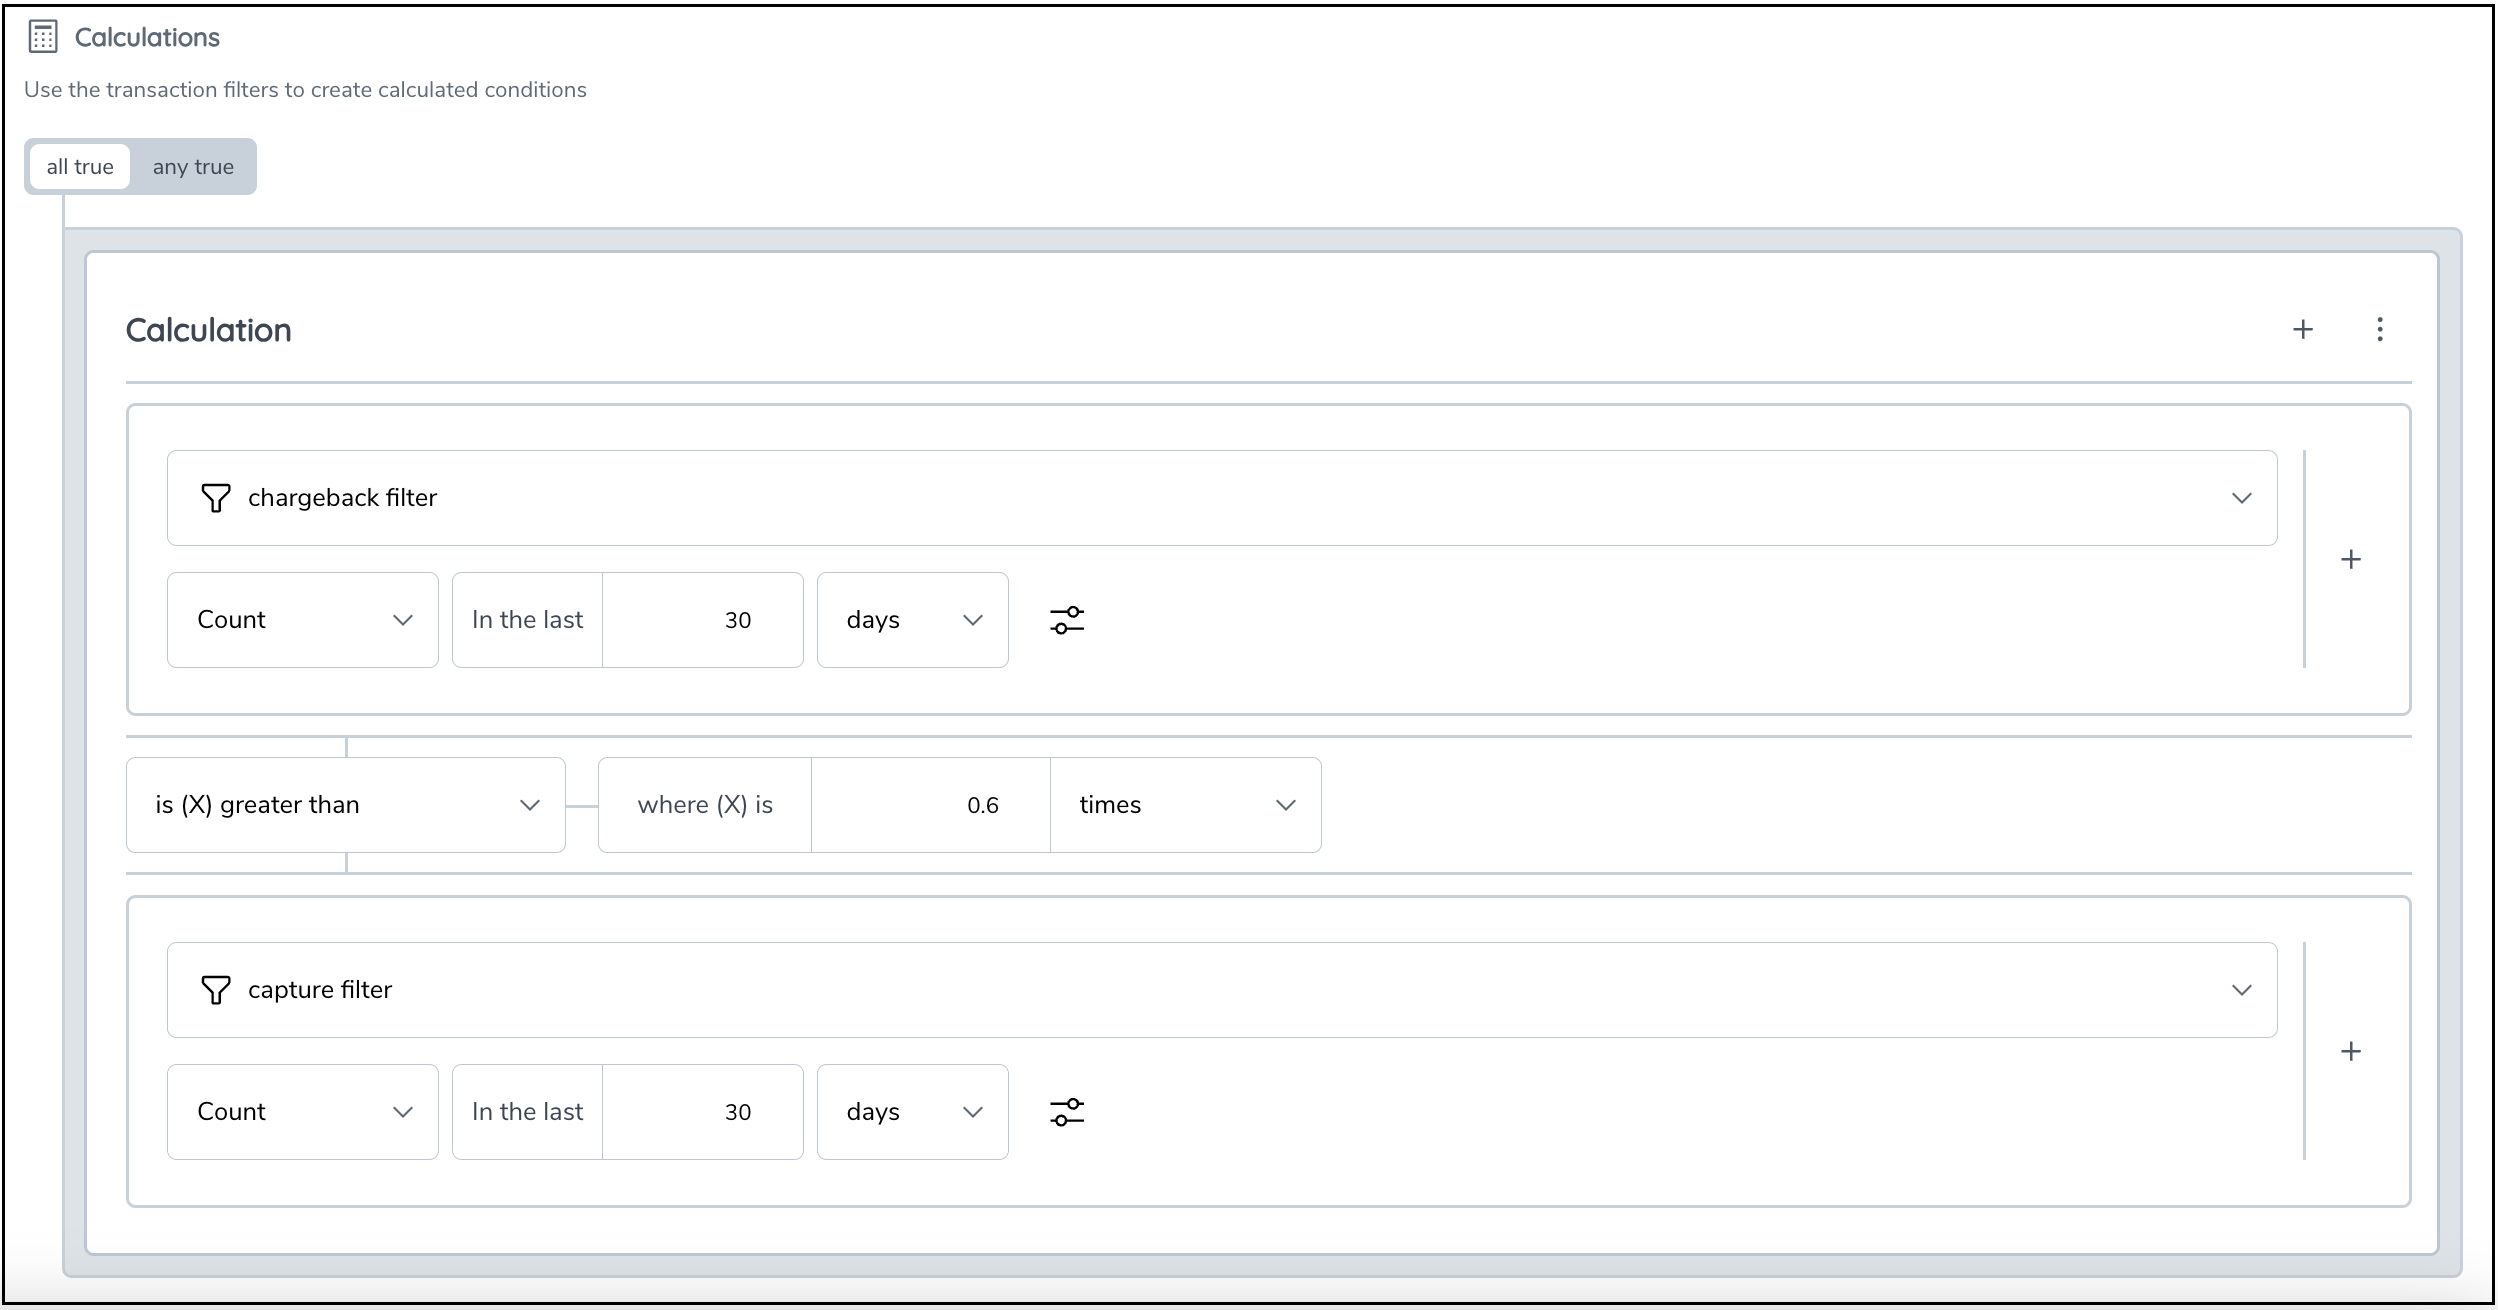
When using "Is X greater than" or "Is X lesser than", you need to specify by how many times or by what percentage the left-hand side is greater or lesser than the right-hand side. For example:
- Example 1: To check if transactions to high-risk countries are 25% of all transactions in the last 30 days, express the rule as
Transactions to High-Risk Countries is 25% greater than All Captured Transactions. - Example 2: To check if transactions to high-risk countries are three times greater than all transactions, express the rule as
Transactions to High-Risk Countries is 3 times greater than All Captured Transactions. - Example 3: To check if the disputes-to-sales ratio is more than 0.6, express the rule as
Disputes divided by Sales is greater than custom value 0.6.
In the Rules Manager, you can also use mathematical operators such as Plus, Minus, Divided by, and Multiplied by to create expressions. For instance, to check if the disputes-to-sales ratio is more than 0.6, you can express this as Disputes divided by Sales is greater than custom value 0.6.
Example Rule Creation
Let's go through an example step-by-step:
Example Rule 2: Checking Disputes-to-Sales Ratio
-
Define Transaction Filters:
- Filter Group 1: 'Disputes'
- Filter: Transactions categorized as disputes (for example modification types that are chargebacks or refunds within the last 30 days.
- Filter Group 2: 'Sales'
- Filter: All sales transactions within the last 30 days.
- Filter Group 1: 'Disputes'
-
Create a Mathematical Expression in the calculation section.
- Expression:
Disputes divided by Sales is greater than custom value 0.6.
- Expression:
Furthermore, 'Count Unique' operator is a useful addition to our business rules toolkit, designed to facilitate the counting of unique occurrences of a specific value within your data.
For example: Single entity using multiple emails in a short period of time: Monitor instances where a single entity utilizes multiple email addresses, signaling potential irregularities in identity or behavior.
Same sender transacting with multiple unique counterparties in a short period of time: Detect cases where a sender engages with a large number of distinct counterparties within a specified timeframe, helping to flag unusual activity.
To use 'Count Unique', you must explicitly specify what attribute's occurance you are counting. For ex: COUNT UNIQUE 'receiver/business/external ID' is greater than 5 in the last 24 hours
The rule details depicted below are to alert on all outbound wire payments where the transaction amount is above 100,000 and where in the preceding 48 hours more than 120,000 was deposited via funds transfer to the same entity's accounts in increments below 5000. To implement this rule, you need to 1) identify the outbound payment and 2) identify the previous behavior of inbound payments.
The first part of the rule is captured by the New Transaction condition.
The second part of the rule is captured by the Previous Transactions condition where the aggregation has been configured to identify the required behavior.
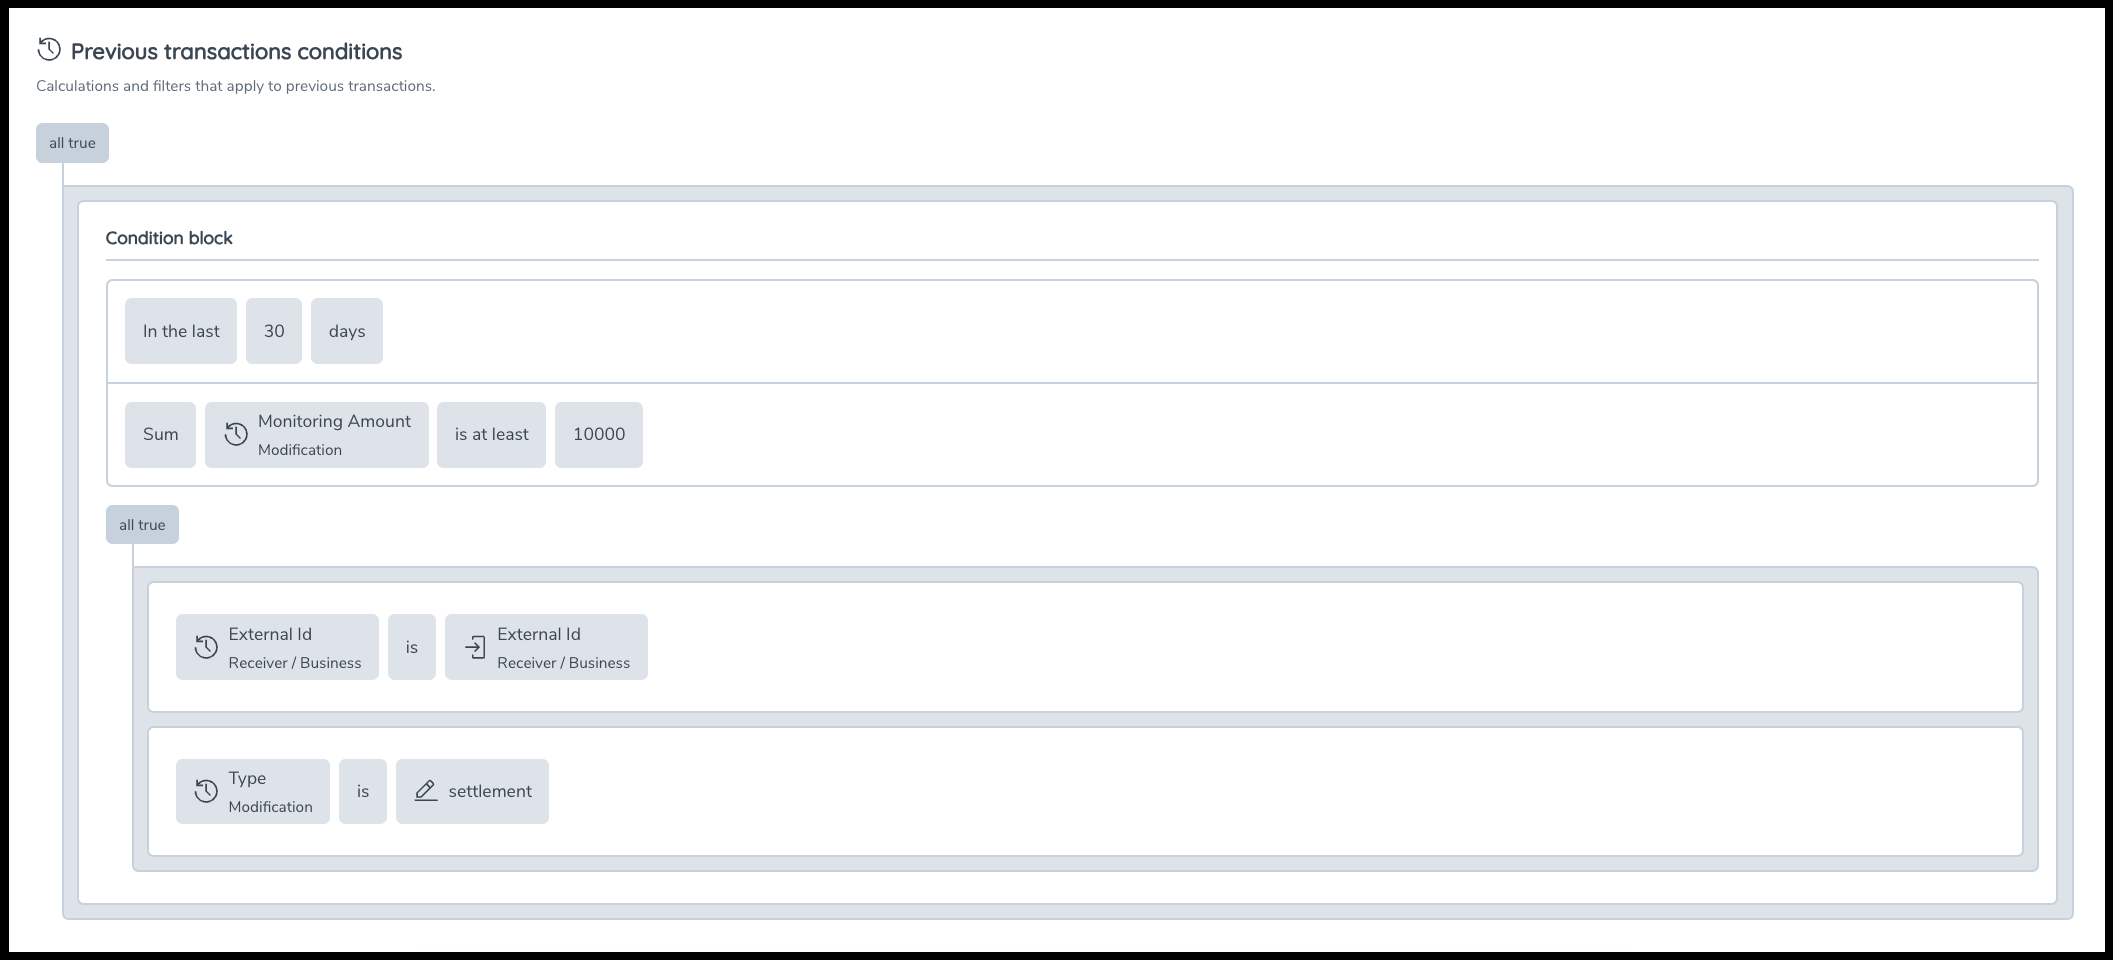
Finally, we must identify a way to connect the new transaction to the historic transactions. Typically, this is done using entity ID. In this case, we connect the new transaction to the historic transactions by stating the receiver's ID in the previous transactions [![] (RackMultipart20231206-1-8pzv8n_html_9375fca8e1d2a183.png) ] is the same as the sender's ID in the new transaction [![] (RackMultipart20231206-1-8pzv8n_html_471545d078ed95c9.png) ]. This would mean this alert would only flag if the same entity previously received transactions that met the conditions in both the previous transactions sections (several inbound transactions) and new transaction section (one outbound transaction).
![]()
Audit
As a rule is moved through lifecycle stages, the rule audit trail is updated with username, action, and timestamp. You can access the audit trail under the Activity tab in the details page for each rule.
The following events are captured in the activity trail along with the timestamp and the username that actioned the event.
- User creates a new draft and saves it
- User backtests a draft rule
- User updates a draft rule
- User publishes a draft rule
- User archives a live rule
- User copies a rule into a new draft
- User creates a new version of a Live rule
The changes made to a live rule will not be captured as part of the activity trail log. However, when a user publishes a version of a rule, the rule's condtions become immutable. Any newly created (and newly publsihed) version will serve as proof of the current changes while the older (archived) version will always show the conditions that existed as part of its rule logic. The user can navigate to the older and newer versions using the hyperlinks in the activity trail.
Backtesting
Fenergo TM provides a backtesting service. This enables you to test a modified rule using historical data to predict alert volume and retrieve a sample of alerted entities with linked transactions. It can also be a way to test the rule correctness in test tenants to reconcile with known test transactions or aggregates.
Only rules in Draft mode can be backtested.
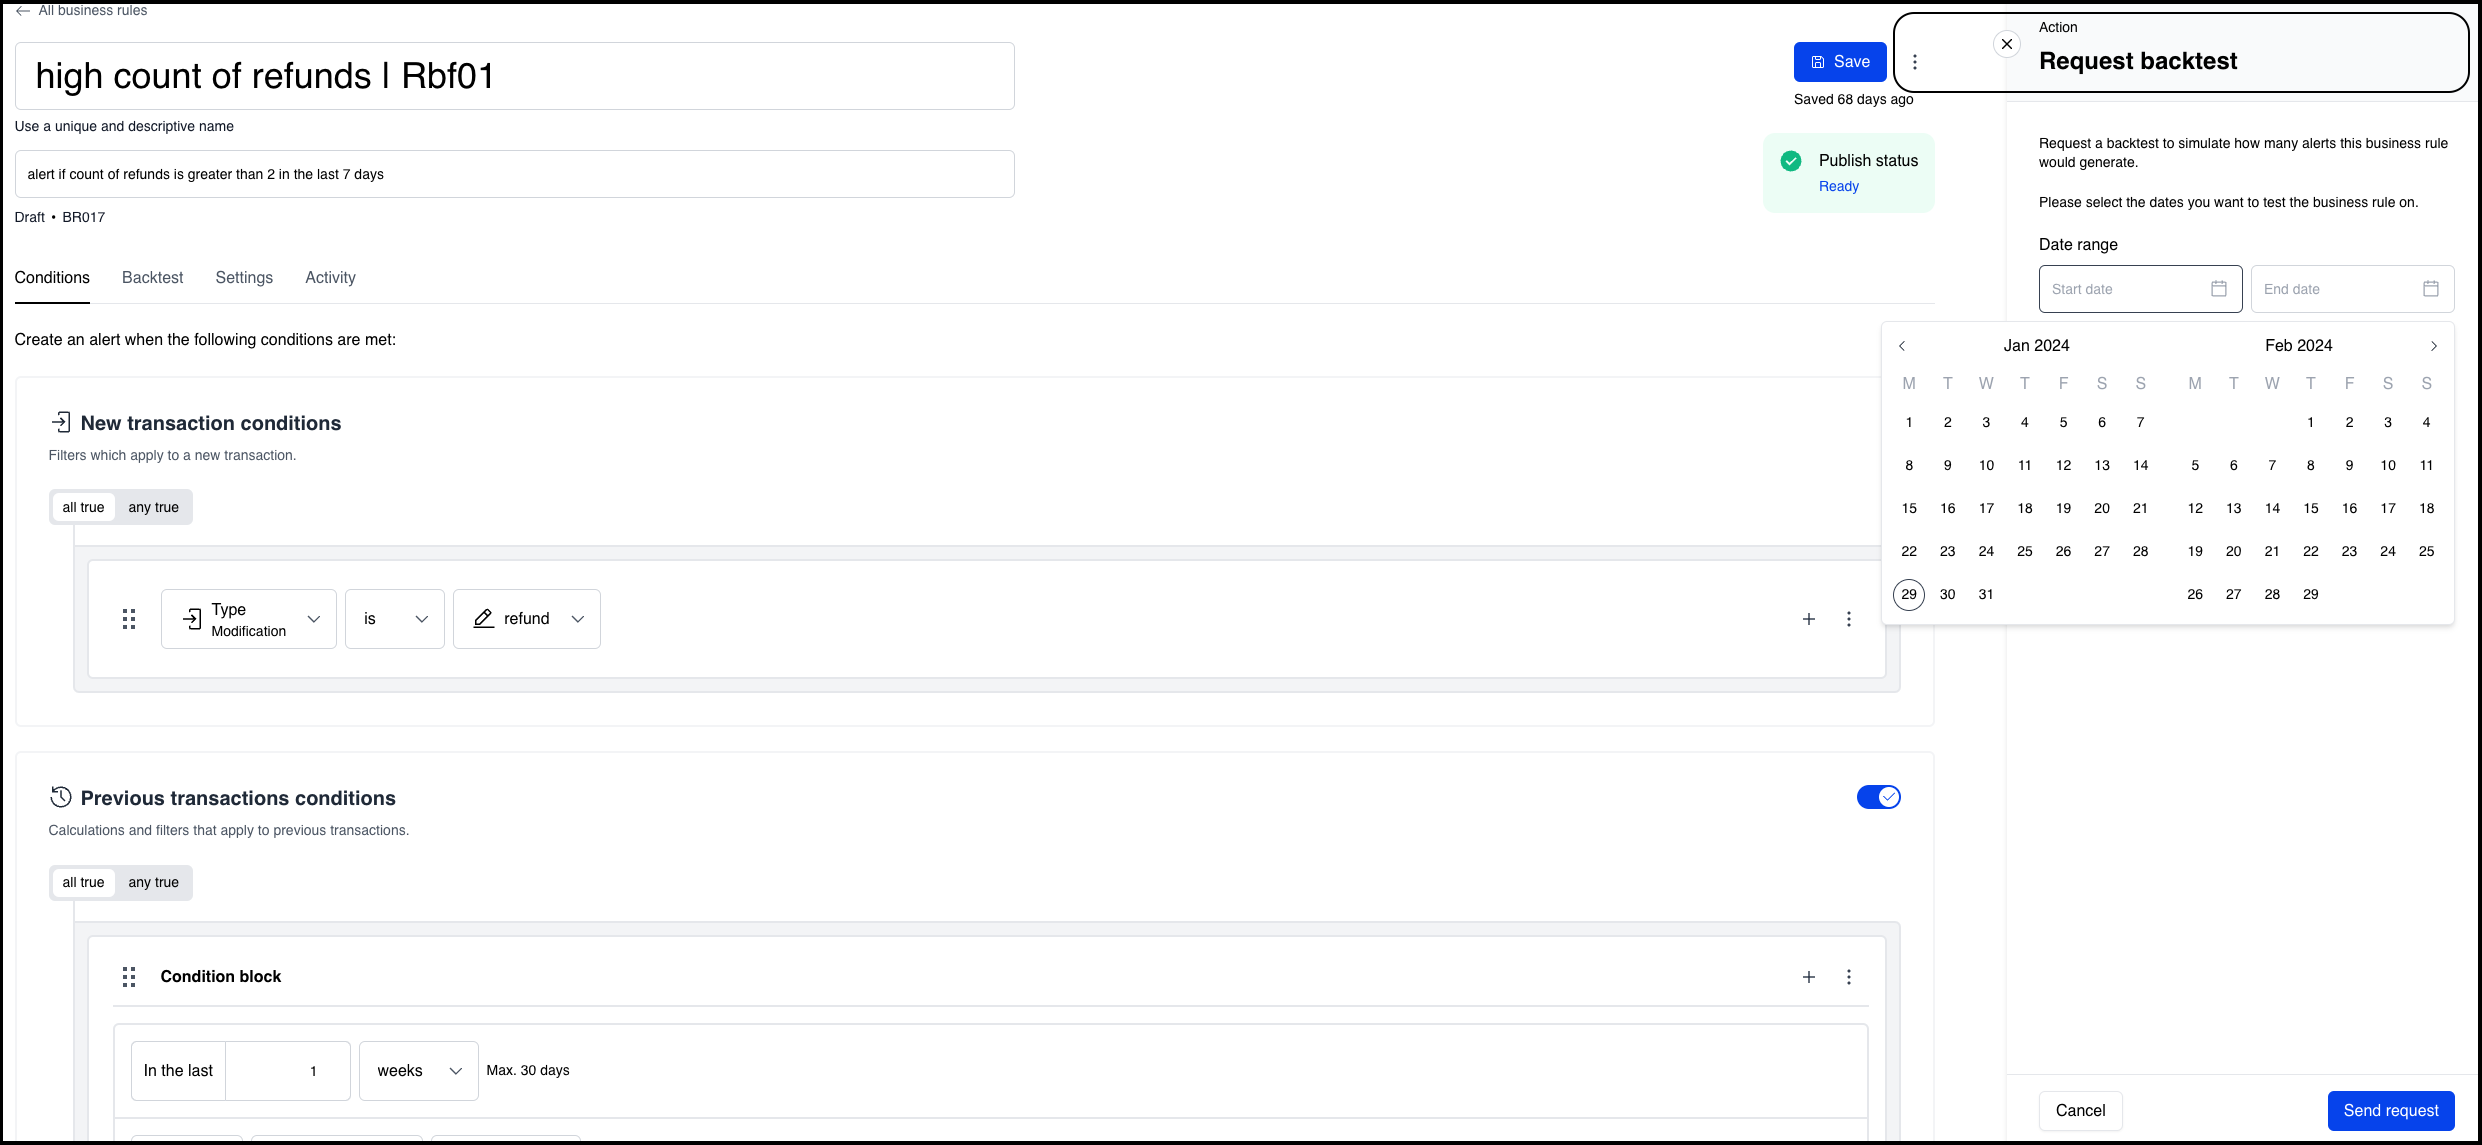
To launch the backtesting service, click the Action button on the rule details screen. Specify the from-to date range over which to run the backtest and click Send Request.
The system will run the backtest in the background. Once completed, the system generates a backtest report and saves it in the Backtest tab on the Rule details page. The report can also be downloaded as a PDF file.
Please note that currently you can always perform a backtest on the latest draft version of a rule. You cannot have multiple draft versions of a rule and run parllel backtests on different draft versions of a single rule.
The report contains the following information.
-
Rule details : This is shown in a section called rule meta data and contains the following information.
- name: {backtest_rulename}
- uuid: {system auto generated backtest id}
- created at: {timestamp}
- test date (X): {yyyy-mm-dd} - this is the date from which the backtesting date range is derived.
- number of backload days (<- X): n - this is the number of days the system will lookback from the test date to establish the applicable data range.
- number of replay days (X ->): n - this is the number of days it sequentially replays the transaction.
- skip backload enabled: True - this pertains to a technical detail about how the data is loaded internally in the system.
-
Number of alerts generated. For periodic rules, this includes the number of alerts per time period.
-
Number of transactions processed.
-
Sample alerts (maximum 20) with linked transactions.
Backtesting Periodic rules Consider the following example to understand the results of a backtest for a periodic rule.
If you created a rule with a periodicity-lookback (query period) of 1 week and set to run once a week, every monday at 00:15 hrs. You have requested a range for the backtest(as an example ) from 01/02/2026 to 17/04/2026
The Backtest would trigger and replay the rule for 11 days specified in the date range. For each activation the system replays data and performs the backtest. the below image illustrates when each activation occurs for the above mentioned setting.
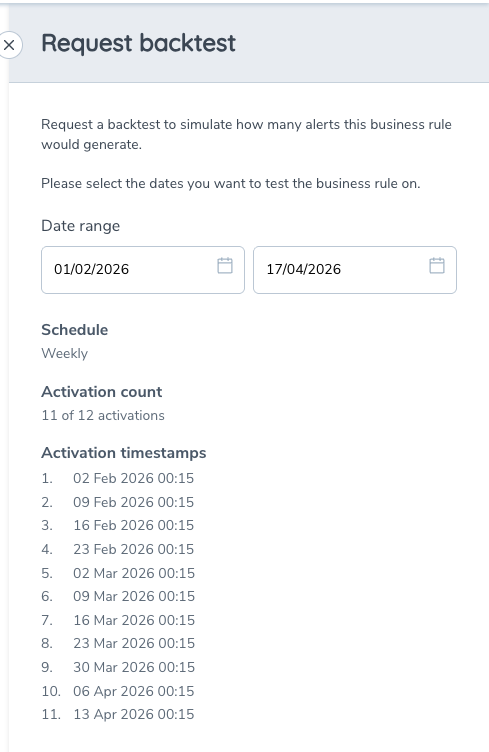
Each days' alert scenarios are returned to the report. If single alert is set as the deduplication setting, then one alert per entity for the scope of each run is returned to the report.
Examples:
-
Daily schedule → one activation per day in the range.
-
Weekly schedule → one activation per configured weekday (e.g. every Monday).
-
Monthly schedule → one activation per configured day (e.g. 25th of each month).
Only these derived timestamps are used during backtesting.
Activation limits
To control processing volume and ensure consistent performance, backtests are constrained by a maximum number of activations:
-
Daily: 31 activations
-
Weekly: 12 activations
-
Monthly: 12 activations
These limits are applied based on the calculated activation timestamps, not the total number of calendar days selected.
Range validation and enforcement
When a user selects a date range:
-
The system calculates the total number of activations within that range.
-
If the limit is exceeded:
-
The UI either prevents the selection, or
-
Automatically truncates the range to the last valid activation date.
-
-
A validation message is displayed to explain the constraint.
Activation visibility
The UI provides transparency into backtest execution by:
-
Highlighting activation days in the calendar
-
Displaying the total activation count
-
Listing the exact activation timestamps that will be used during simulation
This ensures users have a clear and auditable view of how the rule will behave when replayed against historical data.
Note
The rule manger supports queueing unto a maximum of 5 concurrent backtests at any given time. Each request runs independently of each other and will complete in a time that depends on the complexity of the test.
The rule manager supports replaying backtests for a date range of up to 31 days. The ‘replay days’ are the range of days selected when requesting a backtest in the UI, specifying the individual dates to replay the backtest on. The longer the range of dates, the more intensive the backtest becomes. For instance, if a range of dates between 13/06/2025 and 06/06/2025 is selected, the rule is replayed repeatedly on each day within the specified range. Each test will have its own lookback query period, as defined in the rule. This is equivalent to running seven backtests, each executing its own query and identifying alert scenarios. Therefore, it’s recommended to keep the replay days to a smaller figure to ensure the test completes within an optimal time.
So as long as there are the maximum permitted backtests running in the system, you will get an error when you try to initiate another backtest. This applies to backtests for Fenergo managed rules that the technical consultants may trigger from the CLI.
Import/Export
Authorised Users can export 'Live' business rules built out from one tenant and import them into another tenant as a draft rule. This feature exists to simplify the process of setting up the business rules manager with previously tried and tested rules from another environment (For example: UAT).
To export, the user can select the rules and click export. Once the export is completed, the rules can be found in the local downloads folder as JSON files. The downloaded JSON files must not be edited or tampered with at this stage. If the file loses its integrity, the import process will not succeed.

To import, the user can select the 'Import' option in the overview page of the destination system. A set of previously exported rules can be 'dragged and dropped' or selected from the pop-up window. Once the import is successful, there will be a success message.

All the successfully imported rules will have new Rule IDs and will be stored in the Drafts folder. There will be a new activity in the activity trail that describes the rule import event with a reference to the parent rule ID.
Detection Rules Granular Permissions
Rule Manager permissions are configured in CLM Security Configuration.
Assign the relevant permissions to teams based on the actions they should be able to perform in Rule Manager.
Available permissions
-
Rule View List
Allows the user to view the detection rules list. -
Rule View Details
Allows the user to open and view the details of a detection rule. -
Rule Draft Edit
Allows the user to create draft detection rules, edit draft detection rules, save changes, copy rules to a new draft, and create new versions. -
Rule Backtest Run
Allows the user to run a backtest on a draft detection rule. -
Rule Backtest View
Allows the user to view backtest results for a detection rule. -
Rule Publish
Allows the user to approve and publish a draft detection rule. -
Rule Archive
Allows the user to archive a published detection rule. -
Rule Draft Import/Export
Allows the user to import and export detection rule definitions.
Approval workflow for publishing detection rules
When a draft detection rule is ready, users can select Submit for approval.
A user with Rule Draft Edit can create and update draft detection rules, then submit them for approval. A user with Rule Publish can review the submitted rule and either approve or reject it.
If the rule is approved, it is published and becomes live.
If the rule is rejected, it remains in draft. The rejecting user can add a short note, which is recorded in the rule’s activity trail.
Example configuration
To support a maker-checker process, permissions can be split between teams.
| Team | Permissions | Result |
|---|---|---|
| Rule Authors | Rule View List, Rule View Details, Rule Draft Edit, Rule Backtest Run, Rule Backtest View | Users can create, edit, and test draft detection rules, then submit them for approval. |
| Rule Approvers | Rule View List, Rule View Details, Rule Backtest View, Rule Publish | Users can review submitted detection rules and approve or reject them. |
| Rule Administrators | All Rule Manager permissions | Users can manage the full detection rule lifecycle. |

Users only see actions that are available based on their assigned permissions.
Rule Groups and Alert Aggregation
A Rule Group lets you bundle related detection rules so they execute together and, when you choose, produce a single aggregated alert per entity per run — instead of one alert per rule hit. This reduces alert noise and gives investigators a single typology-level finding to triage.
Each Rule Group has its own Alert Aggregation toggle. When the toggle is enabled, the group produces one consolidated alert per entity per evaluation window. When disabled, the group's rules still run together on the same schedule, but each rule that fires surfaces its own individual alert.
Use Rule Groups when:
- A typology (for example Money Mule, Wire Surveillance, Human Trafficking) involves multiple rules whose hits should be reviewed together.
- You want to reduce duplicate alerts on the same underlying activity for one entity.
- You want to retain the option to switch the group back to individual alerts without breaking its schedule.
Where to find it
Rule Groups live inside the existing detection-rules surface in the Business Rule Manager.
Navigation path: Detection Rules > Rule Groups
The Rule Groups page has two tabs:
- Rule Groups — a list of every group, showing ID (for example
RG051), Group name, Rules count, Cadence (Daily, Weekly, Monthly or Mixed), Aggregation status (a tick when enabled) and Modified date. Each row has a kebab menu for edit / delete actions and a row-level aggregation toggle. - Activity — a read-only audit trail of every create, edit, soft-delete and aggregation-toggle change made to any Rule Group, with actor, timestamp and before/after state.
Rules that are not assigned to any Rule Group continue to run on their existing individual schedules and fire single alerts per trigger. These are summarised in the Ungrouped rules callout at the bottom of the Rule Groups list.
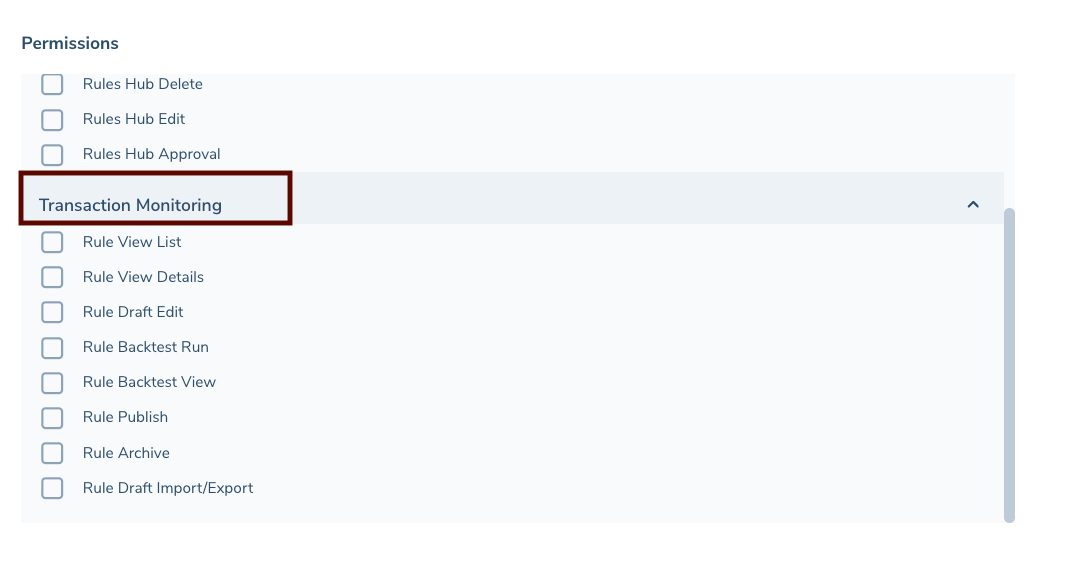
Permissions
Five granular permissions control access to Rule Groups, all listed under Transaction Monitoring in the role management screen:
- Rule Group View — see the Rule Groups page, the list, and any group's detail view in read-only mode. Required for any other Rule Group permission to be useful.
- Rule Group Create — open the Create new rule group modal and create a new group.
- Rule Group Edit — open an existing group, change its name, description, member rules, or Alert Aggregation toggle.
- Rule Group Delete — soft-delete a group from the kebab menu on the row or from within the group detail view.
- Rule Group Activity View — see the Activity tab and the audit trail of changes made to any Rule Group.
Grant the permissions that match each role. A user with none of these permissions does not see the Rule Groups page anywhere in the application.
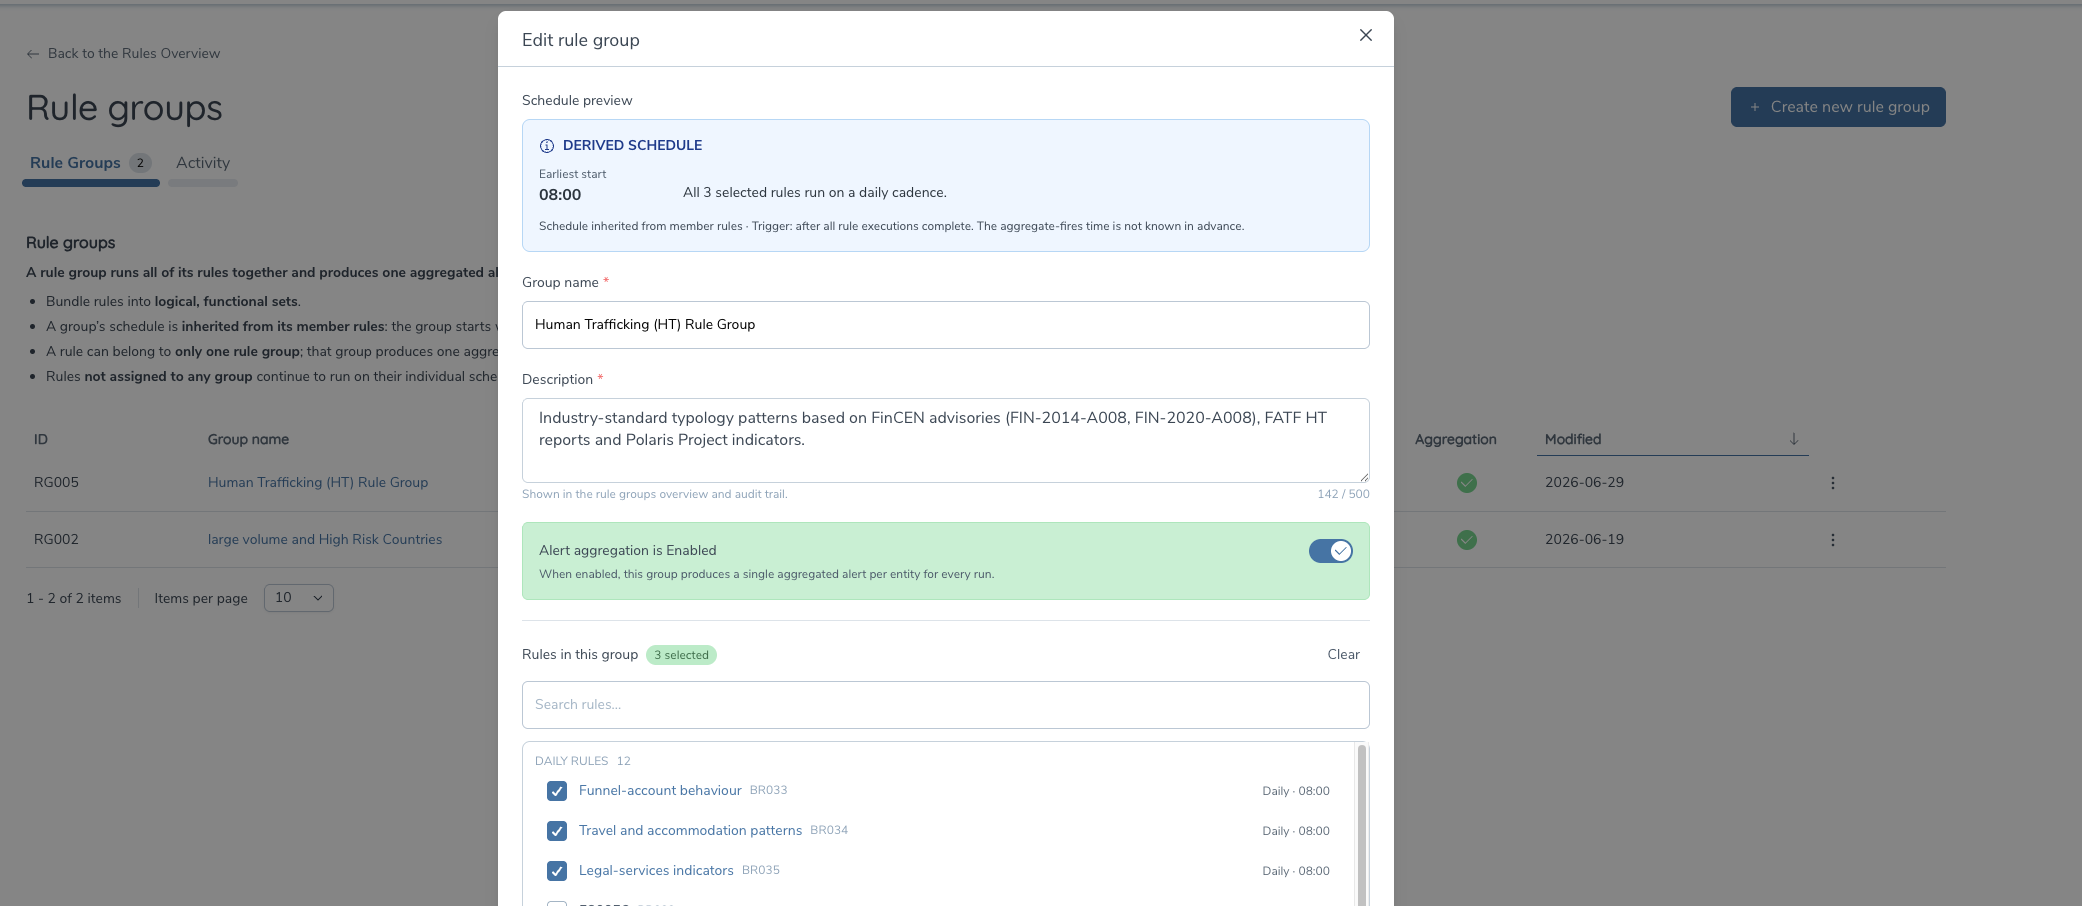
Creating a Rule Group
- From the Rule Groups page, click + Create new rule group (top right). The Create new rule group modal opens.
- Enter a Group name (for example "HVLT Daily Sweeps" or "Money Mule typology"). This is required.
- Enter a Description. This is required, has a 500-character limit, and appears in the Rule Groups list and on the Activity tab, so keep it meaningful for other reviewers.
- Set the Alert aggregation toggle. It is on by default. Leave it on if you want the group to produce a single aggregated alert per entity per run; switch it off if you want the group's rules to keep firing as individual alerts. You can change this later from the group detail view or the row kebab menu.
- Under Rules in this group, use the search box to find rules and tick the ones to include. Each row shows the rule name, rule ID (for example
BR12907) and its cadence and run time (for exampleDaily · 00:00). The selected count updates as you tick rules; use Clear to start over. - Review the Schedule preview panel at the top of the modal. The schedule is derived from the selected rules — the earliest start time and the cadence summary update as you add or remove rules. The aggregate fires once every member rule has completed for that run.
- Click Create group to save, or Cancel to discard.
You cannot mix Scheduled and Real-time rules
Group homogeneity is enforced. A Rule Group contains either all Scheduled rules or all Real-time rules — never a mix. The rule picker filters accordingly, so you only see compatible rules during selection. If you need to cover both execution types for the same typology, create two separate groups (one Scheduled, one Real-time).
A rule can belong to at most one Rule Group at a time. If you assign a rule that is already in another group, it is moved from its previous group.
Turning on or off Alert Aggregation for a Rule Group
Each Rule Group has its own Alert aggregation toggle. It is set at creation time (on by default in the create modal) and can be changed at any point in the group's lifecycle. The current status is shown in the Aggregation column on the Rule Groups page — a tick means enabled.
To change the toggle after a group has been created:
- From the Rule Groups page, locate the group.
- Either use the row's kebab menu and select the aggregation toggle action, or open the group and switch it from within the group detail view.
- The change takes effect from the next evaluation window. Any run already in flight finishes under the prior setting.
When Alert Aggregation is enabled on a group:
- All rule hits within an evaluation window are bundled into one aggregated alert per entity per run for that group.
- The aggregated alert is keyed on Entity ID (External ID).
- The aggregated alert lists every member rule that contributed a hit; the underlying rule outputs are accessible from the alert detail.
- The aggregated score is the sum of contributing rule scores, capped at 100.
- For Scheduled groups, the aggregated alert fires once the slowest member rule for that run completes. For Real-time groups, it fires synchronously with the transaction API response.
When Alert Aggregation is disabled on a group:
- The group's rules still run together on the same schedule.
- Each rule that fires produces its own individual alert per trigger (the same behaviour as ungrouped rules).
- No aggregated alert is produced for the group.
You can switch the toggle on or off at any point in a group's lifecycle.
Editing or deleting a Rule Group
- Edit — open the group from the Rule Groups list, change the name, description, rule membership or aggregation toggle, and save. Changes take effect on the next evaluation window; in-flight runs complete under the prior configuration. Requires Rule Group Edit permission.
- Soft-delete — from the group's kebab menu, select Delete. The member rules return to ungrouped and continue to run on their own configuration. In-flight evaluation windows finish under the prior configuration; future windows do not produce aggregated alerts for the deleted group. Requires Rule Group Delete permission.
Every create, edit, soft-delete and aggregation-toggle change is recorded on the Activity tab for compliance review (visible to users with the Rule Group Activity View permission).
Fenergo Managed rules (Python rules)
To import Fenergo managed rules into the rule manager UI, you need to have access as 'Customer Success". Once, in the overview page, follow the below steps.
- Click on Import Draft
- Enter the name of the rule in the rule name field.
- Enter a detailed and meaningul description for the rule.
- Copy the exact rule alias from the rule meta data in the python file and paste it in the Rule ID field. If there is a mismatch in the rule ID field, there will be an error on page.
Entity Data Rules (KYC Data)
The Entity Data rules have been designed to work alongside the BRM and perform initial evaluations of Entity/KYC data to ease the data load being transferred from CLM to TM. Specific KYC rules can be created in the CLM Entity Data Rules and these reusable rules can be used as the building blocks of the BRM rule. In order to maximise the value of the Entity Data Rules[EDR], they should be created as simple reusable conditions.
The EDR can be created for:
- Entity Data
- Product Data
- Related Party Data*
*Due to the large amount of data being parsed for RPs, these rules should be used for hierarchies with less than 2000 Related Parties.
These EDR can be used as conditions in the python rules.
User Permissions
To use the Rules Hub the following permissions should be added:
- Rules Hub Access - allowing access to the Rules Hub Page and the ability to see rule details
- Rules Hub Edit - allowing users to see the rules hub and add new, or edit existing rules
- Rules Hub Delete - will allow a user to select a rule and delete it.
- Rules Hub Approval - will allow a user to approve configuration version for publication within the Rules Hub.
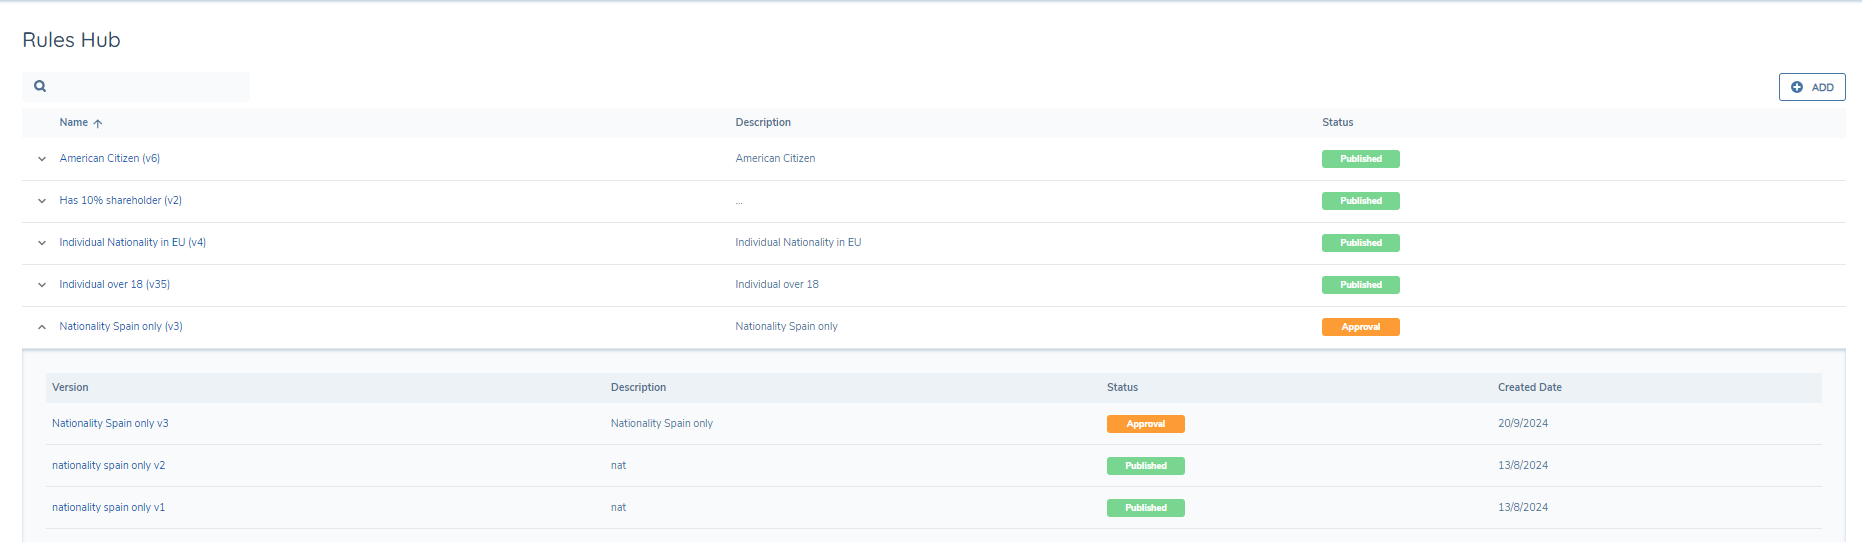
Rules hub can be accessed from Transaction Monitoring area:

The list of rules is searchable, each rule will have a name, description and status. Collapsing a rule will show all the versions of the rule and the date the version was created. Each version can be evaluated.
Creating Rules
With the correct permissions users will see the "Add" button on the Rules Hub page and can add a new rule. Clicking into an existing rule will allow users to create a draft and update a rule. Rules are versioned so updates to rules will be saved as a new version and will need to be approved before they can be evaluated. Only users with the Rules Hub Approval permission will be able to approve a new draft for publication. Rules can also be imported using Config Exchange.
Rules Hub Sources
When create a Rule in the Rules hub, user will be able to select from the following sources:
- Current Entity
- Products
- Associations
- Related Parties
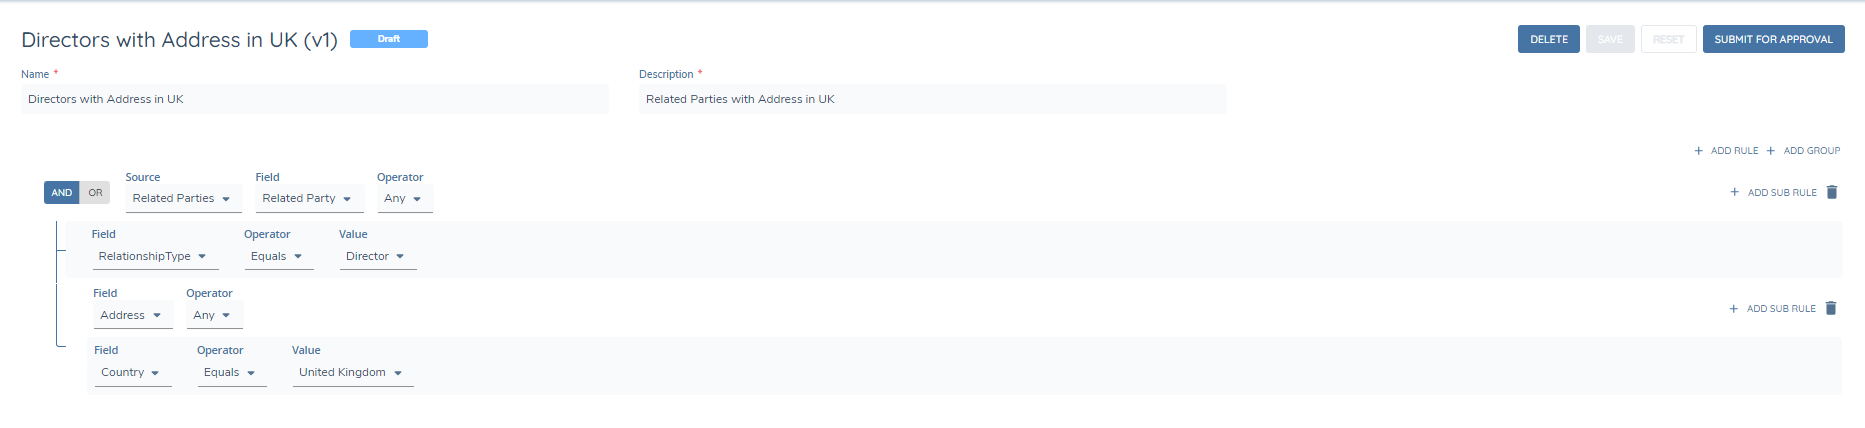
Sample related party rule creation:
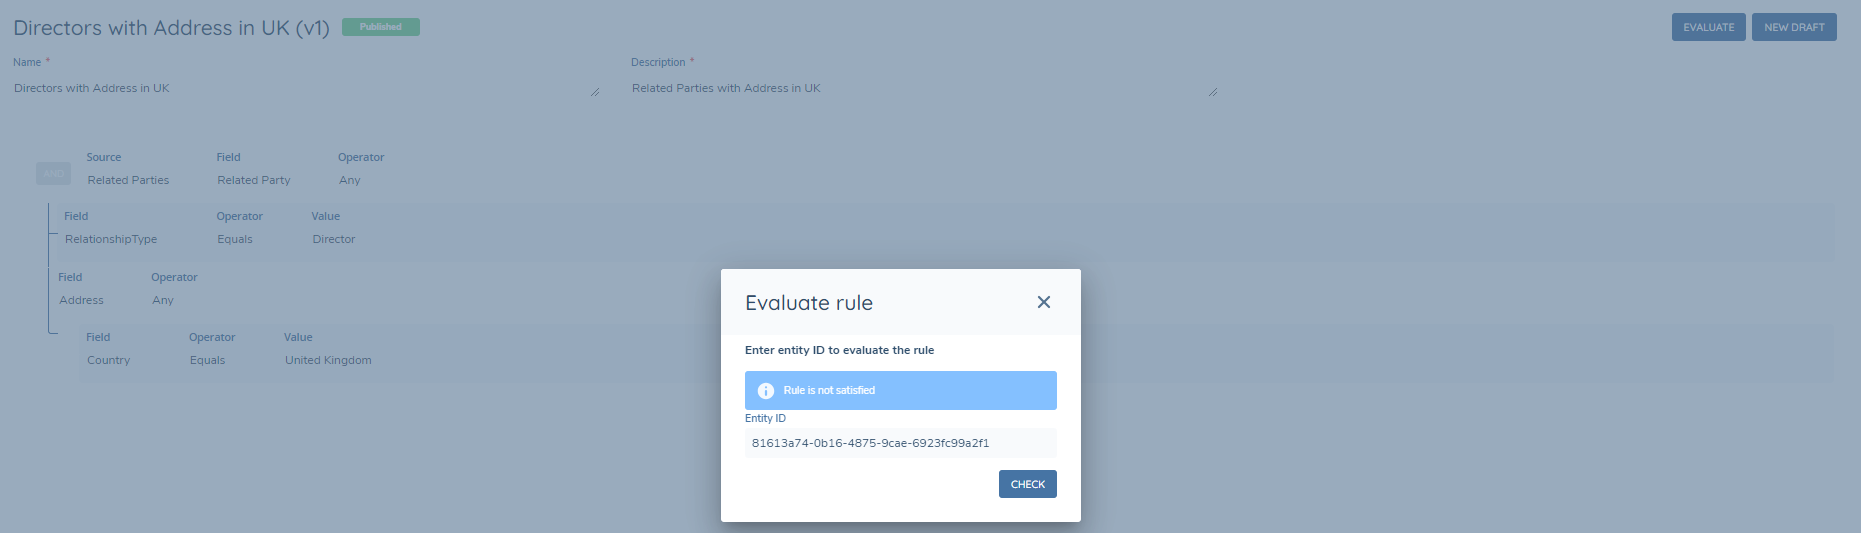
Evaluating Rules
Once a rule is approved, users will see an Evaluate button, clicking on this will invoke a modal which will run the rule on an entity. Enter the entity id on the modal and it will indicate if the rule is satisfied for this entity or not.