Transaction Monitoring Investigations
The Transaction Monitoring application in Fenergo provides a structured, end-to-end process for assessing and resolving alerts generated from the detection of suspicious or unusual activity, including Aggregated Alerts where multiple detection rules within a Rule Group fire against the same entity. Workflow-based investigation ensures a consistent, audited, and compliant process while enabling investigators to efficiently manage and escalate alerts as required. This guide introduces the features that support effective investigation, documentation, and decision-making within the TM investigation lifecycle.
Configuring the Investigation Workflow
TM alert investigation workflows are configured using the Fenergo Journey Builder. Configurators can take advantage the capabilities of the Fenergo Journey Engine to implement a workflow aligned to the Client's operating model requirements using workflow stages, team assignment, maker-checker, SLA management and conditional escalation. The steps to configure a TM alert workflow are as follows, with each step explained further below:
- create a journey of type "Alert Assessment" to support the investigation process
- add the required number of Alert Assessment tasks for triage, review and escalation.
- Mark the final task a Compliance Task which, on completion, results in the alert being closed.
- Assign the relevant Team to each task. Only members of the assigned team will be permissioned to complete the task.
- Add maker- checker if required to enforce a 4-eye control.
- Add conditional steps with Task Scoping rules to enable conditional escalation so that for example only confirmed suspicious activity is escalated from first line to second line.
- Define a journey Event Trigger to connect the alert workflow to the detection engine.
- Define a journey Scoping Rule to link the alert workflow to the focal entity of the investigation.
Alert Assessment Journey
When the detection engine raises an alert, a journey-based alert workflow is triggered in the Alert Management UX using a journey of type Alert Assessment. Users follow the configured workflow to complete their investigation. With Fenergo, you can implement a multi-step workflow to manage a typical First Line / Second Line review and escalation process. False positive alerts can be acquitted early in the workflow, with true positives escalated for further review. To begin the configuration, create a new journey of type Alert Assessment. If that journey type is not available, you must edit the Journey Type reference data list to add it as an option.
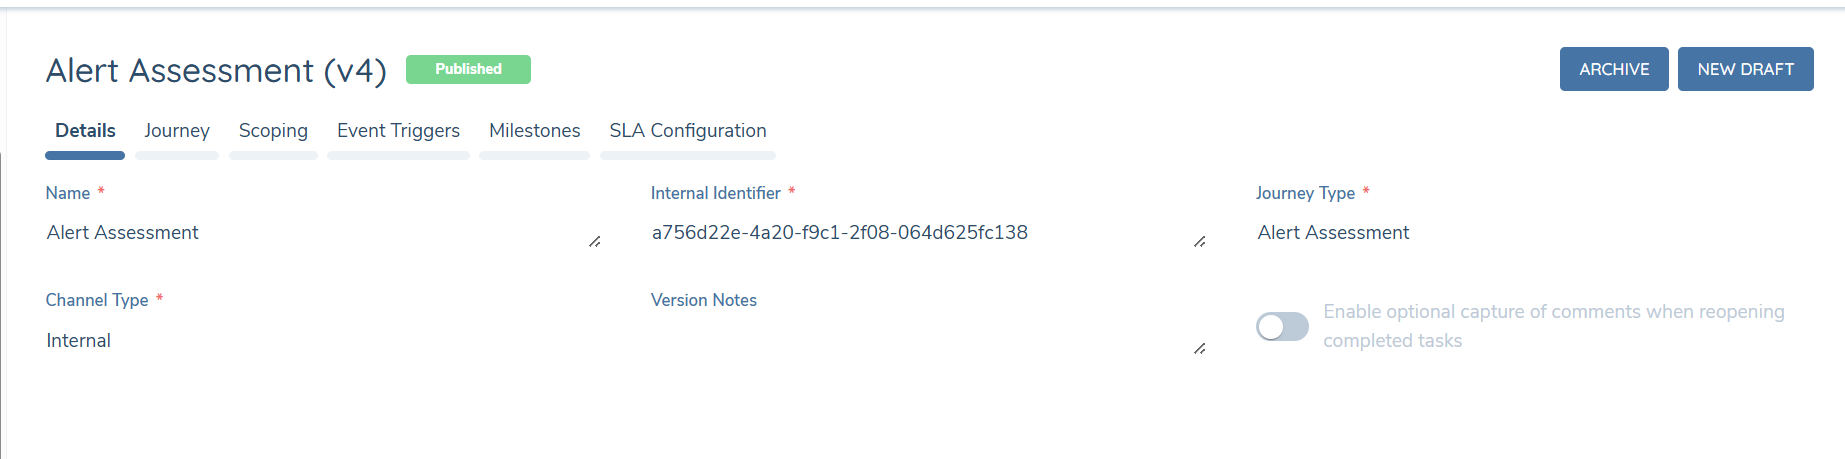
Alert Assessment Tasks
The alert assessment workflow contains individual investigation tasks where each task represents a review and assessment of the alert by a user within a designated team. In the alert workflow, configure the required sequence of tasks ensuring that each task type is set to Alert Assessment (1). Note that all assessment tasks should be added to a single journey stage and implemented sequentially. The final step in the review must be identified as a Compliance task, which is indicated by the toggle (2). Completion of this task signifies the closure of the alert.
Team Assignment
A TM workflow involves multiple groups of users across first and second line functions collaborating in the investigation of suspicious activity. To support this process, each Alert Assessment task is assigned to a specific Team. Users allocated to that Team can then complete their allocated role in the investigation.
Maker-checker
The transaction monitoring workflow can be configured to include maker-checker rules, ensuring that assessments are completed by different users using a four-eye principle. These users may be part of the same Team. Maker-checker is managed via the Checker task option in the task configuration.
Alert Journey Configuration
Journey Scoping
Alert assessment journey must be triggered against the main entity on the alert. The fields available for scoping are Alert Source and Alert Type.
Event Triggers
The journey must be connected to a new alert being triggered when one or more detection rules fire. To do this, a journey Event Trigger must be defined using the following criteria:
- Event Type = Transaction Monitoring
- Event Subtype = Create Alert
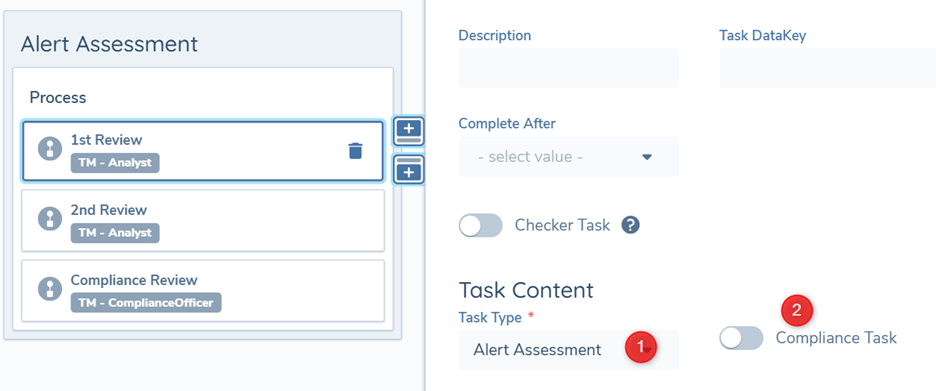
Task Scoping
Within the Alert journey Task Scoping Rules can be used to add conditional steps. These rules are used to enable conditional escalation of the alert based on the previous step(s) in the investigation flow. Each alert assessment task can be triggered based on alert details or the outcome of previous alert assessments.
Alert Dashboard
Users manage investigations from the Alert Dashboard. To view the Alert Dashboard and access an alert in the alert dashboard the following permissions are required.

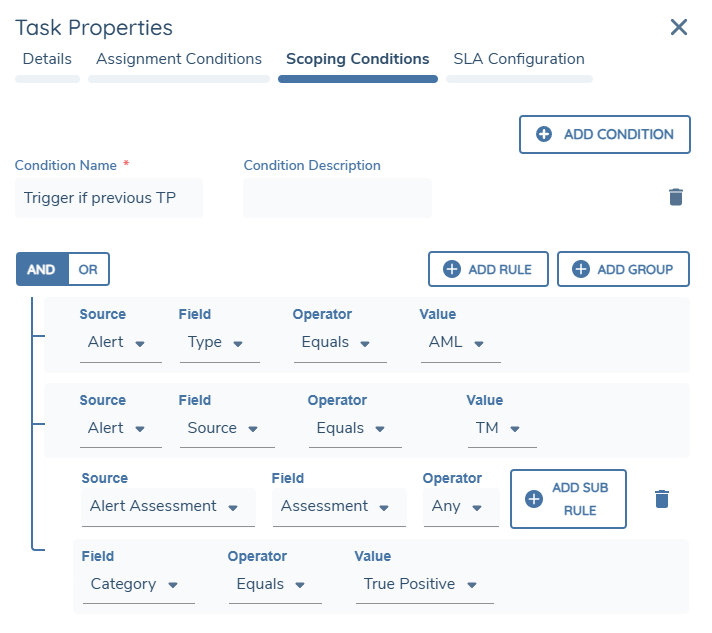
Alert Assessment categorisation
Alerts are assessed during an investigation into outcomes like "Suspected Money Laundering" or "Suspected Terrorism Financing". This categorisation is defined through configuration of two linked reference data lists. Alert Assessment Category: Two options should be added here - "True Positive" and "False Positive"
Alert Assessment Outcome The Alert Assessment Outcome list signifies how suspicious activity is characterised. These outcomes play a critical role in the investigation process. Outcomes can be configured to client requirements as required.
Link these reference data lists as a linked lookup, with Alert Assessment Category as the parent list.
Investigating Suspicious Activity
Fenergo Transaction Monitoring streamlines workload distribution and ensures timely resolution of alerts. With Fenergo Alert Management, clients can efficiently manage assignment of work to investigators, maintain clear oversight of operational activity, and support a consistent, risk-based approach to transaction monitoring investigations.
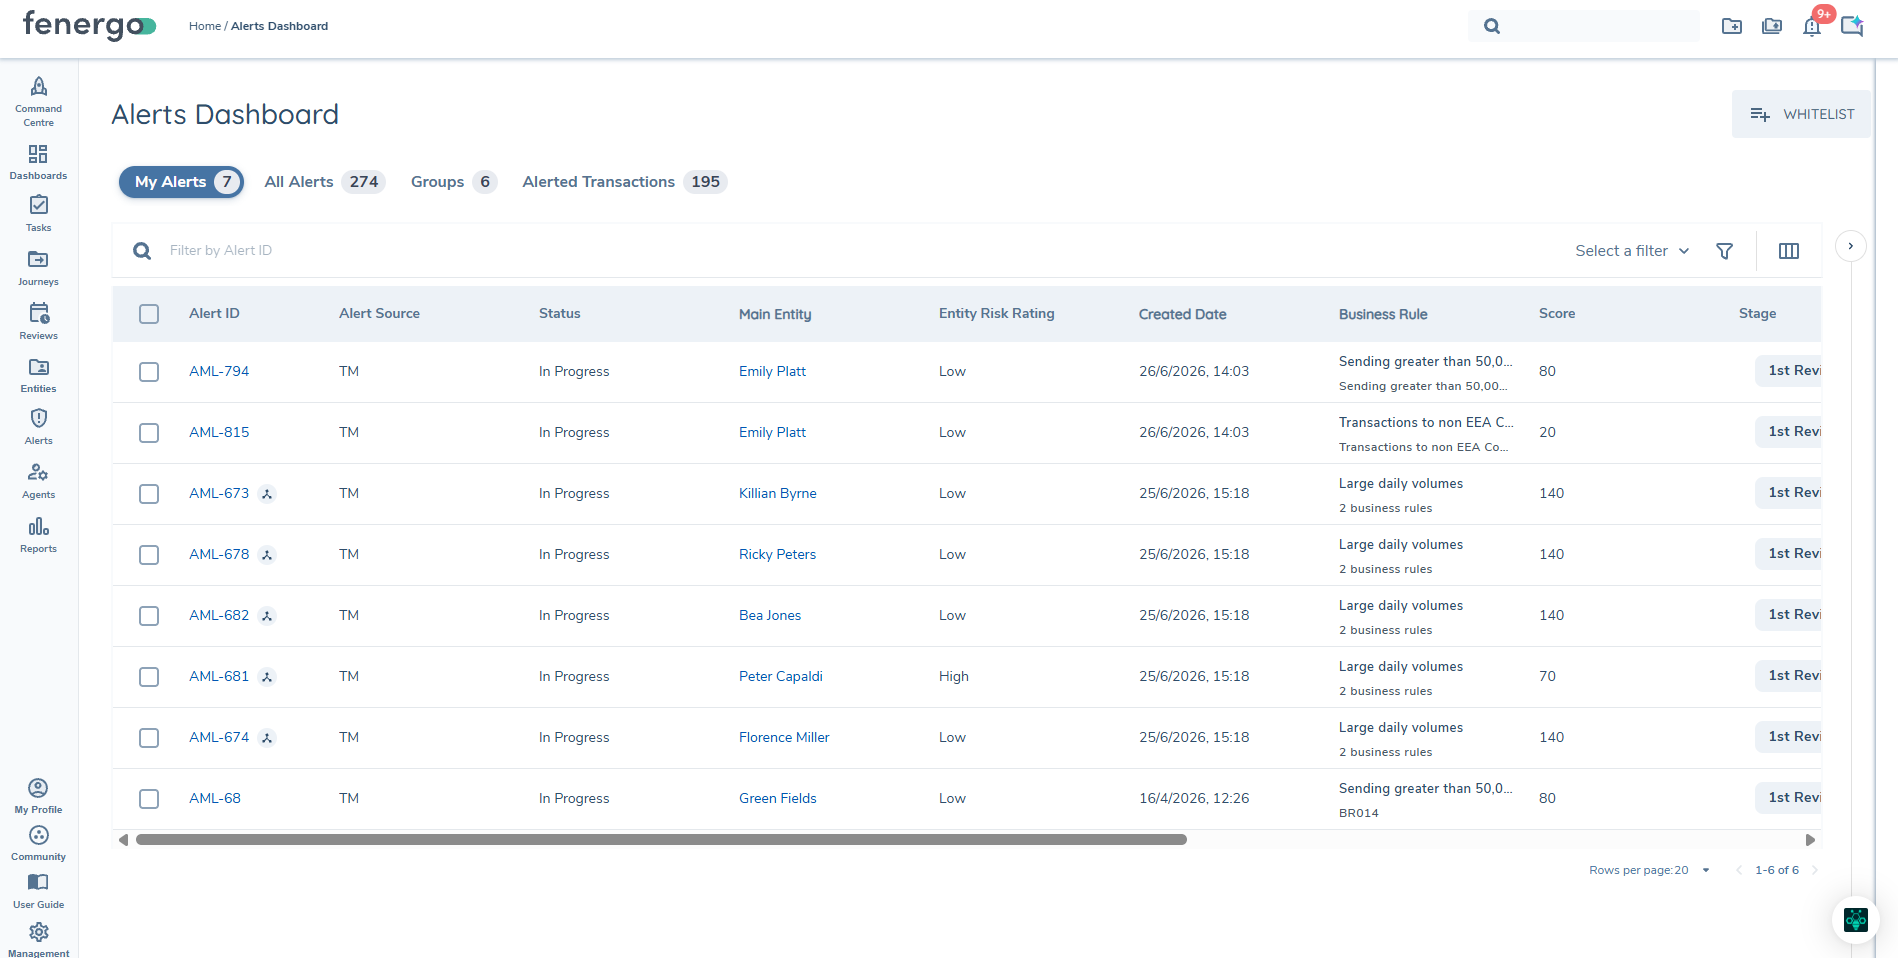
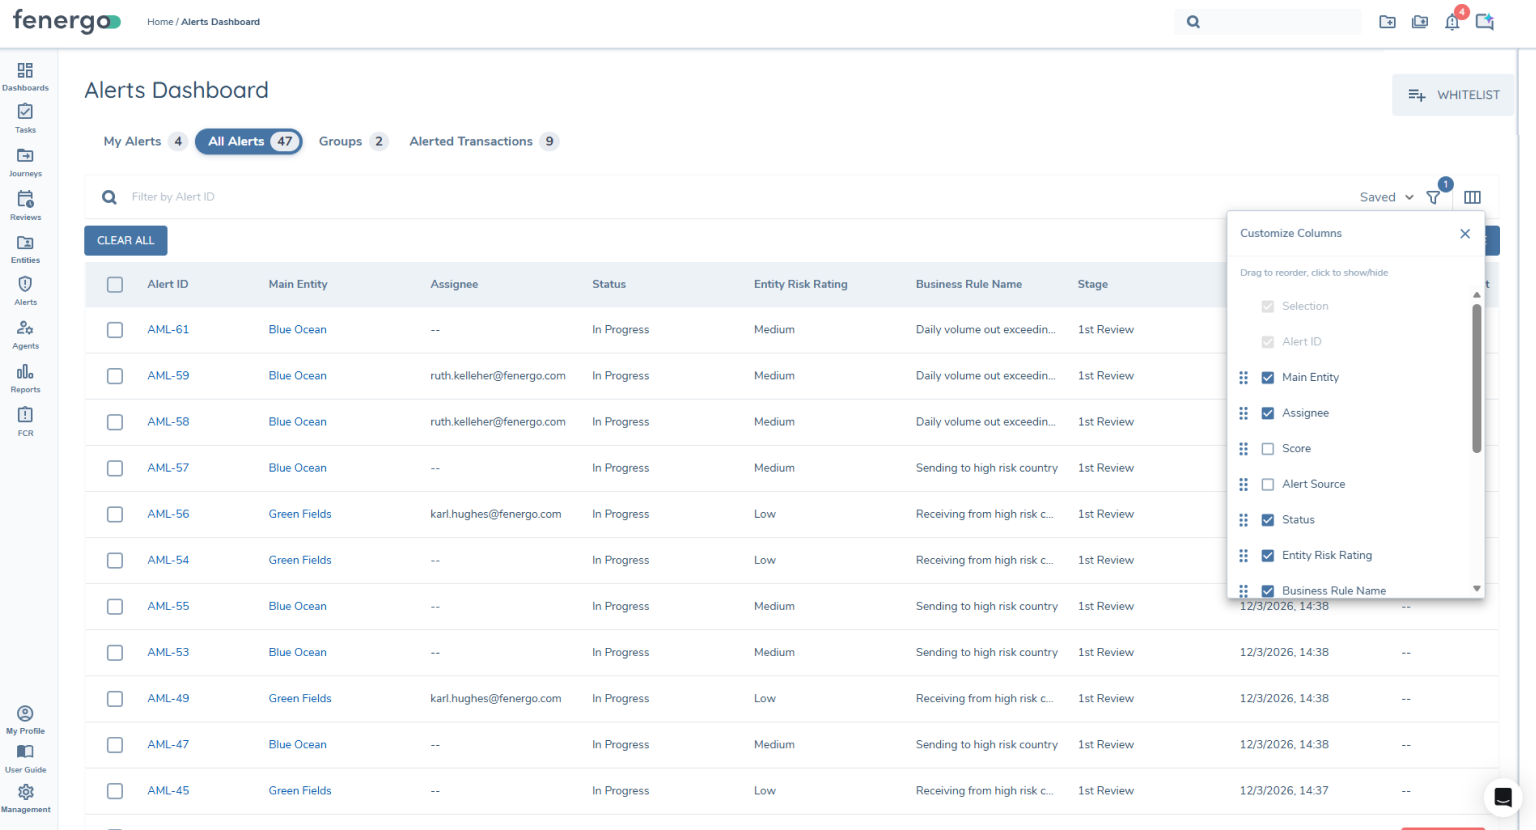
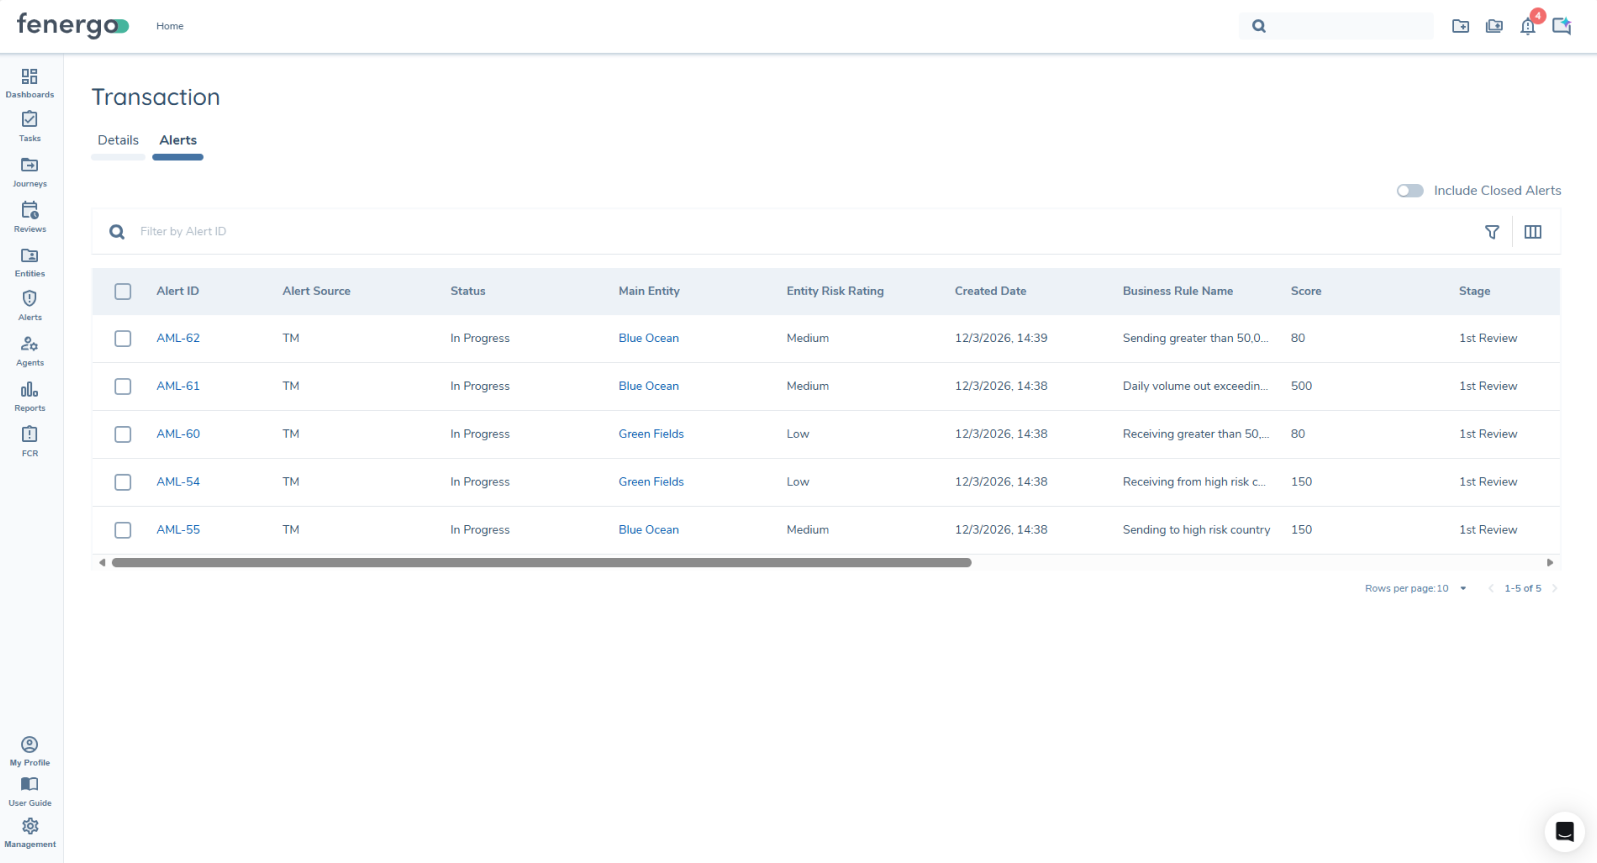
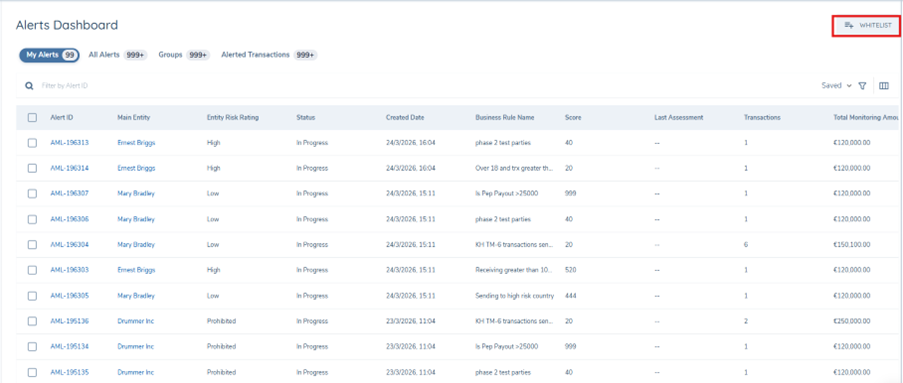
Alerts Dashboard
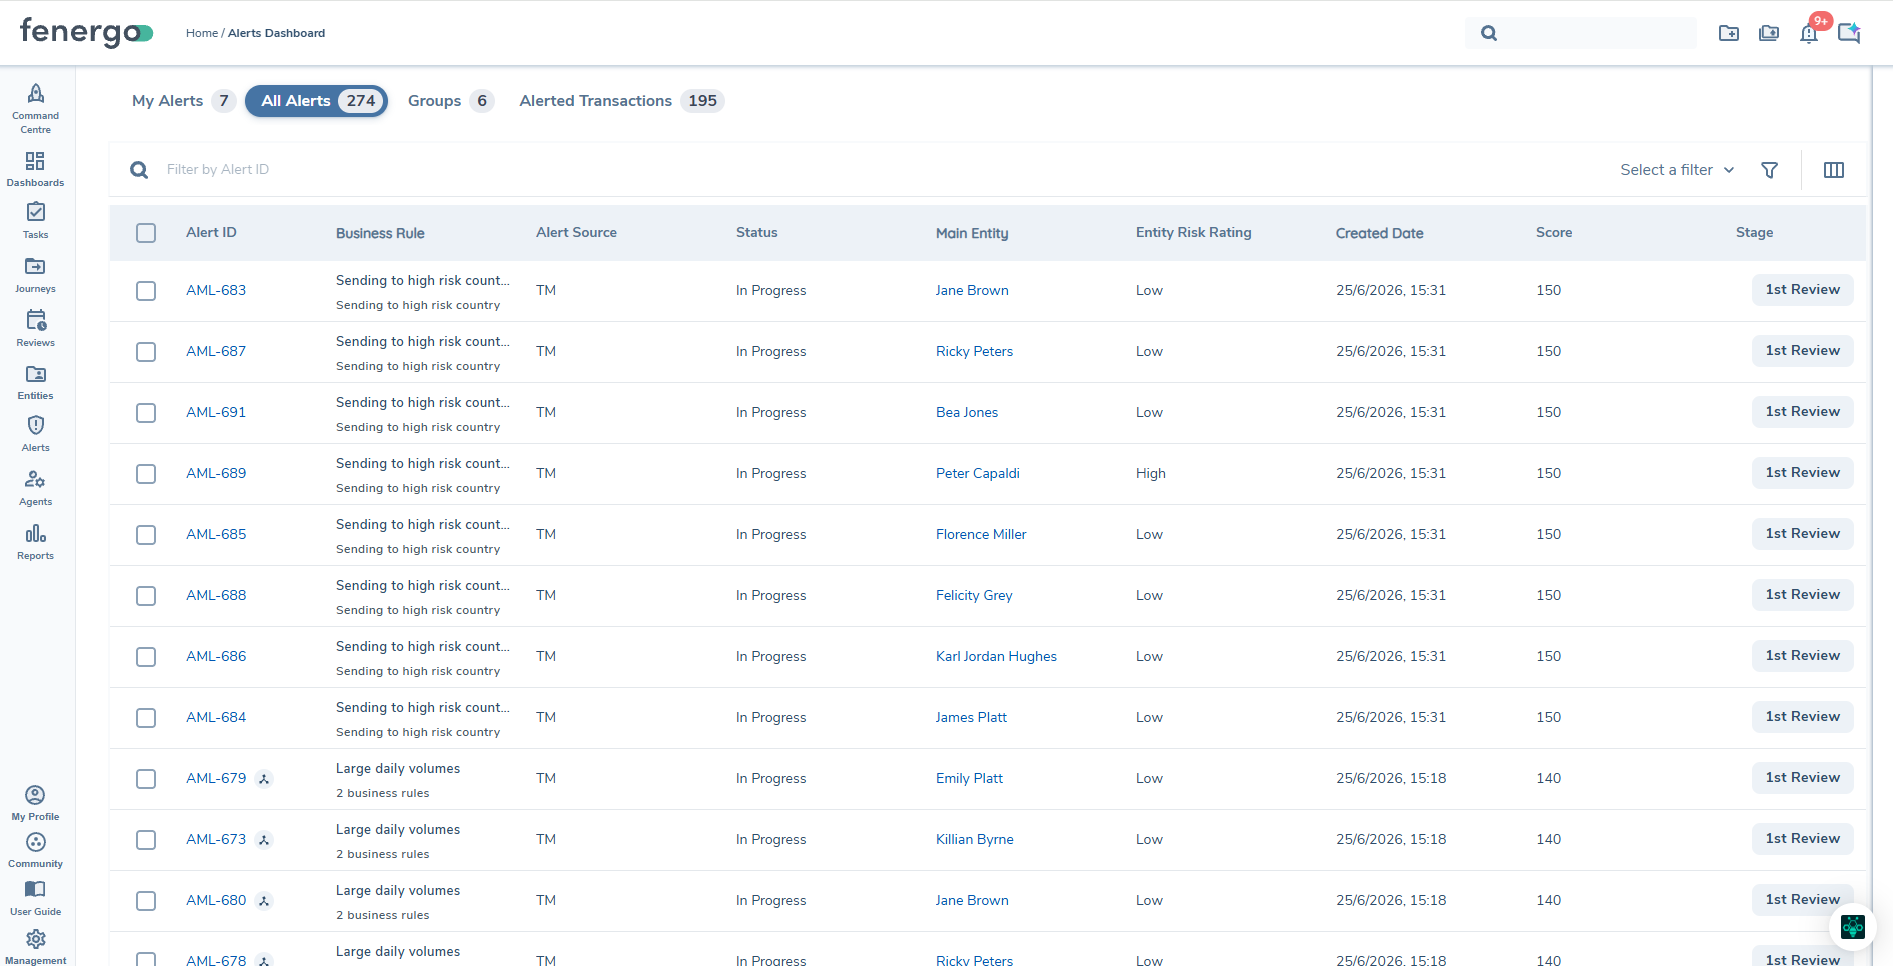
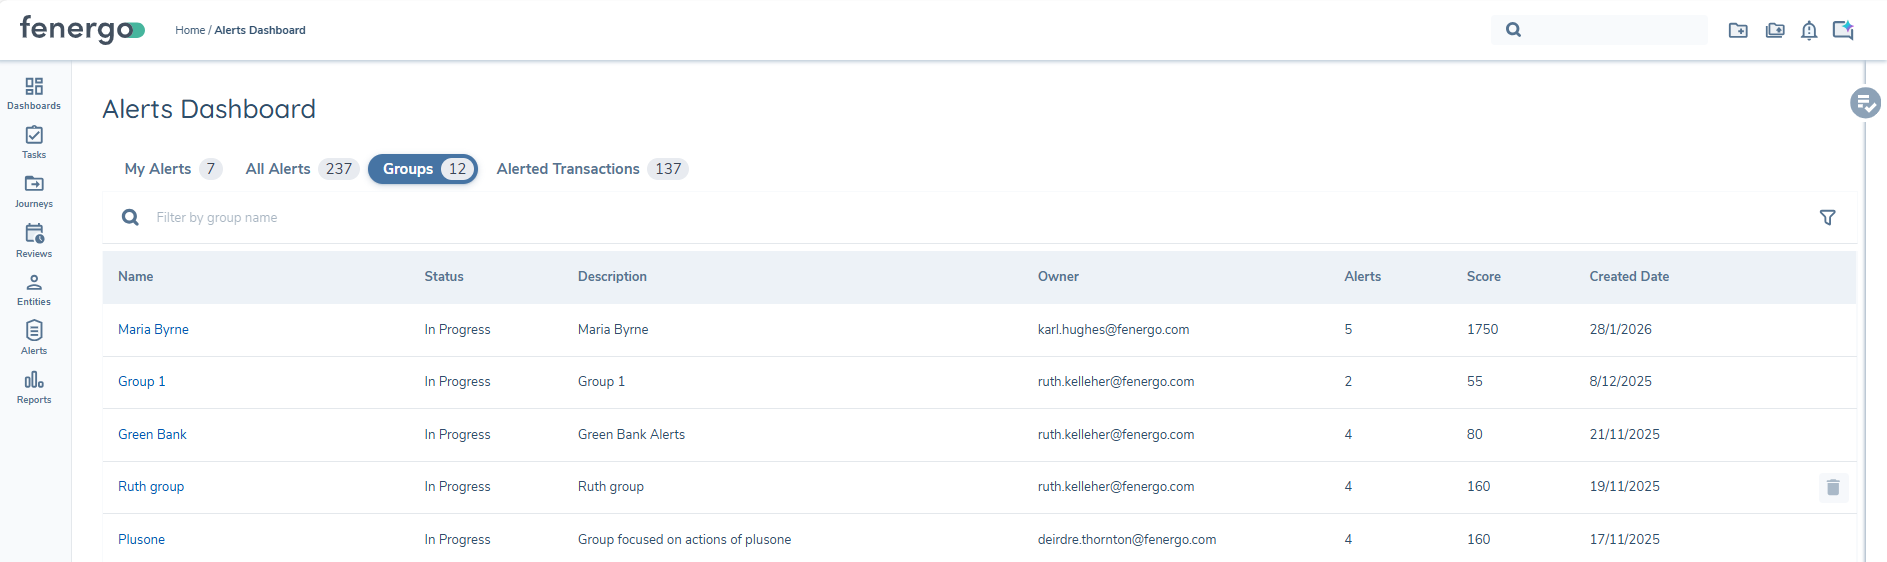
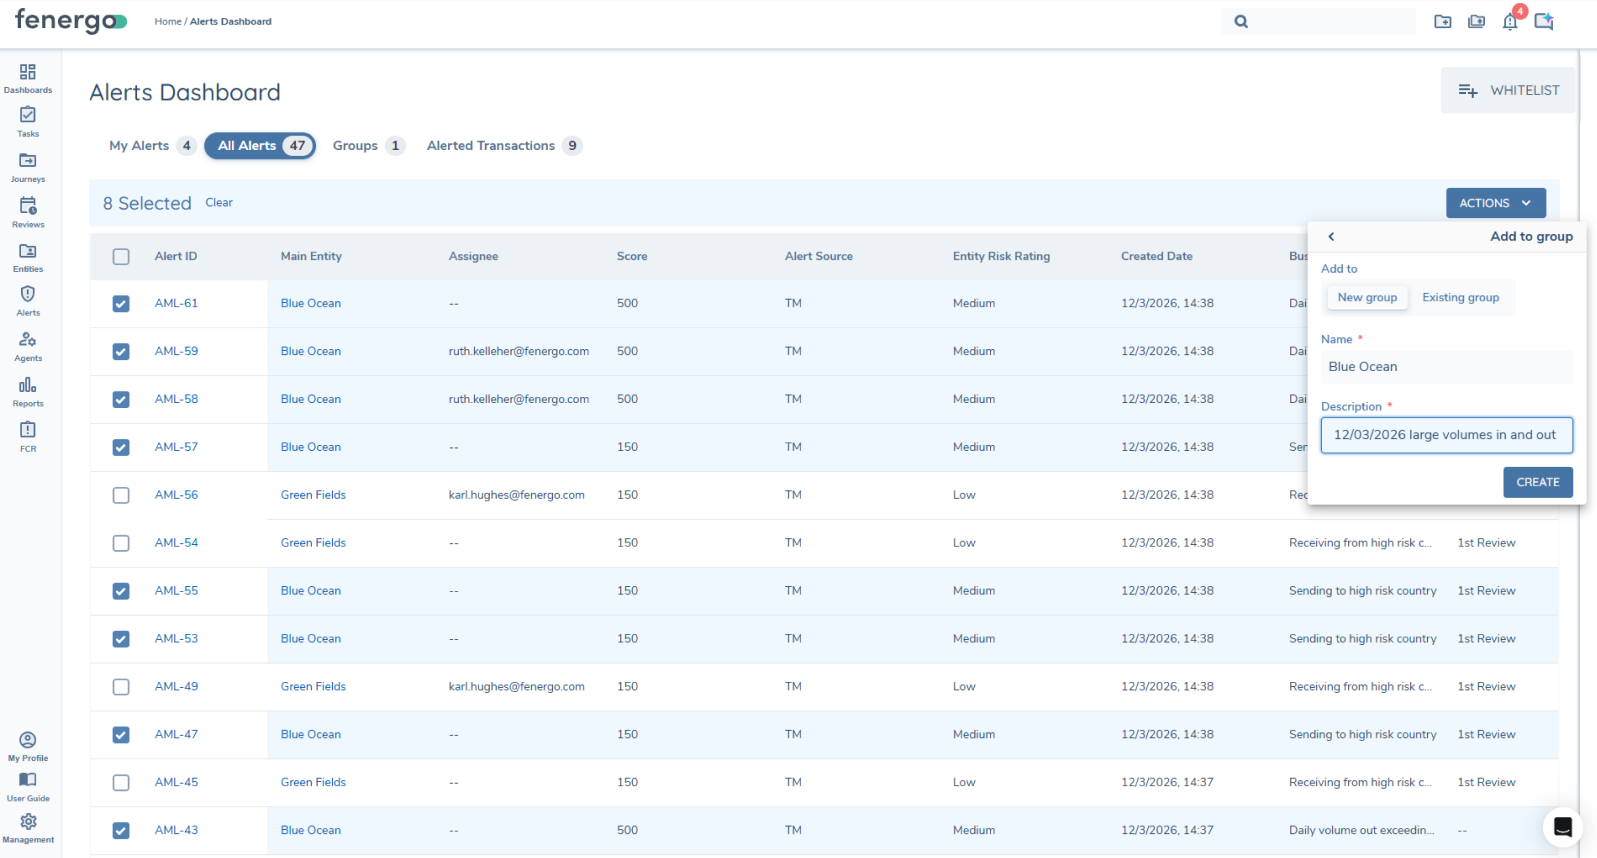
Investigations are launched from the Alerts Dashboard which is accessed from the main menu. The dashboard displays alert queues which provide investigators with an organised view of alerts that require assessment helping ensure efficient prioritisation. The "My Alerts" queue displays alerts specifically assigned to the current user, providing a focused workspace that supports timely review and resolution of their individual workload. The "All Alerts" queue presents the full population of alerts available to the wider investigation team, including unassigned items and those currently in progress. The "Groups" section provides investigators with a consolidated view of related alerts grouped together, supporting efficient assessment and prioritisation of connected activity.
My Alerts
The 'My Alerts' tab shows all alerts that have been assigned to the current user. The following attributes are displayed:
- Alert ID - Identification number which is unique to that particular alert - these always take the format XXX-YYYY where 'XXX' represents the alert type, and YYYY represents a number. Aggregated Alerts are identified by the Aggregated Alert icon displayed alongside the Alert ID.
- Status - Status of the alert.
- Not Started - No journey initiated for this alert
- In Progress - Alert available for assessment
- Completed - Alert has been assessed and is closed
- Paused - Alert Investigation has been paused
- Whitelisted - Alert has been whitelisted and doesn't need investigation
- Main entity - The focal entity of the Alert. This entity can be the sender or the receiver of a transaction
- Created Date - Date and time the alert was created
- Business rule - Detection rule that triggered the alert. For Aggregated Alerts, this displays the Rule Group Name and the number of rules within the group (for example, AML Rule Group (4)). Selecting the Business Rule value opens the Rule Group Right Hand Drawer, showing the full list of triggered rules and their associated transaction detail.
- Entity Risk - this will be read from the "riskRating" field, which must be indexed to show in the Alert grids
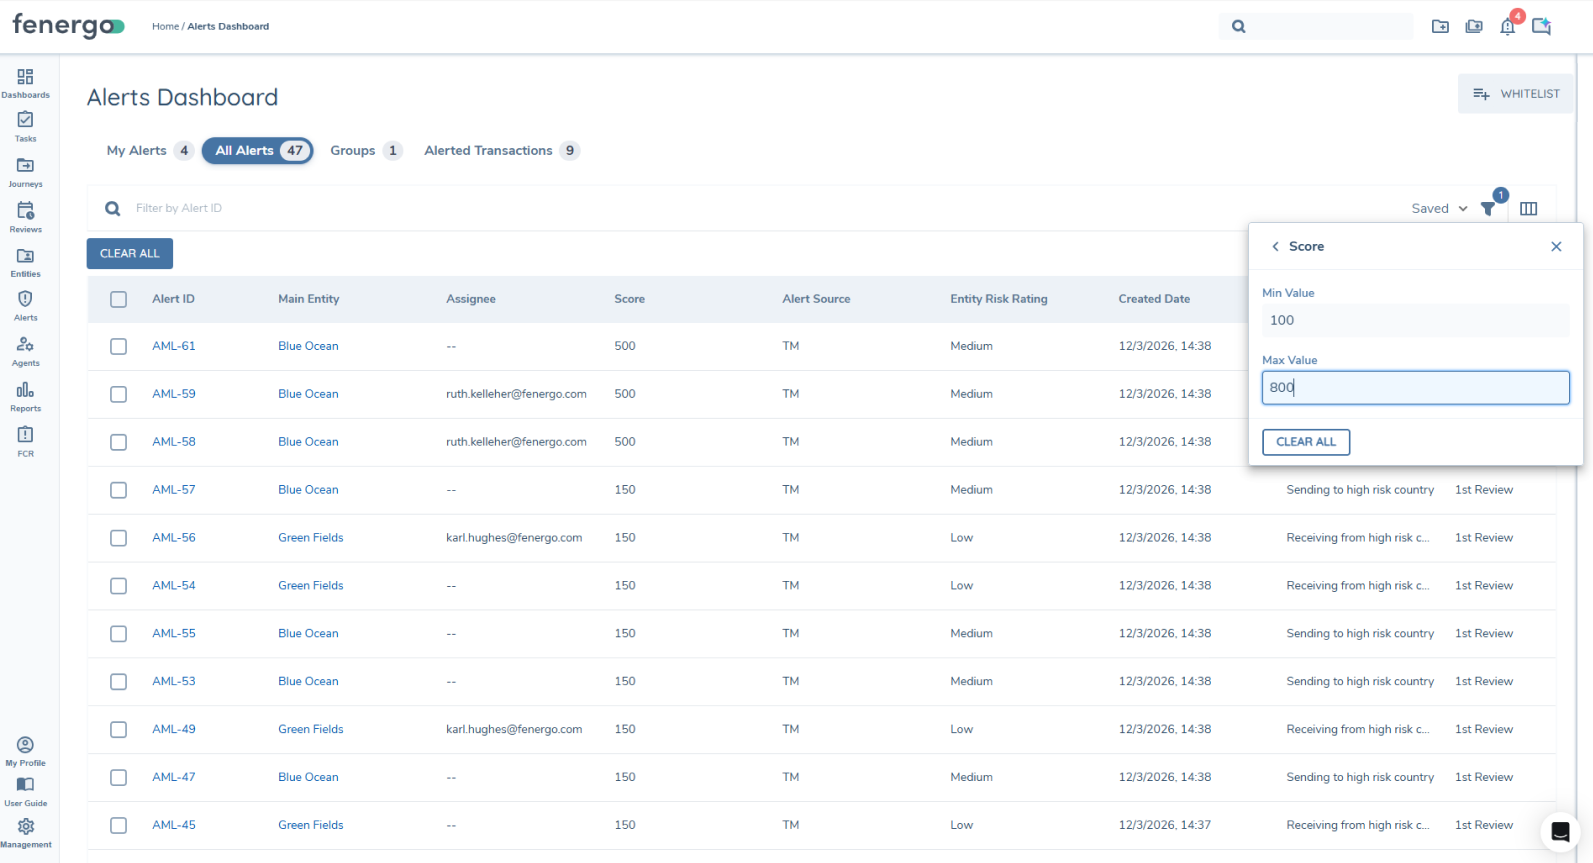
- Score - Score defined in the detection rule. For Aggregated Alerts, this reflects the combined score across all rules in the Rule Group.
- Stage - Displays the progression of the investigation
- Last assessment - Assessment label that was assigned in the previous assessment of an alert
- Group - Indicates if alert has been added to a group of linked alerts
- Transactions - Number of transactions in an alert
- Total Monitoring Amount - Sum of the transaction amounts in the alert
- Alert source - Source system or originating process from which the alert was generated
The Alert Queue can be sorted and filtered based on these attributes. Users can save their filters and reuse them. Saved filters persist across sessions, so when a user logs in to the application, their queue management preference is applied.
An Alert Assessment Activity panel is available on the My Alerts dashboard. This panel gives investigators quick access to the alerts they have most recently assessed, without needing to search or recall alert IDs.
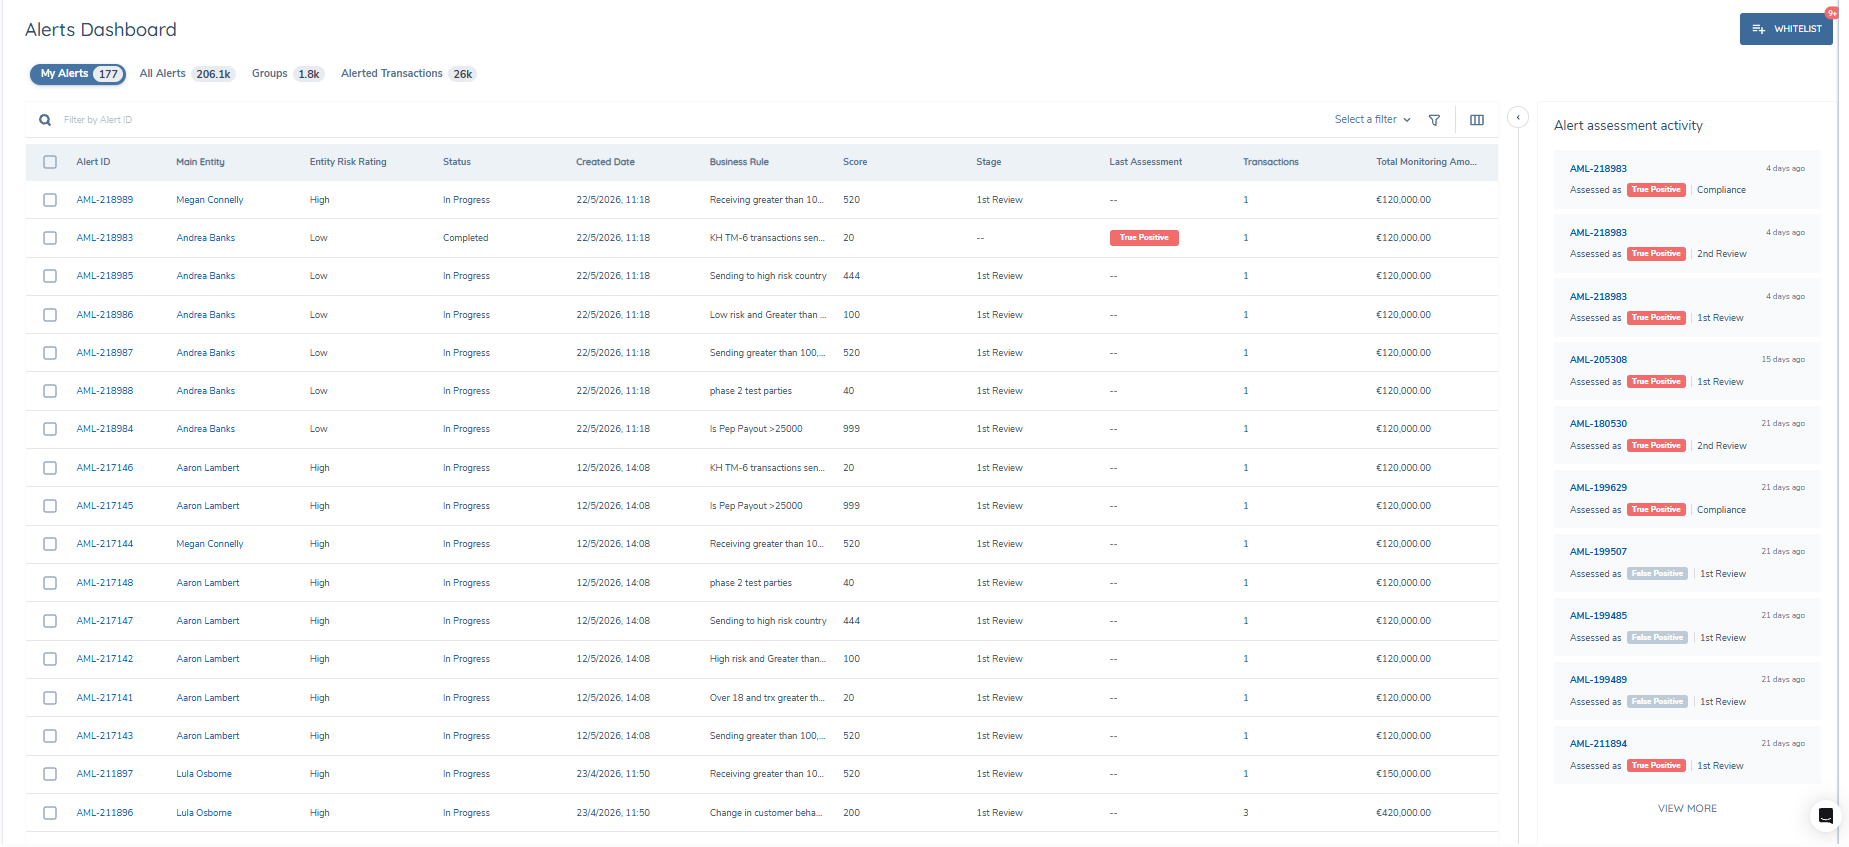
The panel appears as a collapsible side panel on the right-hand side of the My Alerts dashboard. It is collapsed by default each time you navigate to the dashboard. The 10 most recently assessed alerts are displayed by default. Select View More at the bottom of the panel to load up to 20 alerts in total.
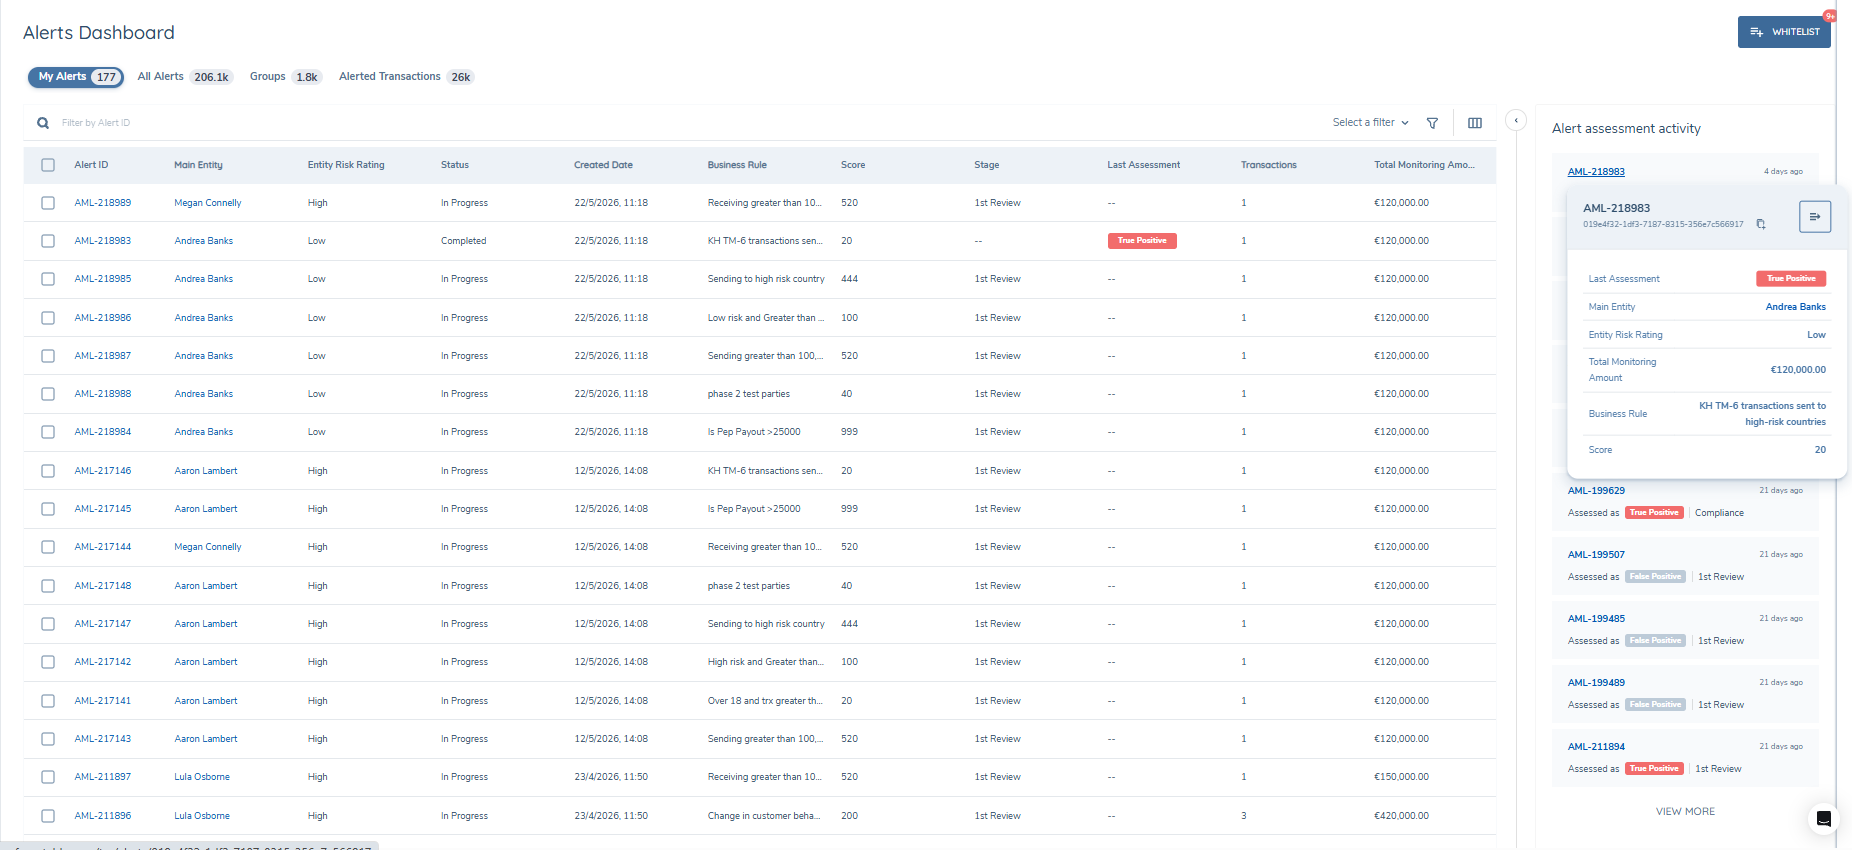
Hover over any alert ID in the list to see a brief popover with key alert details. From the popover, you can open the alert in the right-hand drawer.
When the right-hand drawer opens, the activity panel will automatically collapse to make room; you can re-expand it at any time while the drawer is open.
If you have not yet completed any alert assessments, the panel will display in an empty state.
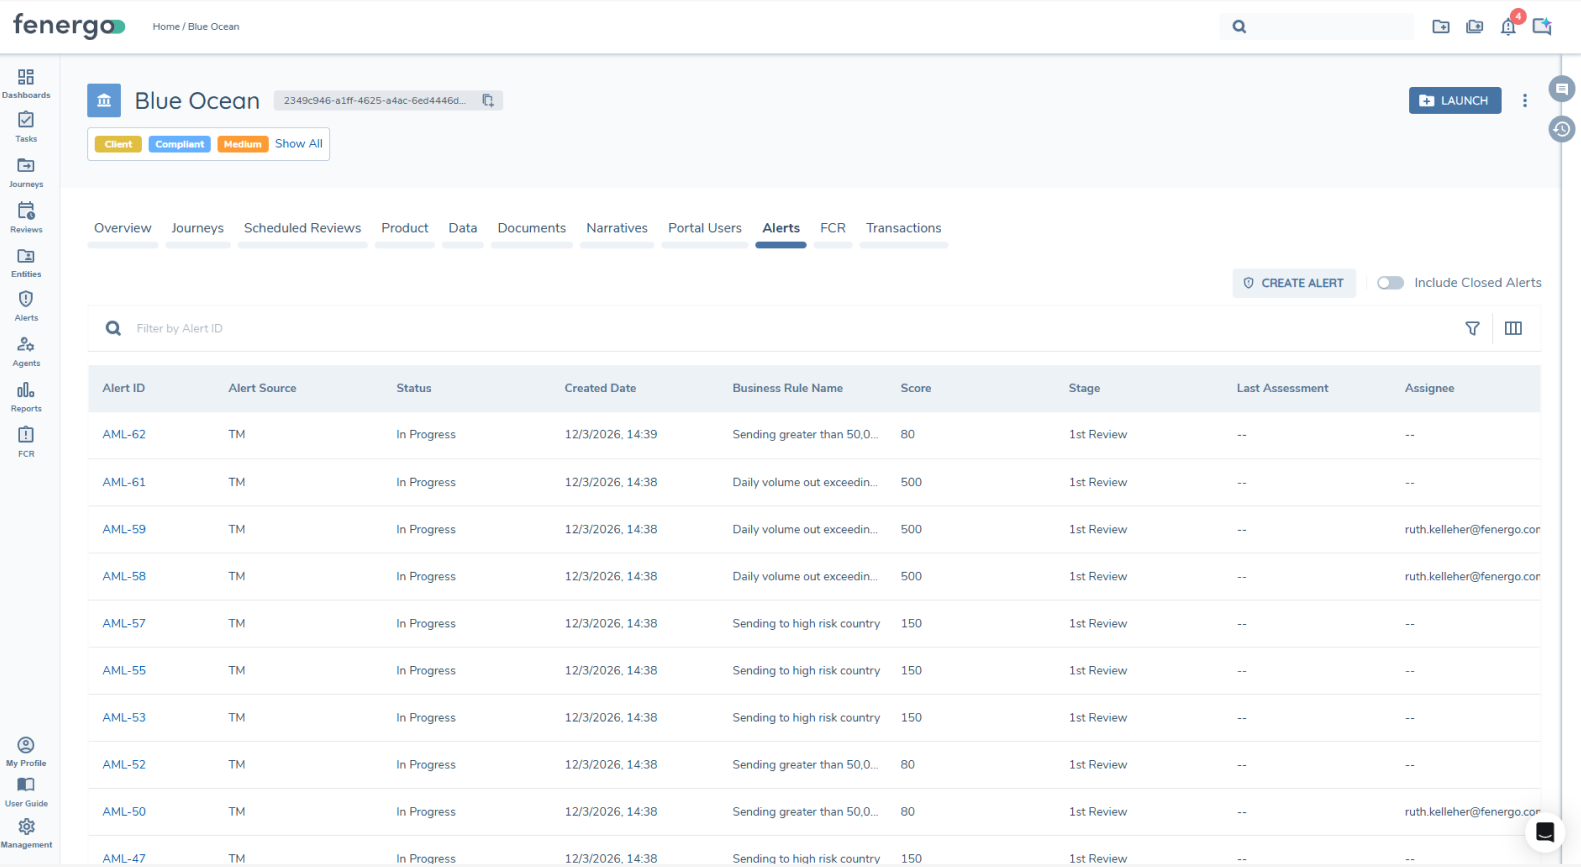
All alerts
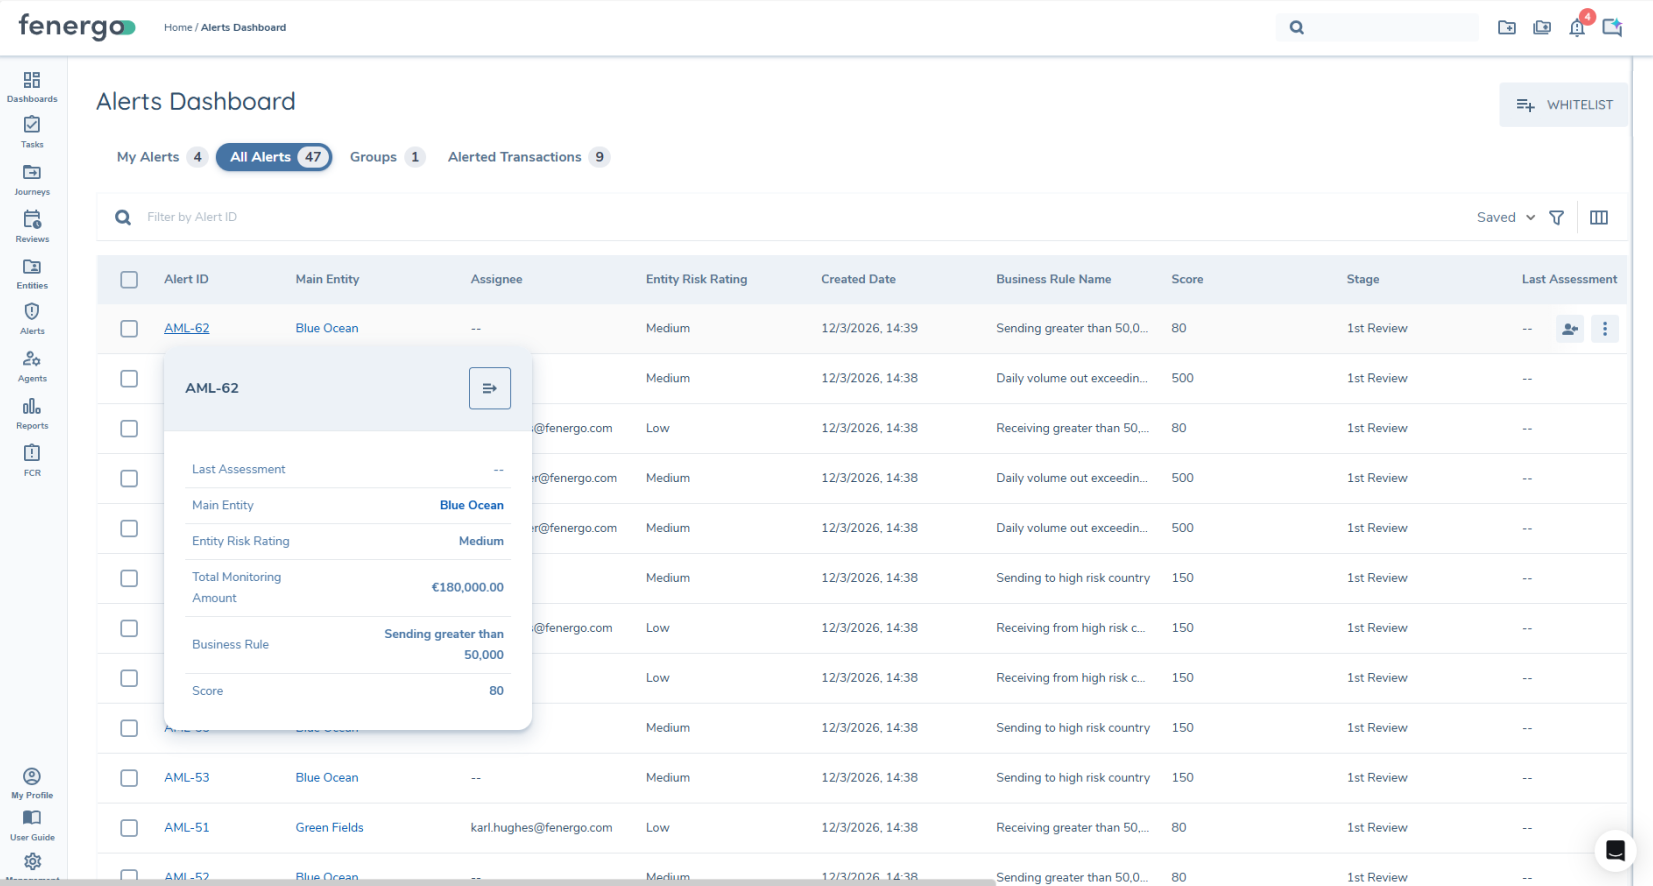
The "All Alerts", tab contains all alerts, in the system including closed alerts. Alerts in this view have the same fields as the "'My Alerts"', view with the addition of Assignee, which indicates the current assigned owner. Journey configuration, including team assignment and maker checker settings influence which user can be assigned to assess an alerts from the Alerts Dashboard.
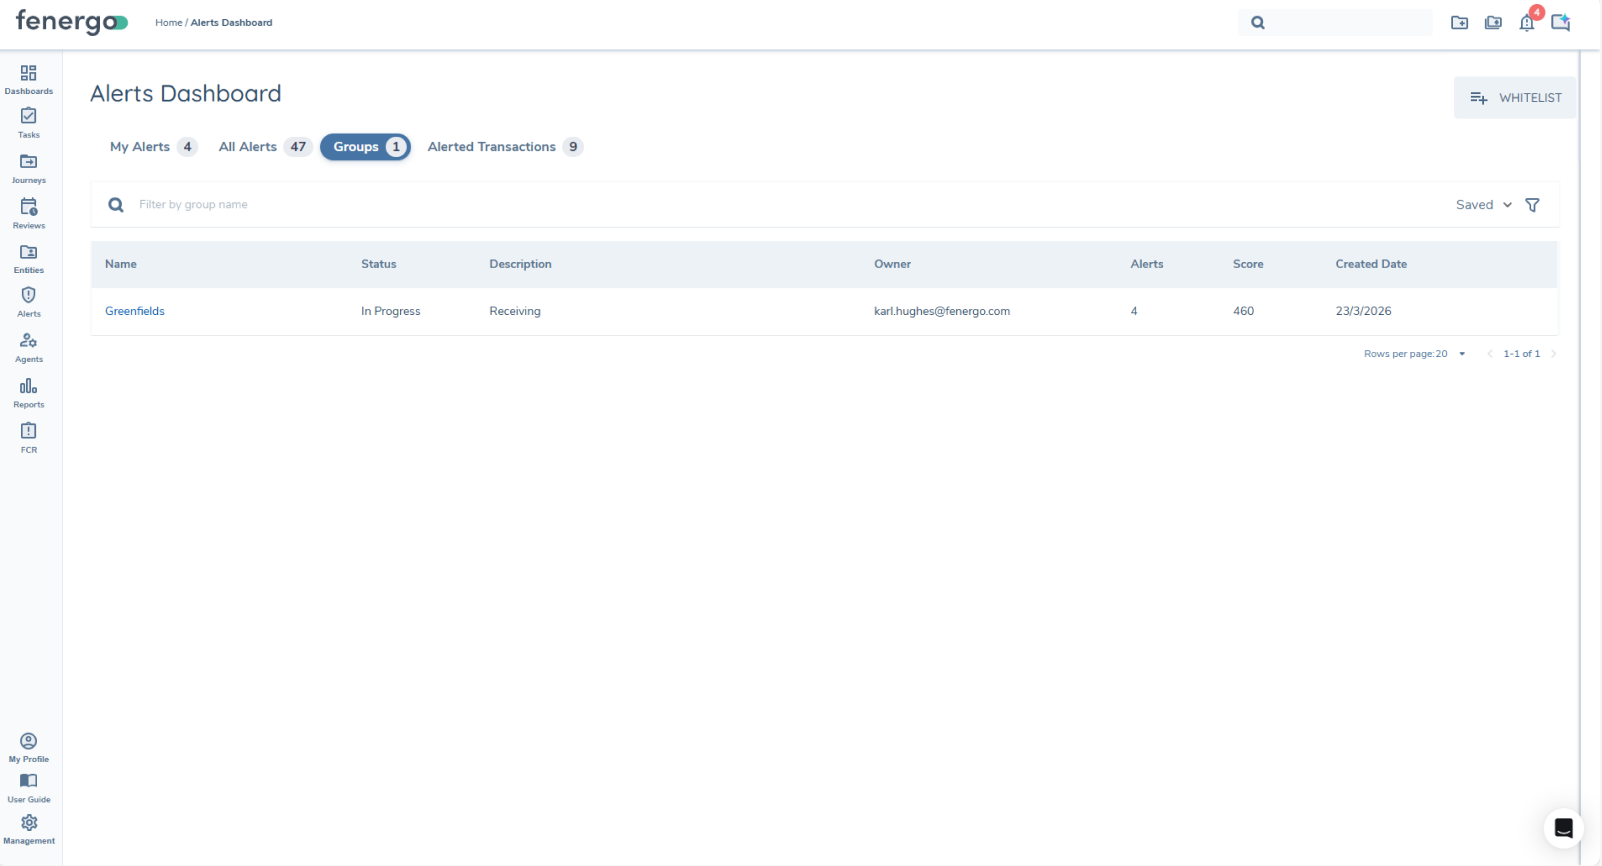
Groups
The "Groups" tab provides a high-level view of alert groups created from the Alerts Dashboard, allowing investigators to see and access sets of related alerts that are being assessed together. From this view, users can navigate into individual groups to review grouped alerts and perform group-level actions as part of the investigation workflow.
Popovers
Popovers provide quick, read-only access to key alert and transaction information without navigating away from the current page. They are used across multiple areas of the application to allow users to preview details and navigate directly to full record views where required.
Alert Details Popover
The Alert Details popover displays a summary of key information for a selected alert. It is available from the My Alerts and All Alerts dashboards, as well as from the Entity RHD, Transaction RHD, and Alert Group details page.
The popover includes core alert attributes such as Alert ID, Last Assessment, Main Entity, Total Monitoring Amount, Business Rule, and Score. From this view, users can navigate directly to the full alert details or assessment page.
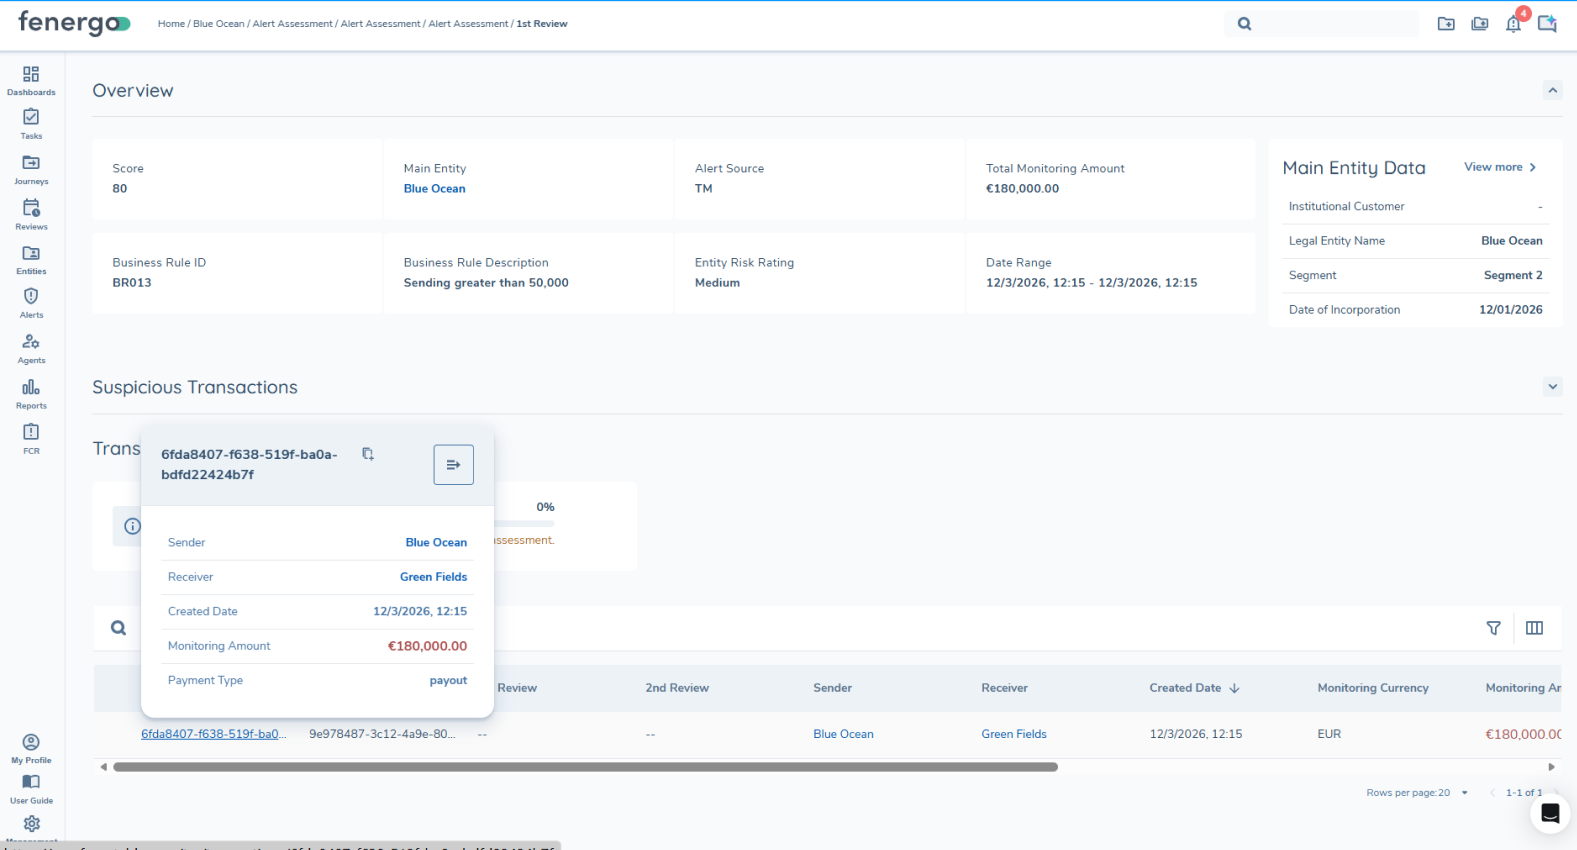
Transaction Details Popover
The Transaction Details popover displays key information for a selected transaction and is available from the Alert Assessment, Alert Details page, and Alert RHD.
It presents transaction-level attributes including Sender, Receiver, Created Date, Monitoring Amount, and Payment Type, allowing users to quickly review transaction information and navigate to the full Transaction Details page when required.
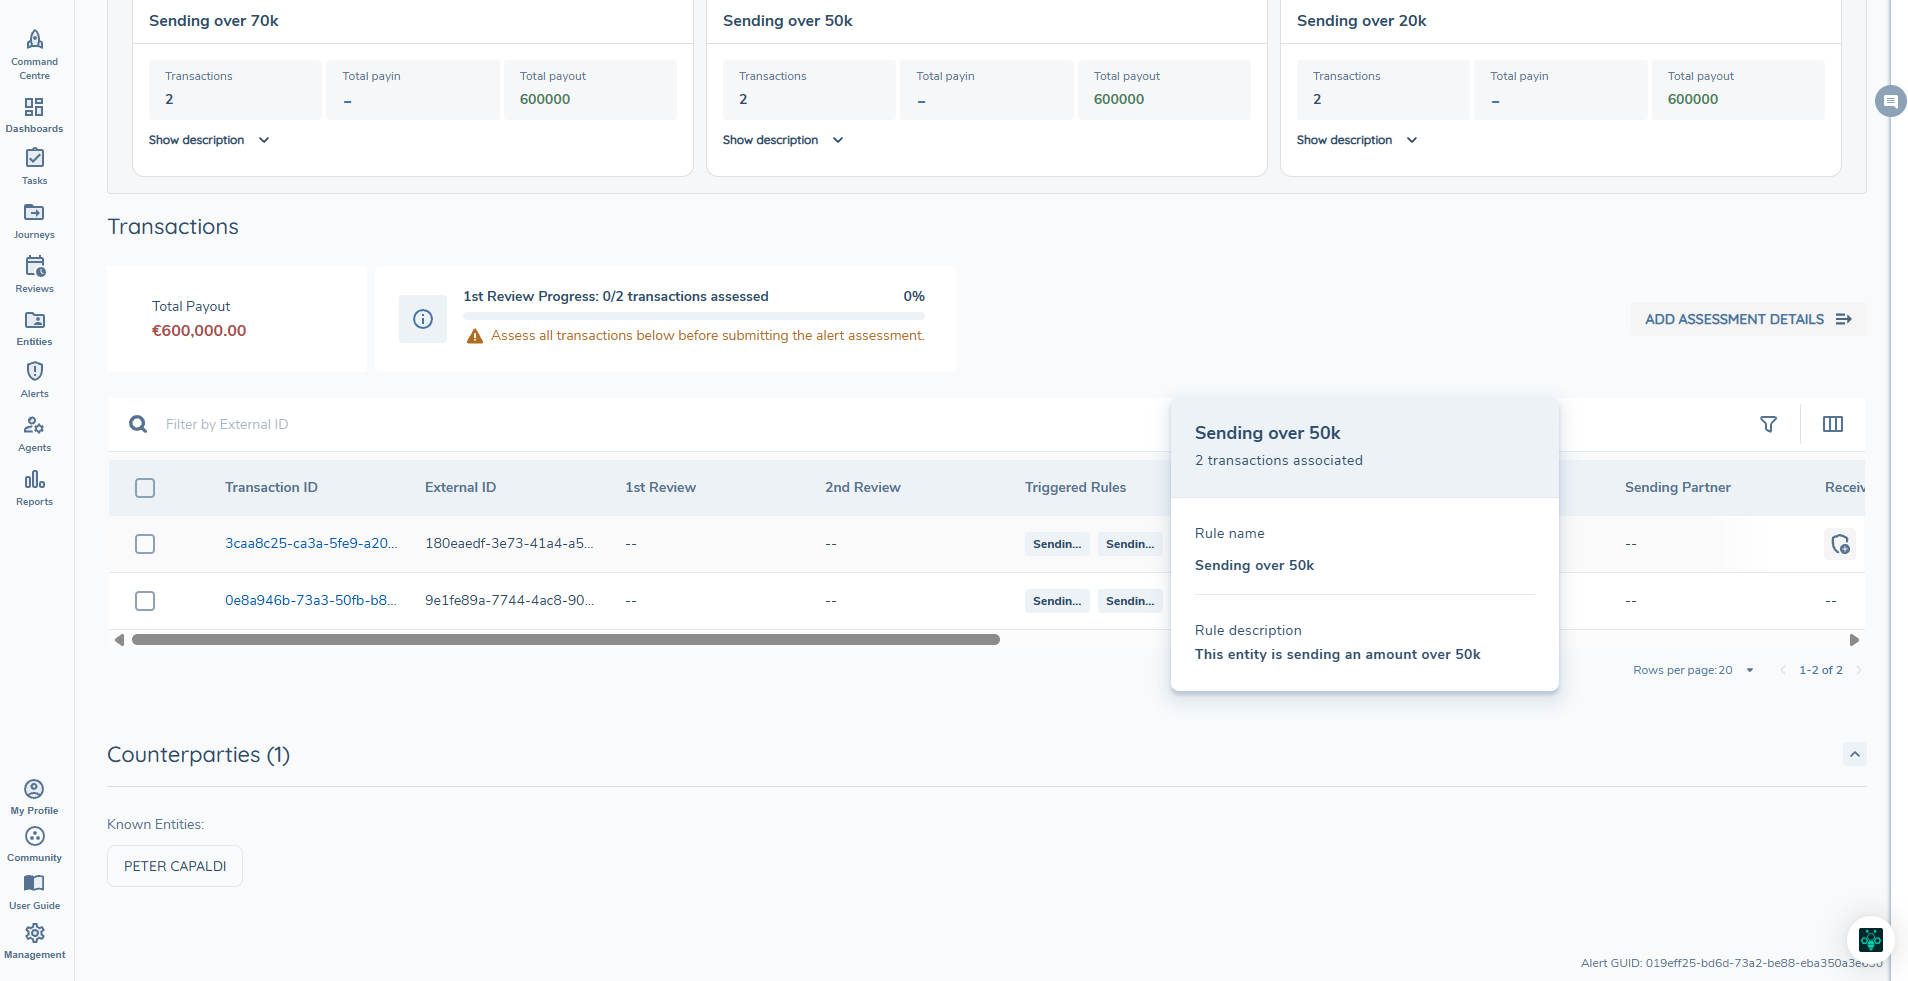
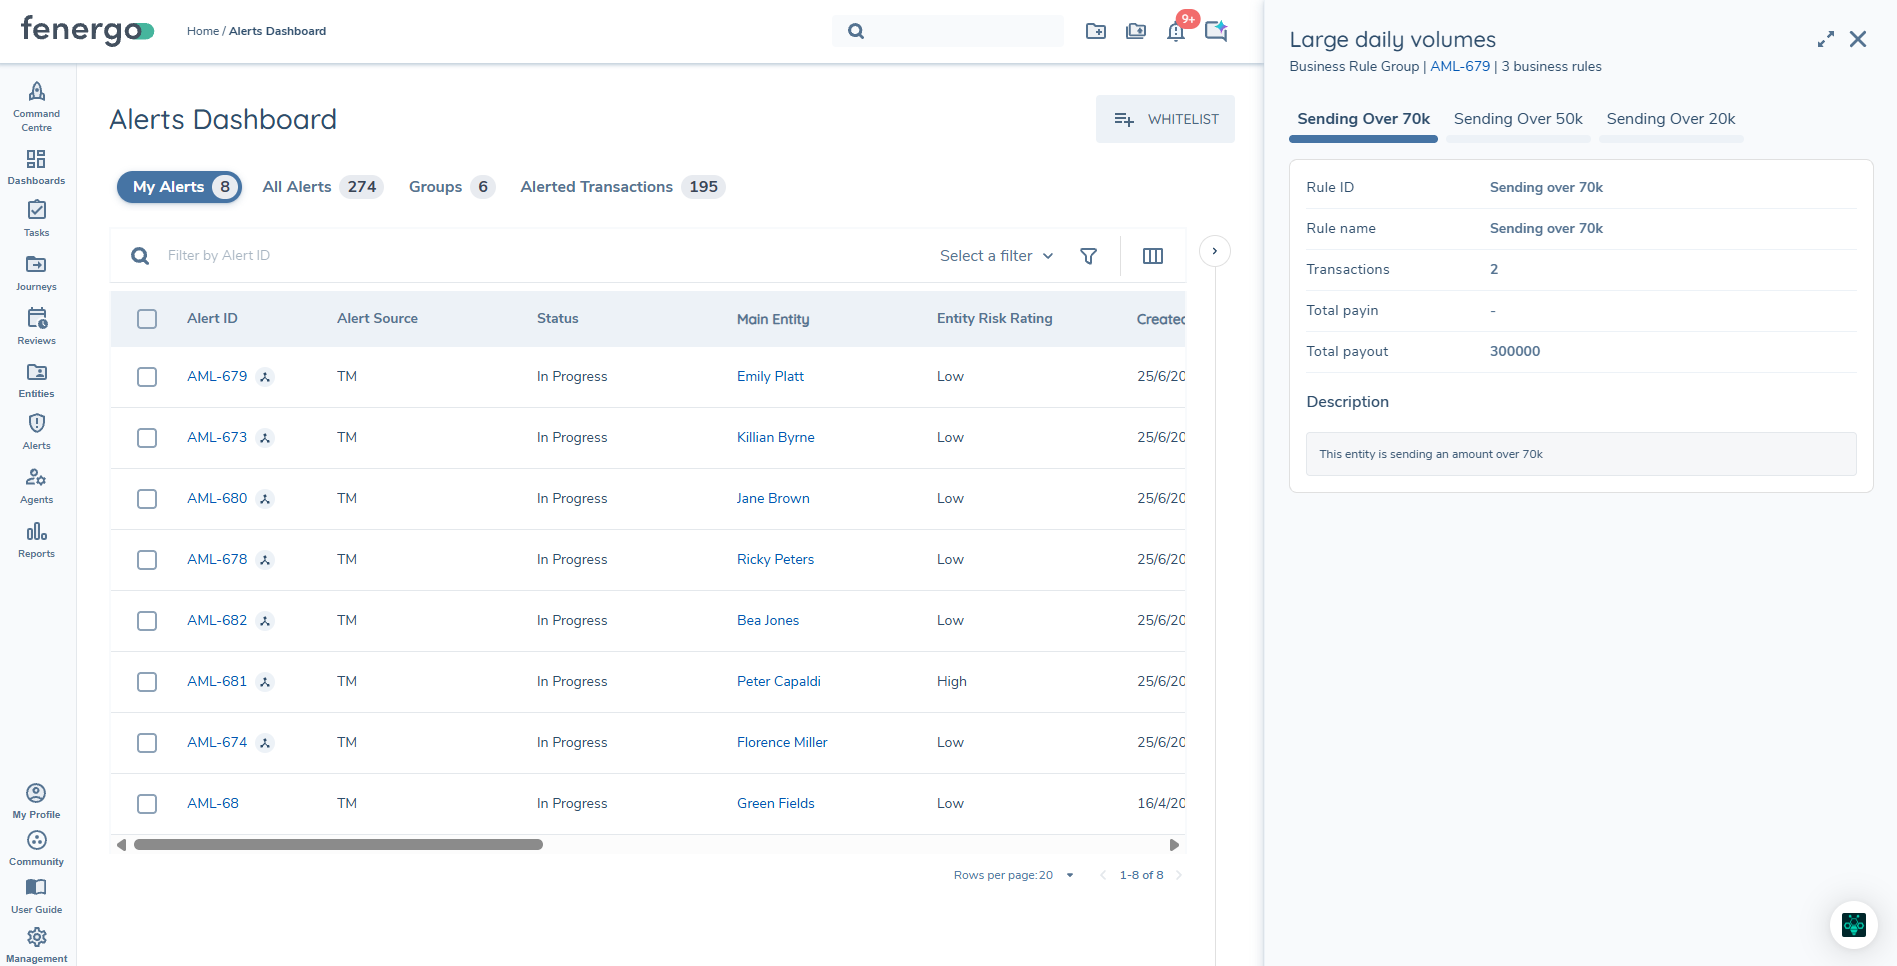
Triggered Rules Popover
The Triggered Rule popover displays key information for a selected detection rule and is available from the transaction grid on the Aggregated Alert Assessment page.
It presents rule-level attributes including Rule ID, Rule Name, associated transaction count, total pay-in, total pay-out, and description, allowing investigators to quickly review the detail of a triggered rule without navigating away from the assessment page.
Alert Visibility
Alert Grid Configuration
The Alert Dashboard supports configurable grid columns, allowing users to tailor the information displayed based on their investigation needs. A configuration icon is available beside the search bar on the Alert Dashboard. Selecting this icon displays a list of available columns that can be shown or hidden on the grid. Users can deselect columns to remove them from view, while the Alert ID column remains mandatory and is always displayed.
Column configuration is applied per grid, enabling users to maintain different column setups across views such as My Alerts and All Alerts, consistent with existing filter behaviour. Where supported, columns can be reordered within the grid using drag-and-drop functionality from the configuration panel.
Certain columns, including the row actions and alert selection checkbox, are fixed and remain in place regardless of configuration changes. Row-level actions are available directly within the grid and are displayed on hover, allowing users to quickly perform actions without navigating away from the dashboard.
Column configurability applies to the user interface only. Any filters applied will continue to function in the background, even if the corresponding column is not visible on the grid.
Some grids are reused across multiple areas of the application. Column configuration changes made to a shared grid will apply wherever that grid appears. The following grids share their configuration:
Transaction Grid
- Transactions Grid (Alert RHD)
Alerts Grid
- EPP Alerts Grid
- Alerts Grid (Entity RHD)
- Alerts Grid (Transaction RHD)
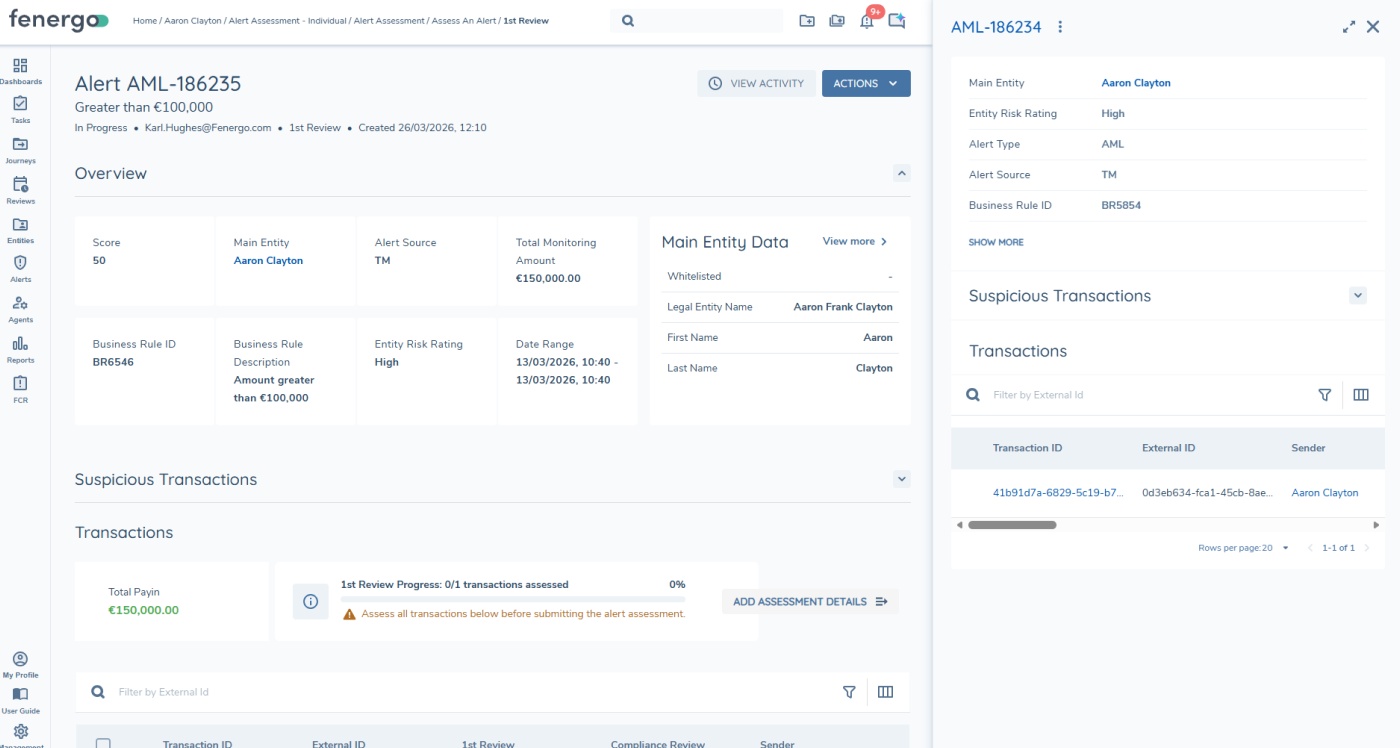
Alert Assessment Page
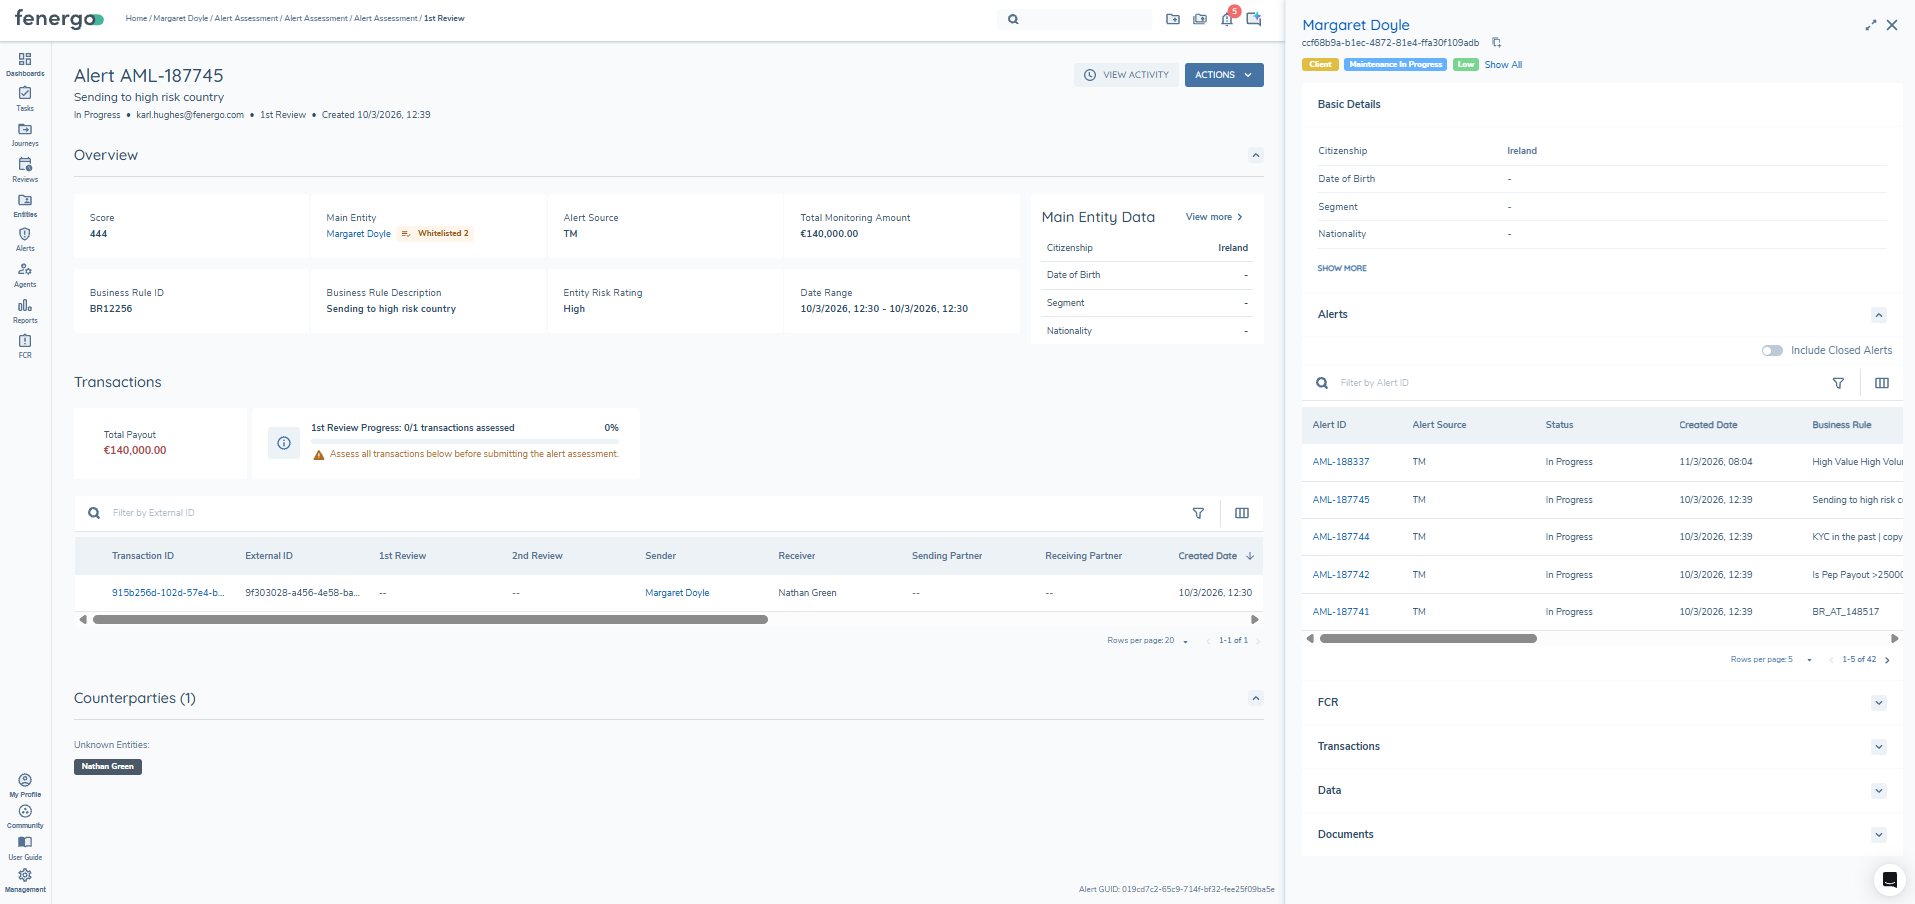
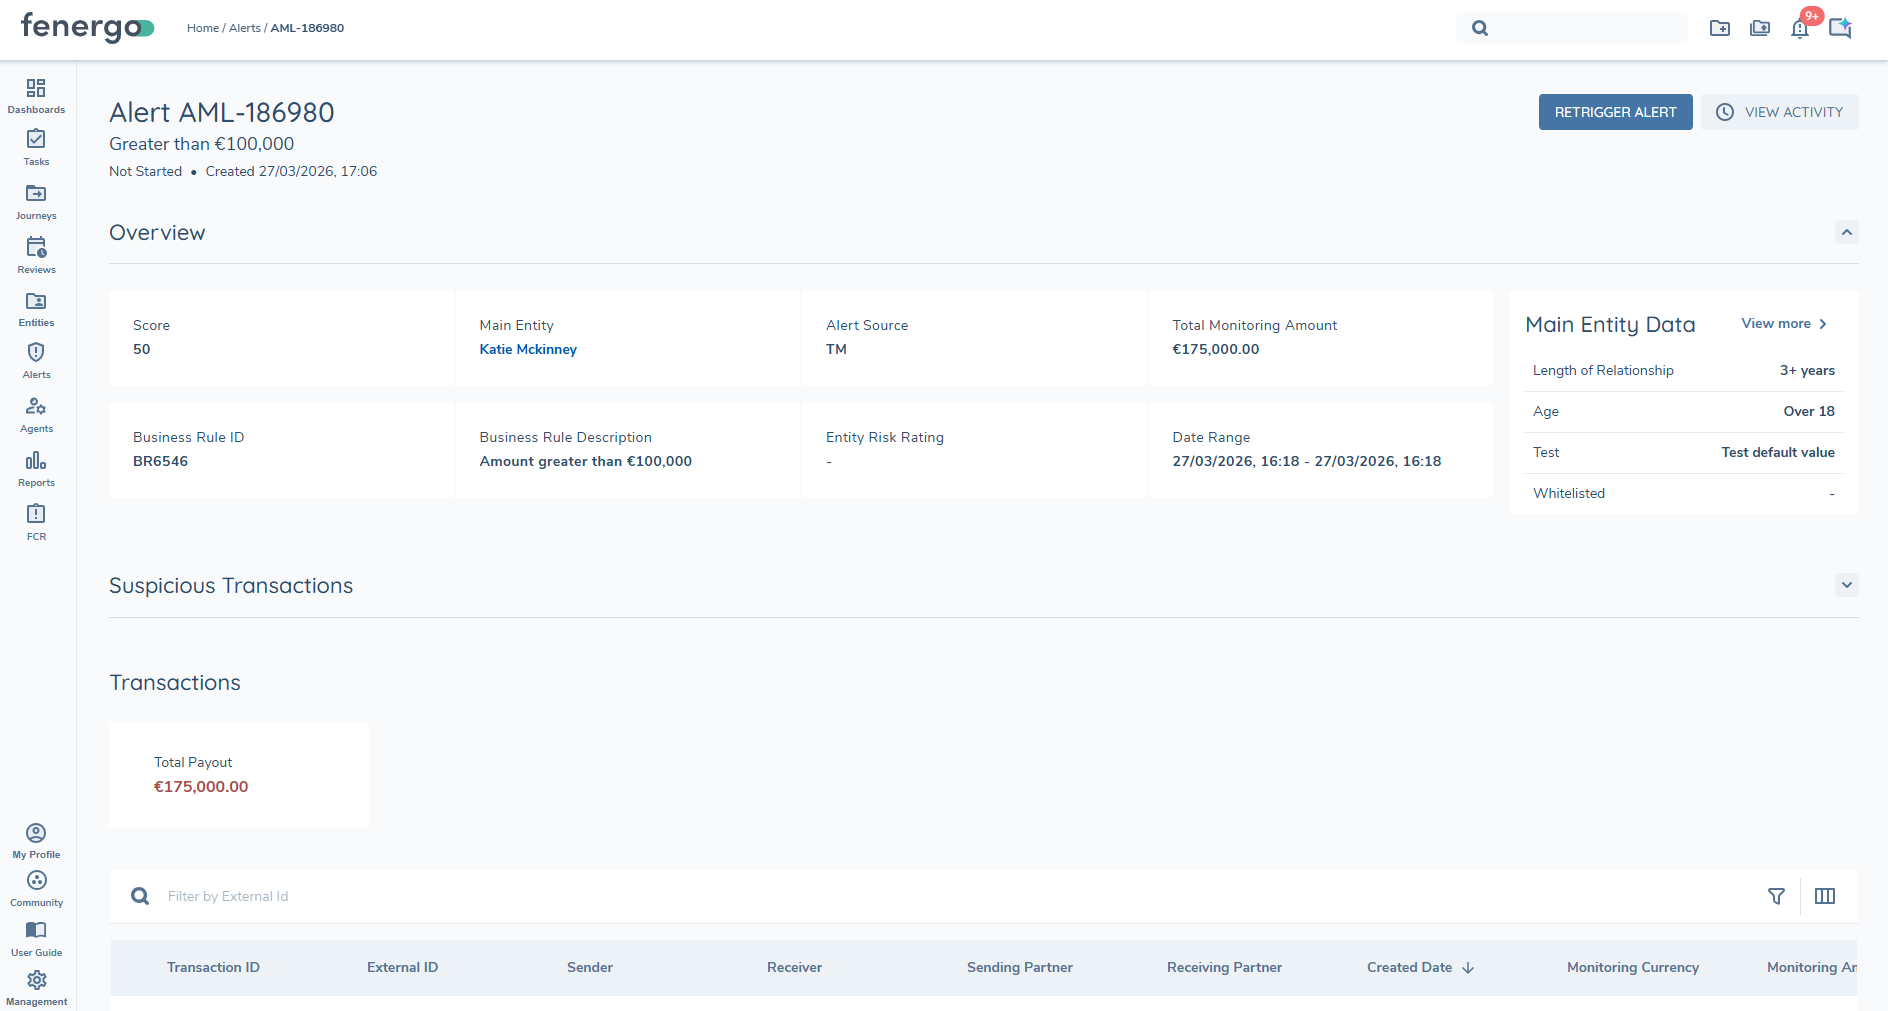
An alert assessment is accessed directly from the alert dashboard. If a previous assessment has been carried out then the result will be shown on the dashboard. Clicking into an alert will bring the user to the latest assessment, if they are assigned to the alert, they can complete the pending assessment. Otherwise, they will see the last completed assessment. The assessment shows the essential information for each individual alert, including:
- Overview: Alert Information
- Entity Widget (configurable)
- Suspicious Transactions
- Transactions
- Assessment Comment
Additionally, at the top left of the page is the Alert's ID and the current stage of this alert. At the top right of the page, there is the option to perform actions on the alert.

Aggregated Alert Assessment Page
When an investigator opens an Aggregated Alert, they are brought to the Aggregated Alert Assessment page. This page follows the same structure as the standard Alert Assessment page but includes additional components that reflect the multi-rule nature of the alert.
The Aggregated Alert icon is displayed at the top of the page alongside the Alert ID, clearly identifying the alert as an Aggregated Alert.
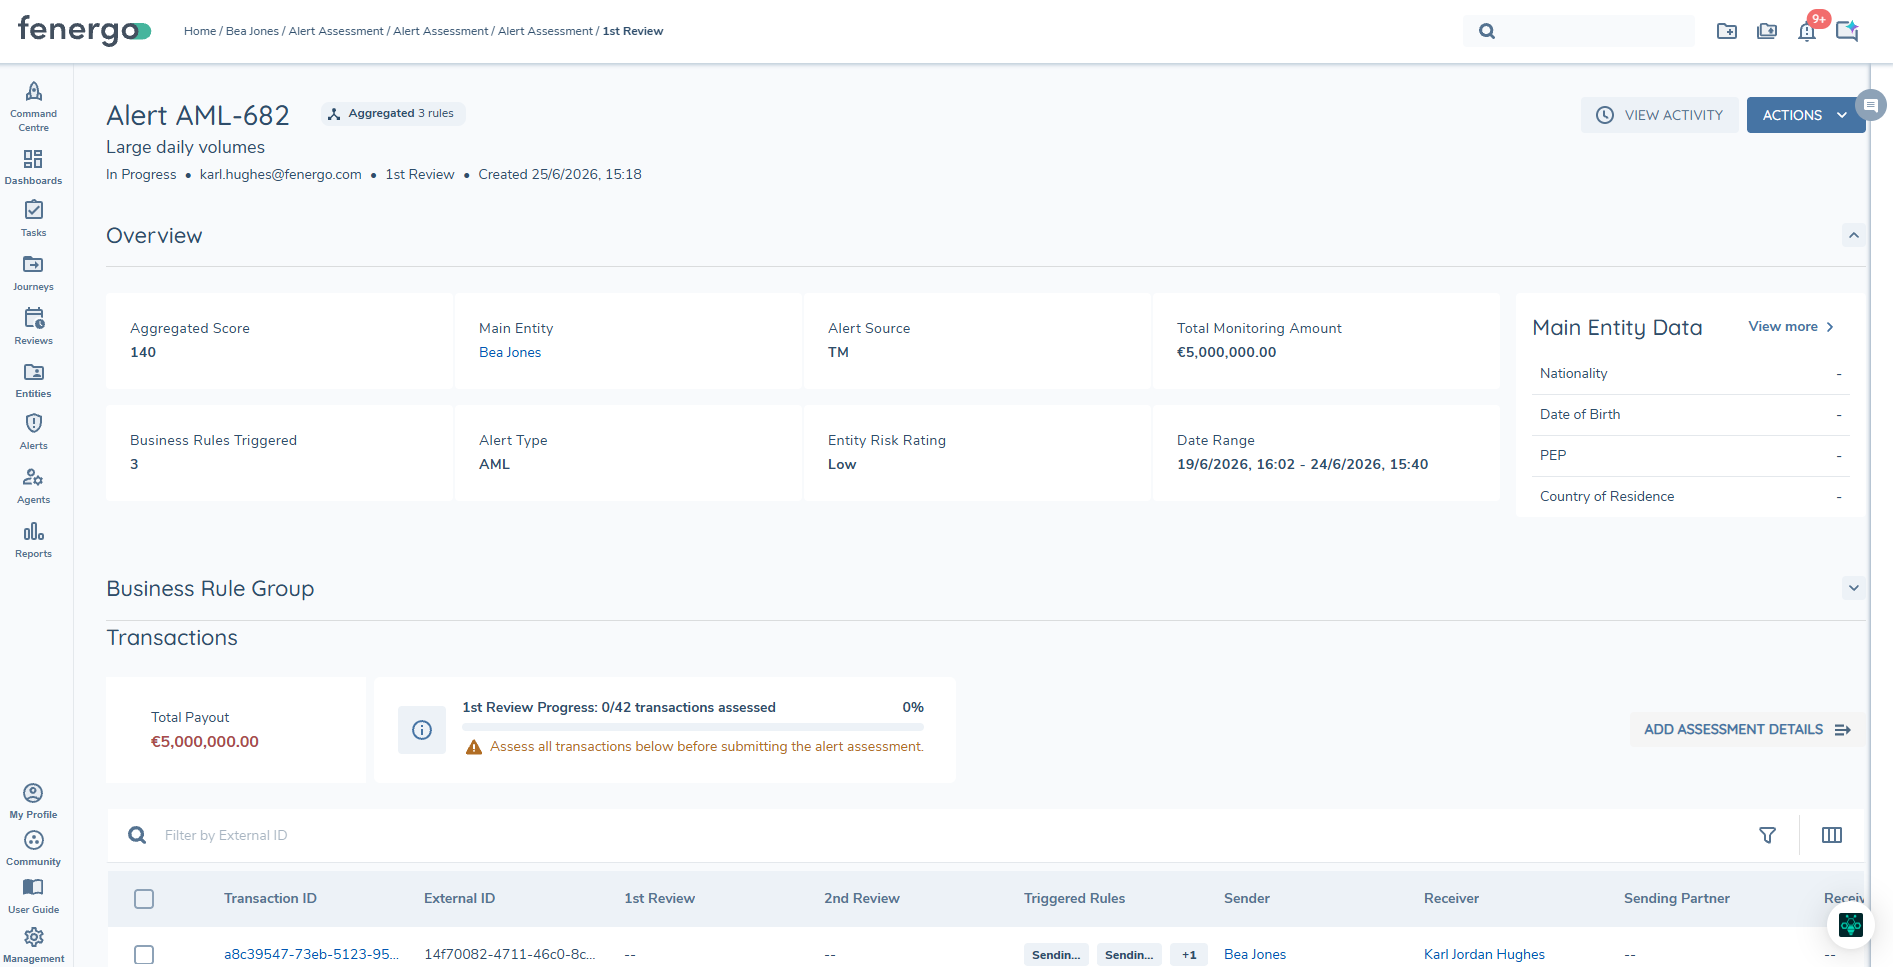
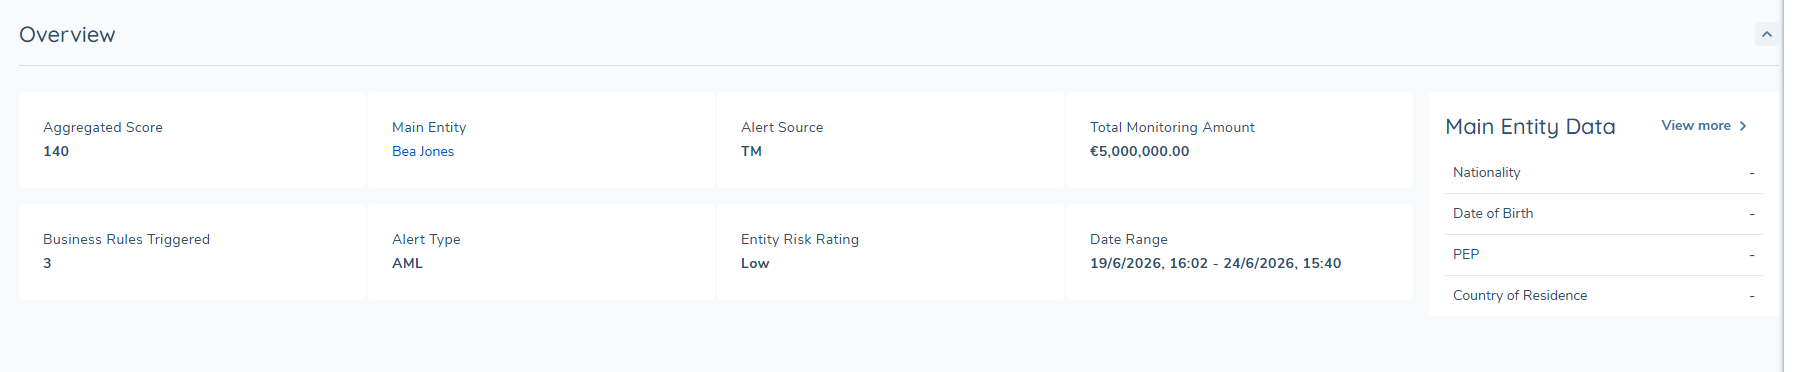
Overview
The Aggregated Score reflects the combined score of all detection rules that contributed to the alert, giving investigators an immediate indication of the overall risk weight. The Business Rules Triggered indicator shows the total number of detection rules that fired to generate this alert, providing immediate context on the breadth of suspicious activity before reviewing the detail.
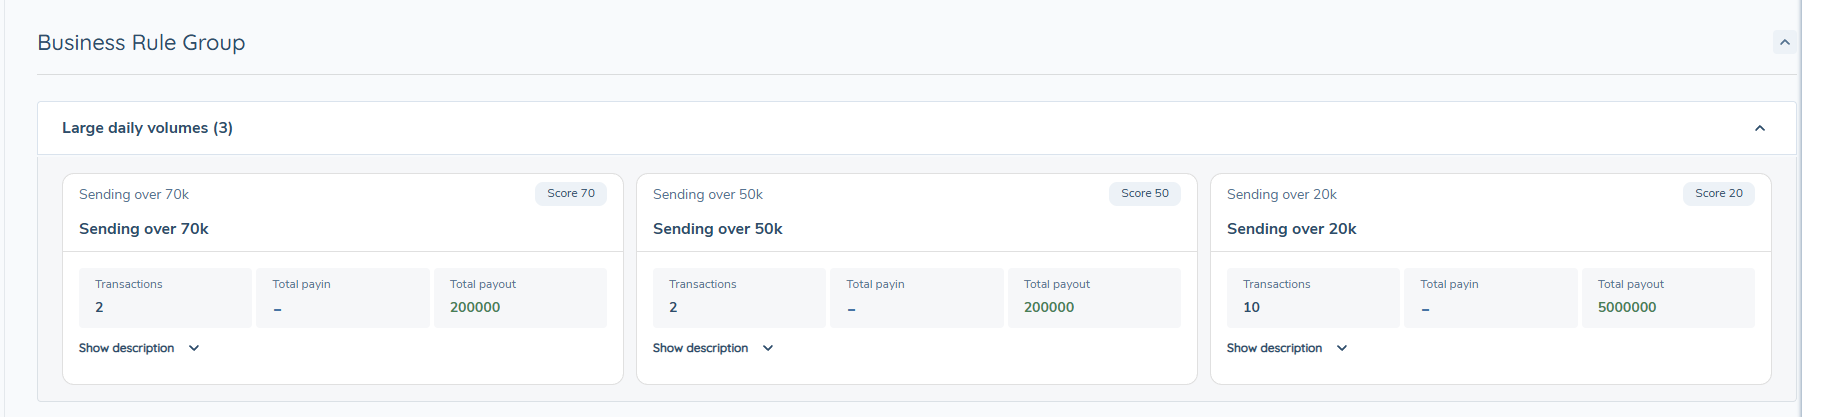
Business Rule Group
The Business Rule Group section provides a breakdown of every detection rule that contributed to the Aggregated Alert. The following information is displayed for each rule:
- Rule ID — The unique identifier for the detection rule.
- Rule Name — The name of the detection rule.
- Transactions — The number of transactions associated with this rule within the alert.
- Total Pay-in — The total pay-in amount across transactions associated with this rule.
- Total Pay-out — The total pay-out amount across transactions associated with this rule.
- Description — A description of the detection rule.
Transaction Grid
The transaction grid includes a Triggered Rules column, indicating which detection rules were triggered by each individual transaction. Hovering over a triggered rule opens the Triggered Rule popover, which displays the rule ID, name, and description for that rule.
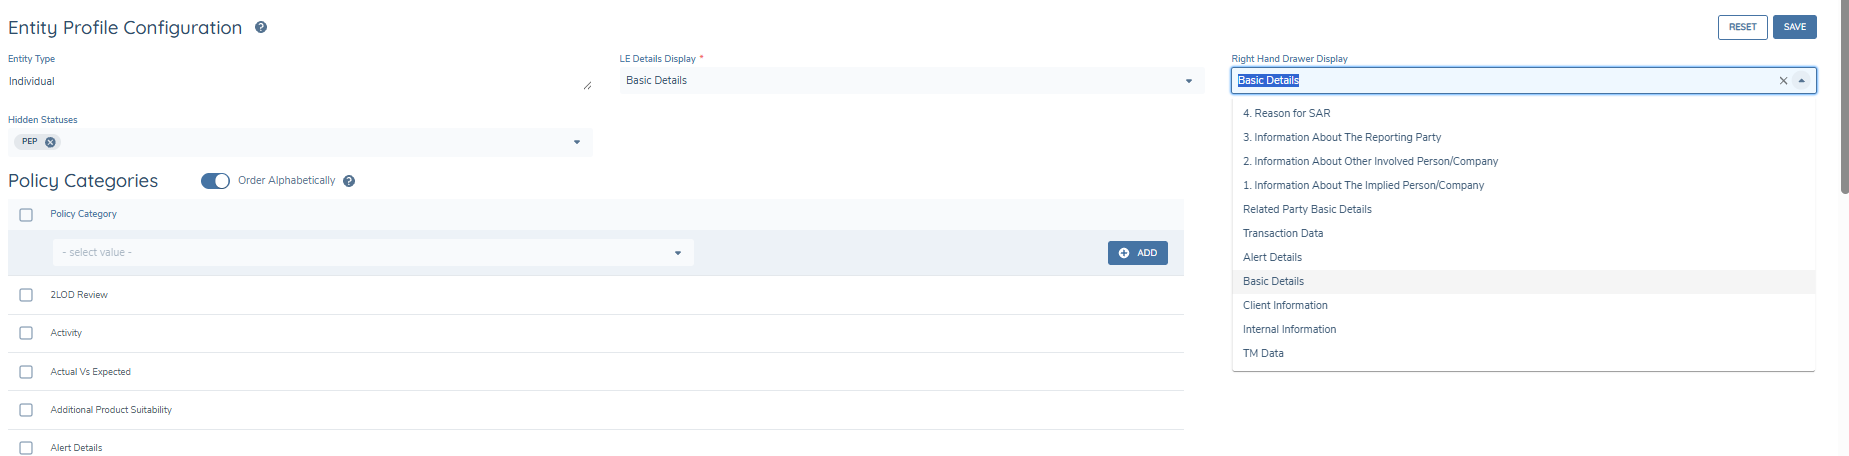
Main Entity Data Configuration
The Right Hand Drawer Display setting within Entity Profile Configuration determines the information shown in the Main Entity Data panel on the right-hand side of the Alert Assessment page. Administrators can configure this by navigating to: Entity Profile Configuration
Within the relevant Entity Type, the Right Hand Drawer Display selection controls:
- The entity layout used in Alert Assessment.
- The fields displayed in the Main Entity Data panel.
- The information shown at the top of the Entity right-hand drawer (RHD).
- The title of the category shown in the drawer.
Any changes to the Right Hand Drawer Display configuration will apply to all alerts associated with that Entity Type.
This ensures that analysts reviewing alerts see entity information aligned to the configured entity layout.
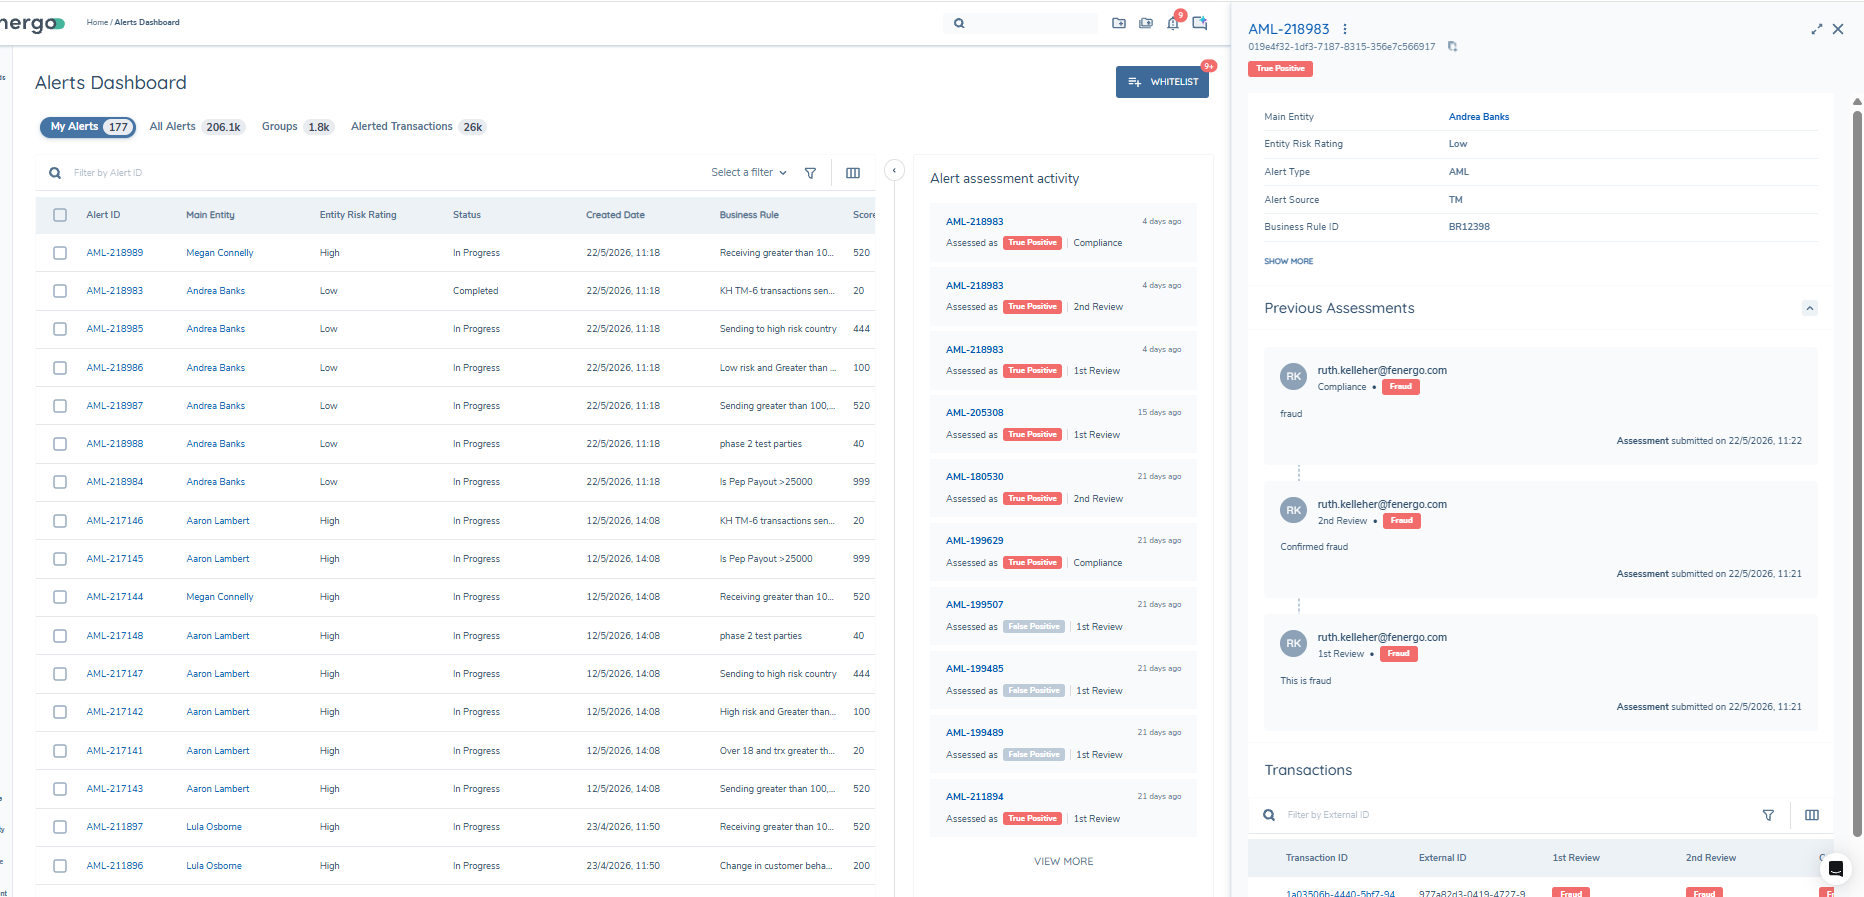
Right Hand Drawer
The Right Hand Drawer is a slide-out panel displayed on the right side of the screen that provides additional contextual information without navigating away from the current page. The content displayed in the panel is context-driven and updates based on the item selected by the user. This gives users the ability to view more than one alert at one time without changing pages.
Entity RHD
The Entity Context view within the Right Hand Drawer displays a summary of key information for the selected entity. This includes the entity name and current status, along with Basic Information such as date of birth, name, and nationality. Additional sections, including Alerts, FCR, Data, and Documents, are available in expandable panels, allowing investigators to quickly access relevant entity-related information without navigating away from the current page. Note that FCR tab visibility follows access permissions — users who do not have permission to view FCR data for an entity will not see this tab in the drawer.
Alert RHD
The Alert Context view within the Right Hand Drawer displays a summary of key information for the selected alert, including Alert ID, Main Entity, Alert Type, Alert Source, and Business Rule information. A Transactions section displays the transactions associated with the alert along with any transaction-level review outcomes. Where applicable, a Suspicious Transactions section is available and is expanded only when suspicious transactions are present; if no data exists, this section remains collapsed.
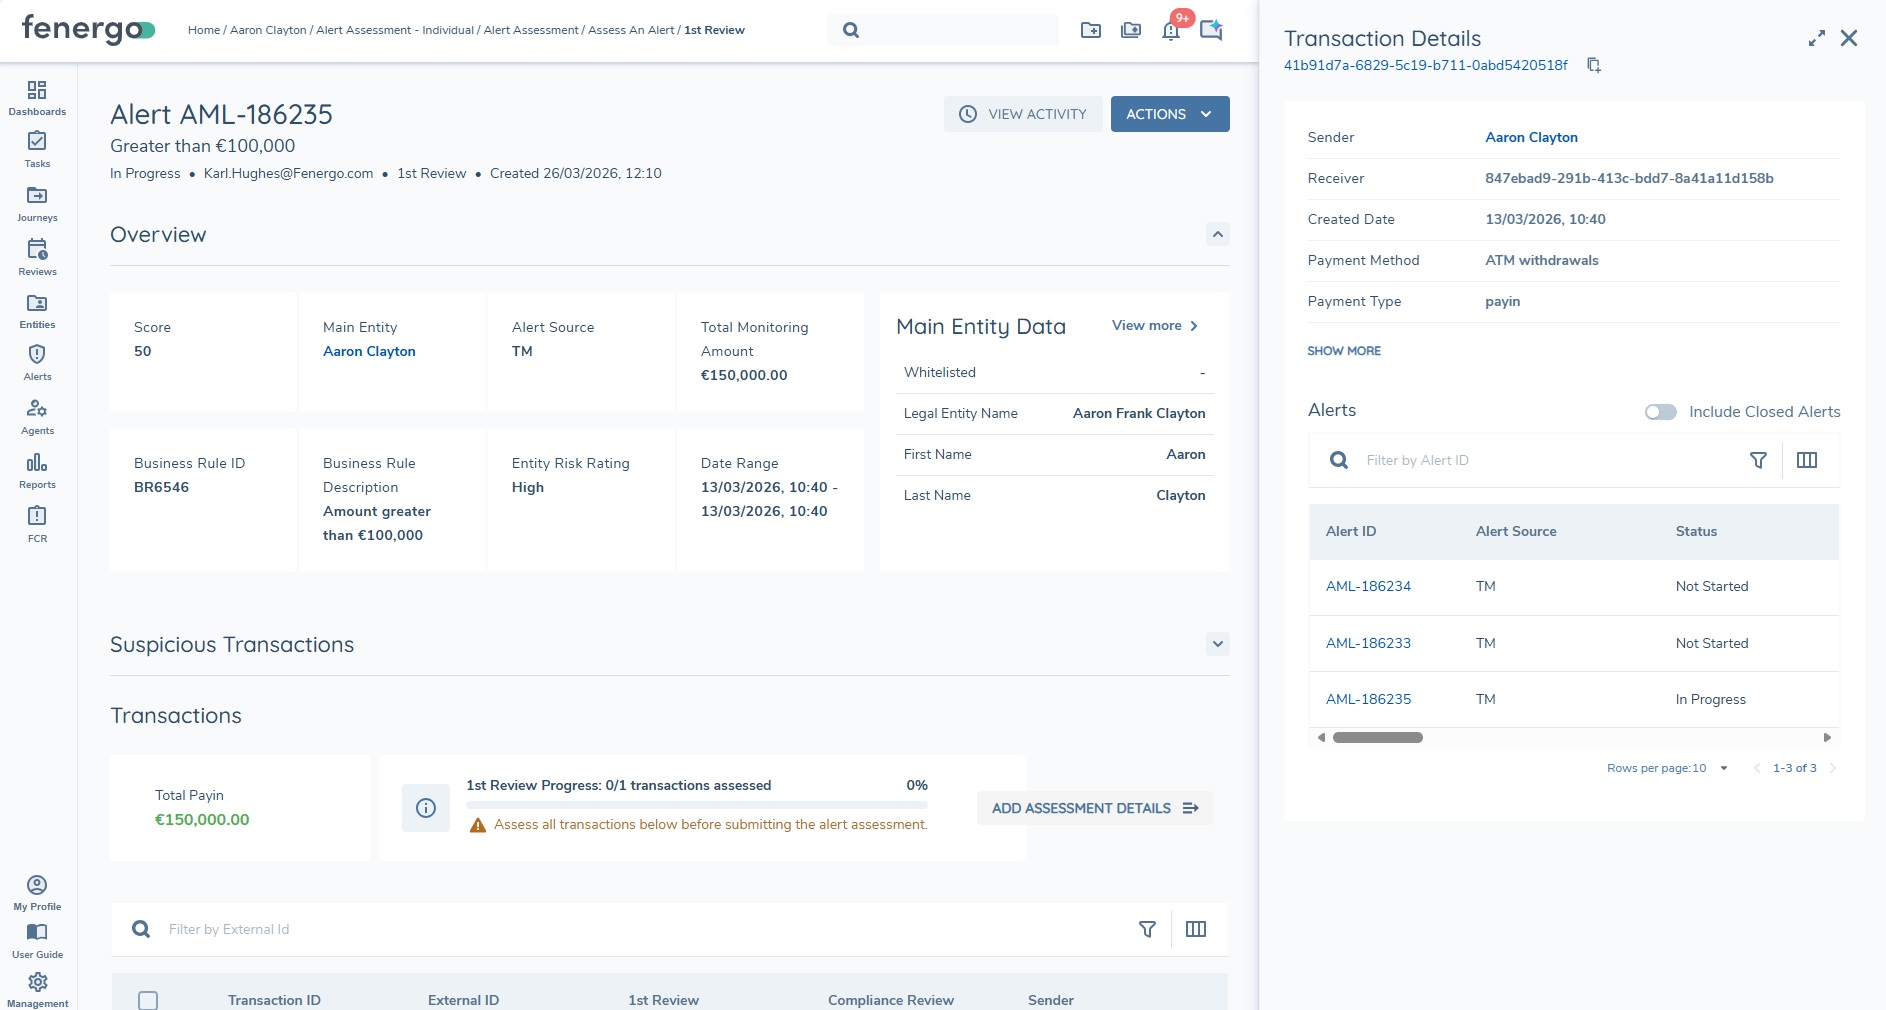
Transaction RHD
The Transaction Context view within the Right Hand Drawer displays detailed information for the selected transaction. This includes key transaction attributes such as Sender, Receiver, Created Date, Payment Method, and Payment Type, with additional details available using the Show More option. An Alerts section is also displayed, listing all alerts associated with the transaction, with the option to include closed alerts and to filter results, allowing investigators to easily review alert activity linked to the transaction without leaving the current page.
Rule Group RHD
The Rule Group Context view within the Right Hand Drawer displays all detection rules triggered as part of an Aggregated Alert. It is available from the My Alerts and All Alerts dashboards and is opened by selecting the Business Rule value in an Aggregated Alert row.
The following information is displayed for each rule:
- Rule ID — The unique identifier for the detection rule.
- Rule Name — The name of the detection rule.
- Transactions — The number of transactions associated with this rule within the alert.
- Total Pay-in — The total pay-in amount across transactions associated with this rule.
- Total Pay-out — The total pay-out amount across transactions associated with this rule.
- Description — A description of the detection rule.
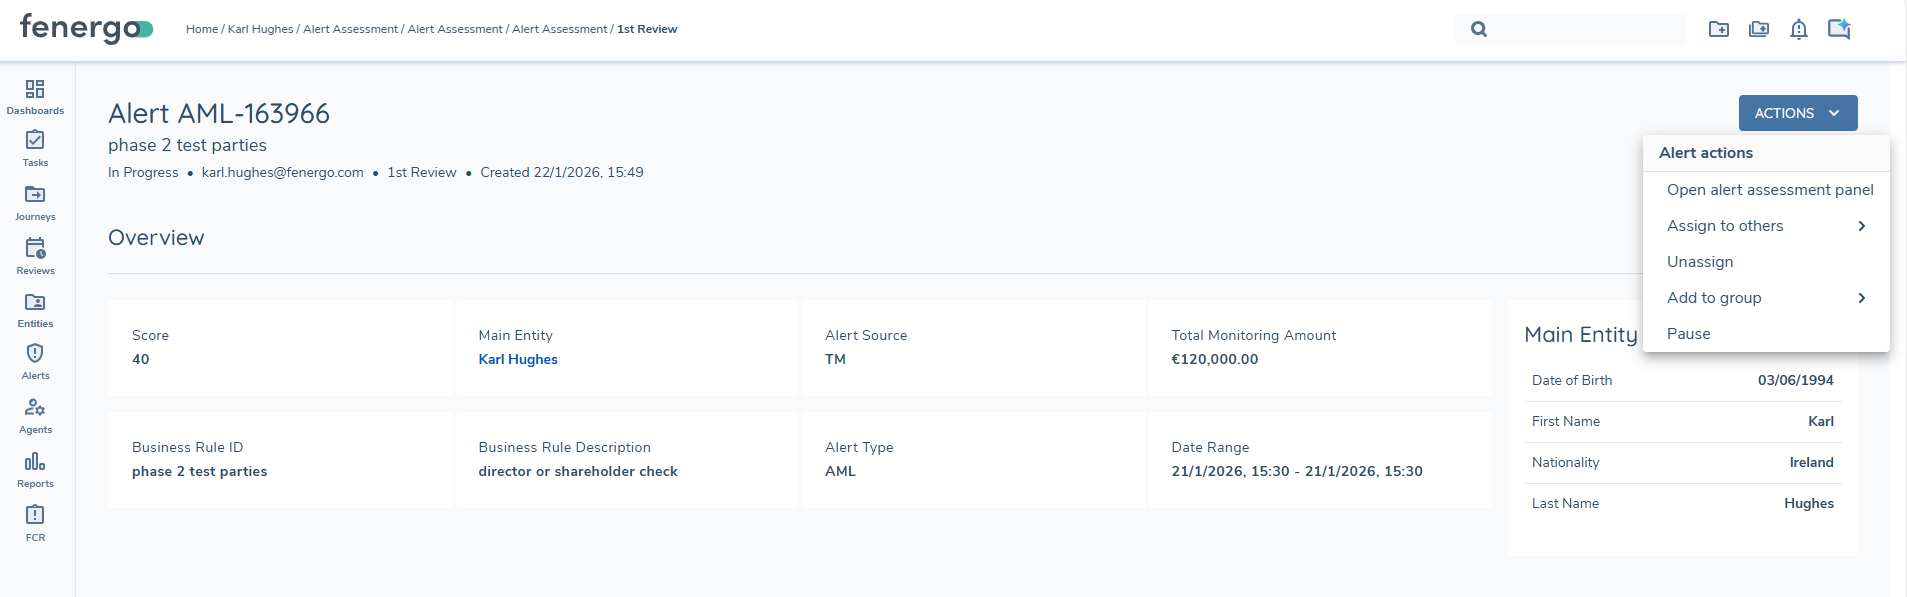
Alert Actions
Alert Assignment: Assign to me/Assign to other/Unassign
An alert is always either assigned or unassigned. An alert must be assigned to a user for that user to assess the alert. Any user (with permission) can, however, comment on an open alert even if the alert is not assigned to that user. A user can only assign an alert to themselves or have that alert assigned to them if they are included in the team that is assigned to assess this alert task. If four-eyes checking has been toggled on, the user must not have assessed the alert in a previous stage. Alerts can be assigned to users from the dashboard or from within the alert task. Depending on the user's permissions, they can assign and unassign alerts from themselves and others or directly reassign assigned alerts to themselves or other users. Alert assignment can be changed from the alert task and on the alert dashboard.
Alert Assessment Page Actions
- Open alert assessment panel
- Assign to me
- Assign to others - this will list the relevant team members eligible for the this task
- Unassign - will remove the current assignee
- Pause - where SLAs are configured, users can pause a task if they have permission, this will update to unpause as relevant
Trigger Alert Assessment Journey Manually
In normal operation, the alert assessment journey is triggered automatically when an alert is created. In some cases, an alert may be created but the journey may not initialise successfully, for example due to journey configuration issues or temporary processing delays. In this scenario, the alert cannot proceed through the standard investigation workflow until the journey has been started.
To manually trigger the alert assessment journey:
-
Open the relevant alert.
-
From the available alert actions, select Retrigger Alert.
-
The system attempts to launch the configured Alert Assessment journey for that alert.
-
If the journey is temporarily unavailable, the system applies a short wait period before retrying.
-
Once the journey has been started successfully, the alert becomes available for investigation through the standard workflow.
If the journey cannot be started after the wait period, the user should verify the journey configuration or retry the action later.
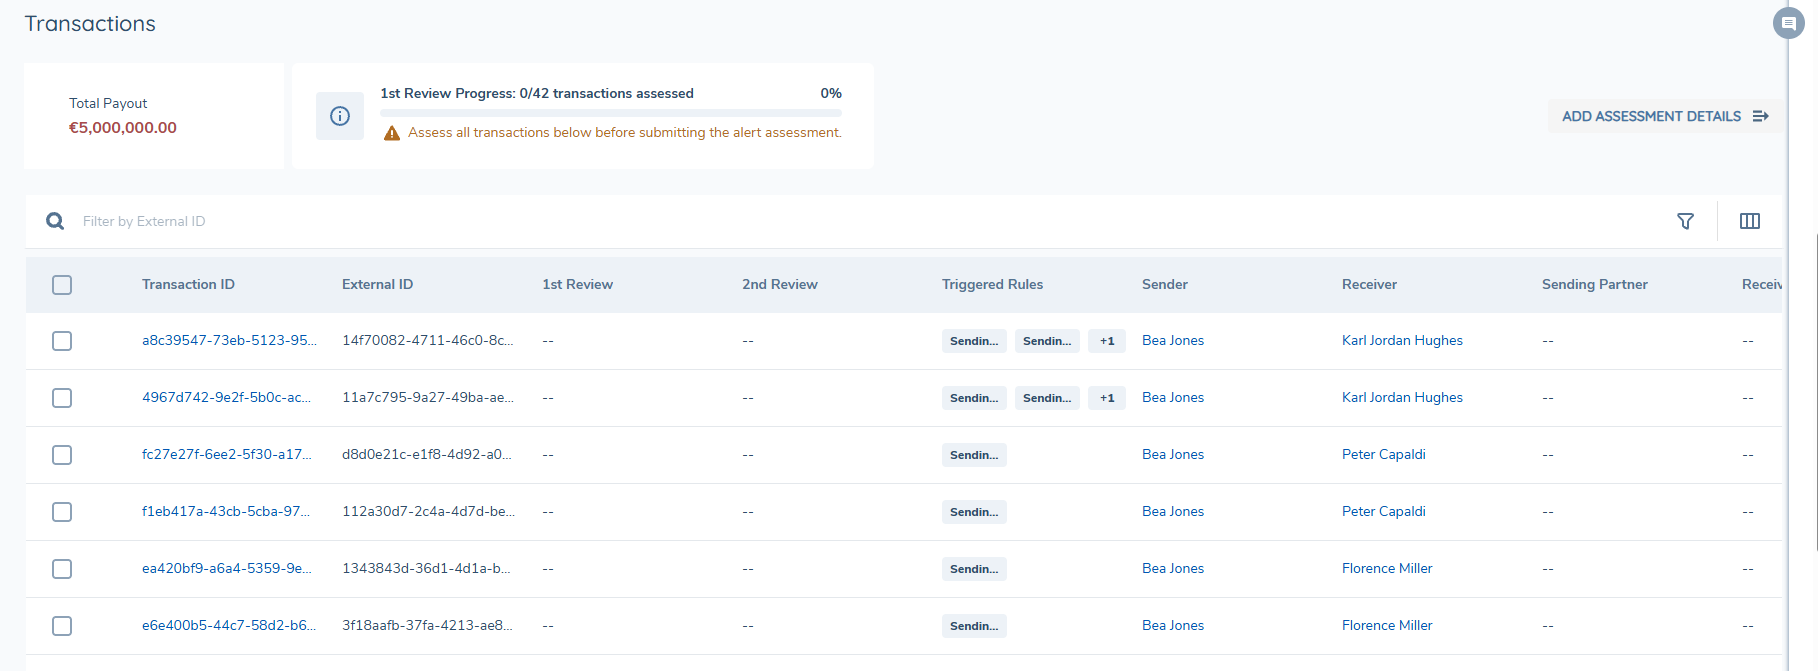
Transaction Evaluation
The transaction evaluation takes place in the Transactions section of the Alert Overview Page. The Transactions section consists of a table with the following columns:
- Transaction ID - Fenergo assigned GUID
- External ID - this is the id sent in the API, can be string or guid
- Relevant review tasks defined by journey- Assessment stages
- Compliance Assessment given at Compliance review stage (if applicable)
- Sender - The sender of funds in the transaction with a hyperlink to the entity if it is the main entity
- Receiver - The receiver of funds in the transaction with a hyperlink to the entity if it is the main entity
- Created Date - The date and time that the transaction took place
- Monitoring Currency - This monitoring currency as defined in the api
- Monitoring Amount - Monitoring amount provided
- Original Currency - Original currency of the transaction
- Original Amount - Original amount of the transaction
- Payment Method - Method used e.g. PayPal, Visa
- Payment Type - Payin/payout
Assessing Alerts
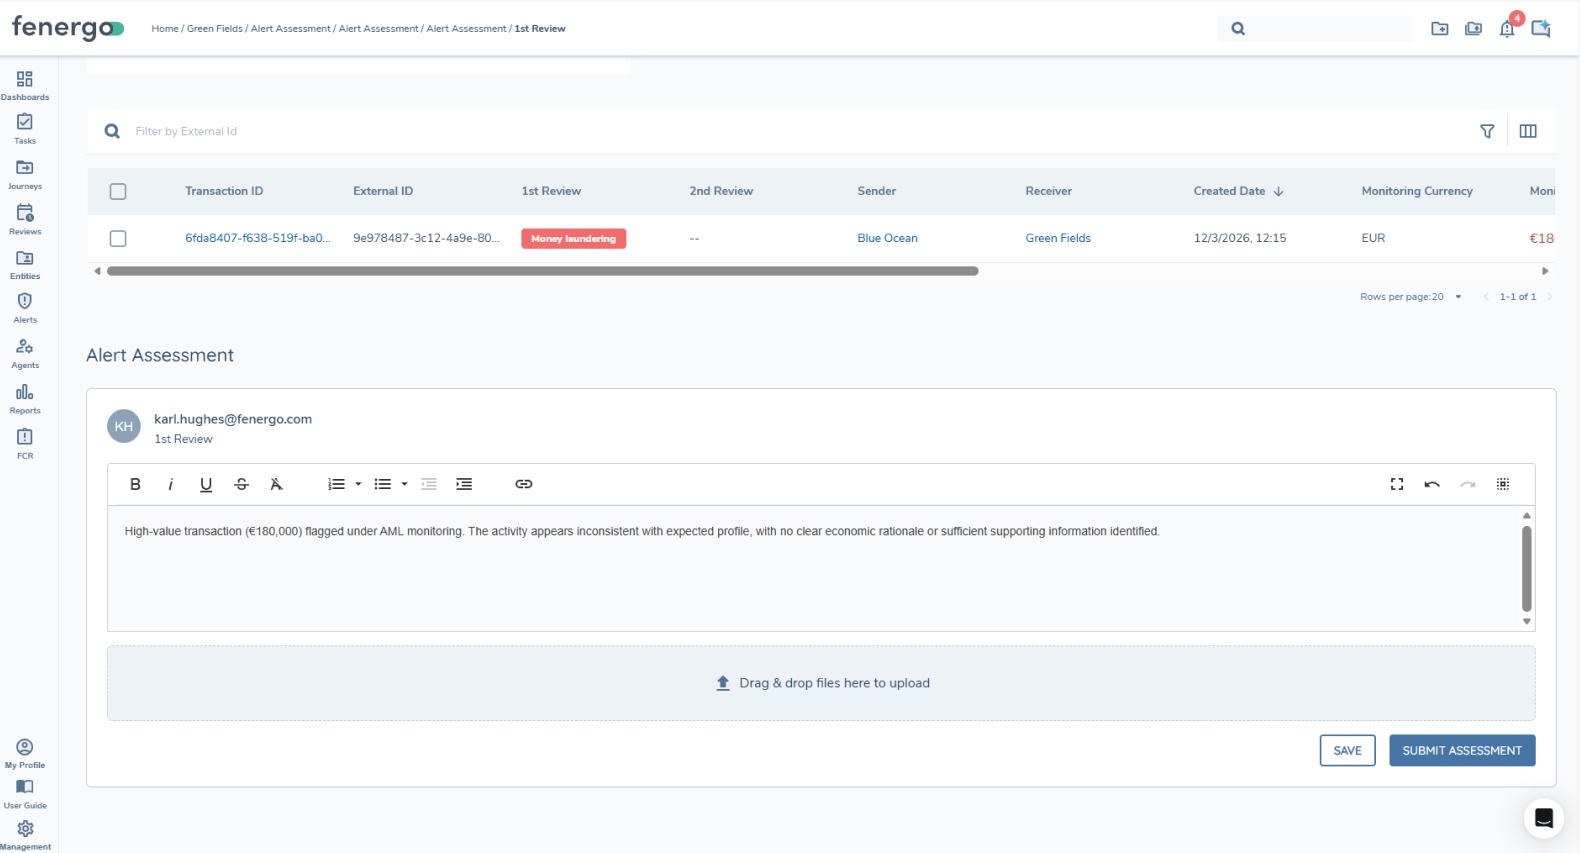
Once all the transactions have been assessed within an alert, the Assessments section of the page will change to display an assessment box. The user must then input an assessment message for the alert and can optionally add files to attach to the assessment . The user must click 'Submit Assessment' to confirm. A modal will be presented which will ask users to confirm their assessment submission. At this point the alert will move to the next stage according to the workflow configuration.
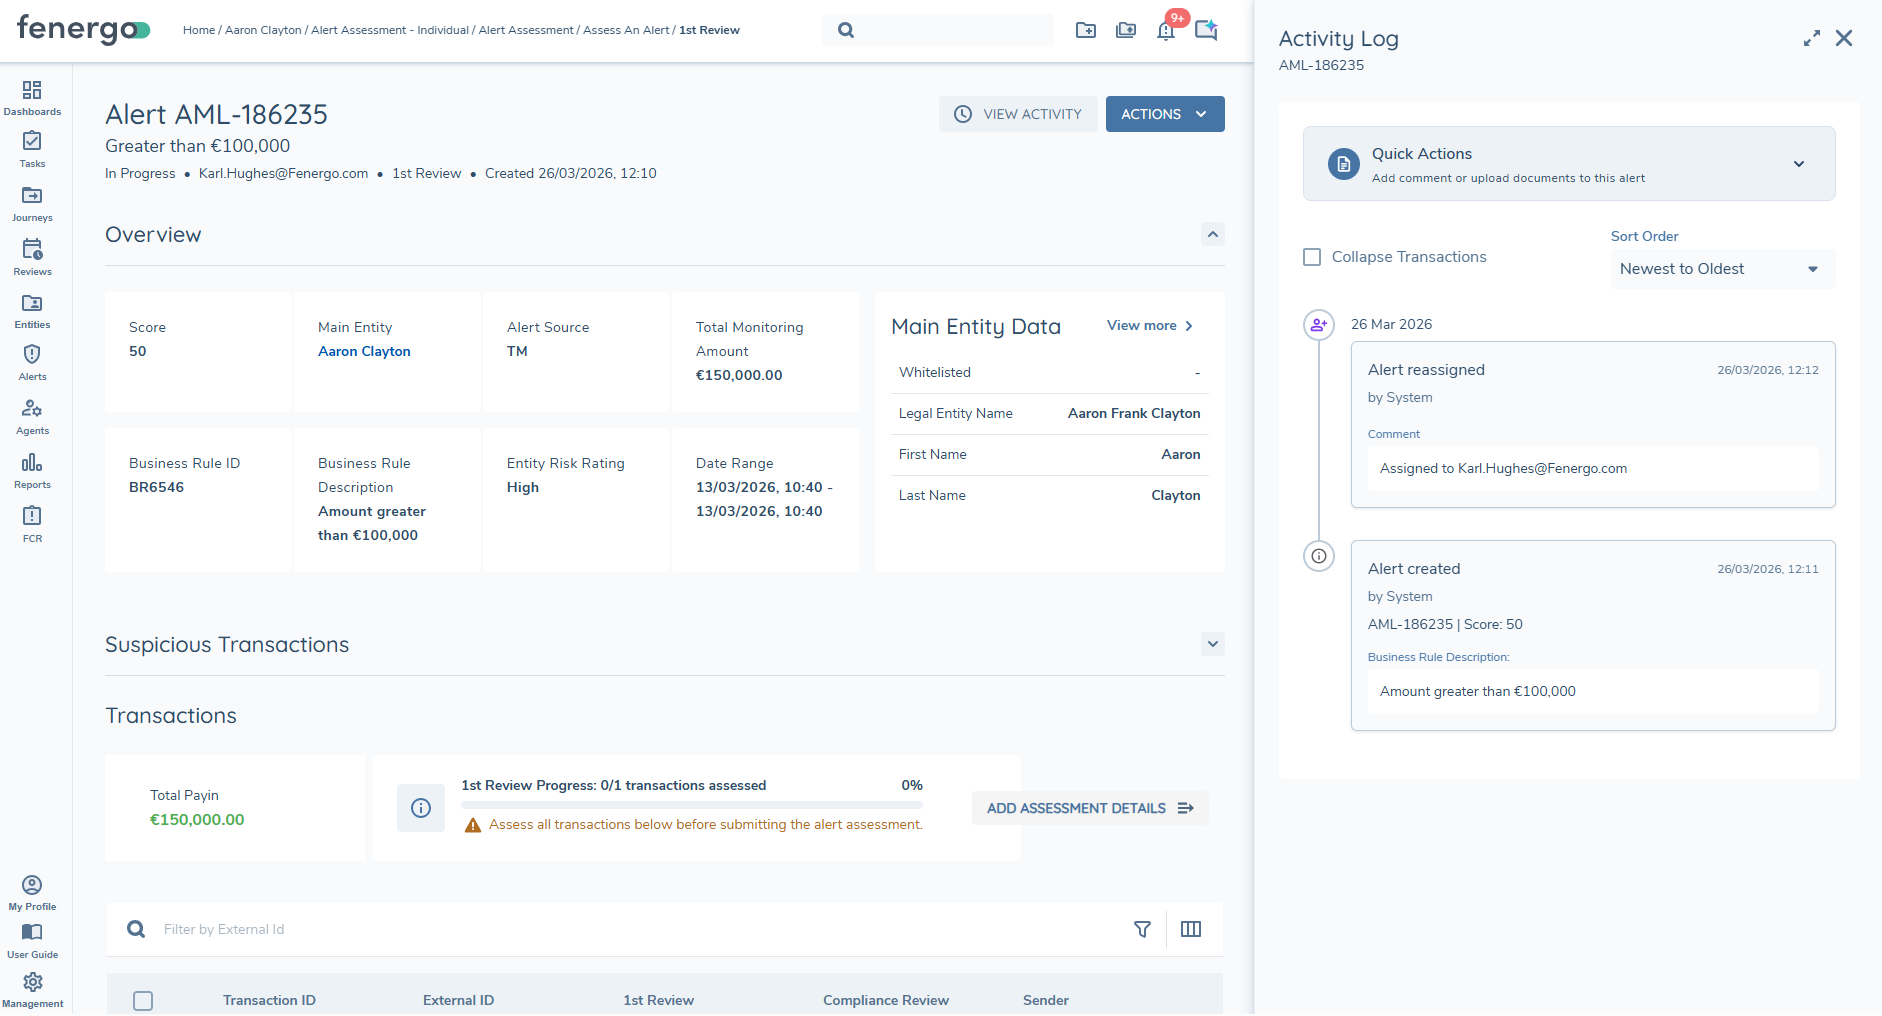
Alert Activity Log
View Activity Log
The View Activity button within an alert opens the Activity Log, providing a complete record of the alert's lifecycle from creation. It captures all activity related to the alert, including comments, uploaded documents, status changes, assignments, and system-generated updates. Each entry includes a timestamp and identifies the user who performed the action, ensuring full auditability.
The Activity Log opens in a right-hand drawer from the alert assessment screen. Users can perform quick actions, such as adding comments or uploading documents, directly within this panel. Activity entries can be sorted from newest to oldest.
Document restrictions
The following restrictions apply to uploading documents (per comment and assessment):
- Maximum of 5 files per comment/assessment
- Maximum 100MB per file
- Files must be one of the following file types:
- bmp (Bitmap Image)
- csv (Comma-separated values)
- doc (Microsoft Office document)
- docm (Microsoft Word Macro-enabled Document)
- docx (Microsoft Office Open XML Format (OOXML) Document)
- dot (Microsoft Word Document Template)
- eml (E-Mail Message)
- gif (Graphics Interchange Format 87a and 89a)
- htm (Hypertext markup language)
- html (Hypertext markup language)
- jfif (JPEG File Interchange Format)
- jpeg (JPEG Image)
- jpg (JPEG Image)
- log (Log File)
- mht (MHTML Web Archive)
- msg (Microsoft Outlook file)
- nsf (Lotus Notes Database Format)
- odt (OpenDocument Text Document)
- oft (Microsoft Outlook file template)
- pdf (Portable Document Format)
- png (Portable Network Graphic)
- ppt (PowerPoint presentation)
- pptx (Microsoft Office Open XML Format (OOXML) Document)
- rtf (Rich Text Format File)
- tif (Tagged Image File)
- tiff (Tagged Image File Format)
- txt (Text)
- xls (Excel spreadsheet)
- xlsm (Microsoft Excel Macro-Enabled Spreadsheet)
- xlsx (Microsoft Office Open XML Format (OOXML) Document)
- xltm (Microsoft Excel Macro-Enabled Spreadsheet Template)
- xml (Extensible Markup Language)
- xps (XML Paper Specification File)
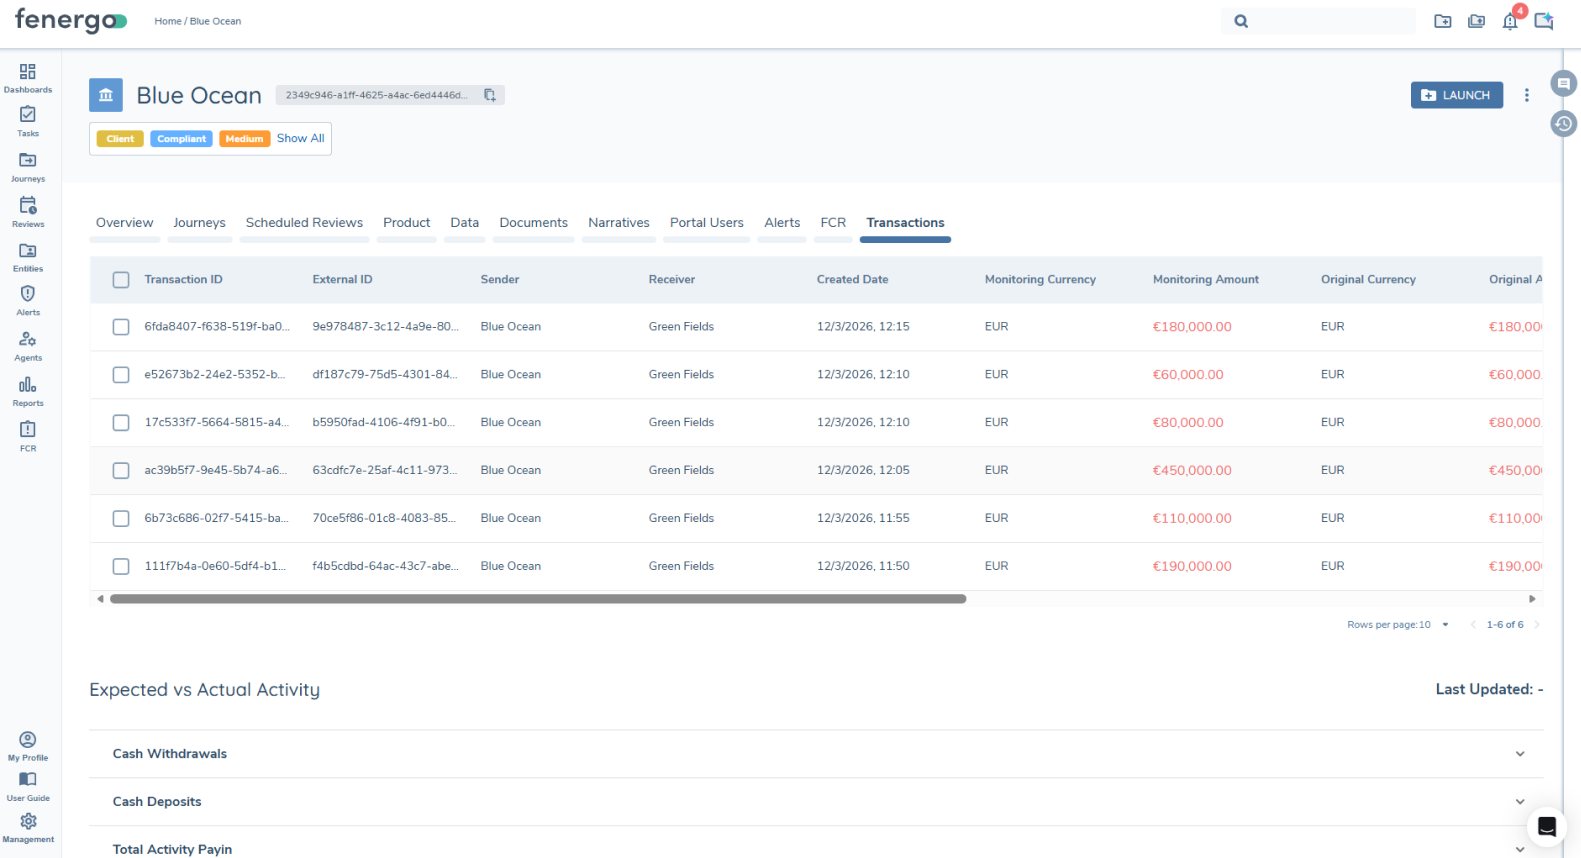
Transactions Page
Transactions can be accessed from either of the two transaction grids on an alert, Transactions or Suspicious Transactions. Clicking on a transaction ID will navigate to the Transaction Details page. Here users can see more information about the transaction.
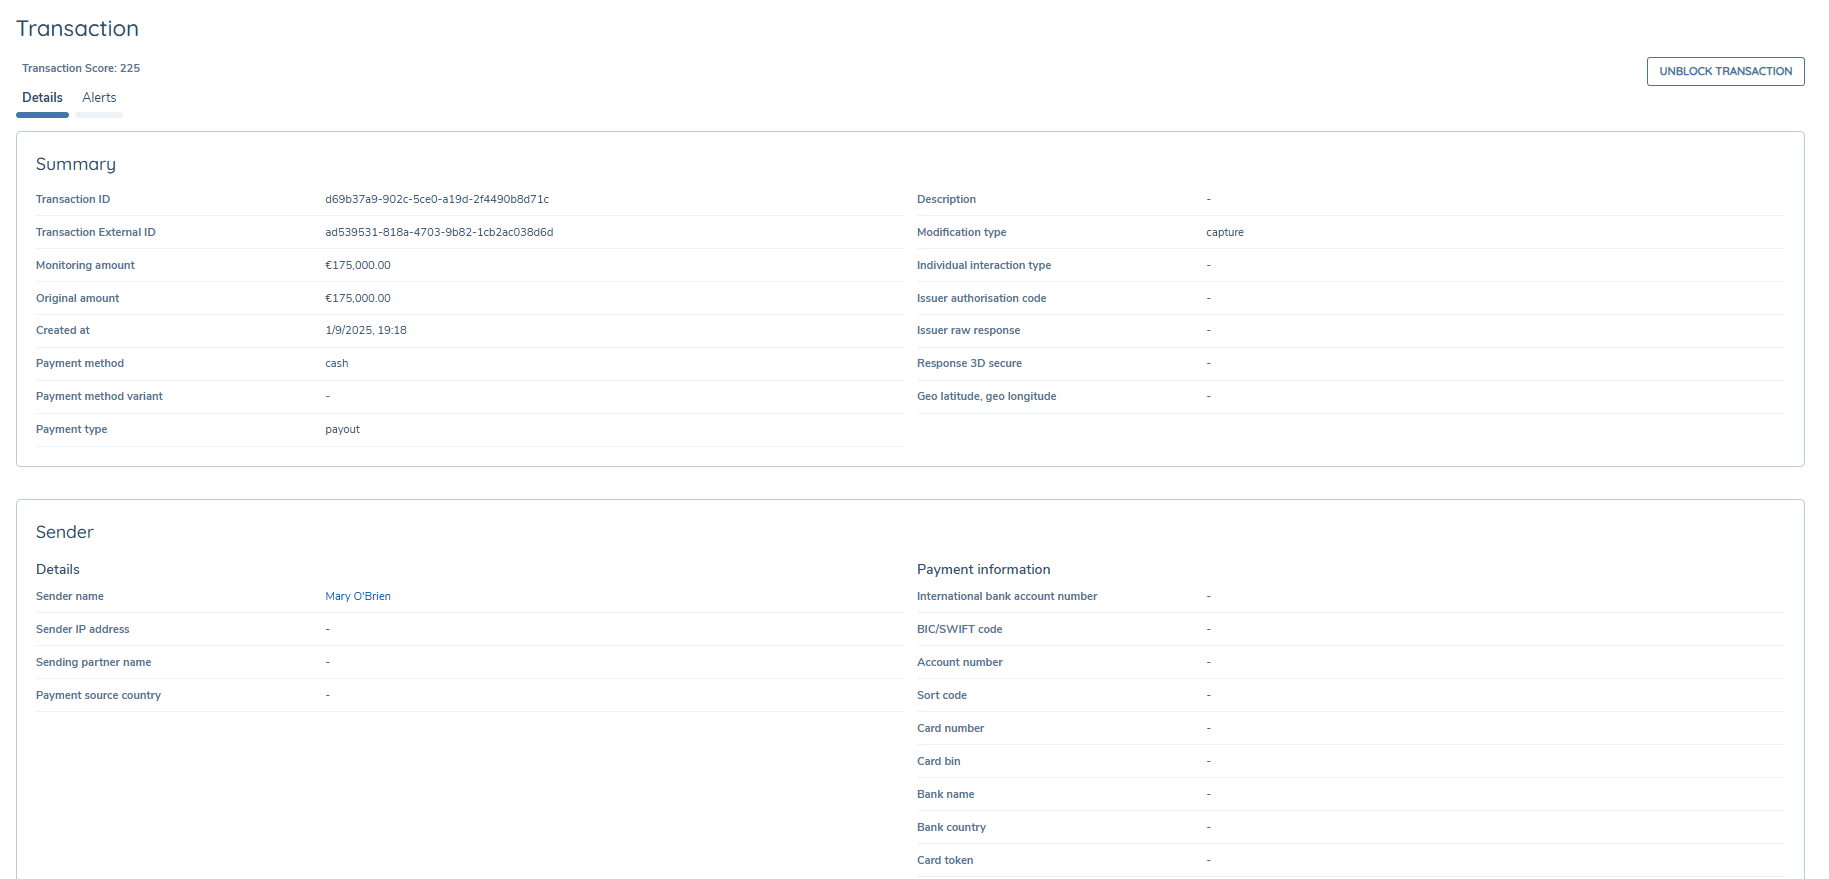
Alerts Tab
This page also has an "Alerts" tab, here alerts with this transaction will be show. Users can also switch the "Open Alerts" toggle if they would like to see completed alerts with this transaction.
Entity Profile
Entity Profile Page Alerts Tab
Alerts for a main entity can be accessed from the Entity Profile page, an Alerts tab will show these alerts. There is also a toggle on this page to include closed alerts for this entity. The alerts journey is available from here.
Entity Profile Page Transactions Tab
All Transactions for an entity can be accessed from the Entity Profile page, Transactions tab will show these alerts. The alerts journey is available from here.
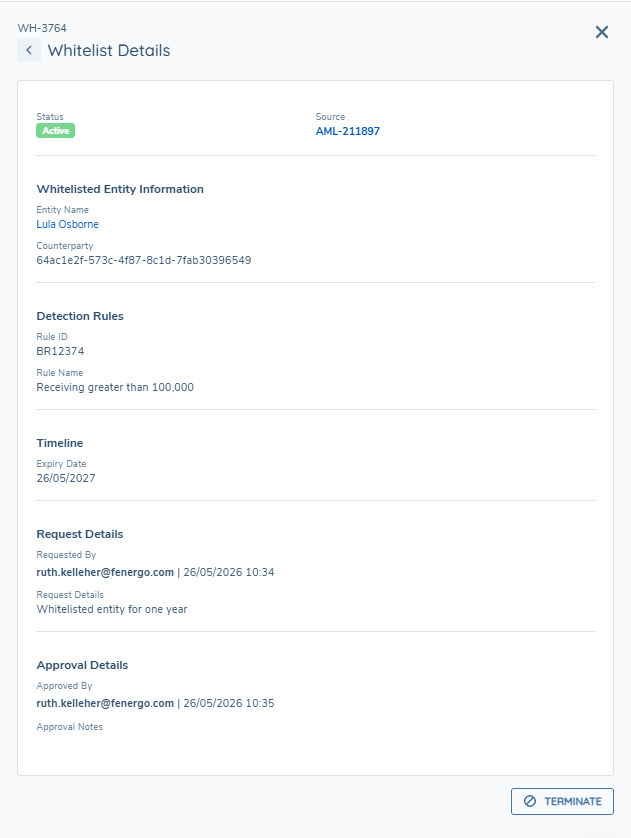
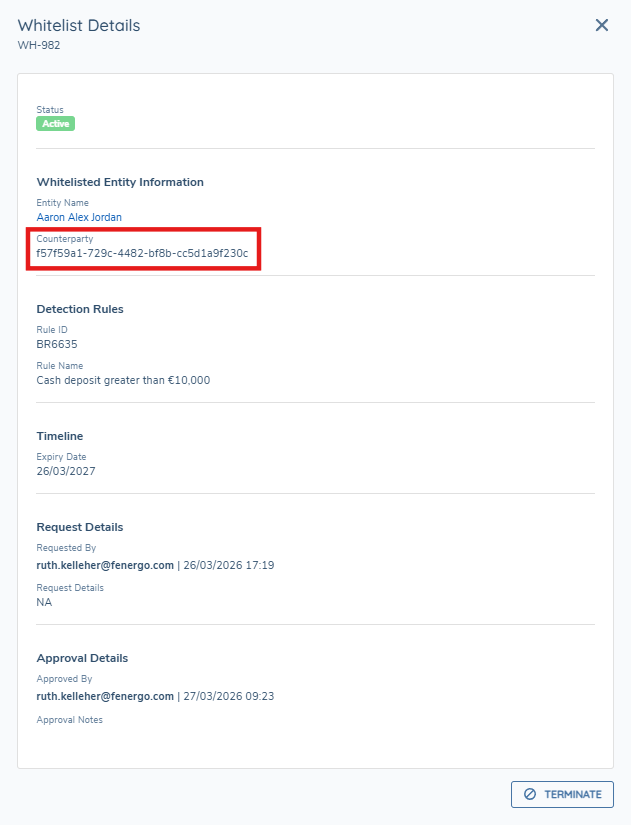
Entity Whitelisting
Entity Whitelisting allows an entity to be exempt from alert investigation for a specific counterparty and a specific rule, for a defined period. While the whitelisting is active, future alerts that match the same rule, entity, and counterparty are treated as whitelisted and do not need to be assessed in the same way.
Create a whitelist request manually from the Whitelist drawer
-
From the Alerts Dashboard, select the Whitelist icon to open the Whitelist drawer.
-
Select the '+' option to add a new whitelist request.

-
Complete the whitelist request by searching for the relevant Rule, Whitelisted Entity, Counterparty, amending the expiry date if necessary, and adding the Request Notes. The GUID of an unknown counterparty can also be used here to whitelist against them. The Request Notes field has a maximum of 500 characters; the current character count is displayed as you type, aligned with the behaviour of the Decision Notes field.
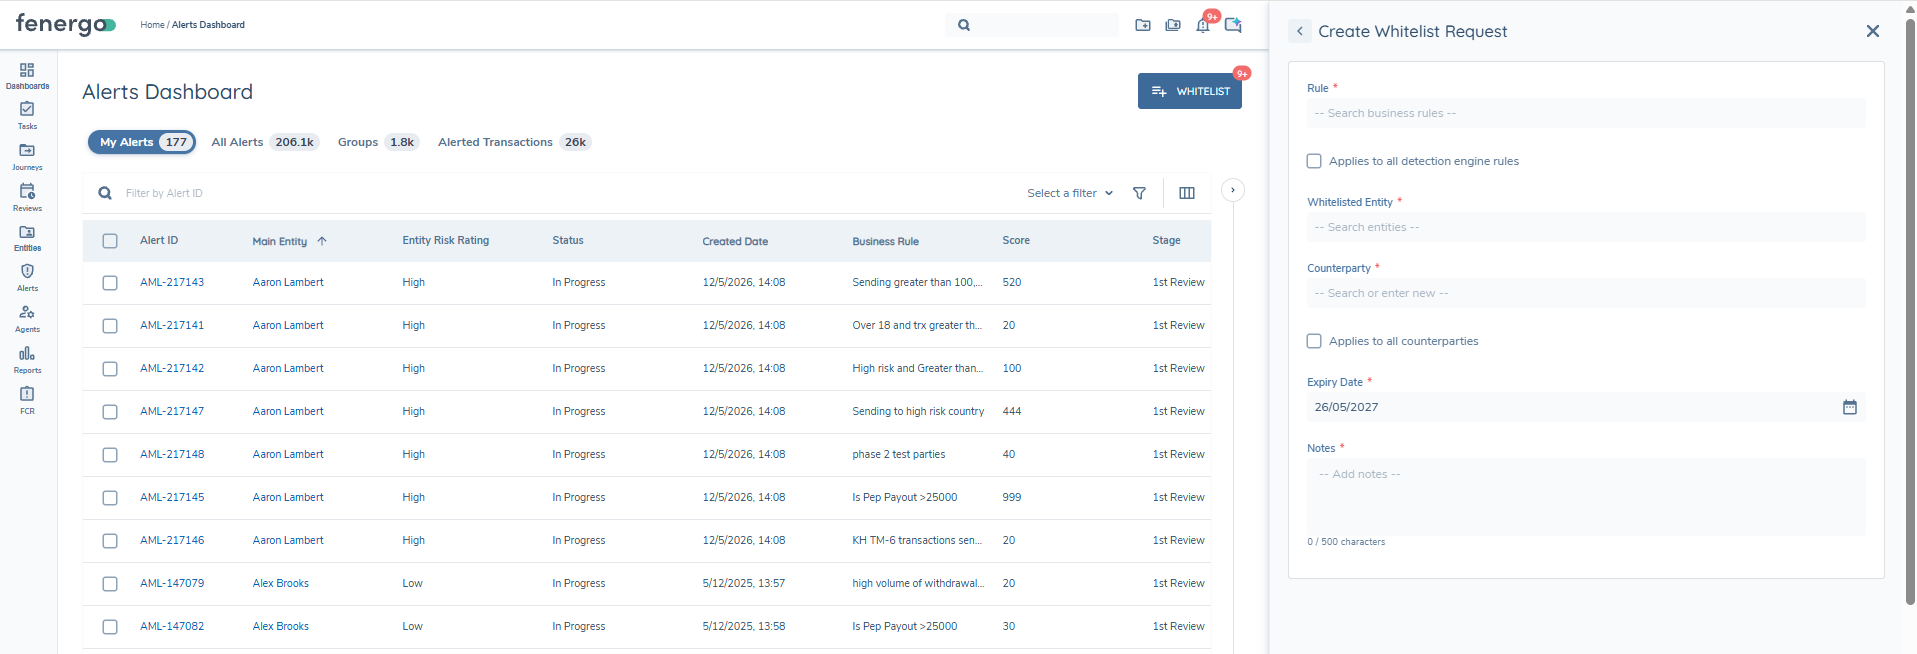
-
When a whitelist is created manually in this way, the Source on the whitelist is shown as Manual.
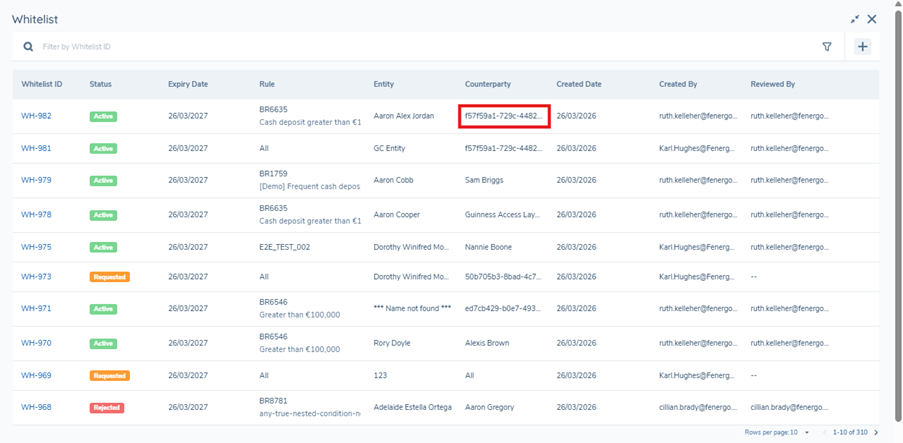
Wildcard Whitelisting
When users are creating a manual Whitelist, instead of selecting a specific Rule or Counterparty, the user can add a wildcard Whitelist. A wildcard can be created for the business rule so instead of selecting a specific business rule, the user will select the checkbox for All. A wildcard can also be created for the Counterparty by selecting the checkbox for All.
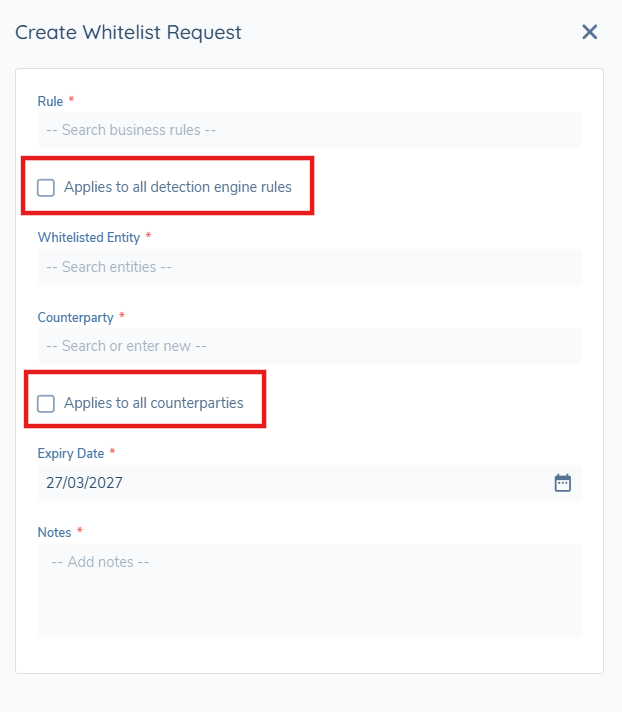
Wildcard whitelists are displayed with a globe icon to distinguish them from standard whitelists. If the wildcard applies to rules, the value is shown as 'All rules'. If the wildcard applies to counterparties, the value is shown as 'All counterparties'. Filters in the whitelist grid also reflect these labels.
Create a whitelist request from an alerted transaction
Analysts with whitelist permission can add an item to the whitelist directly from an alert's transaction grid.
-
Open an alert and navigate to the alert assessment transaction grid.
-
In the relevant transaction row, select the "Add to whitelist" row action (whitelist icon).

-
A pre-populated whitelist request drawer opens.
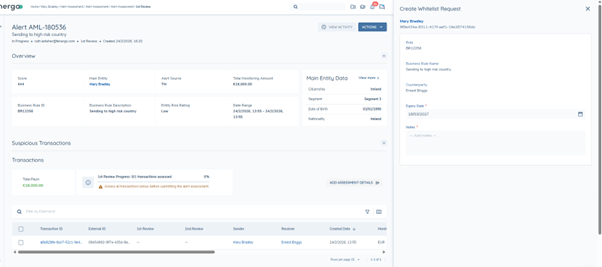
The following fields are populated from the alert/transaction where available:
- Business Rule ID and Business Rule Name - the whitelisting applies per rule.
- Main entity - the entity that is being whitelisted.
- Counterparty - the counterparty that is being whitelisted.
- Expiry date - defaults to 1 year from today but this is editable.
- Notes.
-
Review the details, update Expiry date and Notes if required, then select Submit to submit the request.
-
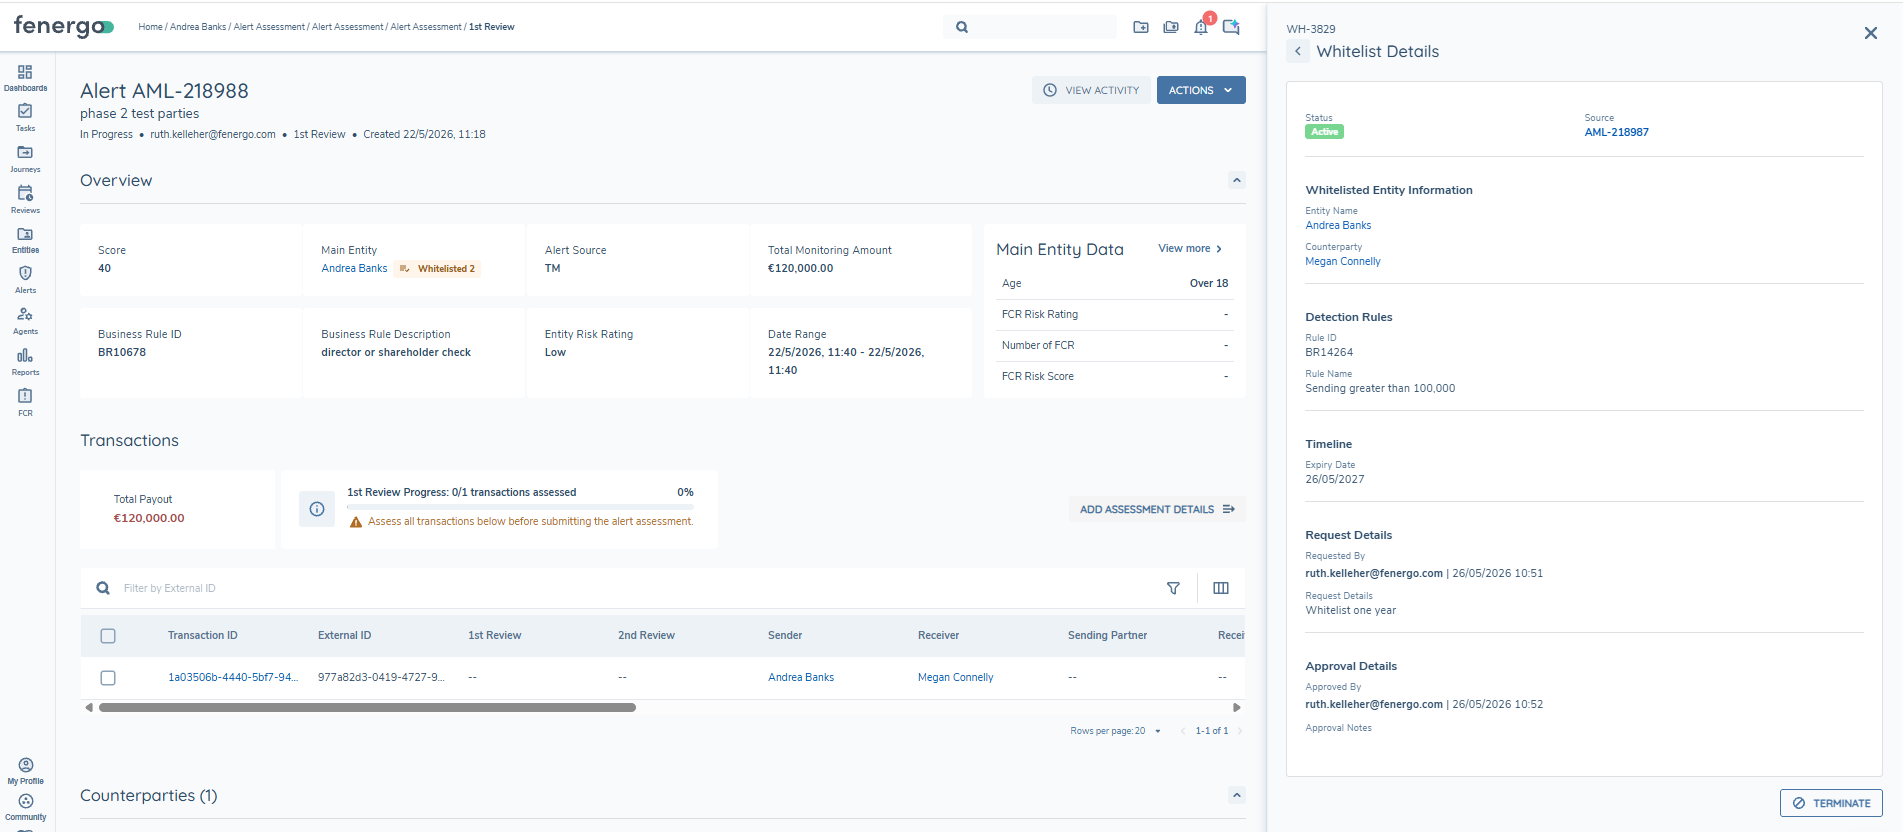
When a whitelist is created from an alert, the Whitelist Source field is automatically populated with the originating Alert ID, providing a traceable link back to the alert. The user can hover on this Alert ID to display the pop over and can open the right hand drawer to view the alert. Historic whitelists will have Source Not Available.
Approval and Rejection
Whitelist requests allow an authorised user to either approve or reject the request.
With this capability:
- Approvers and rejectors can add a Note at the point of decision.
- The comment is displayed in Whitelist Details for auditability and operational transparency.
- Approvals and rejections are performed using the Right-Hand Drawer side panel component.

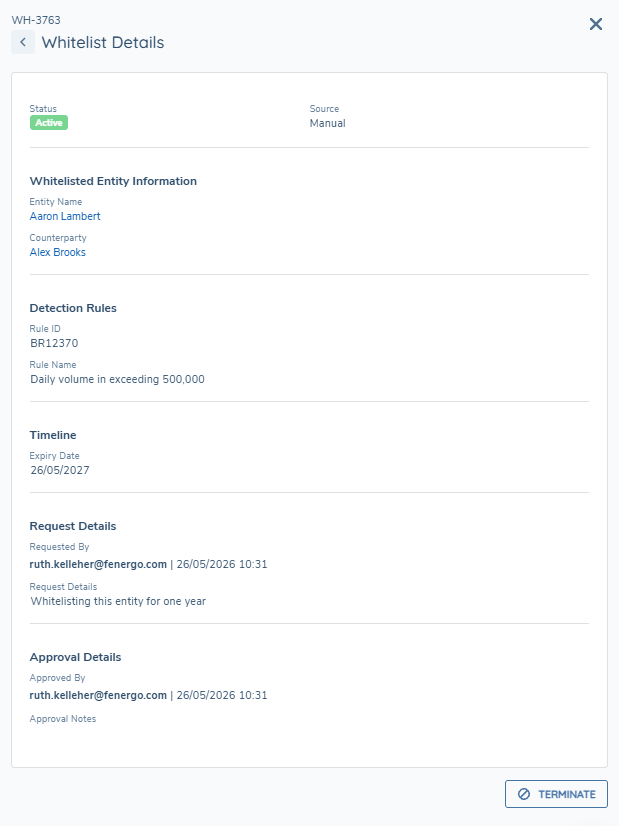
Whitelist Status
A whitelist goes through several statuses throughout its lifecycle. These statuses are as follows:
- Requested - new request, not approved, not active.
- Active – requested, approved and in date.
- Rejected – whitelist was rejected after being requested and never became active.
- Terminated - if a whitelist is deleted before it expires it will show as terminated and no longer active.
- Expired - once a whitelist's expiry date passes, the status will change to expired and it will no longer be valid/active. This includes requests that were never approved or rejected before the expiry date passed which are also marked Expired.
Whitelist Status summary
The Whitelist drawer includes a header section that displays a summary count for each whitelist status. The header shows counts for: Requested, Active, Rejected, Terminated, and Expired. If no records exist for a given status, that status is still shown with a count of zero.
When counts exceed 999, they are displayed in abbreviated format (e.g. 1K, 1.5K, 10.7K), consistent with the Alerts Dashboard.
Clicking on a status tab in the header, filters the whitelist table to show only records with that status.
Within the Whitelist panel, the user can search by the Whitelist ID in the search bar. The user can also filter by all the available columns.
Whitelist Expiry Notifications
The Whitelist button on the Alerts Dashboard displays a health indicator when whitelist entries associated with the current user's context require attention. Three states are surfaced:
- Pending approval – one or more whitelist requests are awaiting approval or rejection.
- Expiring soon – one or more active whitelists are due to expire within 7 days.
- Expired – one or more whitelists have passed their expiry date.
A count is shown for each state. When no entries require attention, no indicator or badge is displayed on the button.
Hovering over the Whitelist button displays a summary popover showing the count for each health state. The user can click on an individual status tab in the popover, the drawer button, or the Whitelist button itself to open the Whitelist drawer.
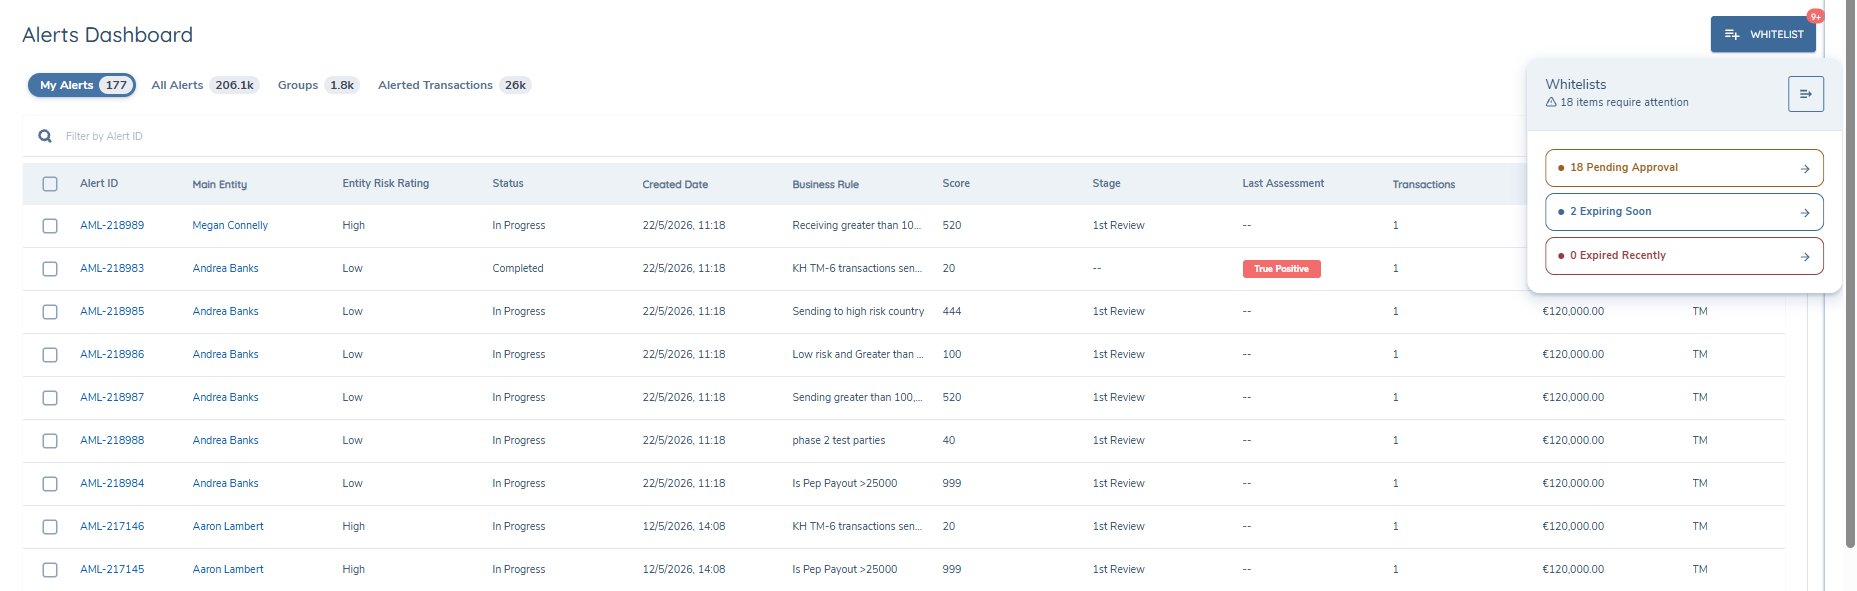
In addition to the dashboard-level notification, users who approved a whitelist entry receive a personal notification 7 days before that entry is due to expire. These notifications appear in the user's notification centre.
Active Whitelist Indicator on Alert
When reviewing an alert, a 'Whitelisted · N' chip is displayed next to the main entity's name in the alert Overview section when N active whitelists exist for that entity. If the entity has no active whitelists, no chip or indicator is shown.
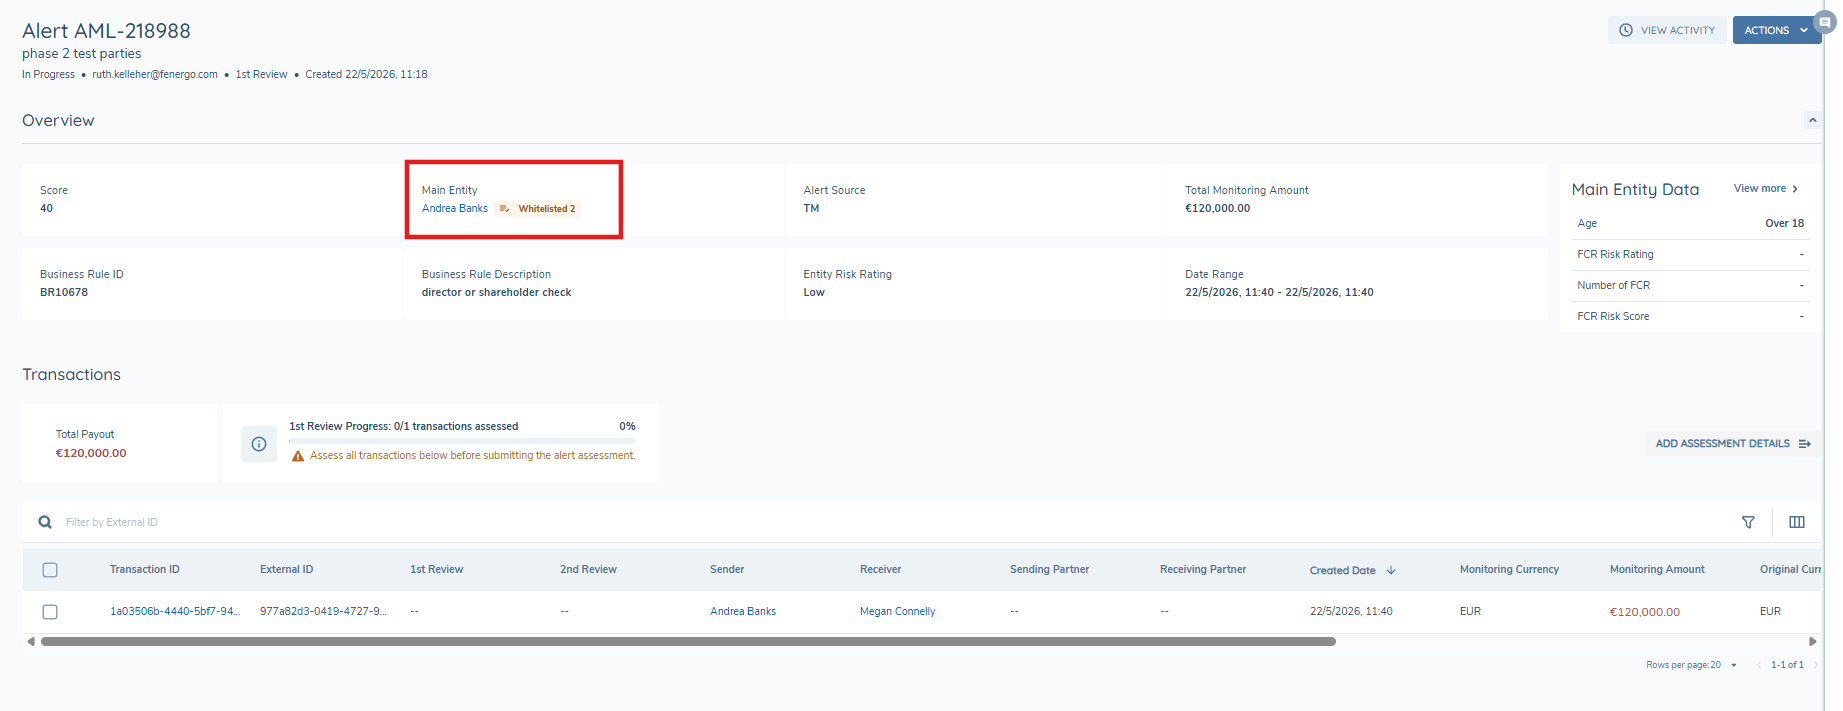
Hovering over the chip displays a popover listing all active whitelists for the entity. Each entry shows the Whitelist ID, an Active status badge, the Business Rule ID and Rule Name, and the expiry date.
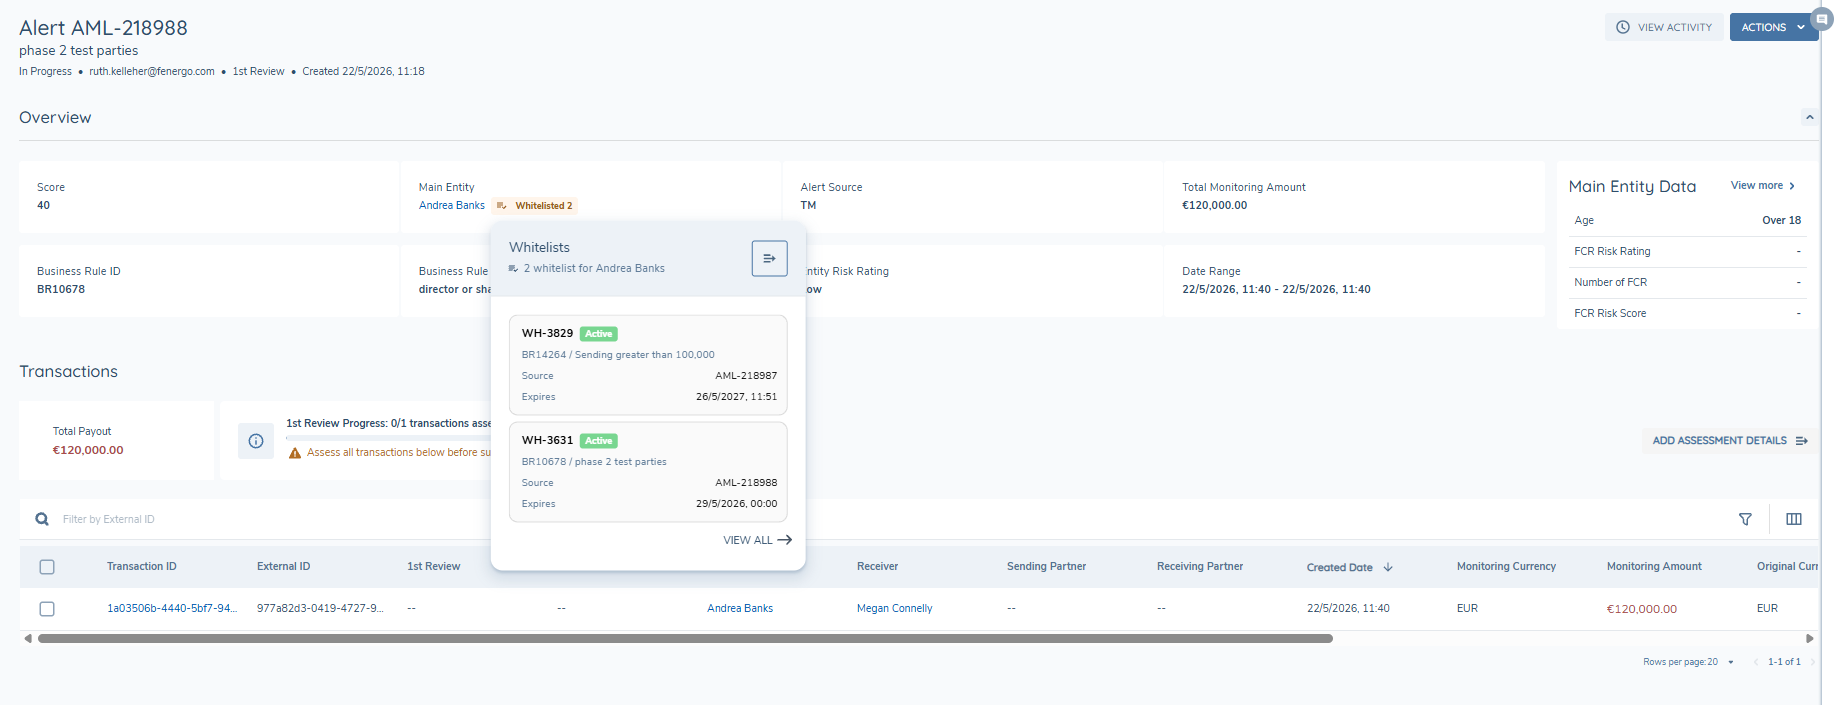
Clicking 'View All' or the right-hand drawer button from the hover popover opens the Whitelist detail drawer on the right-hand side of the alert page, automatically filtered to show whitelists for the main entity. Clicking a specific whitelist entry in the popover opens the drawer showing full details of that whitelist.
Access Layers
Access layers restrict Whitelist visibility so in order to access Whitelist records, you need:
- the relevant Whitelist permissions, and
- access to the relevant Entity. When you view Whitelist records, you only see the records for the main entities you have access to.
If the user doesn't have access to the counterparty, they will be shown with only their GUID on the Whitelist.
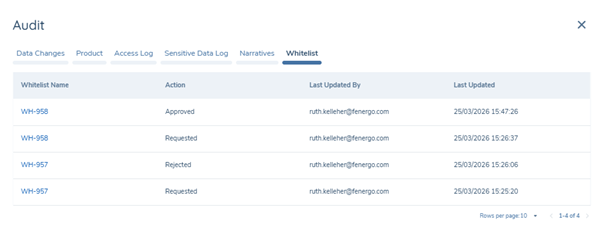
Audit
The audit trail of a Whitelist can be found on the main entity profile in the audit drawer. The full lifecycle of all the Whitelists against the entity can be found here.
Permissions
Entities can be white-listed from generating alerts for specific detection rules. The whitelist notification badge (e.g. '9+') and the 'X items require attention' count within the Whitelist panel are only displayed to users who have the approve permission. Users without the approve permission do not see the notification badge or the attention count, as these items are not actionable by them. The following permissions are required to manage entity white-listing.

Scoring
Why Scoring is Needed
In high-volume transaction monitoring, a binary alerting approach (alert or no alert) generates large volumes of alerts without effective prioritization. This prevents differentiation between isolated low-risk activity and sustained suspicious behaviour. As a result:
- Investigative resources are inefficiently allocated
- High-risk entities are identified with delays
- Compliance with regulatory expectations for risk-based monitoring may be compromised
Scoring can be used to facilitate alert prioritisation.
Configuration
In the Detection Rules a numerical score within the range of 1-999 can be assigned to a business rule during configuration in the Settings tab.

Display Scores on the Alerts Dashboard
When an alert is triggered for which a score has been applied, the score is displayed on the Alerts Dashboard. The score is available on all of the alerts dashboards, including on the entity profile page under the alerts tab.
The alerts can also be filtered by their score by clicking on the filter icon and then selecting score. Here the minimum and maximum scores can be specified e.g. alerts with scores between 0 and 30. These alerts can then be sorted highest to lowest or lowest to highest. This functionality ensures that prioritization can be achieved, as well as efficiency in alert management.
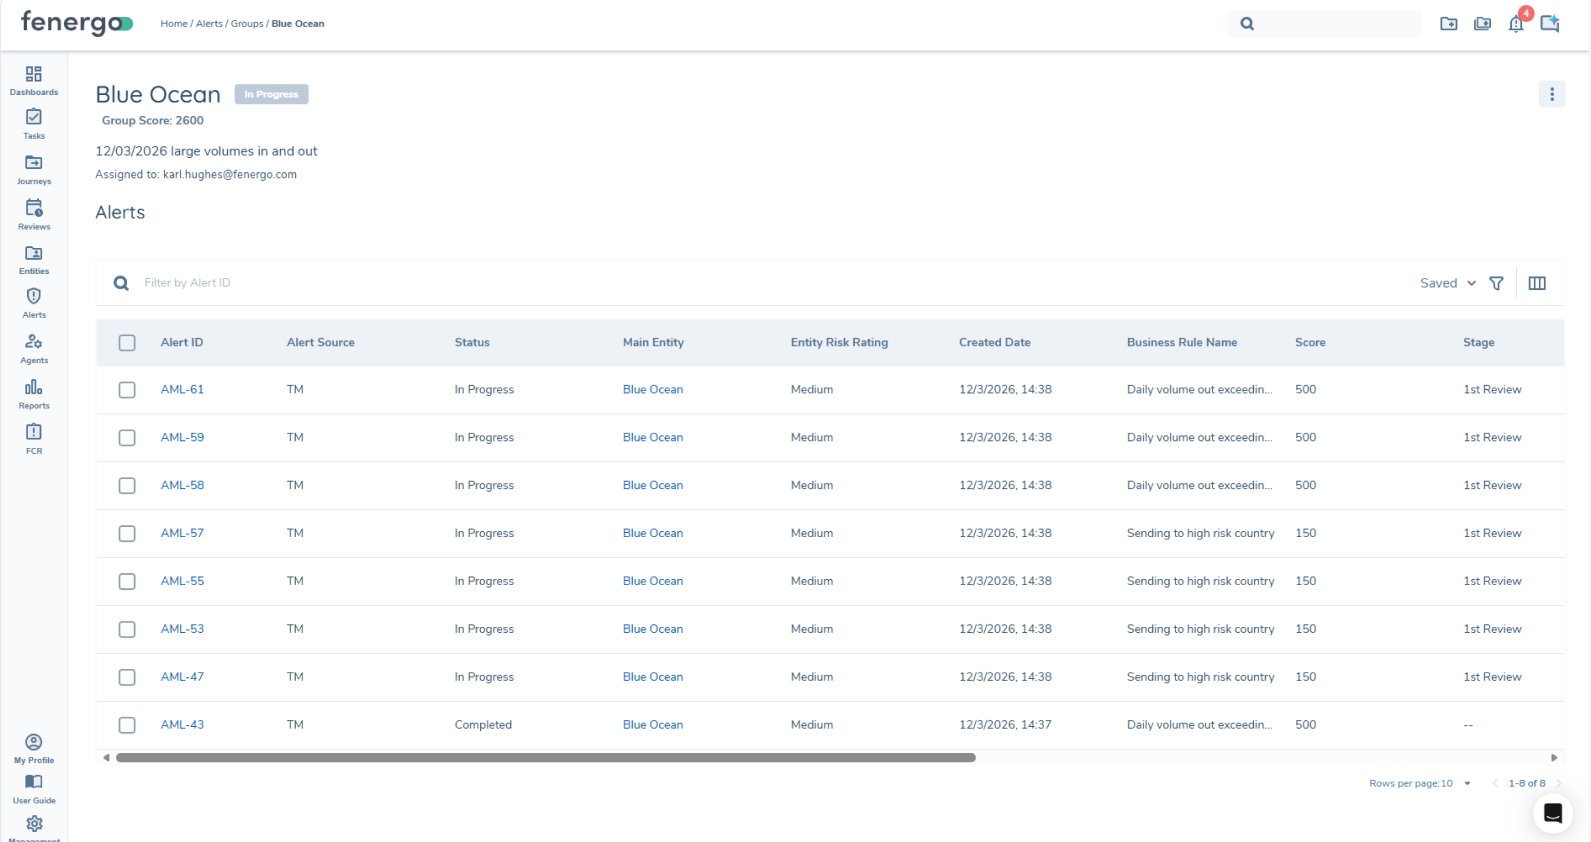
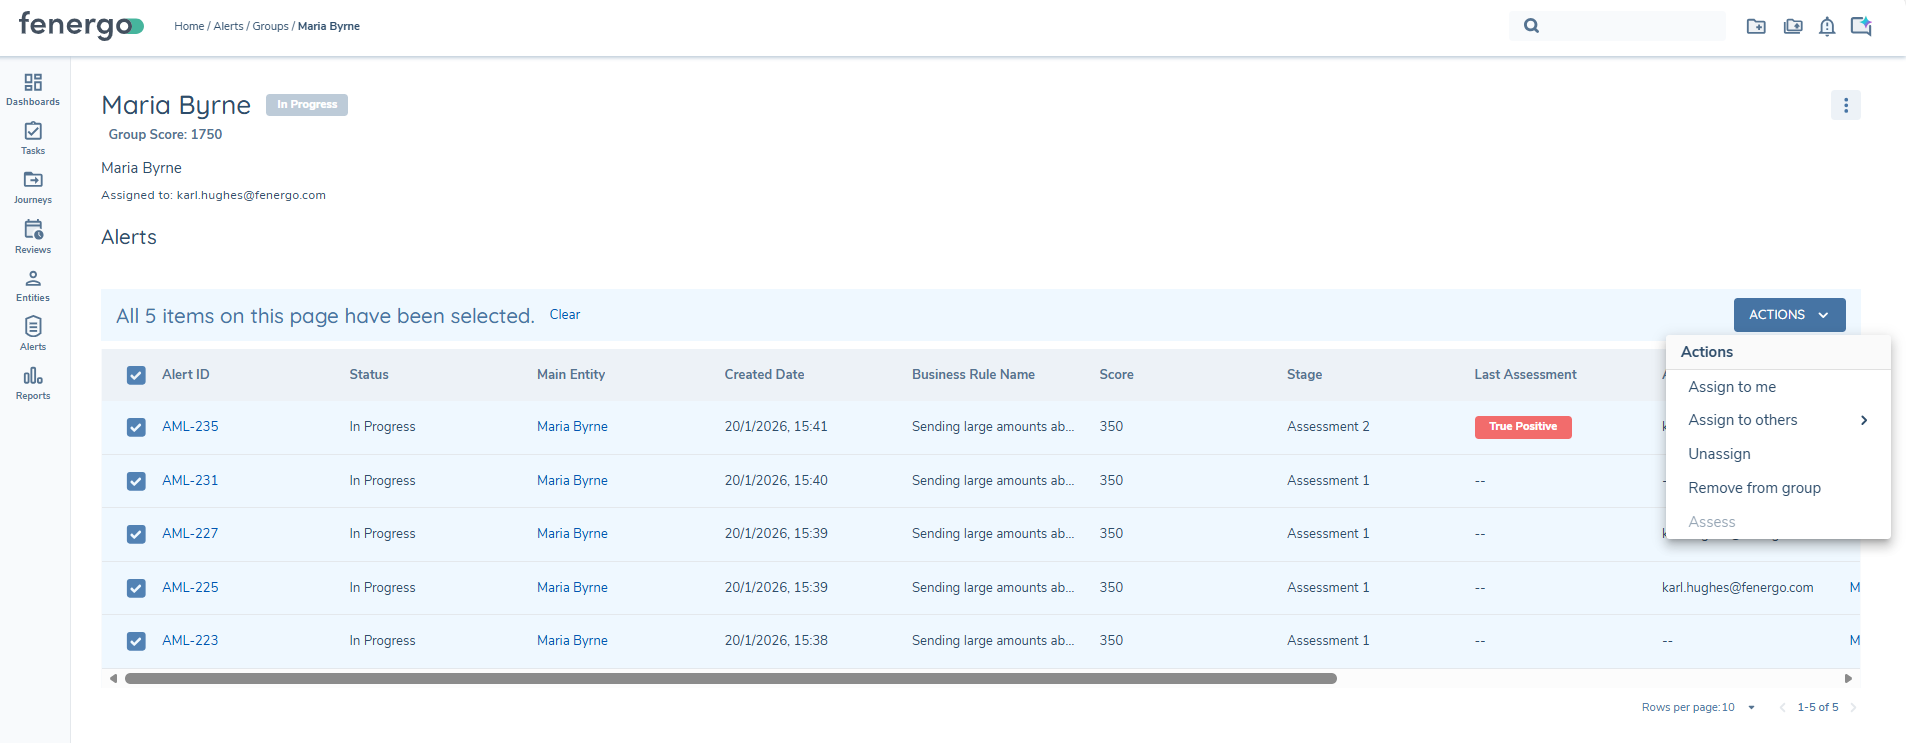
Group Actions
It is possible to create Alert groups, these can be created by multiselecting alerts and choosing the 'Assign to Group' option. This option will allow users to assign selected alert to a new group or to add to an existing one of their groups. Once a user creates a group, they will automatically become the group owner.
Alert Group behaviour:
- only group owners can add to or remove alerts from a group
- group owner can edit the group name
- group owner can reassigned group ownership to another user
- empty groups cannot be created
- users can remove all alerts from a group, rendering it empty
- once all alerts in a group are closed the group will be closed
- Alerts can only be in one group
- All groups are visible in the Alert Groups tab
- Group score is the sum of the alert scores contained in the group
Groups can be accessed from the Groups tab on the main Alert Dashboard.
Create group can be done from My Alerts or All Alerts:
Clicking into a groups will show:
- Group owner
- Group description
- Alerts within the group
Group Actions: Available for the group owner
- Edit group information - rename group or update description
- Edit group owner, reassign group ownership
Alert Actions from within a group:
Available per alert or can be applied in bulk to alerts
- Assign to me
- Assign to others
- unassign
- Remove from group
- Assess (depending on assignment)
Bulk Actions
Alerts can now be managed in bulk (max 20 alerts), there are multiple actions available once a number of alerts are selected:
- Assign to me
- Assign to others
- Assess
- Remove from group
The availability of these bulk actions is dependent on the context, e.g. Bulk assess is available from My Alerts and not All Alerts.
Where a bulk action is selected and applied to a group of alerts the users will get onscreen feedback on the effectiveness of that action.
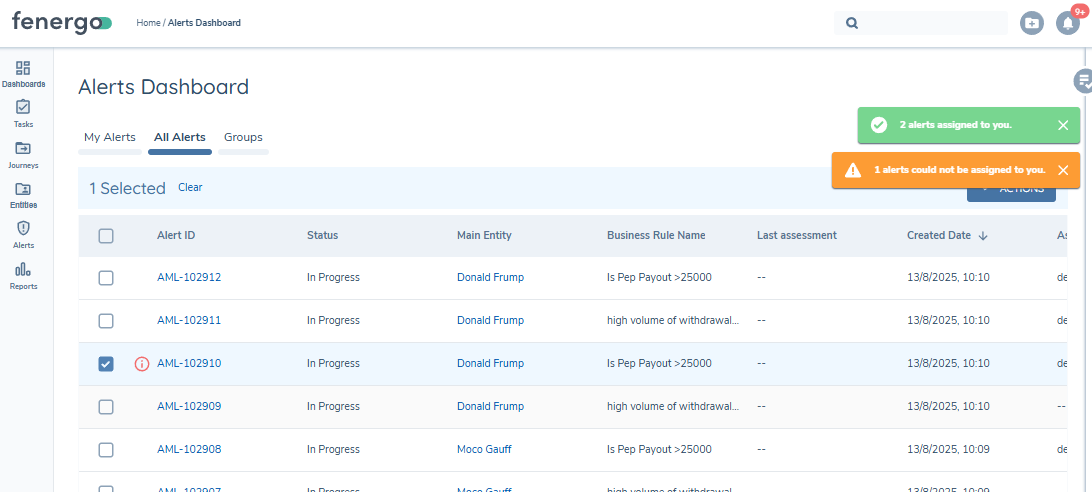
E.g.

Where the action cannot be applied to the selected alerts, a summary of the success of the bulk action is provided and where the action has Not been applied will remain selected, with an icon indicating that the "Alert could not be assigned". Where an action was not executed, these alerts will remain selected so an alternative action can be taken, if not required users can clear the selection using the "Clear" option.
Bulk Assignment
- If alerts are already assigned to you, including these alerts in a bulk "Assign to me" will show that the action wasn't successful
- When selecting the bulk "Assign to others" all tenant users are available for selection, but the action will only be applied if the user selected can be assigned to this alert. e.g. if they are in the relevant team assigned to this assessment task.
- 4 eyes validation on assignment will be done on execution, which mean as user may be assigned to an assessment task but might not be able to complete that task.
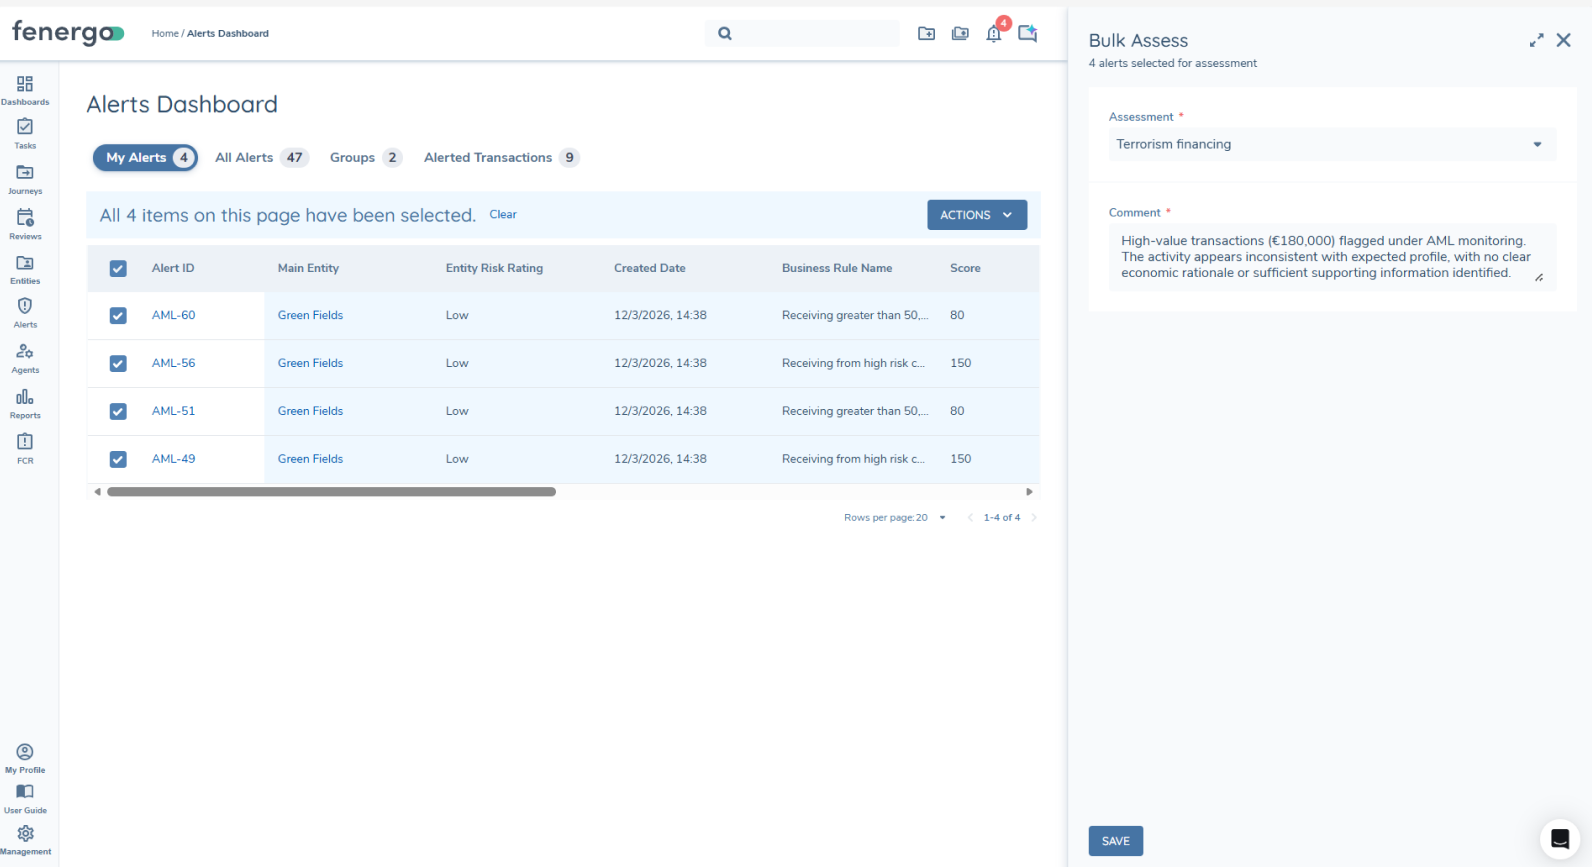
Bulk Assessment
It is possible to bulk assess alerts, users can select the alerts they would like to bulk assess from "My alerts" or from a group. From my alerts, the alerts are all assigned and can be assessed. From a Group, the assess option will only be available if all selected alerts are assigned to the user. Process:
- select multiple alerts - regardless of stage
- ensure that these are assigned to you
- select "Assess" for these alerts
- add an alert assessment result
- add an assessment comment to multiple alerts
This assessment will propagate to all the transactions in this alert for the stage they are at and the alert will progress to the next stage in their assessment journey.
Entity Access Layers on Alerts
Entity access layers are in place on the alert grids, without the correct access to an entity a user will not see alerts relating to that entity on any of the alert grids. This includes Groups, so users will see only see the alerts in a group that they have entity access layer for.
Manual Alerts
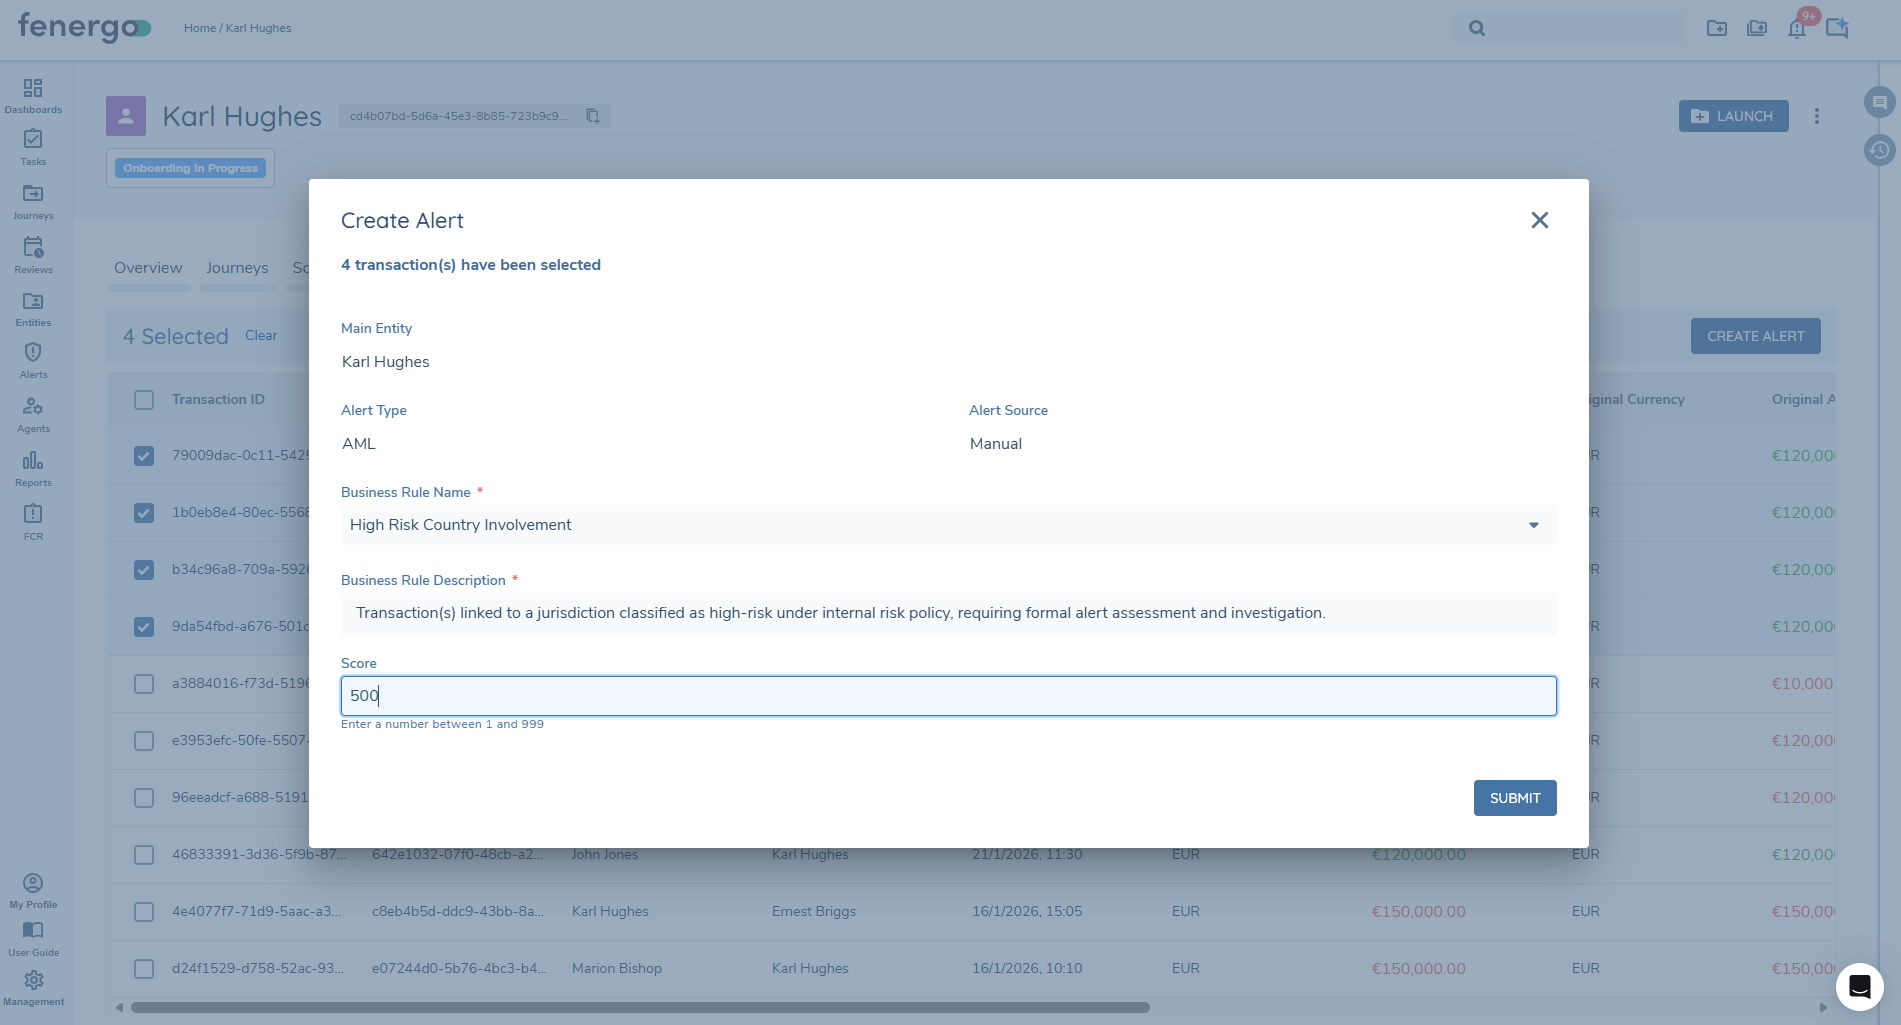
Manual Alerts allow authorised users to create Transaction Monitoring (TM) alerts directly from the Fenergo user interface without relying on the detection engine or external API integrations. This capability supports operational and investigative scenarios where an analyst determines that an alert should be raised.
Manual Alerts can be created as:
- Transactional Manual Alerts – linked to one or more selected transactions.
- Non-Transactional Manual Alerts – created at entity level without associated transactions.
Once created, alerts follow the standard Alert Assessment workflow.
Alert Type – Manual
Manual Alerts use the Alert Type – Manual classification.
This alert type can be referenced in Journey Scoping, allowing configuration of a dedicated Alert Assessment journey for Manual alerts, where required.
Configure Reference Data List - Manual Alert Type
Before users can create Manual Alerts, a reference data list named Manual Alert Type must be configured. This list populates the Business Rule Name dropdown in the Create Alert modal.
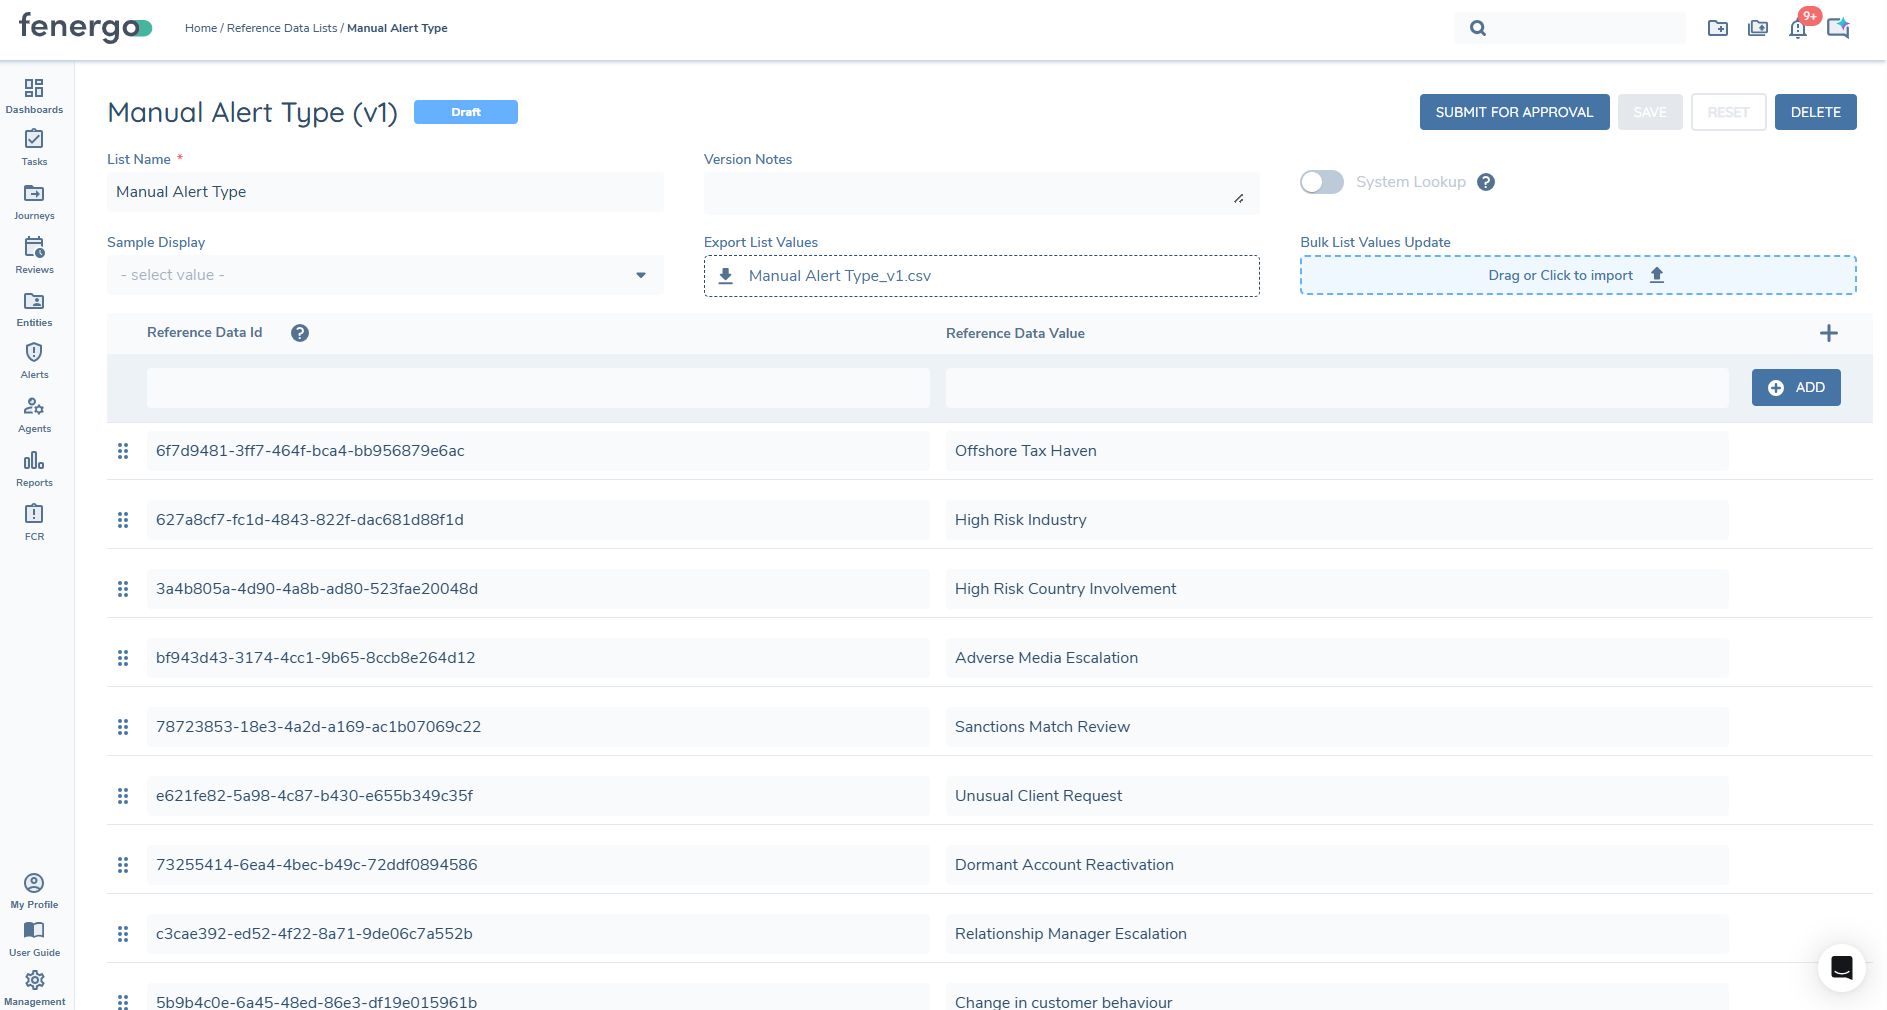
Create the Manual Alert Type Lookup List
- Navigate to Reference Data Lists.
- Select + ADD to create new lookup list.
- Enter the List Name: Manual Alert Type
- Add the required reference data values.
- Save and request approval.
The list must be published before the values are available for selection in the Create Alert modal.
Example Reference Data Values
The values configured in this list represent the reason for creating the manual alert. Examples include:
- High Risk Country Involvement
- High Risk Industry
- Offshore Tax Haven
- Adverse Media
- Regulatory Request
- Internal Escalation
These values will appear in the Business Rule Name dropdown when creating a Manual Alert.
Creating a Non-Transactional Manual Alert
Non-transactional manual alerts are created from the Entity → Alerts tab and are not linked to specific transactions.
Steps to Create:
- Navigate to the relevant Entity Profile.
- Open the Alerts tab.
- Select Create Alert.
- Complete the Create Alert modal.
- Submit the alert.
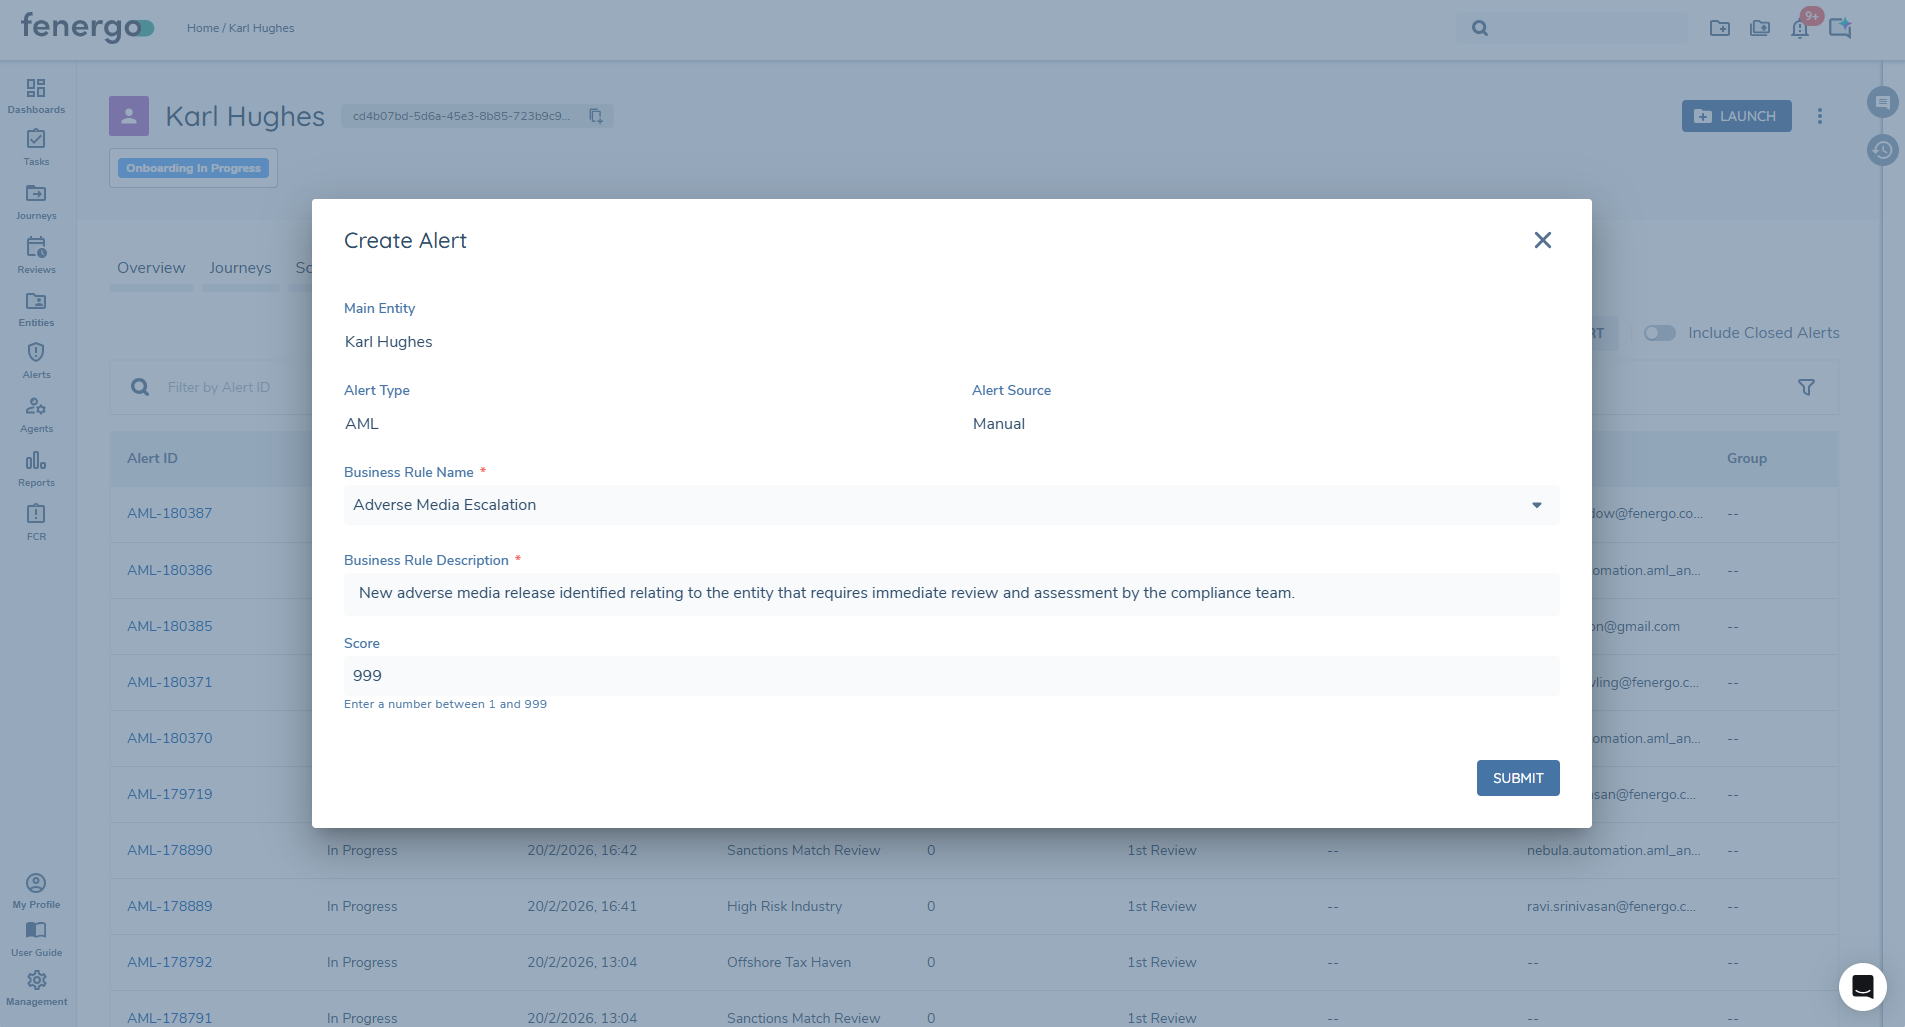
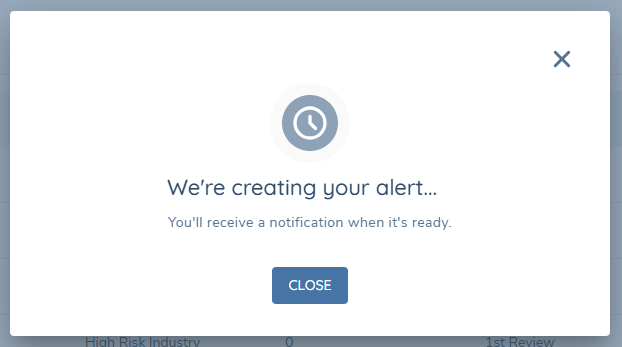
Upon submission:
- The alert is created asynchronously via Event Ingress.
- The alert enters the non-transactional alert workflow.
- The user receives a confirmation notification once processing completes.
Creating a Transactional Manual Alert
Transactional manual alerts are created from the Entity → Transactions tab and are linked to selected transactions.
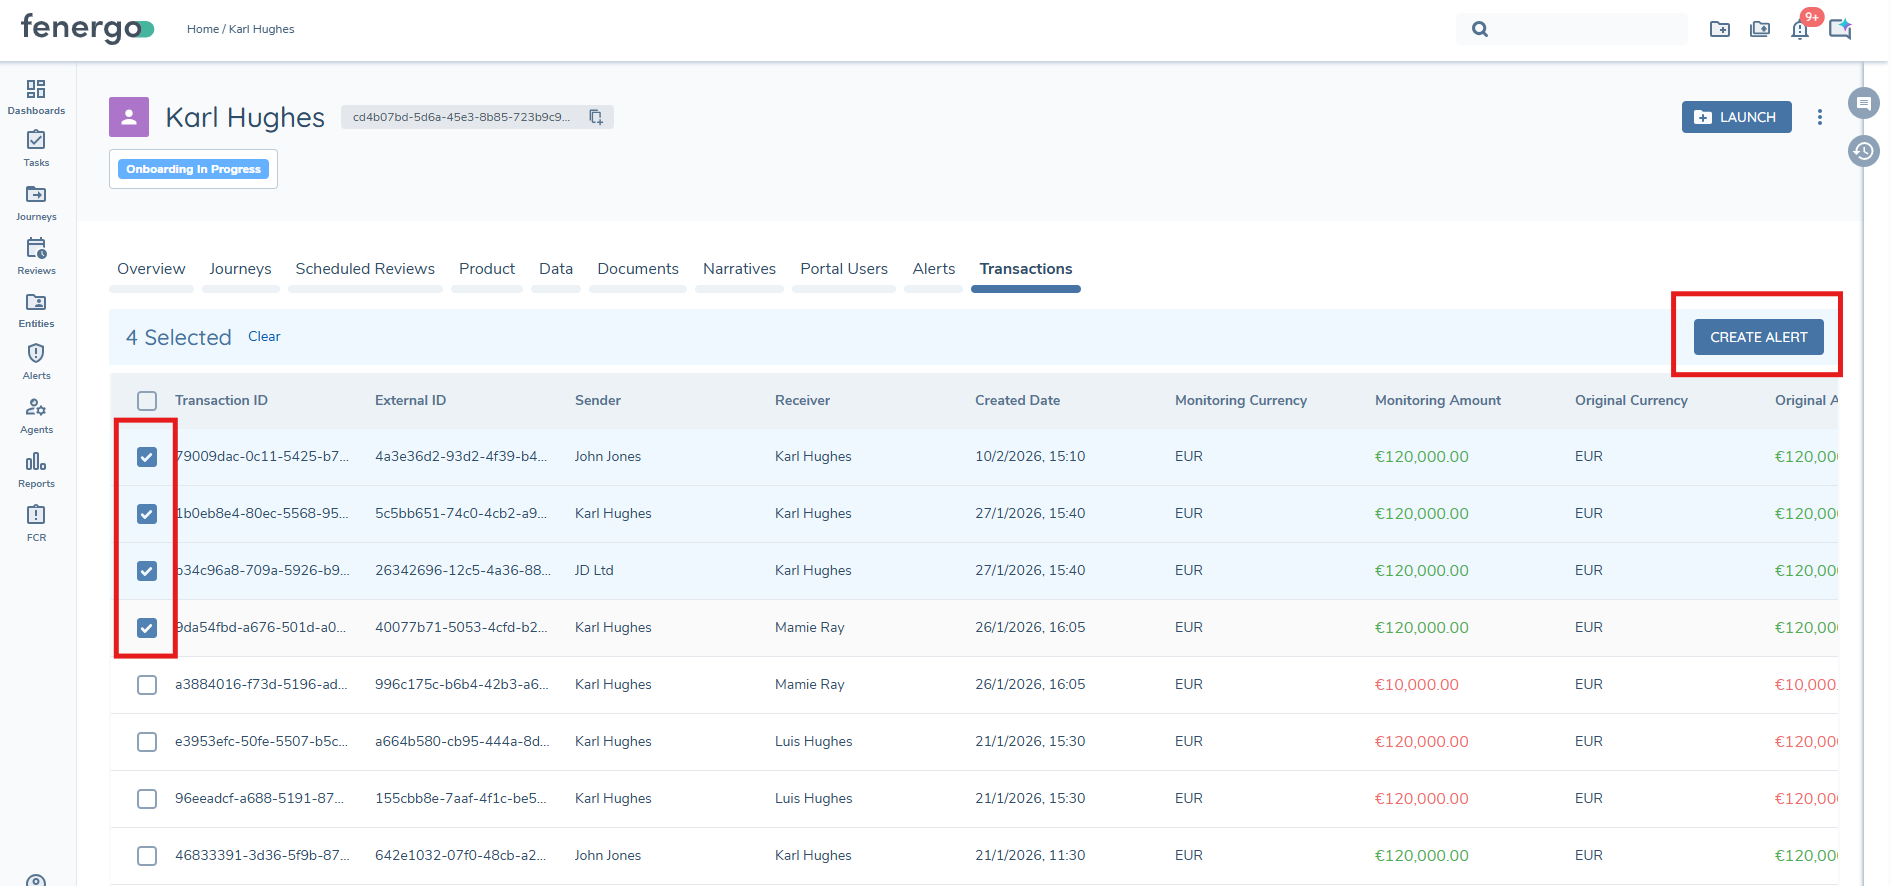
Steps to Create:
- Navigate to the relevant Entity Profile.
- Open the Transactions tab.
- Select one or more transactions from the transactions grid.
- Click Create Alert.
- Complete the Create Alert modal.
- Submit the alert.
Notifications
Submission Confirmation
After submission, users see a confirmation message:
We're creating your alert… You'll receive a notification when it's ready.
Success Notification
When successfully created, users receive a notification:
Your alert for Entity Name has been created, click here to go to this alert.

Notification Settings
A new Transaction Monitoring notification category has been introduced within User Notification Settings.
This category is available under:
- System Notifications
- Email Notifications
Within this section, users can enable or disable the following notification:
- Manual Alert Created
When enabled, users will receive a notification once a manual alert has been successfully created.
Reporting in Transaction Monitoring
The full list of the tables available for reporting Transaction Monitoring data can be found here.
Data Deletion in Transaction Monitoring
The full scope of the deletion of Transaction Monitoring Data can be found here.
Prerequisite checklist
In order to get started with Alerts in Fenergo, the following items must be in place
- User Permissions - there are specific permission for alerts and alert configuration required
- Journey configuration is required
- Alert journey type is Alert Assessment
- Alert assessment tasks are in one stage
- Alert assessment tasks are assigned to a team
- Last alert assessment is set to compliance
- Journey scoping and event triggers are set up
- Alert Assessment Category and Outcome set up correctly
Transaction Monitoring Permissions Catalogue
Permissions can be found in the Security configuration > Permissions > Transaction Monitoring domain
| Permission Name | Description | Notes |
|---|---|---|
| Alert Dashboard Access | Ability to access the Alert Dashboard page. | This permission will allow a user to see the Alert dashboard. |
| Alert Dashboard Configuration Edit | Ability to edit the Alert Dashboard columns- pending. | |
| Alert Access | Ability to access the alert. | This will allow a TM analyst to click through to an alert and see the details and transactions. |
| Create Alert | Ability to create manual alerts from the UI. | Required to display the Create Alert button on the Entity Alerts and Entity Transactions tabs. |
| Whitelist Access | Ability to access the entity whitelist. | This will give a user access to the Entity Whitelist. |
| Whitelist Edit | Ability to edit an entity whitelist entry. | This will allow a user to add to or update the Entity Whitelist. |
| Whitelist Delete | Ability to delete an entity whitelist entry. | This will allow a user to remove a whitelist record. |
| Whitelist Approve | Ability to approve an entity whitelist entry. | This is required by users who should approve a whitelist added for an entity. |
| Entity Profile Transaction view | Ability to view transaction details for an entity. | This will allow a user to see all the transaction for an entity. |
| Transactions Api Access | Ability to use transactions api. | This allows a user to use the transaction API. |
| TM Risk Configuration Edit | Ability to edit risk configuration. | Required by system configuration to update the TM risk configuration. |
| TM Risk Configuration Access | Ability to access risk configuration. | Required by system configuration to access the TM risk configuration. |
| TM Risk Configuration Approve | Ability to approve risk configuration. | Required by administrator to approve the risk configuration, not typically granted to users in Production environment. |
External Alerts
Clients can create their own Alerts through Event Ingress. For more information visit: Event Ingress - CreateAlert overview