KYRA:Screen User Guide
KYRA:Screen
KYRA:Screen is an Automation agent that resolves screening hits within Fenergo's governed workflows. Analysts retain oversight of review and final outcomes. By applying match resolution logic, generating explainable rationales, and processing hits in real time, KYRA:Screen reduces manual workload, accelerates onboarding, and ensures consistent, auditable outcomes.
KYRA:Screen offers:
- Hit Resolution: Resolves hits as either true match or false positive based on client configured screening instructions. This reduces the volume of unresolved hits requiring analyst intervention.
- Materiality Assessment: Assesses the materiality of confirmed screening hits based on client configured Materiality Instructions.
- Agent Autonomy: Supports two autonomy configuration modes (Semi-Autonomous, Fully Autonomous). These are configuration settings that control how much KYRA:Screen handles automatically - they do not change its Automation class designation.
- Decision Rationale: Provides full transparency on the decision made for each hit, with rationale (including Instruction Reference ID) recorded in the Comments field for each decision.
Configuring KYRA:Screen
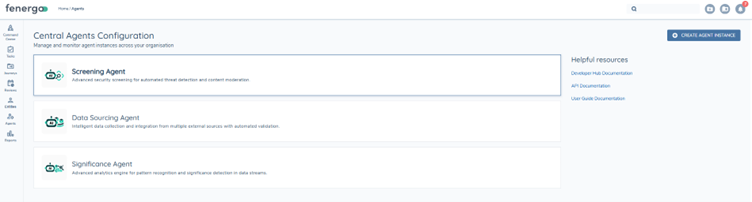
KYRA:Screen can be managed and monitored through the Central Agents Configuration area.
In order to use KYRA:Screen, screening must first be configured in your tenant. Refer to the Configuring Screening Functionality User Guide for setup instructions.
To enable and configure KYRA:Screen:
-
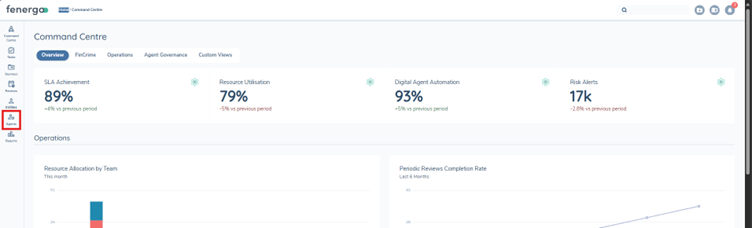
Navigate to Agents
- In the left-hand navigation menu, click Agents.
- Select KYRA:Screen from the available list.
-
Create a KYRA:Screen Instance
- Click Add Instance.
- Enter a name and description for the KYRA:Screen Instance.
- Assign the agent Instance to the relevant Journey Type(s).
- You can create a maximum of five KYRA:Screen Instances.
- A Journey Type can only be assigned to one KYRA:Screen Instance.
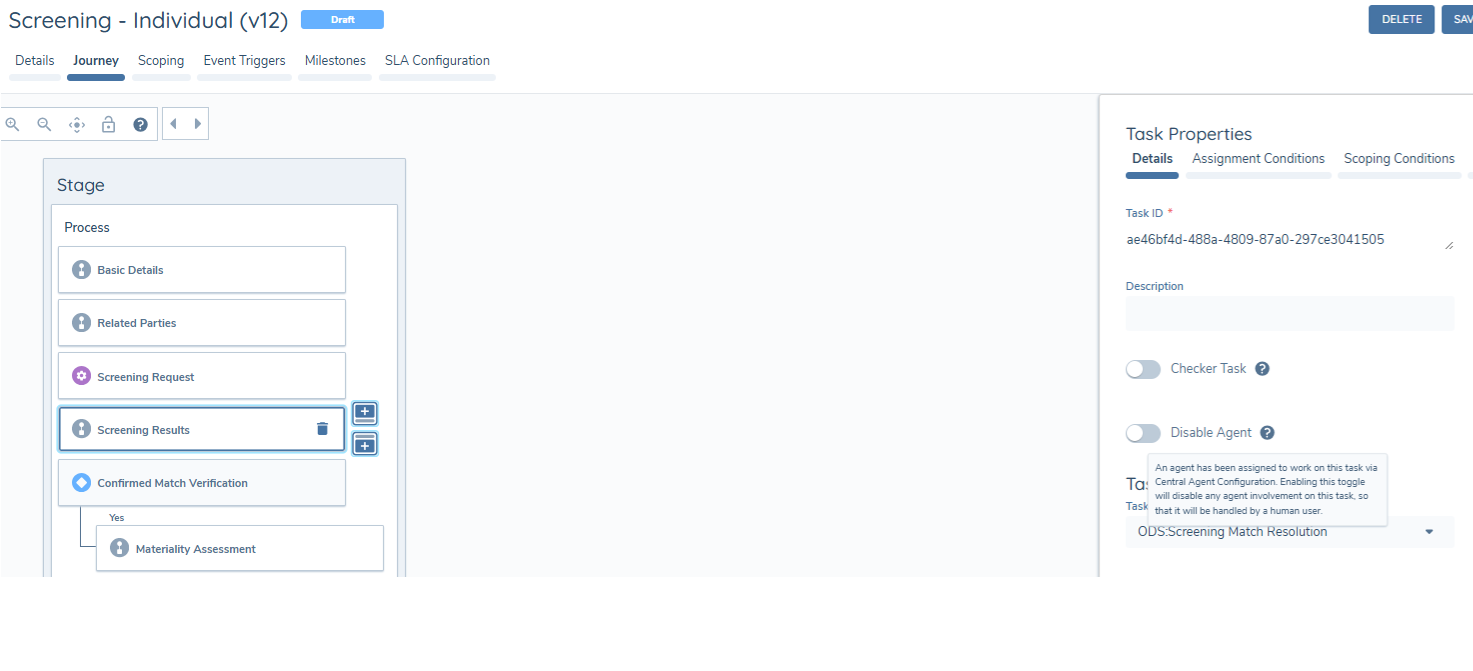
- To disable KYRA:Screen for a specific Journey Schema while keeping it active for the overall Journey Type, use the Disable Agent toggle within the Screening Match Resolution task.
-
Set Autonomy Level Within each agent instance, select the Autonomy Level appropriate for your organisation's needs.
Autonomy Levels Explained
-
Manual
- The agent does not take any resolution action.
- All hits must be manually reviewed and resolved by an analyst.
-
Semi-Autonomous
- The agent resolves hits where possible but leaves the task open for analyst confirmation.
- Recommended as the default rollout mode, as it reduces workload while maintaining human oversight.
-
Fully Autonomous
- The agent resolves all hits it can and automatically completes the task.
- Provides the highest efficiency gains but should be enabled only once confidence in the agent's performance is established.
- All agent decisions and rationale are available in the Audit drawer.
-
-
Enable Materiality Assessment (optional) Select whether to use KYRA:Screen for the materiality assessment for this Journey Type.
noteThis capability is available for the Screening Resolution & Materiality task (v2 Screening) only. The toggle can be enabled on both Semi-Autonomous and Fully Autonomous agent instances. In Semi-Autonomous mode, the action item returns to Required after the agent completes the assessment, awaiting analyst confirmation. In Fully Autonomous mode, the action item transitions to Completed. See the Materiality Assessment Action Item States section for full detail on all states.
noteKYRA:Screen only assesses materiality when at least one Materiality Instruction is active. Make sure at least one instruction is active before relying on this capability.
-
Enable the Agent
- Toggle Agent Enabled to activate the agent.
- If required, you can disable the toggle at any time while retaining your configuration (e.g., to pause agent activity temporarily).
-
Save Configuration
- Click Save to apply your settings.
- KYRA:Screen will now run according to the selected configuration for the specified journeys.
Screening Instructions
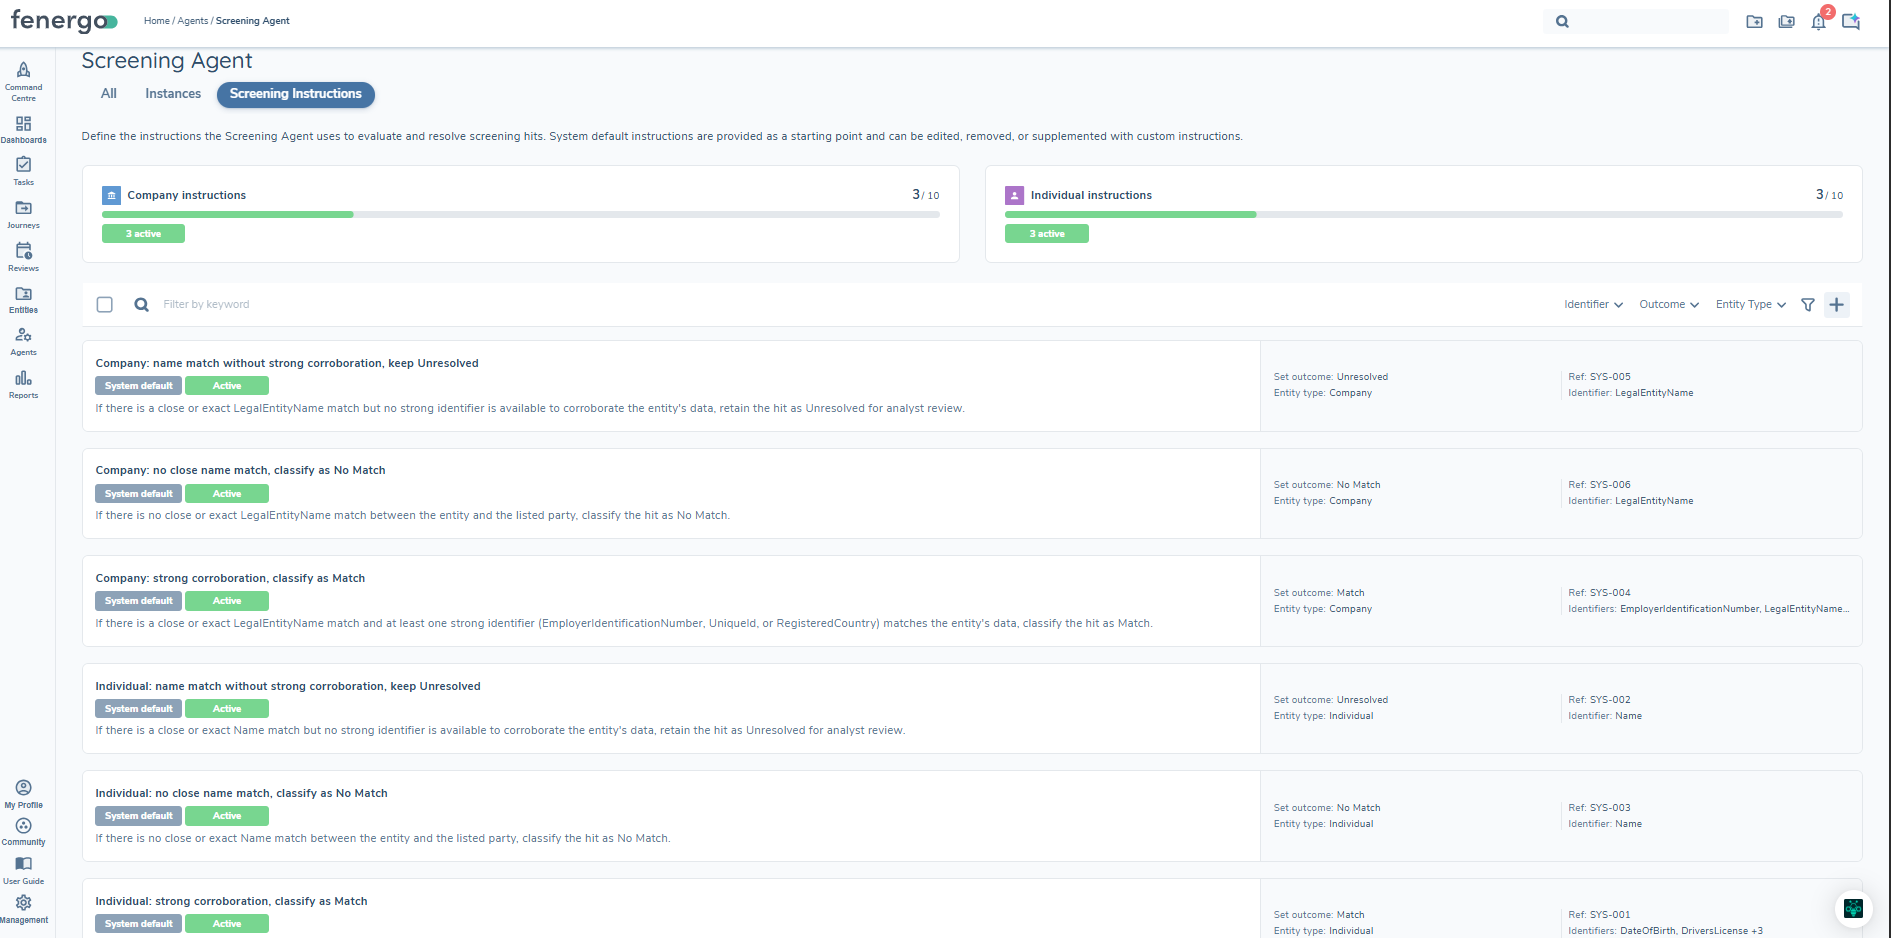
The Screening Instructions page is where you configure the logic KYRA:Screen uses to evaluate and resolve screening hits. KYRA:Screen reads your active instructions, evaluates them against the secondary identifiers inputted during screening and the hit data returned by the screening provider, and applies the most relevant instruction to reach a decision.
Instructions are built around secondary identifiers — the data points submitted during screening, such as date of birth, nationality, or address. Each instruction specifies which identifiers are relevant to its conditions. When KYRA:Screen evaluates a hit, it compares these identifiers against the hit data returned by the provider and applies the most relevant active instruction.
The system defaults are a starting point, not a recommendation. The six instructions provided out of the box illustrate the kinds of rules you can create — covering common scenarios like a close name match with no corroborating identifiers, or a strong match across multiple fields. They are not designed to reflect any specific organisation's screening policy, and they should not be treated as a substitute for one. Before going live, you should review, adapt, and supplement these defaults with instructions that reflect how your organisation defines a match, a false positive, and an unresolved case.
How KYRA:Screen applies instructions
When a screening hit is returned, KYRA:Screen evaluates the hit against all active instructions for that entity type. It looks at:
- The secondary identifiers inputted during screening (name, date of birth, address, etc.)
- The hit data returned by the screening provider
- The identifiers selected on each instruction
For each instruction, it assesses whether the conditions described are relevant to the hit. If the instruction is selected for use, it applies the configured outcome — Match, No Match, or Unresolved. If no instruction applies, the hit is returned as Unresolved for analyst review.
A few things worth knowing before you start:
-
Name matching uses three thresholds to assess how closely a hit’s name matches the entity’s:
- Exact — token sets are identical after normalising case, punctuation, and diacritics.
- Close — core first and last name tokens match; allows for nicknames, initials, diminutives, extra middle names, suffixes, common transliterations, and alternate spellings of the same name.
- Not close — fundamentally different; a different first name and a different last name, not explainable by any of the above.
For company names, generic corporate suffixes (such as “Sarl” or “UAB”) are de-weighted before comparison.
-
Match Score is not used as an identifier. KYRA:Screen does not use the screening provider’s match score in its identifier set or reasoning. Match scores are provider-specific — a score of 100 from one provider does not carry the same meaning as a score of 100 from another. Treating match scores as a reliable signal would make instructions provider-dependent and produce inconsistent results across different screening configurations. KYRA:Screen evaluates the underlying name and identifier data directly instead.
-
Identifiers define the scope of each instruction. An instruction only applies if the identifiers you select are relevant to the hit being evaluated.
-
The system does not validate your data. KYRA:Screen works with the information available. If entity data is incomplete or inaccurate, instructions that depend on that data may not fire as expected.
To access Screening Instructions:
Navigate to Agents (left navigation panel) → KYRA:Screen → Screening Instructions tab.
System Default Instructions
Fenergo provides six system default instructions out of the box — three for Individual entities and three for Company entities. These cover the most common screening scenarios and are active from day one. They are labelled with a System default badge in the instructions list.
System default instructions can be edited, moved to draft, or deleted. Once a system default has been edited or deleted, it can be restored to its original content at any time.
Restoring System Defaults
If you have edited or deleted a system default instruction and want to return it to its original content:
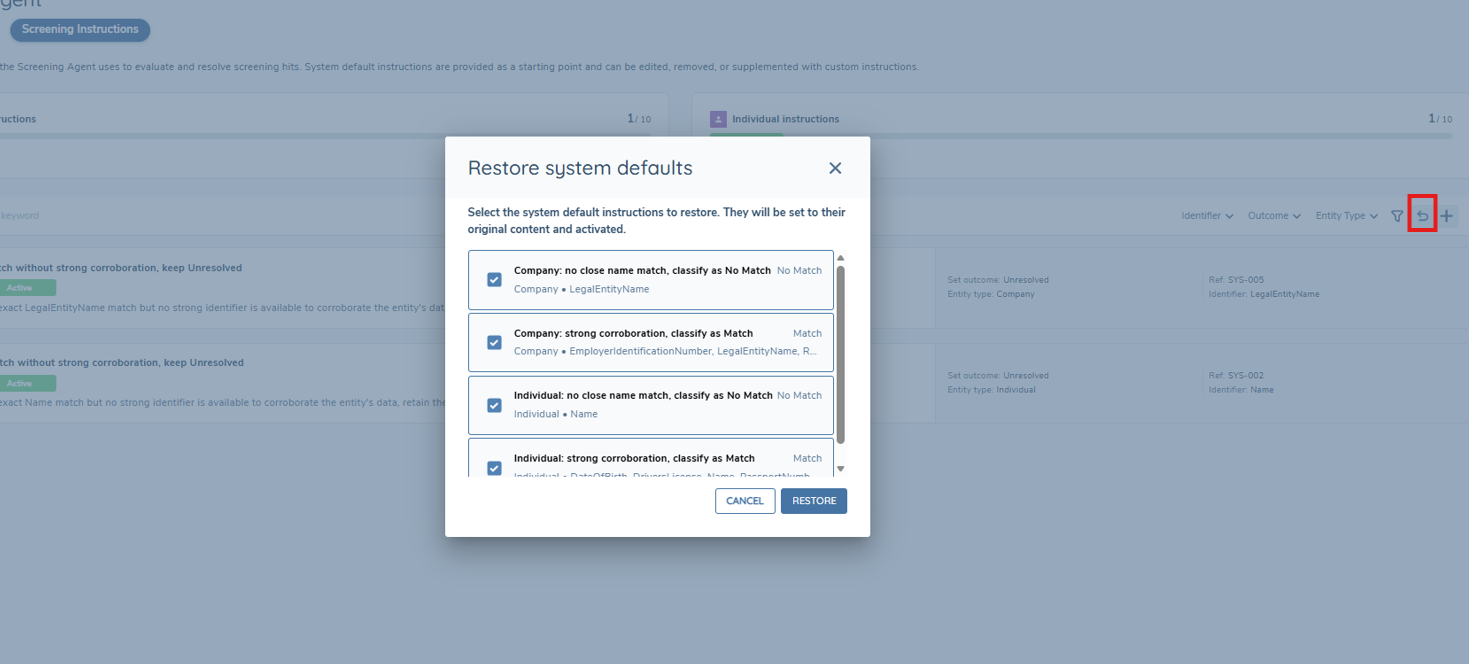
- Click the Restore defaults button in the top right of the instructions list.
- A panel will open showing any system default instructions that have been deleted or are no longer in their original state.
- Select the instructions you want to restore and click Restore.
- Restored instructions are set to Active with their original content.
If restoring an instruction would exceed the limit of 10 active instructions for that entity type, you will need to move an existing instruction to draft first.
Instruction States
Each instruction has one of two states:
| State | Description |
|---|---|
| Active | The instruction is applied by KYRA:Screen when evaluating screening hits |
| Draft | The instruction is not applied and has no impact on screening decisions |
Managing Instructions
Adding a custom instruction
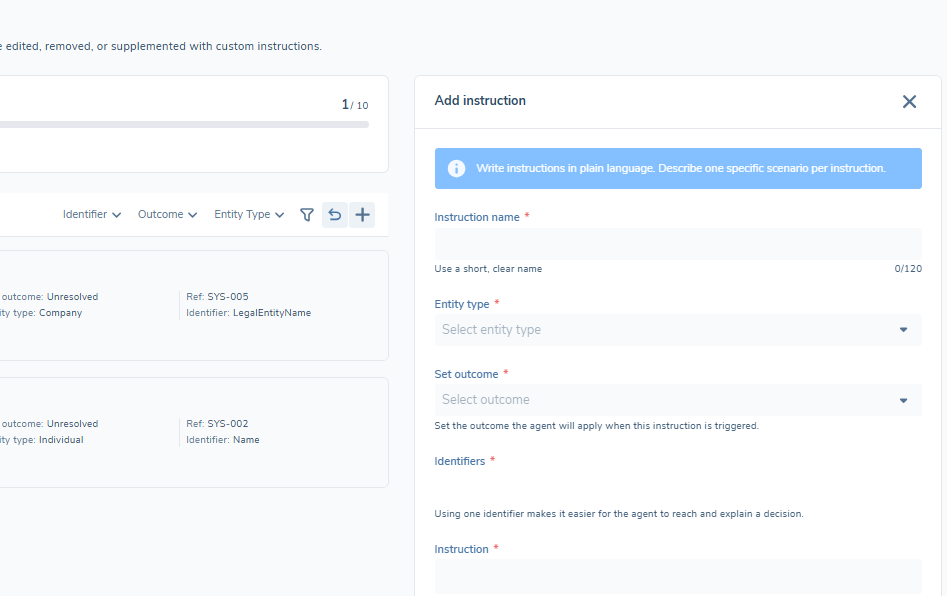
Click the + (Add instruction) button in the top right of the instructions list to open the add instruction panel, then complete the following fields:
| Field | Description |
|---|---|
| Instruction name | A clear, descriptive name for the instruction |
| Entity type | Select Individual or Company |
| Set outcome | The outcome KYRA:Screen will apply when this instruction is triggered — Match, No Match, or Unresolved |
| Identifiers | The data points the instruction references. Using fewer identifiers makes it easier for the agent to reach and explain a decision |
| Instruction | Write the instruction in plain language. Reference each identifier by its exact name in the instruction text, for example “Date of Birth” or “Legal Entity Name” |
Instructions are always created as draft. You must explicitly activate an instruction before KYRA:Screen will apply it.
Activating an instruction
To make a draft instruction live, click Activate on the instruction card and confirm. Once active, KYRA:Screen will apply the instruction to all relevant screening hits going forward.
Editing an instruction
Click Edit on any instruction card to open the edit panel. All fields can be updated. Changes are saved as draft — you will need to reactivate the instruction after saving for it to take effect in live screening.
Moving an instruction to draft
To deactivate an instruction without deleting it, click Move to draft on the instruction card. The instruction remains in the list but is no longer applied by KYRA:Screen. It can be reactivated at any time.
Deleting an instruction
Click Delete on any instruction card to remove it. Custom instructions are permanently deleted. System default instructions can be restored at any time using Restore defaults.
At least one active instruction must remain for each entity type. The delete and move to draft options are disabled on the last remaining active instruction for that entity type.
Instruction Limits
Each entity type supports a maximum of 10 active instructions — 10 for Individual and 10 for Company, counted separately. There is no limit on the number of draft instructions. The counter at the top of the page shows how many active instructions you currently have for each entity type.
When the limit is reached, the activate option is disabled on all draft instructions for that entity type. Move an existing instruction to draft to make room before activating another.
Identifier Overlap
If multiple active instructions share the same identifier and are both triggered for the same hit, the following logic applies:
- If both instructions return the same outcome — that outcome is applied.
- If the outcomes differ — the hit is set to Unresolved for analyst review.
A warning is displayed in the instruction form when a selected identifier is already used by another active instruction. This is to prevent conflicting instructions from producing inconsistent outcomes on the same hit, which would require manual analyst review to resolve.
Decisioning Rationale
The Comments field on a resolved hit shows exactly which instruction was applied and why the decision was reached.
This makes it straightforward to audit decisions, trace outcomes back to the instruction that drove them, and validate that your configured logic is working as expected. If you are testing a new instruction, you can see immediately whether it is being picked up and applied correctly.

What Happens When No Instructions Apply
The outcome for a screening hit depends on the instructions that are active at the time it is processed:
- If no instructions are active for an entity type — KYRA:Screen returns Unresolved with the message: “No enabled instructions configured for this entity type.”
- If instructions are active but none are relevant to the hit — KYRA:Screen returns Unresolved with a message indicating that no instructions were relevant.
- Provider-set false positives — hits that the screening provider has already resolved as false positives will display as No Match regardless of your instruction configuration.
In all other cases where no instruction applies, the hit will be set to Unresolved and will require manual analyst review.
Best Practices
- Ensure your instructions cover all expected scenarios. KYRA:Screen can only resolve a hit if an active instruction applies to it. Any hit that does not match an active instruction will be returned as Unresolved, increasing manual workload. The more comprehensively your instructions cover the range of screening outcomes your organisation encounters, the greater the automation benefit.
- Use the system default instructions as a baseline. Before deleting or deactivating defaults, consider whether the scenarios they cover are genuinely irrelevant to your screening programme. Restoring defaults at a later stage is straightforward, but any hits processed in the interim will have been left as Unresolved if they have no corresponding instruction.
- Test new instructions before activating at scale. Review the rationale within the Comments field of resolved hits to confirm that a new instruction is behaving as expected before relying on it in production.
- Monitor Unresolved volumes. A sustained increase in Unresolved hits can indicate that your instructions no longer cover the scenarios being generated by your screening provider. Review and update instructions accordingly.
- Use precise, specific language. Avoid generic or vague instructions. The more exact and unambiguous your instruction text, the more reliably KYRA:Screen can apply it. Reference identifiers by their exact names and define clear conditions — this removes ambiguity for the agent and reduces the likelihood of unexpected Unresolved outcomes.
Materiality Instructions
The Materiality Instructions page is where you configure the instructions KYRA:Screen uses to assess the materiality of confirmed screening hits.
KYRA:Screen uses your active Materiality Instructions to make a materiality decision (Material or Immaterial) for each screening category (PEP, Sanctions, Adverse Media, Enforcements, Other) of a confirmed screening hit.
When the Complete materiality assessment toggle is enabled for your KYRA:Screen instance, KYRA:Screen starts the materiality assessment automatically on the Screening Resolution & Materiality task once all screening hits have been resolved and at least one confirmed match exists. See Using KYRA:Screen for Materiality Assessment for more detail.
Instructions can be configured to simply determine which screening categories should be assessed as Material or Immaterial (for example, all Sanctions hits should be assessed as Material). Additionally, they can be configured to assess materiality depending on:
- The relationship and association type of a Related Party, for example, an indirectly associated Authorised Signer should be assessed as Immaterial.
- The Classification Data configured and used during match resolution, for example, a Domestic PEP should be assessed as Material.
KYRA:Screen can also complete the Sanctions Proceed Decision, where this is configured on the task.
For more information on the materiality assessment, see Using ODS: Screening Resolution & Materiality.
To access Materiality Instructions, navigate to Agents (left navigation panel) → KYRA:Screen → Instructions → Materiality Instructions tab.
This feature is supported in the Screening Resolution & Materiality task (v2 Screening) only.
How Materiality Instructions Work
When more than one active instruction applies to a screening category, KYRA:Screen applies the following rules:
1. More specific instruction wins
When more than one instruction matches a category, the one with the most conditions takes priority, for example:
Instruction 1: Sanctions → Material
Instruction 2: Sanctions + Association: Direct → Immaterial
Outcome: Immaterial
The second instruction has more conditions, so it takes priority.
2. Material wins a tie
If multiple equally matched instructions conflict, KYRA:Screen applies Material - the more conservative outcome, for example:
Instruction 1: Sanctions → Material
Instruction 2: Sanctions → Immaterial
Outcome: Material
Both instructions have the same number of conditions, so Material wins.
3. No matching instruction - manual review required
If no instruction applies to a confirmed hit, KYRA:Screen cannot make a determination. The assessment stays open for an analyst to complete.
4. Conflicting Sanctions Proceed Decisions default to Human review required
When two equally matched Sanctions instructions both result in Material but specify different Sanctions Proceed Decisions, KYRA:Screen defaults to Human review required - the most conservative outcome.
Instruction 1: Sanctions + Classification Data condition → Material, Sanctions Proceed Decision: Not ok to proceed
Instruction 2: Sanctions + Association: Direct → Material, Sanctions Proceed Decision: Ok to proceed
Outcome: Material
Sanctions Proceed Decision: Human review required
Both instructions are equally matched. The Sanctions Proceed Decisions conflict, so KYRA:Screen defaults to Human review required.
Instruction Structure
Each instruction has the following fields:
| Field | Description |
|---|---|
| Instruction name | A clear, descriptive label for the instruction. |
| Screening categories to assess | The category or categories this instruction applies to: PEP, Sanctions, Adverse Media, Enforcements, Other. An instruction can span multiple categories - it fires independently for each category where a confirmed match exists. |
| Outcome for categories | Material or Immaterial - the outcome KYRA:Screen records when this instruction is applied. |
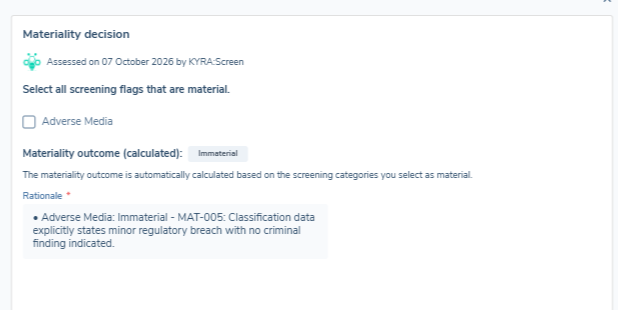
Each instruction is automatically assigned a unique reference ID in the format MAT-XXX when it is created. KYRA:Screen cites this reference ID in the Rationale field of the Materiality outcome.
Optional Conditions
Instructions can include the following optional conditions. These narrow the scope of an instruction and serve as the tiebreaker when multiple instructions are triggered for the same hit.
| Condition | Description |
|---|---|
| Classification Data (AI) | Tells KYRA:Screen when to apply judgement using the Classification Data values captured during match resolution. Example: "Trigger this instruction if the Classification Data captured during match resolution contains the words 'Domestic PEP'." In this scenario, if two PEP instructions are triggered for the same hit and the hit's Classification Data includes "Domestic PEP", KYRA:Screen selects the instruction containing that condition over one without it. For the Classification Data field to be picked up by KYRA:Screen, the Database field name of the Policy field for the Screening Category must match the format exactly as described in the Configuring ODS: Screening Resolution & Materiality User Guide: PEP → pepClassificationDataSanctions → sanctionsClassificationDataEnforcements → enforcementsClassificationDataAdverse Media → adverseMediaClassificationDataOther → otherClassificationData |
| Related Parties | Filters by how the Related Party (RP) is connected to the main client. Comprises: Relationship - the RP's relationship role, drawn from the configured Relationship lookup. Association: Direct - the RP is directly connected to the client. Indirect - the RP is connected to the client through one or more intermediate entities. Both - applies regardless of whether the connection is direct or through intermediate entities. |
Sanctions Proceed Decision
When an instruction has the outcome Material and includes the Sanctions screening category, a Next step: Sanctions decision section is displayed on the instruction. Use it to set the Sanctions Proceed Decision that KYRA:Screen applies when it assesses a Sanctions hit as Material using this instruction.
The Sanctions Proceed Decision setting only applies if the Sanctions Proceed Decision step is enabled at task level. If it is not enabled, leave this section unset.
Under If Sanctions are material, KYRA:Screen applies:, select one of the following options:
| Option | Description |
|---|---|
| Human review required | KYRA:Screen records the Material outcome but leaves the Sanctions Proceed Decision for an analyst to complete. The Materiality Assessment action item shows "Sanctions decision required". |
| Ok to proceed | KYRA:Screen records "Ok to proceed" as the Sanctions Proceed Decision. |
| Not ok to proceed | KYRA:Screen records "Not ok to proceed" as the Sanctions Proceed Decision. |
This setting is optional and no option is selected by default. If two equally matched Sanctions instructions specify different Sanctions Proceed Decisions, KYRA:Screen defaults to Human review required. See rule 4 in How Materiality Instructions Work for an example.
For more information on completing the Sanctions Proceed Decision on the task, see Using ODS: Screening Resolution & Materiality.
Materiality Instruction States
Each instruction is either Active or Draft.
| State | Description |
|---|---|
| Active | The instruction is evaluated by KYRA:Screen during materiality assessment. Each screening category supports a maximum of 10 active instructions. |
| Draft | The instruction is saved but not evaluated. There is no limit on the number of draft instructions. |
Managing Materiality Instructions
Adding a Materiality Instruction
Click + Add instruction to open the instruction panel. Complete all required fields and any optional conditions. Instructions are created as Draft - they must be activated before KYRA:Screen will evaluate them.
Activating a Materiality Instruction
Click the Activate button (lightning bolt icon) on a Draft instruction card. Once active, KYRA:Screen evaluates it for all subsequent materiality assessments.
Editing a Materiality Instruction
Click Edit on any instruction card. All fields can be updated.
Duplicating a Materiality Instruction
Click Duplicate to create a copy of an instruction. The copy is created as Draft.
Moving a Materiality Instruction to Draft
Click Move to draft on an Active instruction to deactivate it without deleting it. It can be reactivated at any time.
Deleting a Materiality Instruction
Click Delete to permanently remove an instruction.
Materiality Instruction Limits
Each screening category supports a maximum of 10 active instructions. Progress bars at the top of the list show current usage per category. When the limit is reached, the activate option is disabled - move an existing instruction to Draft to make room.
Using KYRA:Screen
Once KYRA:Screen has been enabled and configured, analysts can interact with its results directly in the Screening Results task.
-
Open the Screening Results Task
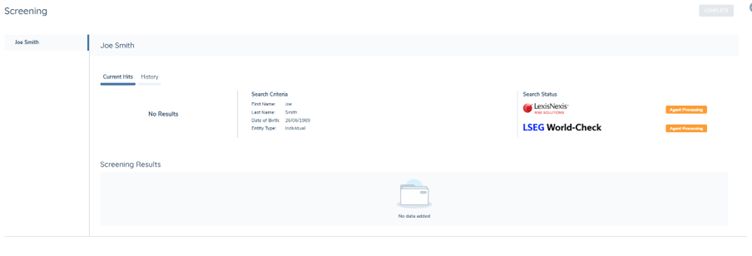
- When a screening request is initiated, the Search Status will display as “Agent Processing” while KYRA:Screen analyses the results from the selected provider and compares them with the entity's Search Criteria (name, date of birth, entity type, etc.).
- Once processing is complete, all screening hits are displayed in the Screening Results table.
-
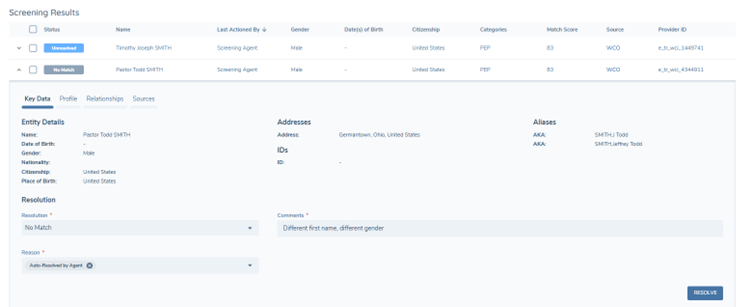
Review Agent Decisions
Expand each hit in the Screening Results table to view the Agent's decision and rationale.
Each resolution includes:
- Resolution (e.g., No Match, Match, Unresolved)
- Reason (e.g., Auto-Resolved by Agent)
- Comments (e.g., Different first name, different gender)
The Last Actioned By column indicates whether the hit was handled by:
- KYRA:Screen
- A user/analyst (for example, re-used resolutions from previous screening runs)
- The screening provider in some cases, if auto-resolution of false positive hits is enabled
This ensures analysts can always verify how and by whom a decision was made.
-
Resolve Any Outstanding Hits
In Semi-Autonomous mode, KYRA:Screen will attempt to resolve screening hits but will leave the task open for review. To override an Agent decision:
- Expand the hit, update the Resolution, add the Reason, and record Comments.
In Fully Autonomous mode, if all hits are resolved by KYRA:Screen, the task will auto-complete without analyst intervention. Analysts must resolve any remaining unresolved hits before the task can be completed.
-
Audit Trail & History
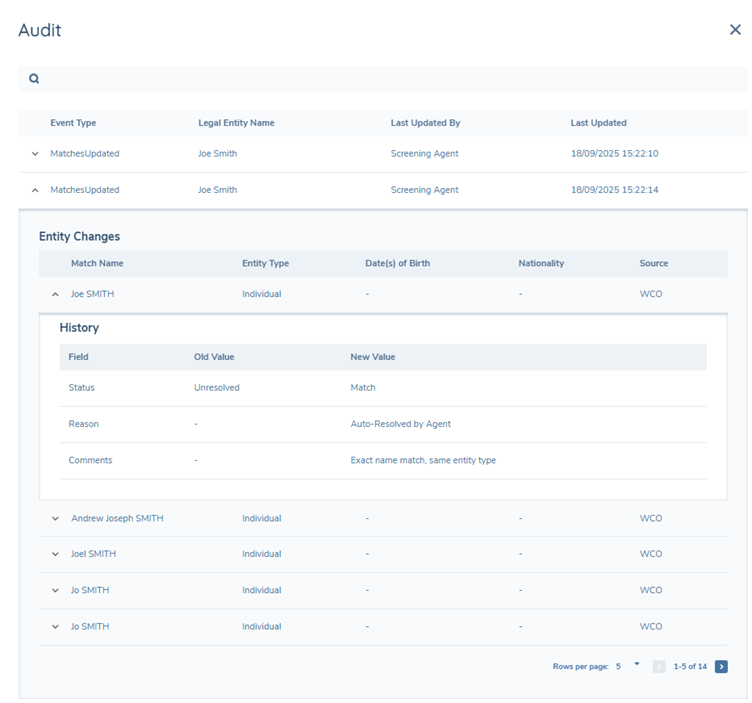
Every decision made by KYRA:Screen is fully auditable.
Open the Audit view to see:
- Event type and entity name
- Who last updated the match (Agent, User, or Provider)
- Timestamp of the change
- A detailed history of changes (e.g., status updated from Unresolved → Match, reason recorded as Auto-Resolved by Agent)
This provides full transparency and accountability for compliance purposes.
Using KYRA:Screen for Materiality Assessment
KYRA:Screen automatically starts the materiality assessment when all of the following are true:
- The Complete materiality assessment toggle is enabled on the Agent Instance for the Journey Type.
- All screening hits have been resolved.
- At least one confirmed match exists.
When these conditions are met, the Materiality Assessment action item moves to Agent Processing and KYRA:Screen begins assessing.
Applicable Jurisdiction is populated automatically by KYRA:Screen based on the following logic:
- If only one value is configured in the Screening Materiality Jurisdiction lookup, KYRA:Screen selects it automatically.
- If multiple values are configured, KYRA:Screen checks whether any configured lookup value exactly matches the In Scope Policy jurisdiction of the entity being screened or any of its related parties. All matching values are selected.
- If no configured value matches, KYRA:Screen leaves the field unresolved and the assessment remains open for the analyst to complete manually.
Materiality Assessment Audit Trail
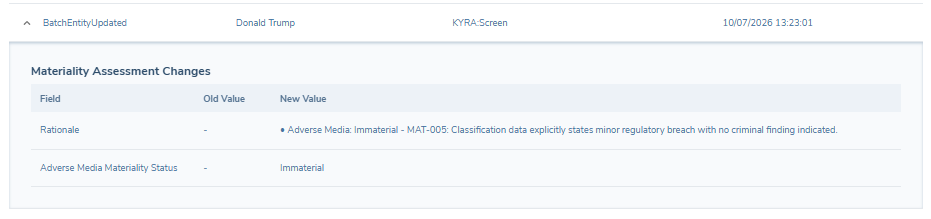
Materiality assessments completed by KYRA:Screen are recorded in the audit trail. In the Audit view, the BatchEntityUpdated event type shows KYRA:Screen as the user who last updated the entity. Expand the event to see the Materiality Assessment Changes section, which lists the Rationale and the Materiality Status for each screening category assessed.
Retriggering KYRA:Screen
After KYRA:Screen completes a materiality assessment, the completed assessment will be invalidated if either of the following occurs:
- A match decision is updated - for example, a confirmed match is changed to no-match.
- Classification Data is updated on a resolved hit.
When this happens, the action item returns to Required state and the previous assessment is cleared. Manually retrigger KYRA:Screen using Assess with KYRA:Screen → in the Action Items panel, or complete the assessment manually using Assess →.
KYRA:Screen and Escalation
KYRA:Screen does not take action on escalated tasks. When a Screening Resolution & Materiality task is escalated to a second-line review, the Materiality Assessment action item displays an Escalated chip. KYRA:Screen will not trigger in this state.
Materiality Assessment Action Item States
The Materiality Assessment action item can display the following states in the Action Items panel:
| State | Description |
|---|---|
| Agent Processing | KYRA:Screen is actively running the materiality assessment. |
| Required (not yet assessed) | Confirmed matches exist and no assessment has been completed. The analyst can assess manually or ask KYRA:Screen to assess. |
| Required (agent completed, SA mode) | KYRA:Screen has completed the assessment in Semi-Autonomous mode. The result is ready for analyst review and confirmation. |
| Required (no matching instruction) | The agent ran but could not find an applicable instruction for the confirmed hit. Manual assessment is needed. |
| Required (Sanctions decision pending) | The agent assessed the hit as Material, but the Sanctions Proceed Decision requires human sign-off. |
| Required (jurisdiction unresolvable) | The agent could not determine the applicable jurisdiction because multiple values were configured but none matched the entity's In Scope Policy jurisdiction. Manual completion is needed. |
| Required (AI evaluation error) | The underlying model was temporarily unavailable when KYRA:Screen attempted to evaluate Classification Data instructions for the category. This does not indicate a configuration problem. The analyst can assess manually or ask KYRA:Screen to assess again. |
| Required (assessment cleared) | A match decision or Classification Data was updated after the assessment was completed, invalidating the previous result. The analyst can assess manually or ask KYRA:Screen to assess again. |
| Completed | KYRA:Screen has completed the assessment in Fully Autonomous mode. The assessor is recorded as KYRA:Screen. |
| Completed (agent assessment confirmed) | An analyst reviewed the KYRA:Screen assessment and saved it without changing the outcome. |
| Completed (agent assessment overridden) | An analyst changed the outcome of the KYRA:Screen assessment before saving. |
| Escalated | The task has been escalated to second-line review. KYRA:Screen will not trigger in this state. |
Best Practices for Adoption
- Start with Semi-Autonomous mode to maintain oversight while reducing analyst workload.
- Monitor early outcomes using the Audit drawer before switching to Fully Autonomous mode.
Ongoing Screening
KYRA:Screen can be used in Ongoing Screening (OGS) journeys to automatically analyse and resolve hits generated, allowing organisations to maintain continuous monitoring without increasing manual workload for their operations teams.
How It Works When an OGS journey is triggered, KYRA:Screen evaluates the resulting hits using the same resolution logic applied in on-demand screening journeys.
Depending on the autonomy level configured for the agent instance, it may:
- Automatically resolve matches,
- Leave them open for analyst confirmation (Semi-Autonomous), or
- In Fully Autonomous mode, complete the task automatically.
Configuration Requirements
To enable KYRA:Screen for OGS:
-
Create a KYRA:Screen Instance
- Navigate to Agents → Add Instance, and create a new instance dedicated to OGS journeys.
- Assign the instance to the Journey Type that represents your OGS process.
- A Journey Type can only be linked to one agent instance, so Ongoing Screening should have its own instance, separate from on-demand screenings.
-
Set the Autonomy Level
- Choose between Manual, Semi-Autonomous, or Fully Autonomous, depending on organisational risk appetite and oversight needs.
-
Enable the Agent
- Turn on the Agent Enabled toggle to activate automated match resolution for the assigned OGS journeys.
Once configured, KYRA:Screen will automatically evaluate and resolve hits for all ongoing screening events associated with that journey type.
- Unlike On Demand Screening, for OGS KYRA:Screen resolves hits before the journey launches.
- Therefore, no initial audit record is created.
- An audit entry will only appear if a user later reviews and changes KYRA:Screen's decision.
Sources Summarisation
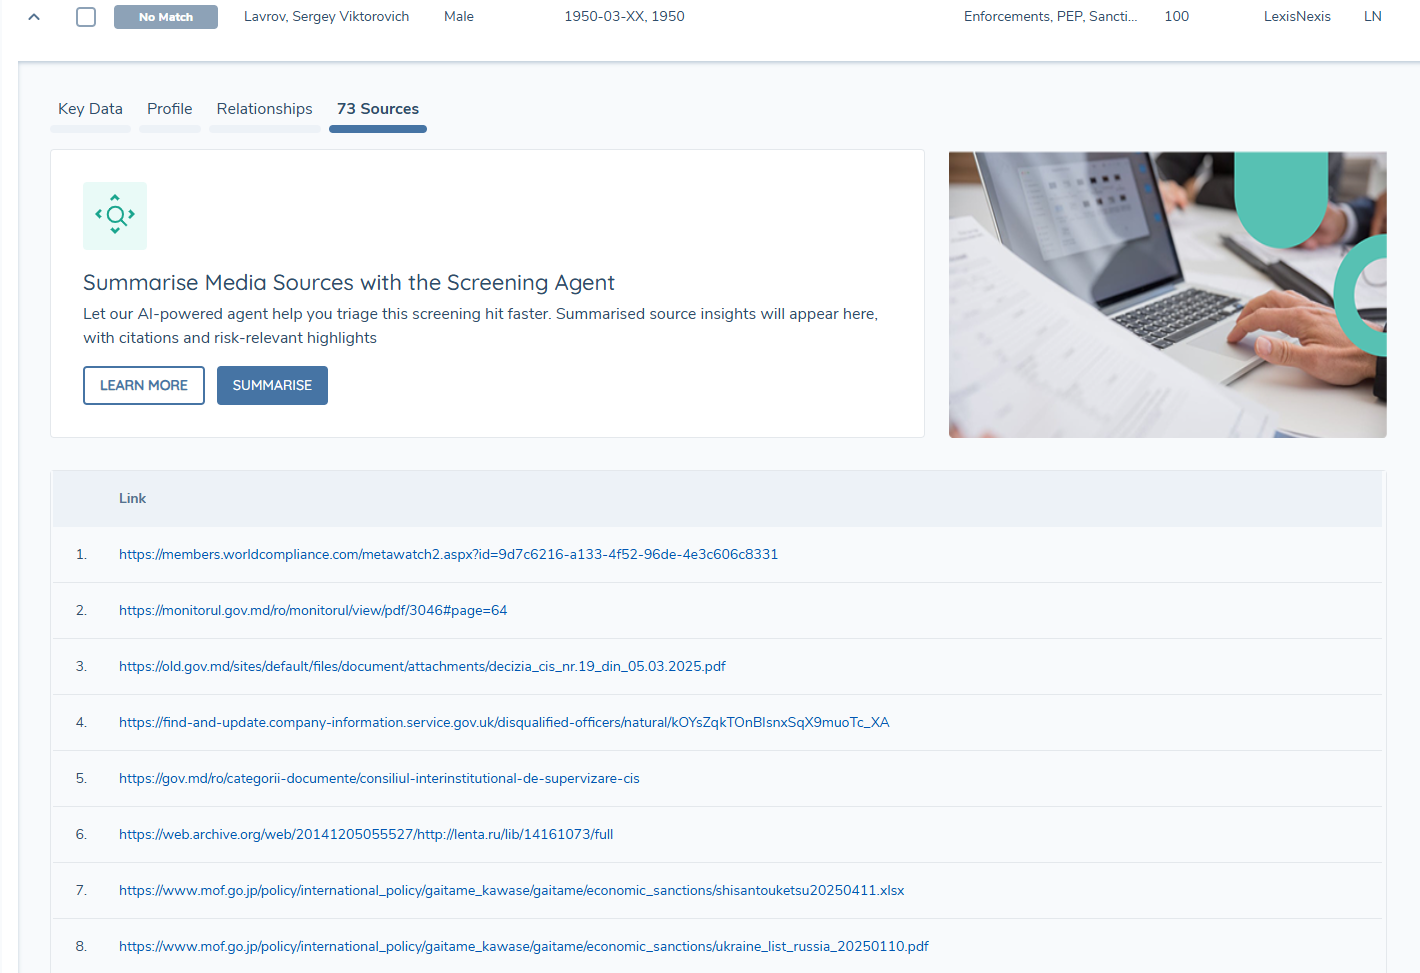
Sources Summarisation enables KYRA:Screen to generate AI-powered summaries of articles linked within the Sources tab of a screening match.
Instead of manually opening and reviewing each link, analysts can request a consolidated summary directly within the Screening Results task.
Summarisation runs asynchronously, allowing you to continue reviewing the task while summaries are being generated.
How to Use Sources Summarisation:
- Once screening results have been generated, open a screening match in the Screening Results task.
- Navigate to the Sources tab.
- Click Summarise Sources.
- A progress bar will indicate when the summarisation is complete.
KYRA:Screen will:
- Generate a structured summary for each applicable source in the right hand pane, available through clicking the “View Sources” button.
- Provide a Sources Overview, summarising the key high level information across all links.
- Highlight common themes identified across articles in bullet point format.
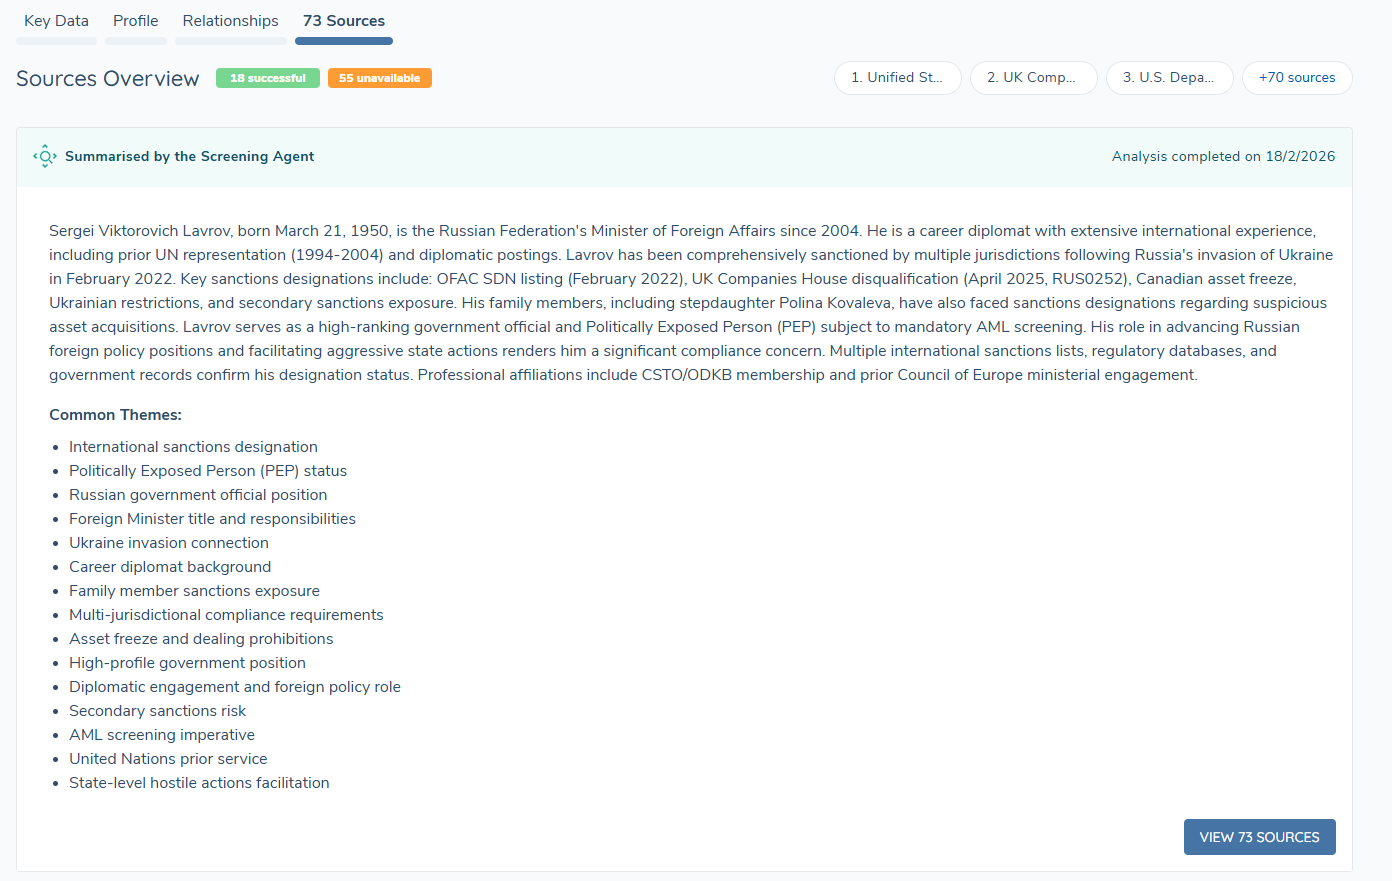
What to Expect:
- The original source links remain clickable at all times.
- Links that cannot be summarised (for example, unsupported formats or inaccessible content) are clearly flagged as Unavailable in the right hand pane.
- Non-English sources are automatically translated into English for summarisation.