Configuring Journey Priority
The priority column in the Management Dashboard allows you to assign a custom priority value to each journey.

Priority can be used to help users better understand what journeys need their attention. In Fenergo SaaS journey priority is configurable, flexible, and optional – if you do not wish to capture journey priority this column will be left blank.
Before using this guide to configure your tenant, it will be useful to know the following things about your prioritization process.
- What labels you wish to use (High-Medium-Low , 1- 2 - 3, etc.)
- The data format in which priority is captured (Selection, freetext, numerical, etc.)
- When you wish to capture priority in a journey (at entity creation, after a particular task, etc.)
- The rules around auto-setting a priority to a certain level based on entity data o For example, “All entities from Singapore are high priority journeys”
All of these items are configurable, meaning you can define the process and configure it accordingly.
Configuration
To make this attribute appear on the dashboard, you must capture a value for ‘priority’ in a journey. You must create and configure this field using the policy and journey builder.
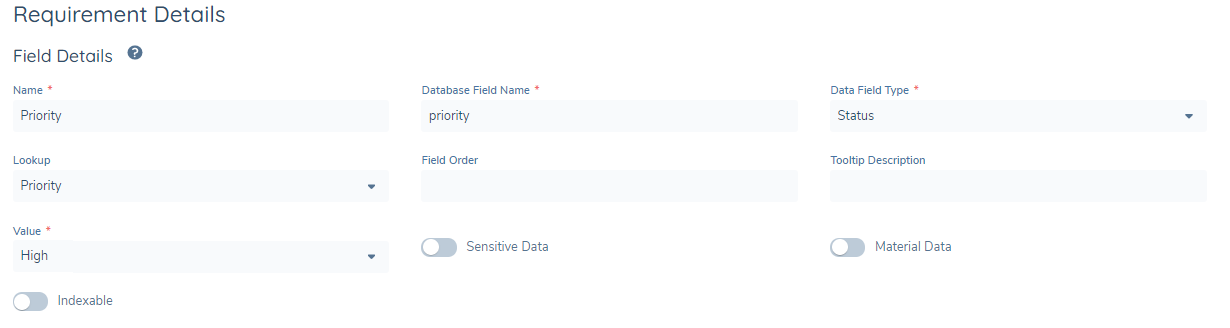
In a policy, configure a new field called ‘priority’:

- Name: This can be anything. It is the label that will appear above the field when it is being captured in the journey.
- Data Field: This must be ‘priority’ for the dashboard to recognize and display it
- Type: Set this to whatever data type you are capturing. Limitations are explored on page 11.
- Category: This dictates where the field will appear in the journey o ‘Basic Details’ will make this appear on the New Request screen when you are creating the entity. (Not that this will not work for conditional fields: see page 5 ) o Any other categories can be configured using the journey builder
- Entity Type: This field dictates what entity type (Company, Individual, Other) this priority field is to be used for. Note: to capture priority for each entity type, the field must be configured 3 times (1 each for Company, Individual, Other).
- Target Entity: This must be ‘Client’ to be saved correctly to the entity draft.
Capturing Priority in a Journey
We have outlined three ways to capture priority for a journey in Fenergo SaaS.
Manual
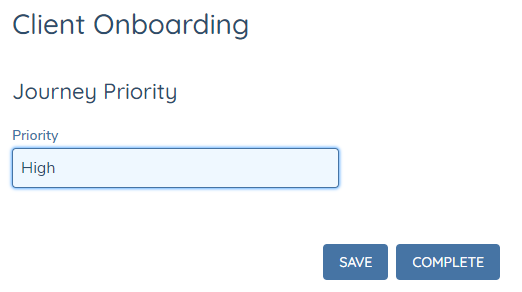
This method is suitable for situations where the analyst will manually decide the priority of each case. For this method, the field “priority” is presented to the user for them to input a value.
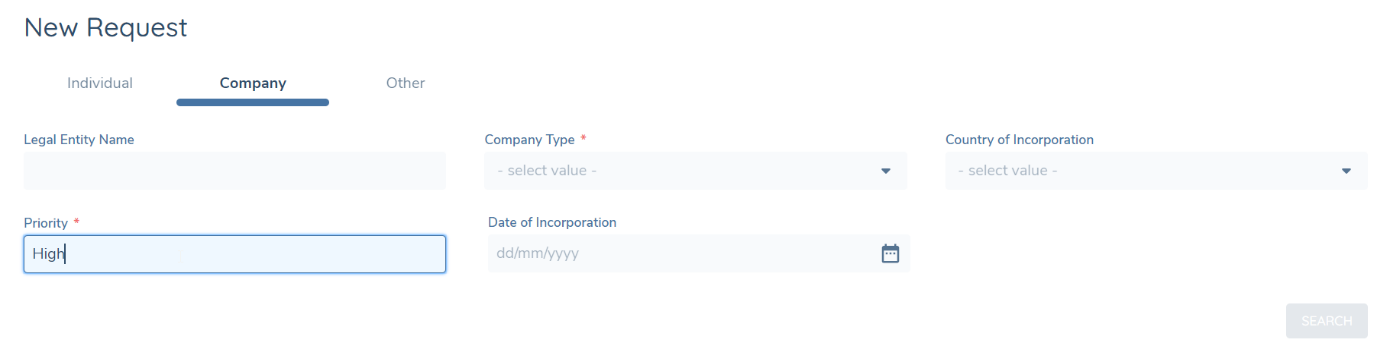
To capture priority on the ‘New Request’ screen, ensure your field has the business category “Basic Details”. If you wish to surface the field at a different point in the journey:
- Give it a relevant business category e.g. “Priority Fields” (if you wish to create a new business category for priority, use the reference data editor to create a new entry in the “Requirement Classification” lookup.)
- Use the journey builder to surface that business category at whatever point in the journey you need.
Logic Engine
This method is suitable if you have a few set rules around how journeys are prioritized. For example:
- “All entities booked through Singapore are High priority, else it’s Low”
- “If the journey has come from the portal and it is not for a company, then the priority is Urgent”
Please note that the conditional fields will not work on the ‘New Request’ screen. If you wish to use this method, you must surface the priority field inside the journey instead of just on the ‘New Request’ screen.
To configure this:
-
Create a field in the policy with the Database Field Name “priority”
-
Assign a Data Field Type
- If the user is not allowed to manually override priority after it is presented to them: i. In the Reference Data Editor, create a lookup that contains all your priority values. ii. make this Data Field Type a “Status” and give it a value e.g. “Urgent”, “High”, etc.
- If the user is allowed to manually change the priority after it is presented to them, give it any valid data type and a default valu e e.g. “Urgent”, “High”, etc. (Note that making this field “read only” will cause errors when trying to reopen or recalculate the value and you should instead use the status method above.)
-
Create a trigger condition that describes the scenario in which this priority is triggered. For example, if the rule “All entities booked through Singapore are high priority”: a. the value is “High” b. the rule is “Booking Entity equals Singapore”

-
Give this field the relevant business category and entity types.
-
In the journey builder, surface this field at some point in the journey using the relevant business category.
When you have configured this correctly, the entities that have “Singapore” captured as the Booking Entity will have the priority automatically set to “High” once the priority field comes into scope.
Repeat these steps, creating a new ‘priority’ field in the policy for every scenario. Note that if you have a rule like “All entities booked through Singapore are high priority, else the journey is low priority ” you must create the field and rules to cover off the else scenario:


Ensure that all trigger conditions do not overlap, or else multiple priorities will be triggered for the journey. In this scenario, the priority that is triggered last will be taken.
Risk Engine
If you have a more complex formula-like method to calculate priority, you can harness our existing risk engine to calculate journey priority using the entity’s data.
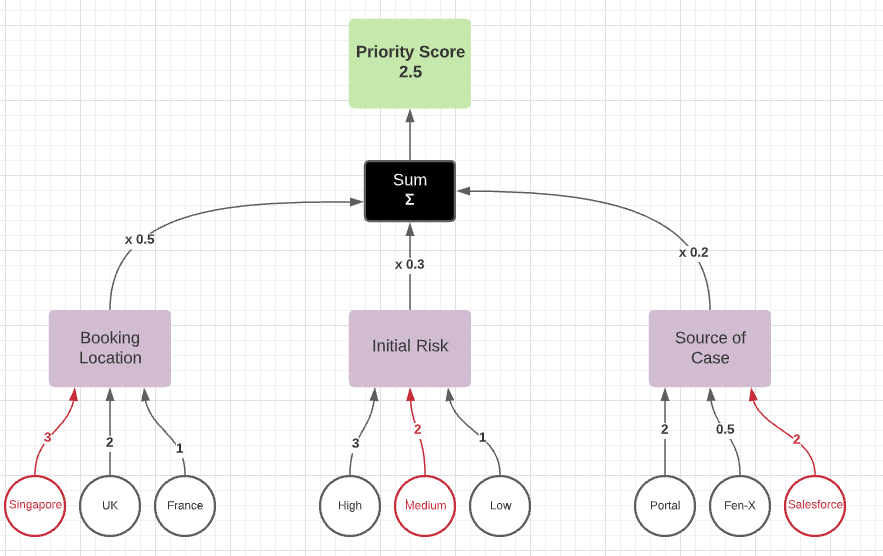
For example, Bank X has a formula where their journey priority is calculated using a combination of:
- The booking location
- The initial risk level of the entity
- The source of the journey – portal, salesforce, etc.
They have given each of these data points an importance or ‘weight’:
- The booking location is 50% of the priority score
- The initial risk of the entity is 30% of the priority score
- The source of the journey is 20% of the priority score
They have given each of the potential inputs for each data point a value to describe how important they are. For example:
- The potential inputs for “Booking Location” are “Singapore”, “France”, “UK”.
- Singapore cases are the highest priority. It has a value of 3. France has a value of 2, and UK 1.
We can assemble all this information into a model using our risk configuration area. For more detailed guidance on using the risk tool, please see the Risk User Guide.
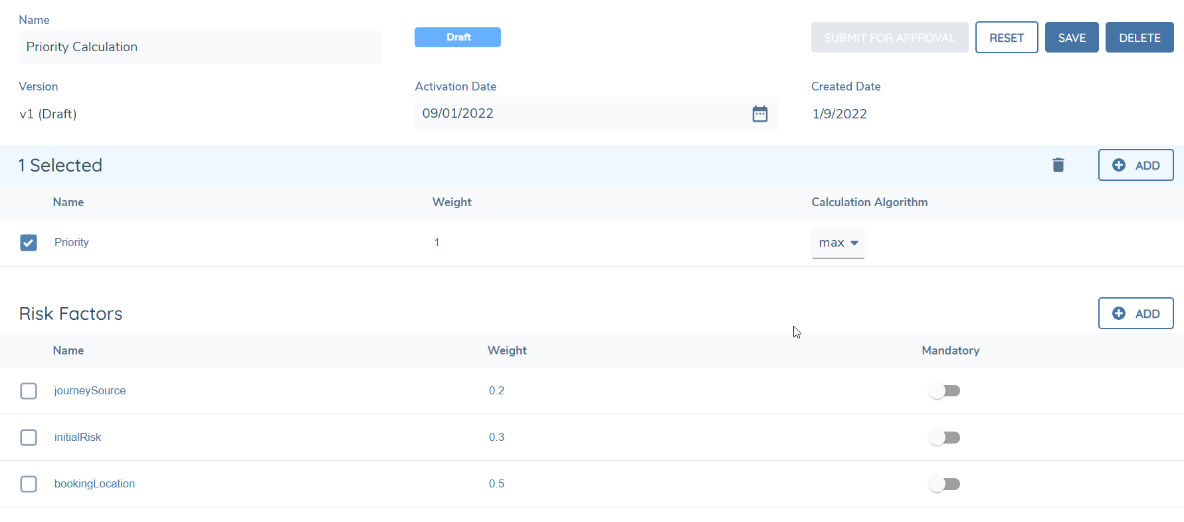
Go to the risk configuration area and create a new risk model to capture all the data points that will be used for the entity, and the weight (importance) of each one.
Bank X would use one group ‘Priority’ as their model isn’t that complex. If you have a lot of data points you may want to organize your data into groups. They input journeySource, initialRisk, and bookingLocation as their risk factors, and assign the relevant weight.
You can make some of these factors mandatory. If they are not captured, the calculation will fail and no priority will be assigned.
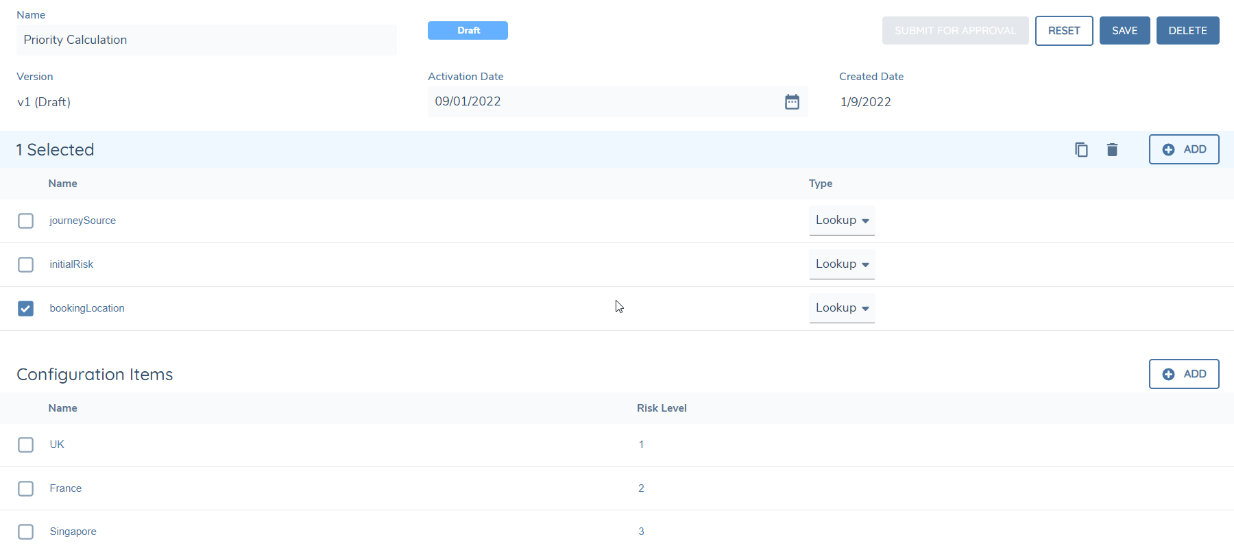
Next, create a configuration collection to list all potential inputs. You must capture every single potential input here. If bookingLocation is a factor, and the user can input from a list of 250 locations, then all 250 must be listed here with a corresponding score. The ‘Risk Level’ score here refers to how important each potential input is (for example, “Singapore is the highest priority, so it gets a score of 3”). Bank X only has 3 potential inputs, so they put “UK”, “France”, “Singapore” and give them each a score. If they ever introduce new booking locations, they will have to update this model accordingly.
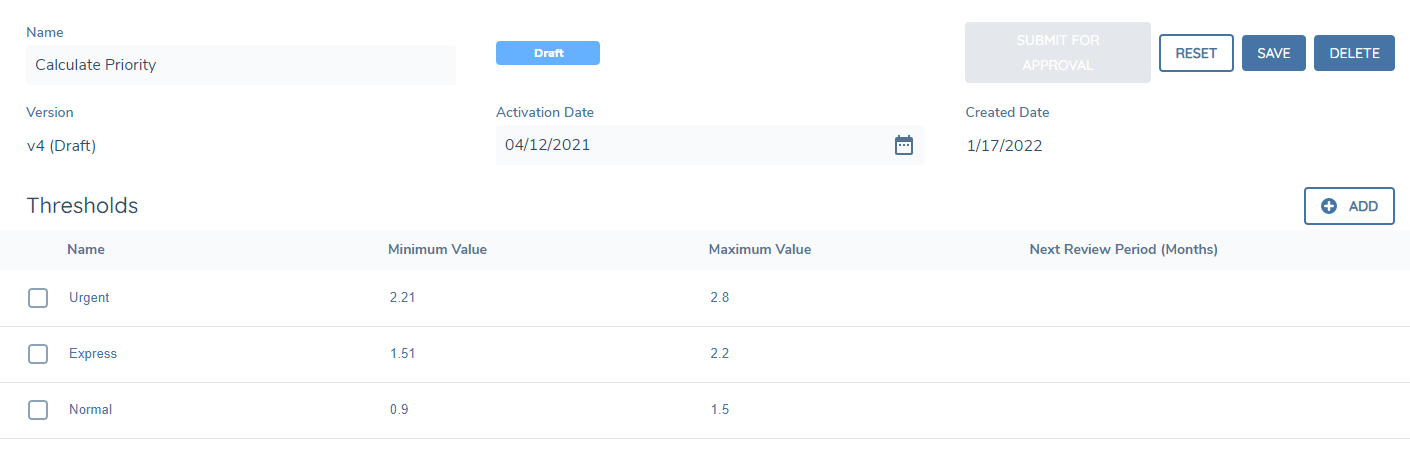
Next, you will create a threshold model to designate what priority labels are assigned to each score. You can have any number of priority levels here. Bank X has 3 levels – Urgent, Express, and Normal. When they ran all simulations with all potential inputs, they found that they had to account for any score between 0.9 and 2.8. They decide to split this so that anything between 0.9 - 1.5 is Normal, 1.51 - 2.2 is Express, and 2.21 - 2.8 is Urgent.
In the journey builder, create a risk task with your Risk Model, Configuration Collection, and Threshold Model
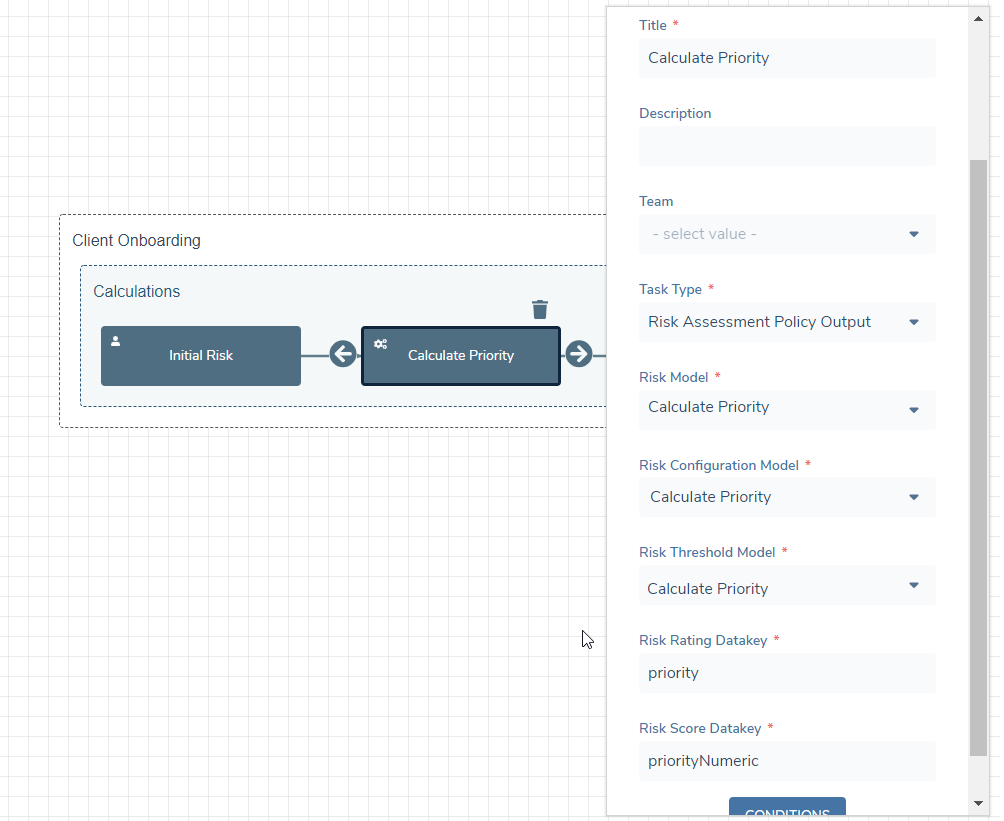
- Task Type: Risk Assessment Policy Output
- Risk Model: Name of your risk model
- Risk Configuration Model: Name of your configuration collection
- Risk Threshold Model: Name of your threshold model
- Risk Rating Datakey: Priority
- Risk Score Datakey: This variable can be used to save the numeric score of the priority calculation
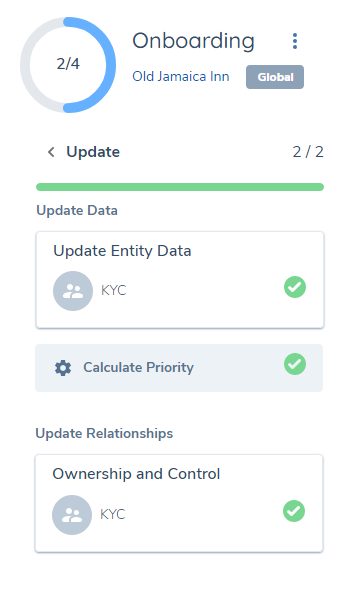
Place this task anywhere in the journey you want priority to be calculated. It can be repeated multiple times (i.e., For scenarios where priority must be recalculated when new data is added or changed).

This priority calculation task must be placed after all data has been captured. If initialRisk is a factor for calculating priority, but initialRisk has not yet been captured, the priority calculation will fail.
When the journey is started and the task is reached, a calculation will be performed that produces a value for ‘priority’ based on the entity data and the model you designed.
You can create as many priority calculation models as you need. If you recalculate priority many times in a journey, you may wish to create additional models that account for more data that has been captured in later parts of the journey.
If using this method, your ‘priority’ field in the policy must have a data type that is a string. The current risk threshold model framework does not support dates or numbers as outputs.
Data Types
When creating the ‘priority’ field in the policy, you have an option to choose a data field type. Each option and their limitations are explored here.
Recommended Data Types
These data types are most suited to a priority value.
Select Dropdown Users select a priority from a pre-configured list of values. You can create a custom list in the reference data editor.


Multiple Select Dropdown Users can select more than one value from a pre-configured list of values. This is suitable for cases where journeys may have more than one descriptor for their priority level. Using this option may complicate sorting on the dashboard.


Linked Select Dropdown Users select a priority from a pre-configured list of values, which is linked to a parent/child list. This is useful if you wish to guide the user and refine the priority list based on a prior selection. For example, if they choose “High Risk” from a parent “Risk” list, they may only be allowed to choose “High” or “Urgent” priority from the Priority list. Please note that in order for this to work, both lists must be in scope inside the same task.

Linked Multiple Select Dropdown Users can select more than one value from a pre-configured list of values, which is linked to a parent/child list. This has the same advantages as linked select dropdown above, but still may complicate sorting due to the multiple selections.
Status This data type is useful when using the Logic Engine capture method (described on page 5 ). This will set a read-only priority status based off previously captured entity data and trigger conditions.

In the above example, a user has set the Country to “Spain” which has autoset the Priority status to “Urgent”. All rules can be configured using the logic engine. You must create a priority field for every rule you have.
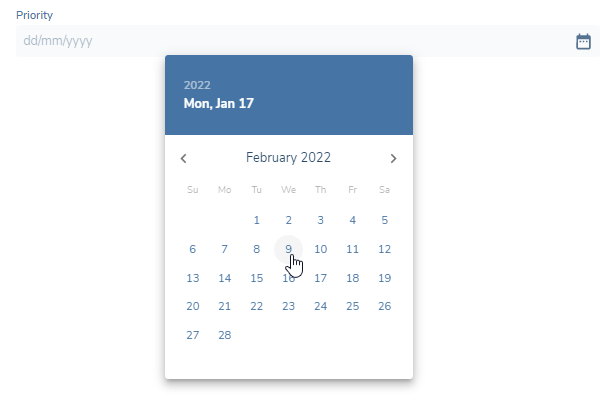
Date Users select a date from a calendar.

Non-Recommended Data Types
These data types may cause errors if used to capture priority.
Text Field When using this data type, users will be able to type whatever they want into the text box. This can be prone to error if the user misspells a priority level or leaves whitespace, as it will not be grouped correctly when sorting the dashboard.
Text Area This is similar to the text field option but allows more text. Since the priority chip on the dashboard is a fixed width, it will be truncated anyway.
Number Users can freely enter any numerical value. While this allows for better sorting, it still can be prone to error due to the fact users can enter any number. It may not align to numbers other users have entered for other journeys.
Data Group This is not a supported data type.
FAQ
Do I have to assign priority to every journey?
It is optional – you will see a blank column if you choose not to use it.
Can I change priority after a journey has already started?
Priority can be reassigned as many times as needed in a journey. The value can be changed whenever a task has the “priority” field in scope.
What labels does Fenergo SaaS use for priority?
You can decide whatever wording best suits your client. Some examples include:
- Normal, Express, Urgent
- Low, Medium, High, Super High
- Red, Green, Amber
- 1,2,3,4,5,6,7...
- High Risk – Urgent, Low Risk – Normal
How many levels of priority can I have?
You can have as many levels as you want. If you have a select dropdown, the possibilities are limited to whatever values are configured for your Priority lookup. If it is a free text box the user populates themselves, the possibilities are endless.
What data type does the priority field have to be?
The value can be anything except for “Data Group”. Nothing will show on the dashboard if ‘priority’ is configured with this type. Other data types are explored on page 11.
Why isn’t my dashboard ordered by priority when I first arrive on the page?
The dashboard will continue to be ordered by “days open.” Since priority is custom, there is not yet a way for Fenergo SaaS to know how your priority is ordered (e.g. that “Urgent” is higher priority than “Express”).
To sort the dashboard, click the column header

If your priority levels are ordinal, add prefixes 1, 2, 3.. so that you can easily order the journeys on one click.


Can an entity have 2 journeys open at once with different priorities?
Yes - the data is saved to the entity draft, which is tied to that unique journey.
Can I mix datatypes for priority in a single journey?
No – if you bring priority into scope as a “select dropdown” in task 1, then bring it into scope again in task 2 with type “date”, there can be errors when saving and validating the data. Try to keep the priority field to a single type.
Priority is not appearing on my dashboard
- Ensure you have created a field with the data field name “priority” in your policy
- Ensure this policy is approved/published
- Ensure the journeys you have started are using this policy
- Ensure this field is in scope at some point in your journey (e.g. Check the business category containing the priority field is configured to appear in the journey builder, and ensure this journey is published)
- Ensure a value is captured for priority in the journey and the task is saved/completed