Configuring External Data Sources
The External Data feature in Fenergo SaaS allows a user to enrich a client record with data from different data providers.
While the framework is configurable to support integrating with any data external or internal data provider, Fenergo SaaS supports OOTB integrations with the following data providers:
Orbis:
- Import Entity Data: Yes
- Import Hierarchy: Yes
- Import Documents: No
Kompany:
- Import Entity Data: Yes
- Import Hierarchy: Yes
- Import Documents: Yes
Dun & Bradstreet:
- Import Entity Data: Yes
- Import Hierarchy: Yes
- Import Documents: No
The External Data domain, communicates with External Data Providers through an interface defined in a component called the Adapter. The Adapter is responsible for accessing data from an External Data Provider and applying all of the transformations required to integrate the provider with the External Data domain.
While the Adapter component is pre-defined and not configurable, a configuration user is able to define a set of mappings via a UI Mapping Tool to ensure that the attributes being provided by a data provider correspond to the correct properties in Policy.
These mapping configurations are tenant specific and support the following steps in the API sequence:
- Search Criteria
- Search Response
- GET Request
- GET Response
The mappings created between the Adaptor and a tenant's policy are integral to the operation of the External Data service and certain configuration steps must be completed before the service can be activated and operated within a Journey. These steps include:
- Reference Data and Policy setup
- Authentication & Activation
- Data Mapping definition
- Journey Configuration
The Reference Data & Policy Setup section of this user guide break down the configuration steps outlined above. The Mapping Definition section descries the functional behaviour and instructional guide for using the UI tool.
Reference Data & Policy Setup
Reference Data Extension
The External Data service leverages Policy as the source of data configuration for both the External Data Results task and the Mapping Tool. To create a robust solution, pre-defined Policy Requirement Categories must be introduced for the end-to-end service operation. These Requirement Categories are specifically used for External Data and are defined as follows:
- External Data Search Criteria
- External Data Search Response
- External Data Results
- External Data Related Party Details
- External Data Company Officials
- External Data Individual Relationships
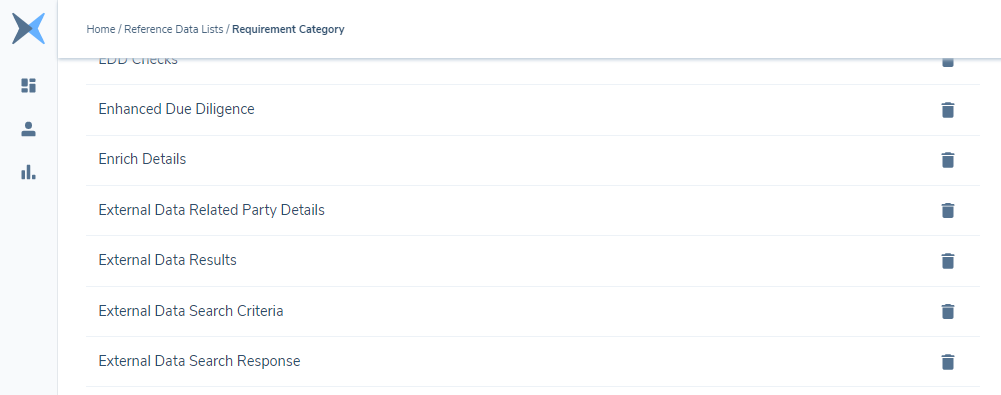
First, these Policy Categories must be added to the 'Requirement Category' Reference Data list.
- Navigate to the Reference Data editor.
- Click on the existing 'Requirement Category' entry in the grid, and hit 'New Draft'.
- Add the four individual values as stated above and hit 'Submit for Approval.
- Finally, hit 'Approve' to publish the updated list version.
Policy Extension
The External Data Policy Categories are used by the system to construct the UI of the External Data Results journey task, as well as provide the basis for the mappings. As such, Data Requirements must be populated into these Policy Categories within the Global Policy for the tenant.
- Navigate to the Policy Configuration screen via the management menu.
- Select the Global Policy and hit 'New Draft. This will create a new draft version of the Global Policy to which we can add the relevant Data Requirements for the provider.
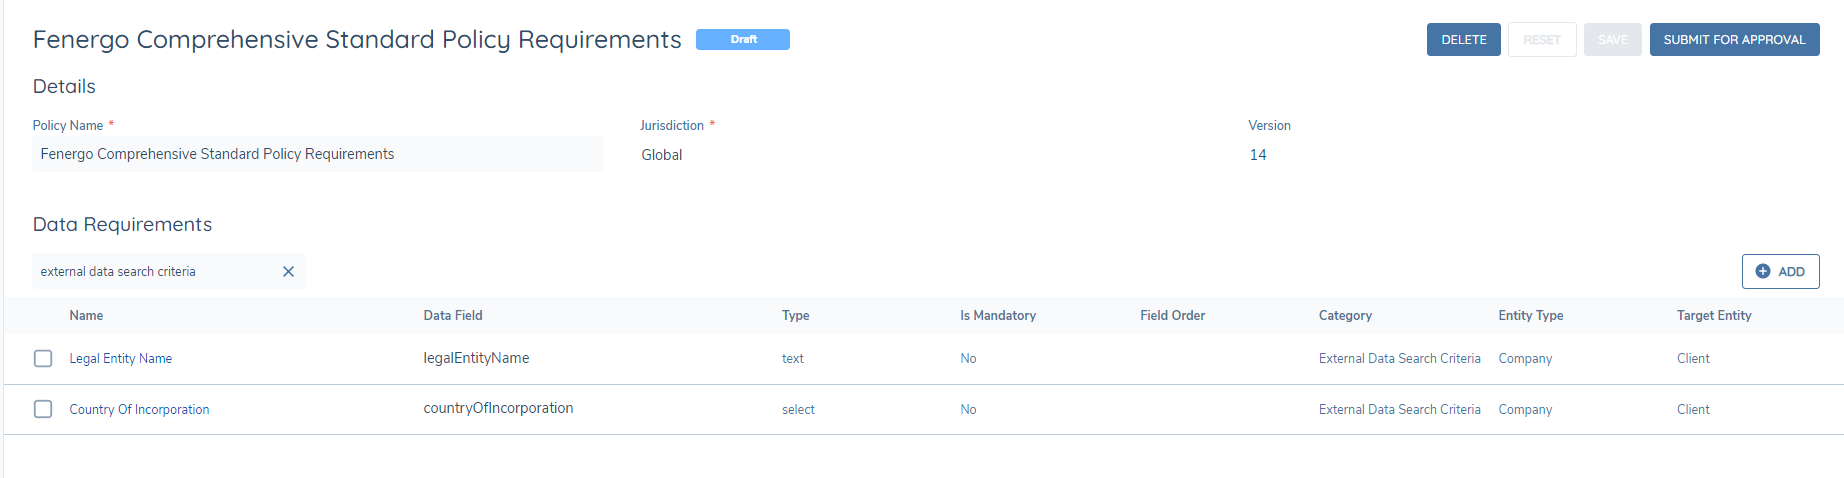
External Data Search Criteria
Begin with building out the 'External Data Search Criteria' category. This category should include all the search criteria that will be used when making a search request to an External Data Provider. Each entry to this category may be mapped to the relevant search criterion available on the External Data Adapter. Each Data Requirement in this category should have a 'Target Entity' of 'Client', and 'Entity Type' of 'Company'.
The user can configure the system to use a number of search criteria:
- LEI
- Registered Number
- National ID (Orbis Only)
- Entity Name and Country combination
These fields must be created in policy and mapped to the corresponding field in the adaptors in order for them to be used as search crieria.
If all four fields are populated in the search request, the system will search in the following order:
- LEI
- Registered Number
- National ID (Orbis Only)
- Fallback to Entity Name & Country combinbation (Users are expected to always add this criteria to ensure a fallback option exists)
Example: If the system fails to return a match for an LEI search it will move on to search by Registered Number and so on. If no matches are found it will fallback to the Name/Country combination.
Its important to include valid and complete LEI and Registered Numbers in the search criteria, to avoid the providers attempting to match on invalid Numbers and returning unrelated entities.
A field in the adaptor called Match Type can be mapped to a field in policy, in the External Data Search Response category, to inform the user which of the search type has been succesful in the search.

External Data Search Response
Next, the 'External Data Search Response' category must be built out. This category will define the data that displays in the Search Results grid. The order in which fields are defined in this category (using the Field Ordering value within each Data Requirement) is used to order the grid column headers, left to right. Each Data Requirement in this category should have a 'Target Entity' of 'Client', and 'Entity Type' of 'Company'.
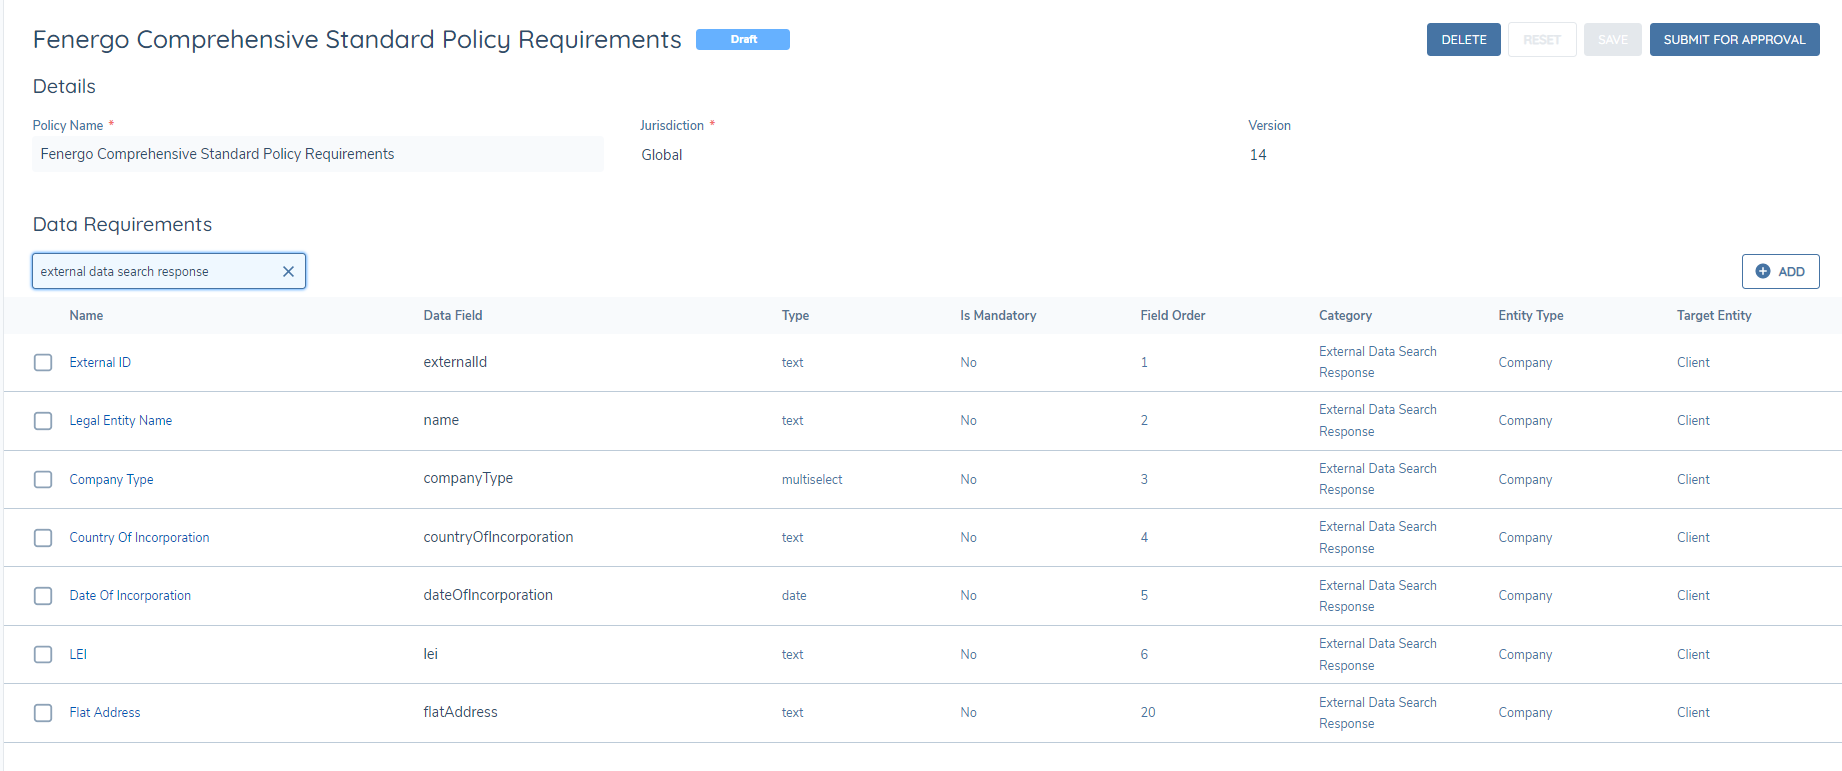
Please note, to populate an Address within the search results grid, a Data Requirement of type 'Text' must be created within the 'External Data Search Response' category. The proper structured address provided by the data provider will eventually be mapped to a Data Group allowing the system to concatenate the result and display it as a string within the data group grid.
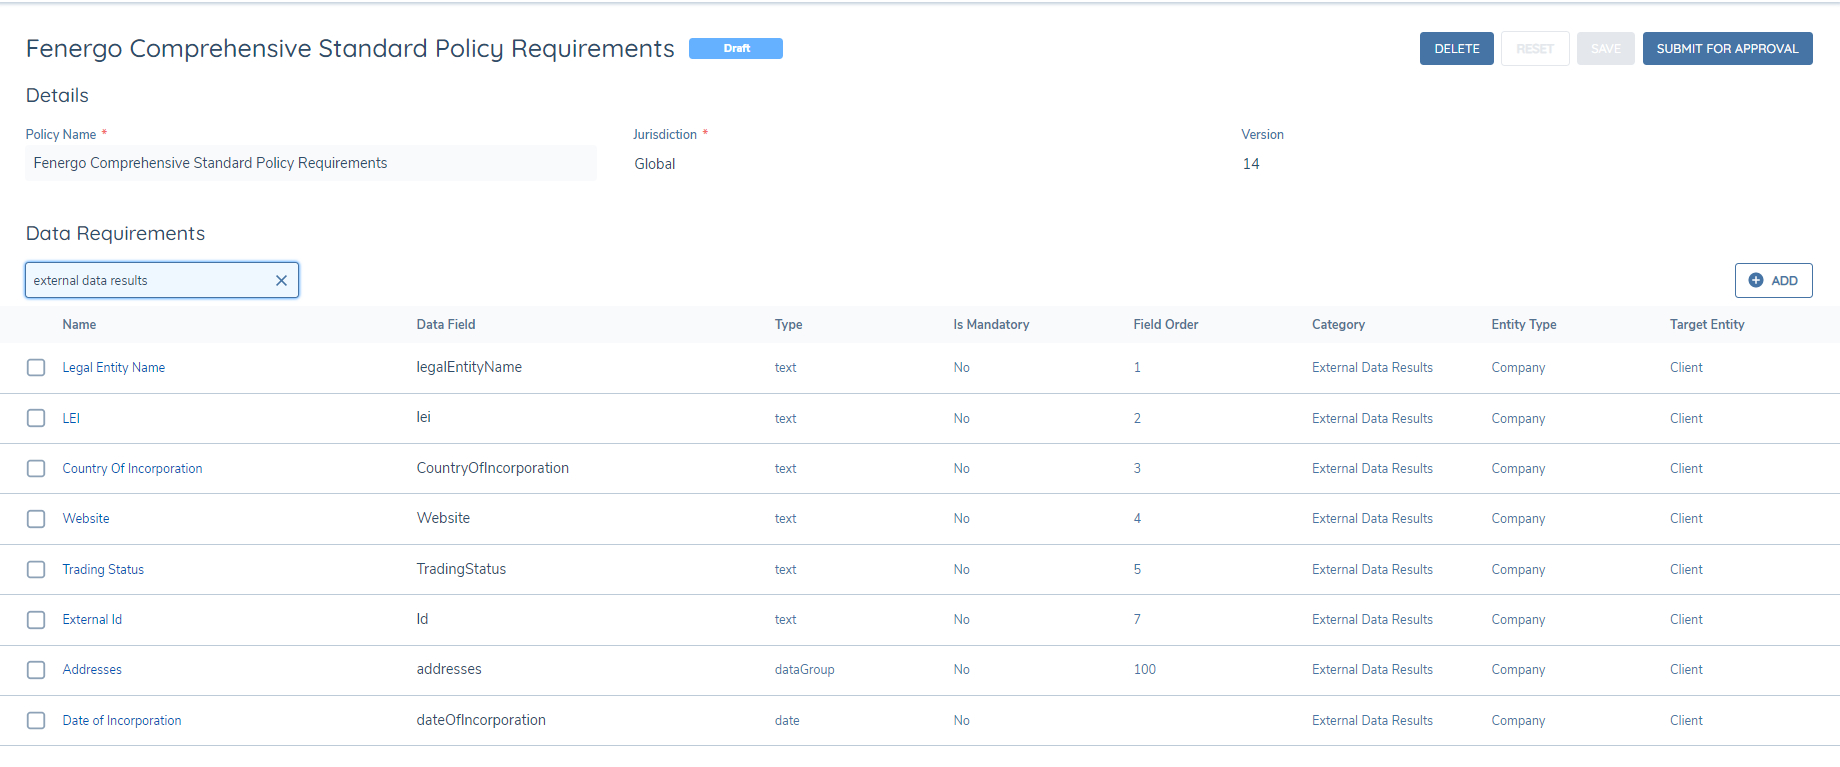
External Data Results
Next, the 'External Data Results' policy category must be built. This category should include all fields that are required from the data provider for the Root Entity (the entity customer being checked against the data provider). Fields entered into this Policy category will be displayed in the Company Profile area of the External Data results task and will be used to map the relevant external data that will ultimately be imported into Fenergo SaaS. Each Data Requirement in this category should have a 'Target Entity' of 'Client', and 'Entity Type' of 'Company'.
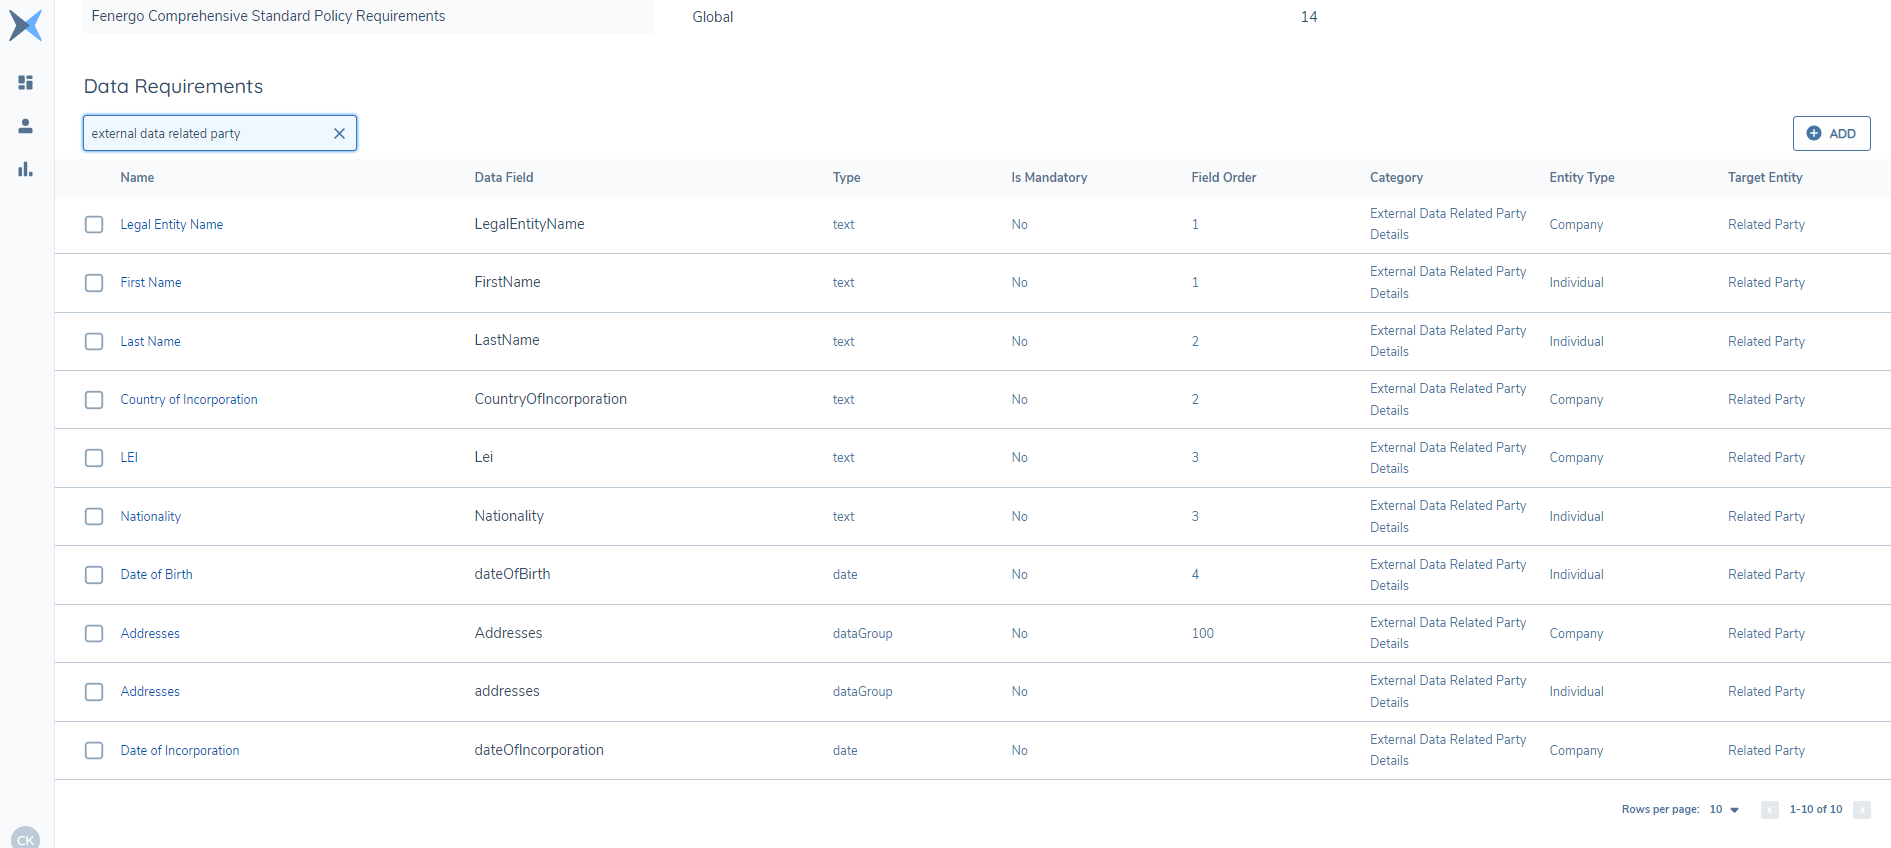
External Data Related Party Details
Next, the 'External Data Related Party Details' category are used to define the data that appears in the expanding rows for both Company and Individual related parties. Supporting information that is of interest but does not appear on grid headers, such as Nationality or Date of Incorporation, should be included here. This category will contain data relating to both 'Entity Type' of 'Company' and 'Individual' (as appropriate per the specific field) and input the 'Target Entity' as 'Related Party'.
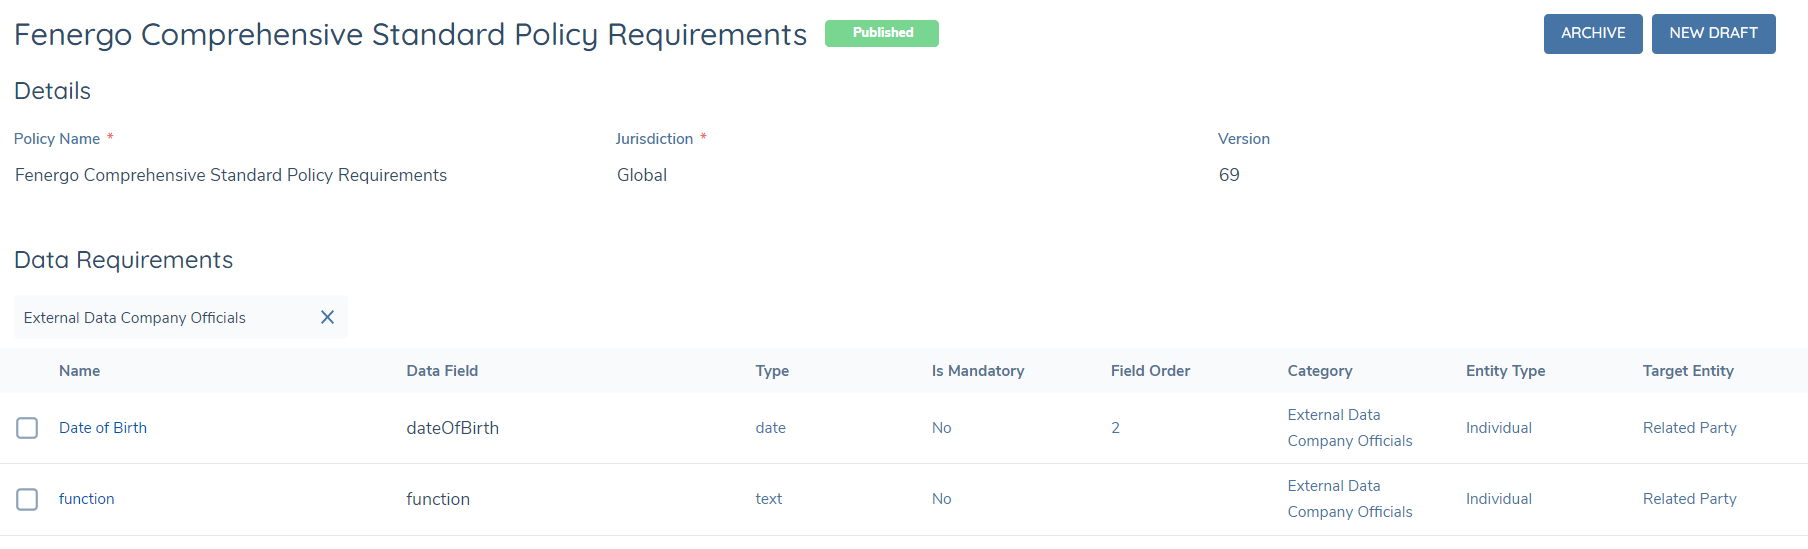
External Data Company Officials
Next, the 'External Data Company Officials' category may be used to define additional data that a user wants to present within the Company Officials grid for the External Data results as "extension headers". The data that appears in the header columns for Individual related parties within the Company Officials grid. This category will contain data relating to the 'Entity Type' of 'Individual' and input the 'Target Entity' as 'Related Party'.
External Data Individual Relationships
Finally for Custom Integrations that support Individual Searches, the 'External Data Individual Relationships' category may be used to define additional data that a user wants to present within the 'Related Parties' grid for the External Data results as "extension headers". The data that appears in the header columns for Individual Related Parties within the Individual Related Party grid. This category will contain data relating to the 'Entity Type' of 'Individual' and input the 'Target Entity' as 'Related Party'.

Provider Authentication
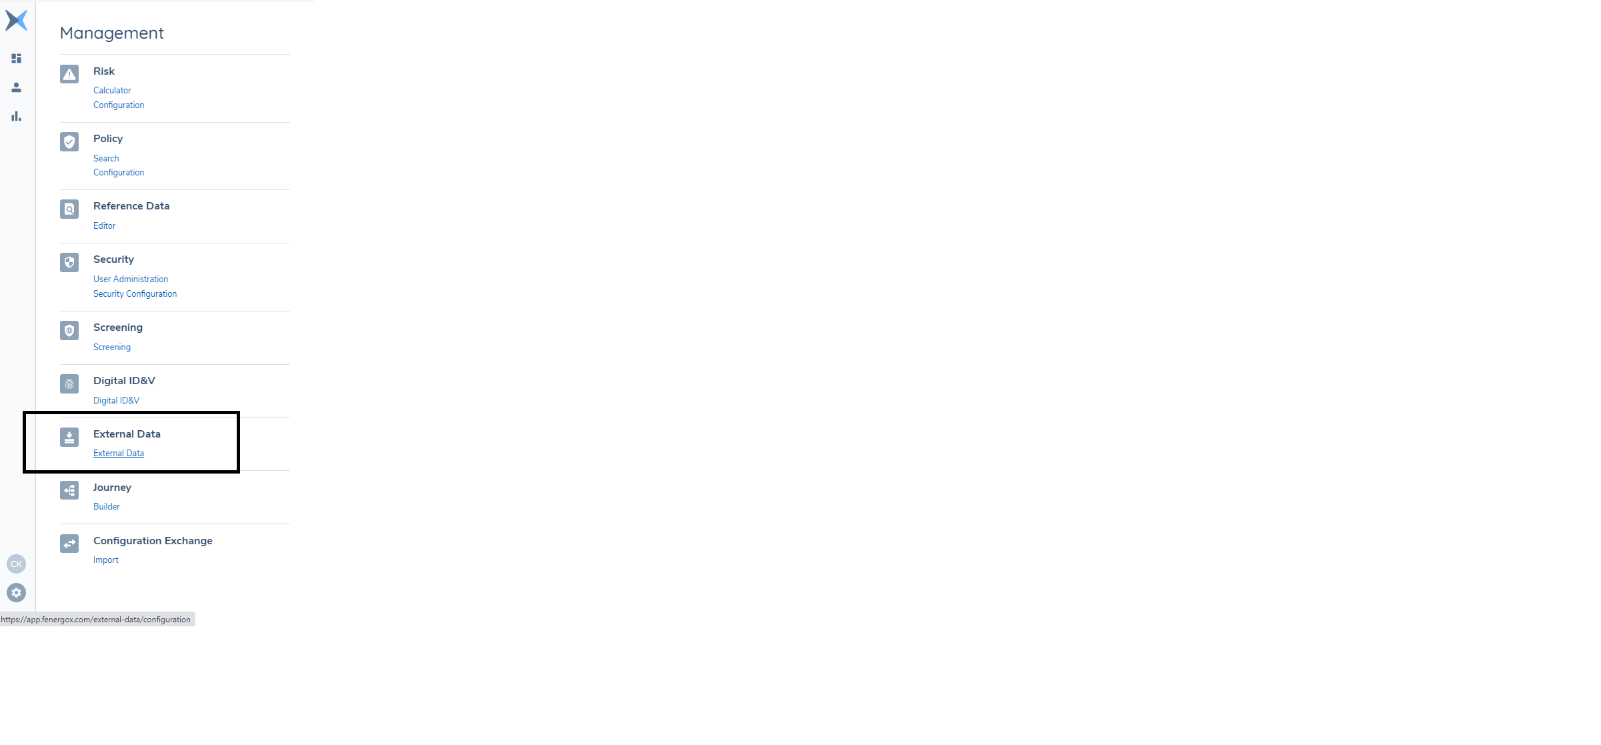
A system configuration user can enable an External Data Provider through the External Data domain by navigating to the External Data administration area via the left-hand navigation.
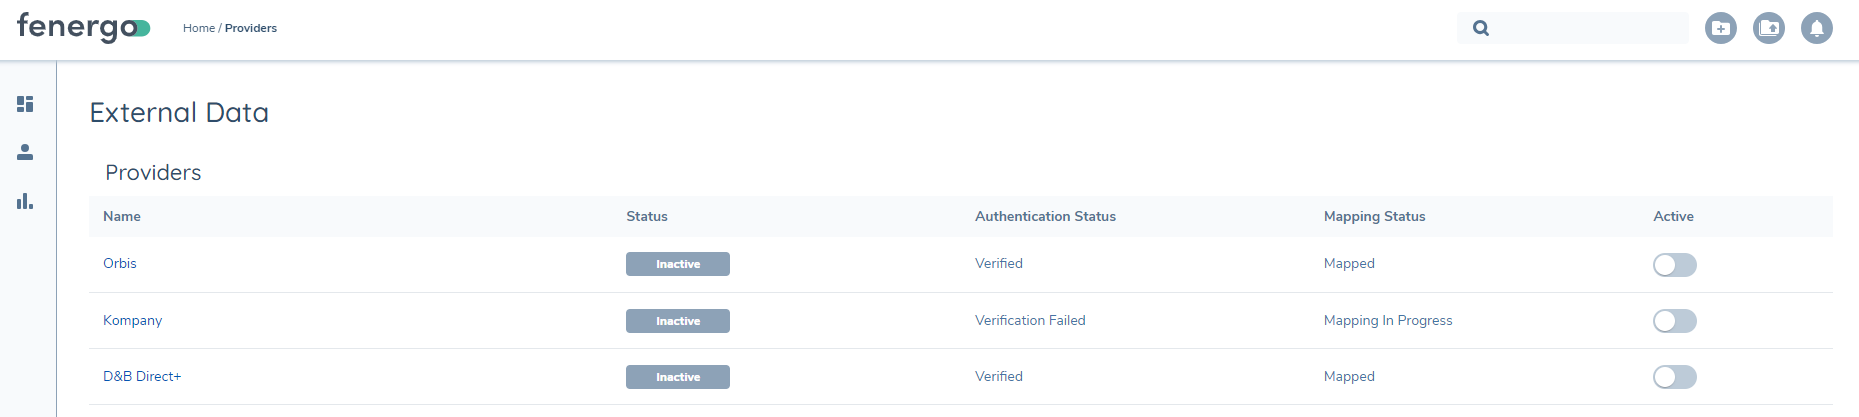
The system configuration user will be presented with the External Data Configuration page where the user will see all the available Data Providers (the example image below shows Orbis, Kompany, and Dun & Bradstreet):
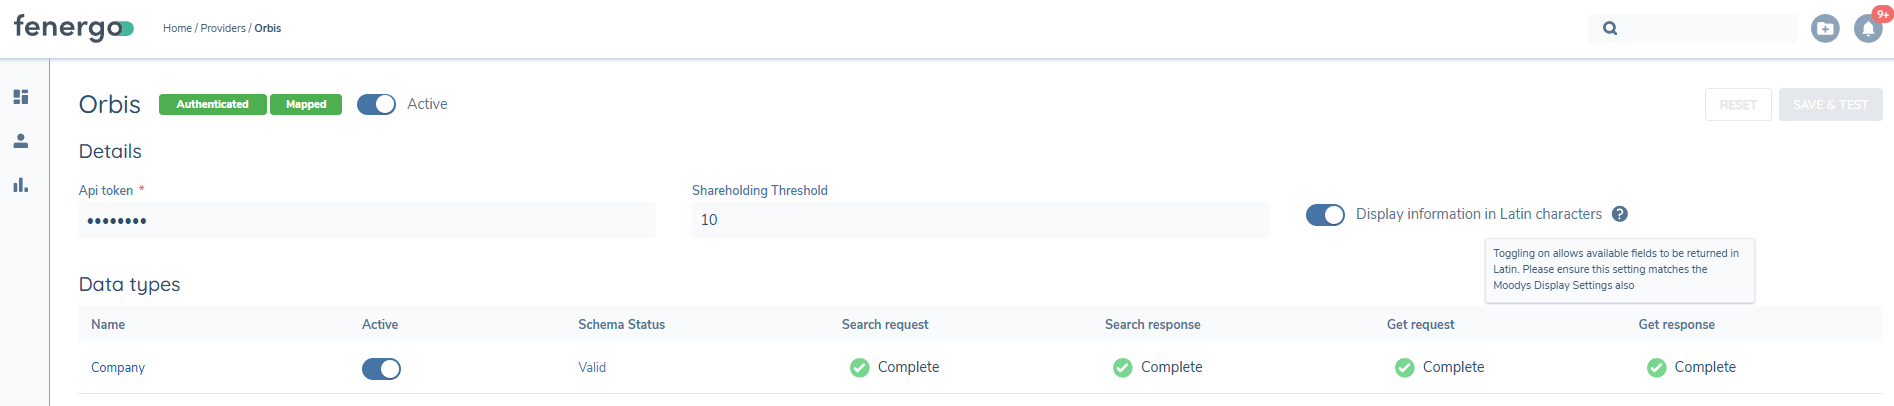
The system configuration user should first click the provider's name (e.g., 'Orbis') to navigate to the configuration screen for the particular provider. Once the mandatory credentials have been entered, the user must click 'Save & Test' which will initiate a test request to the External Data provider to confirm validity.

Note: The Fenergo credentials have been removed from the above screenshot. The client Orbis credentials should be entered in the API token field.
The Authentication Status informs the user if the API Token and Adapter values are valid by presenting a value of "Verified" based on a successful API connection to an external data provider.

Note: The Fenergo credentials have been removed from the above screenshot. The client Orbis credentials should be entered in the API token field.
If an error is found, a snackbar message will appear informing the user of the reason for the test request failure.

Note: After saving new API Token values, the Active toggle on the External Data Configuration page will revert to the "Disabled" setting and will need to be re-toggled back to "Enabled":
Mapping Definition
After authenticating the provider credentials and returning a 'Verified' status, the Data Mapping tool will become available, allowing the user to map the Adapter Schema to the relevant Fenergo SaaS policy categories that have been defined previously.
Mapping Tool Operation
The Mapping Tool is segmented into the relevant steps in the API sequence:
- Search Request
- This represents the data sent in a search request from Fenergo SaaS to the Data Provider
- The Fenergo SaaS Policy category used is the 'External Data Search Criteria'
- Search Response
- This represents the data returned from the Data Provider to Fenergo SaaS
- The Fenergo SaaS Policy category used is the 'External Data Search Response'
- GET Request
- This represents the data sent to the provider to retrieve a full company profile once a search result has been selected
- This portion of the API sequence uses data returned in the 'External Data Search Response' and therefore also uses this Fenergo SaaS Policy category
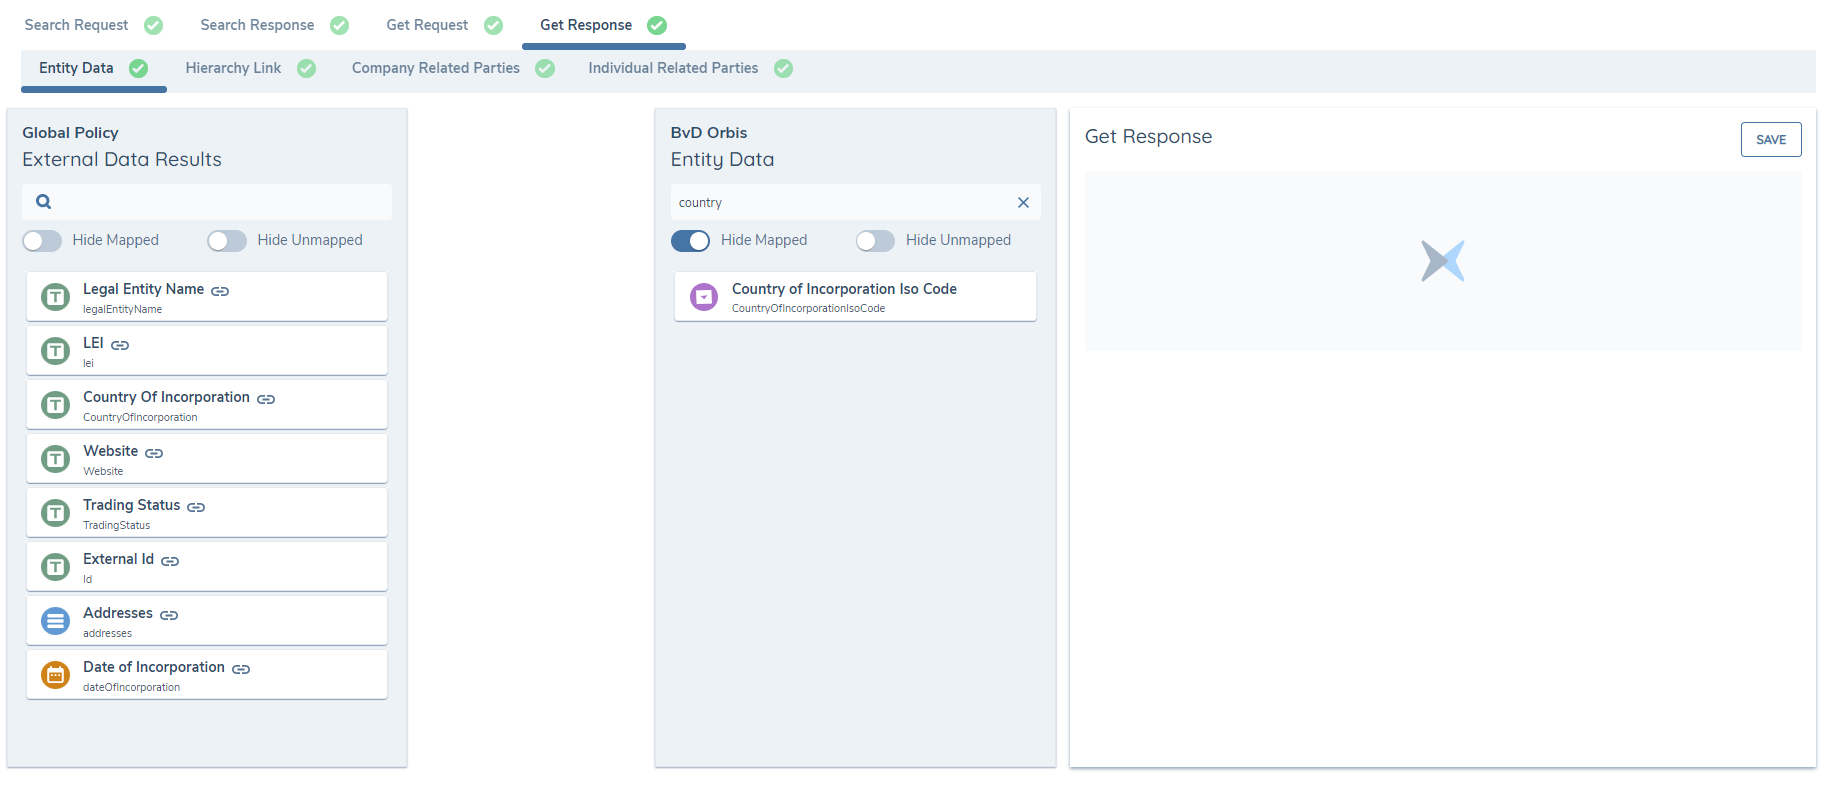
- GET Response
- This represents the full company profile returned by the Data Provider
- This portion of the sequence is sub-categorised into four components that require independent mapping
- Entity Data - Specific Company related data. Configuration is through Policy.
- Hierarchy Link - 'relationshipType' field and 'directPercentageLabel' field can be configured in Policy, in the Relationship Details Category, Related Party Target Entity, for display in the Related Party Task.
- Hierarchy Node (Individual) - Related Party data specific to Individuals e.g Shareholders & Company Officials.
- Hierarchy Node (Company) - Related Party data specific to Companies, e.g Shareholders.
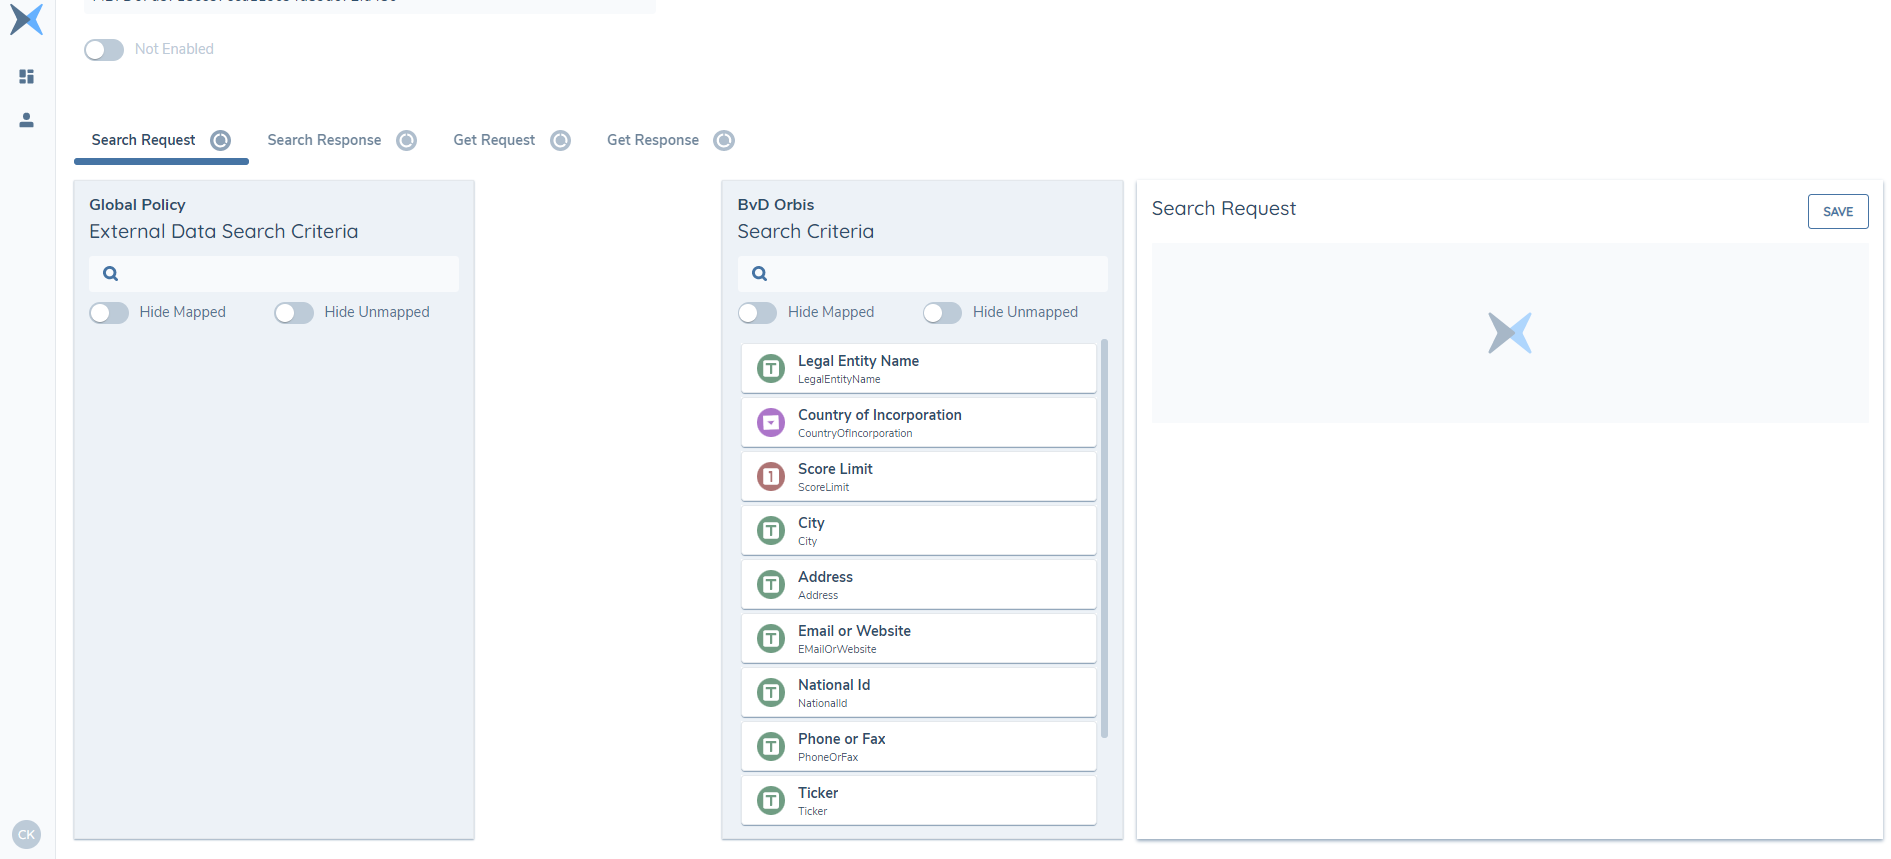
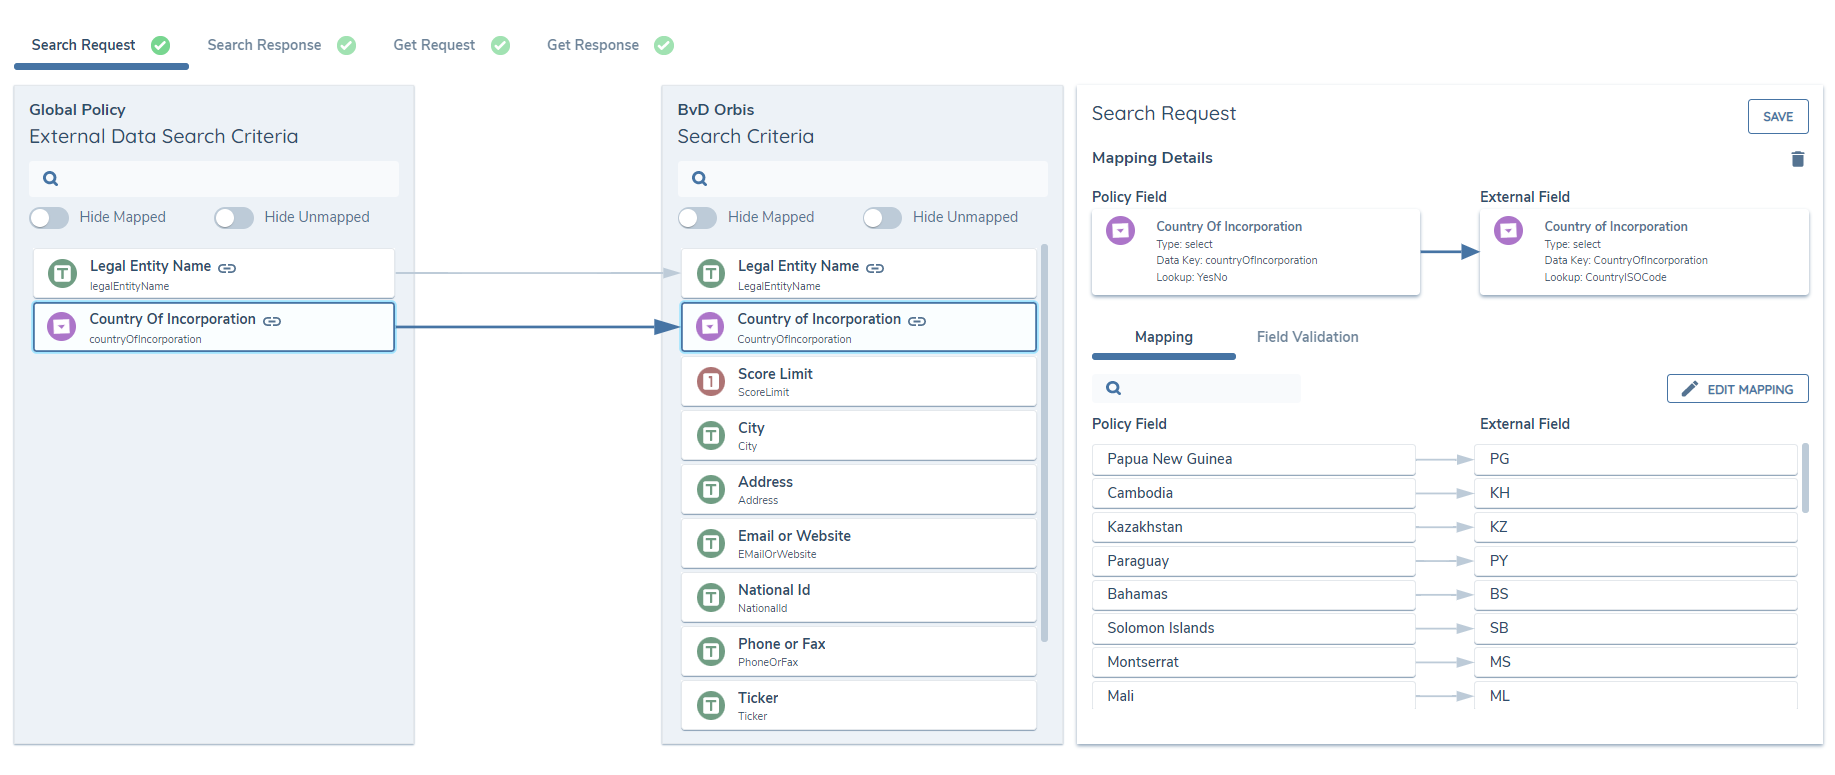
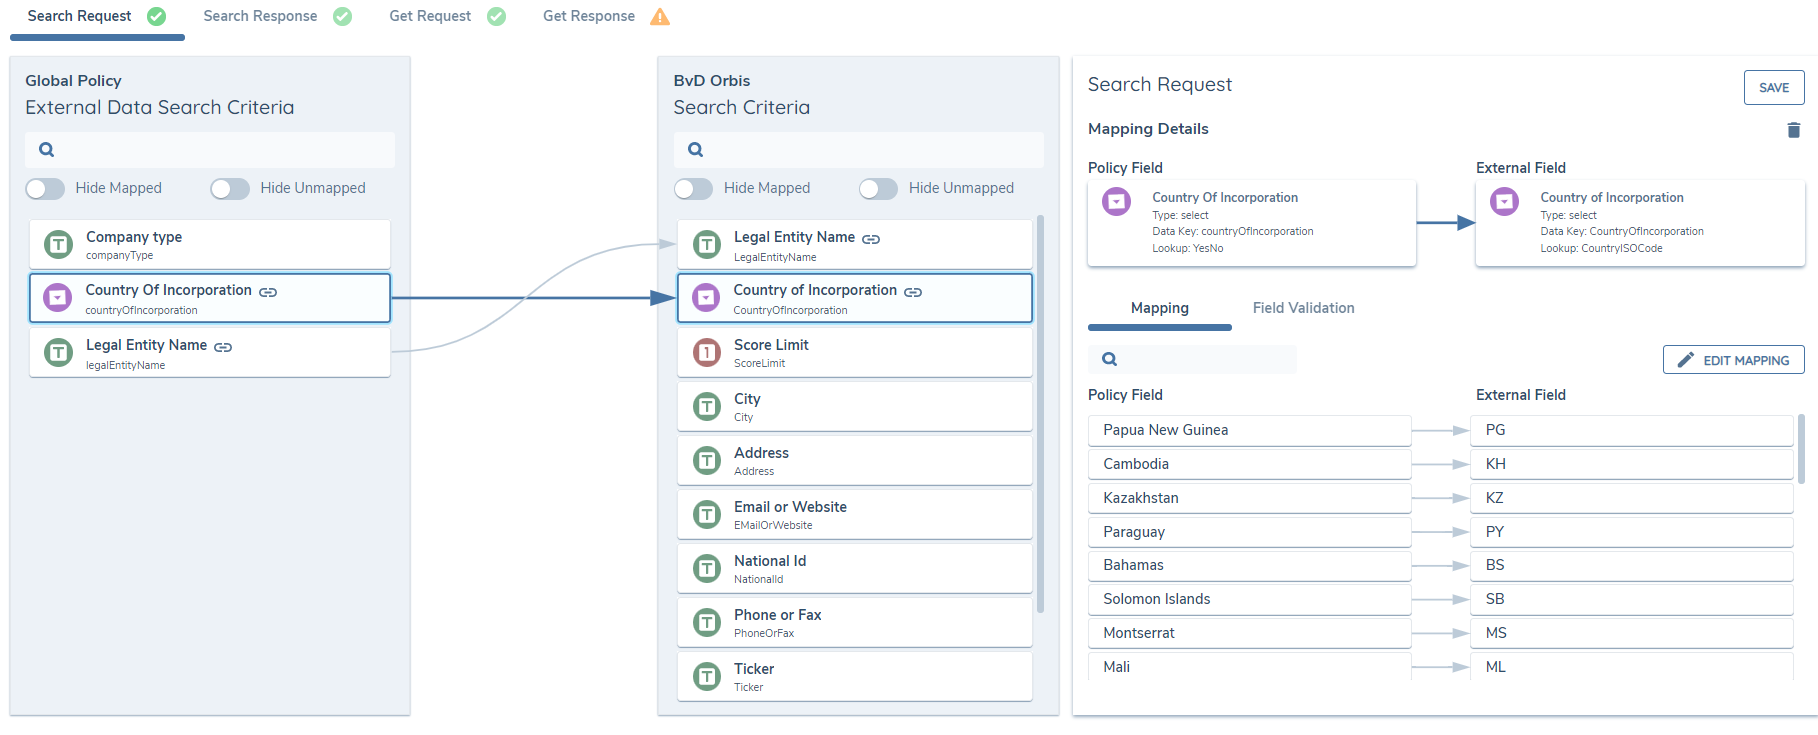
For each step in the API sequence the mapping tool displays the Fenergo SaaS Policy category on the left-hand side, with the available fields in the provider Adapter on the right. Relevant fields can be mapped together by selecting an item from the left column and selecting the corresponding value on the right. The system will identify cases of invalid mapping pairs (for example, a Text field mapped to a Select field). The search capability at the top of each column can be used to filter data entries by friendly name. Additionally, the toggles can be used to independently hide mapped or unmapped fields on each column to make large mappings easier to navigate.
Once two valid fields have been connected, the Mapping Details panel on the right-hand side will populate with additional information regarding field type, data-key, lookup name where relevant and any validations applied to the Policy data requirement.
In the cases of Select-Select, Data Group-Data Group and Select-Text type mappings, there are further activities required to complete the mappings. The system will indicate that there is outstanding action against a mapped pair with the amber 'Unmapped' chip. The second level mapping activities are described below.
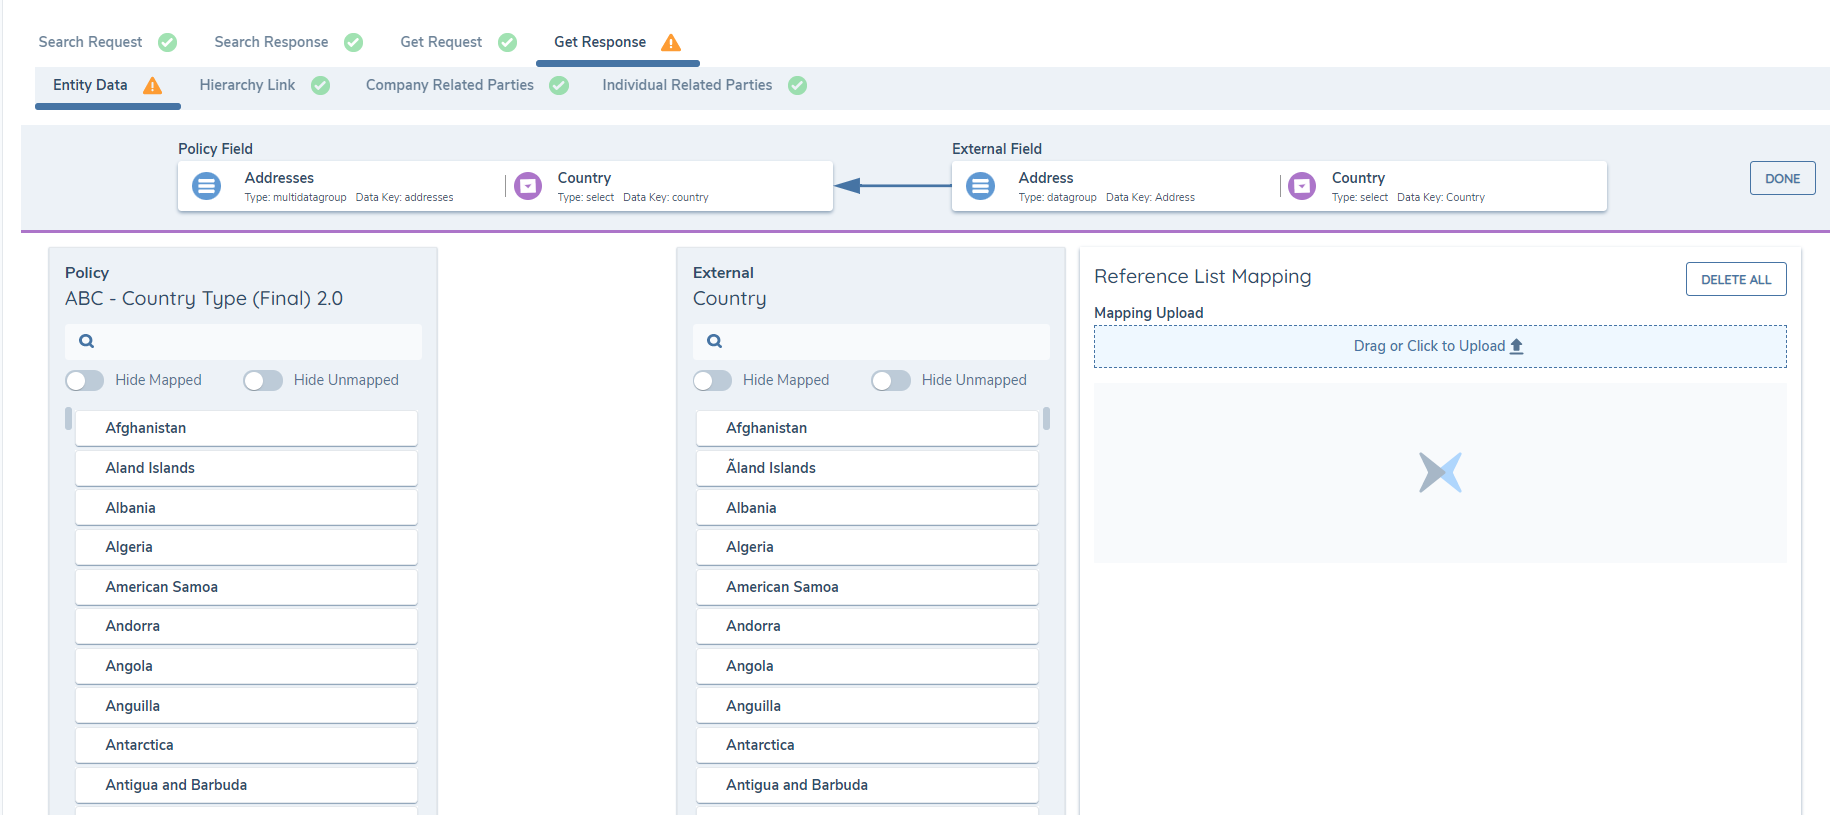
Select to Select Mapping
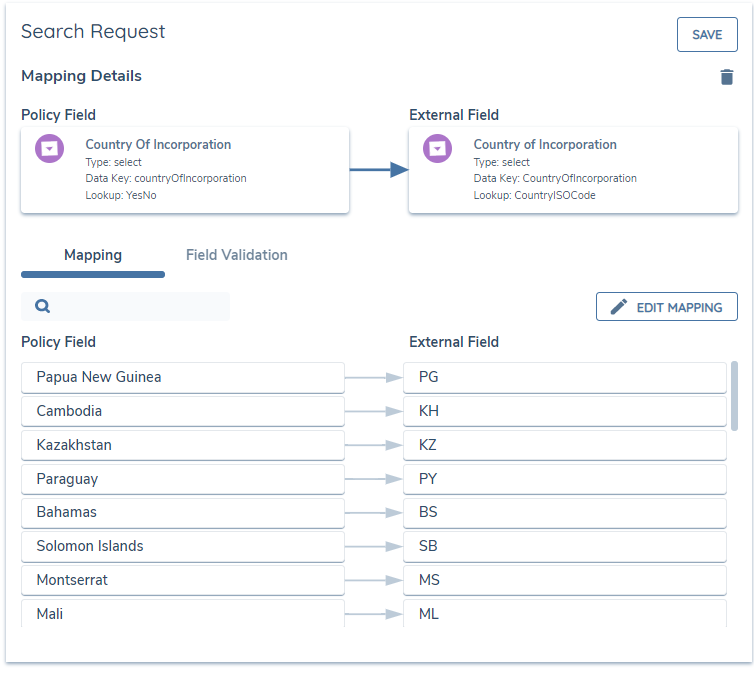
When two fields are mapped together that reference a lookup list of values, these values must also be mapped together to ensure a valid mapping. To map lists of values together, click the 'Edit Mapping' button on the Mapping Details panel. The system will load the Reference List Mapping view, which displays the Fenergo SaaS list on the left and the Data provider list on the right.
The interaction is completed in a similar way to the previous activity, with matching values being connected by clicking a value on one side followed by a value on the opposite side. To cancel a connection, hit the cancellation icon in the centre of a connector.
Once the Reference List Mapping has been completed, hit the 'Done' button to return to the main mapping view. The amber 'Unmapped' icon should have disappeared from the mapped pair, and a preview of the mapped lists should be visible the Mapping Details panel. To edit this mapping, return to the Reference List Mapping view by clicking the 'Edit Mapping' button.
Data Group to Data Group Mapping
When two fields are mapped together that contain nested properties, referred to in Fenergo SaaS as Data Groups, the underlying values must be mapped together to ensure a valid mapping. To map Data Groups together, click the 'Edit Mapping' button on the Mapping Details panel. The system will load the Data Group Mapping view, which displays the Fenergo SaaS data group values on the left and the Data Provider nested values on the right.
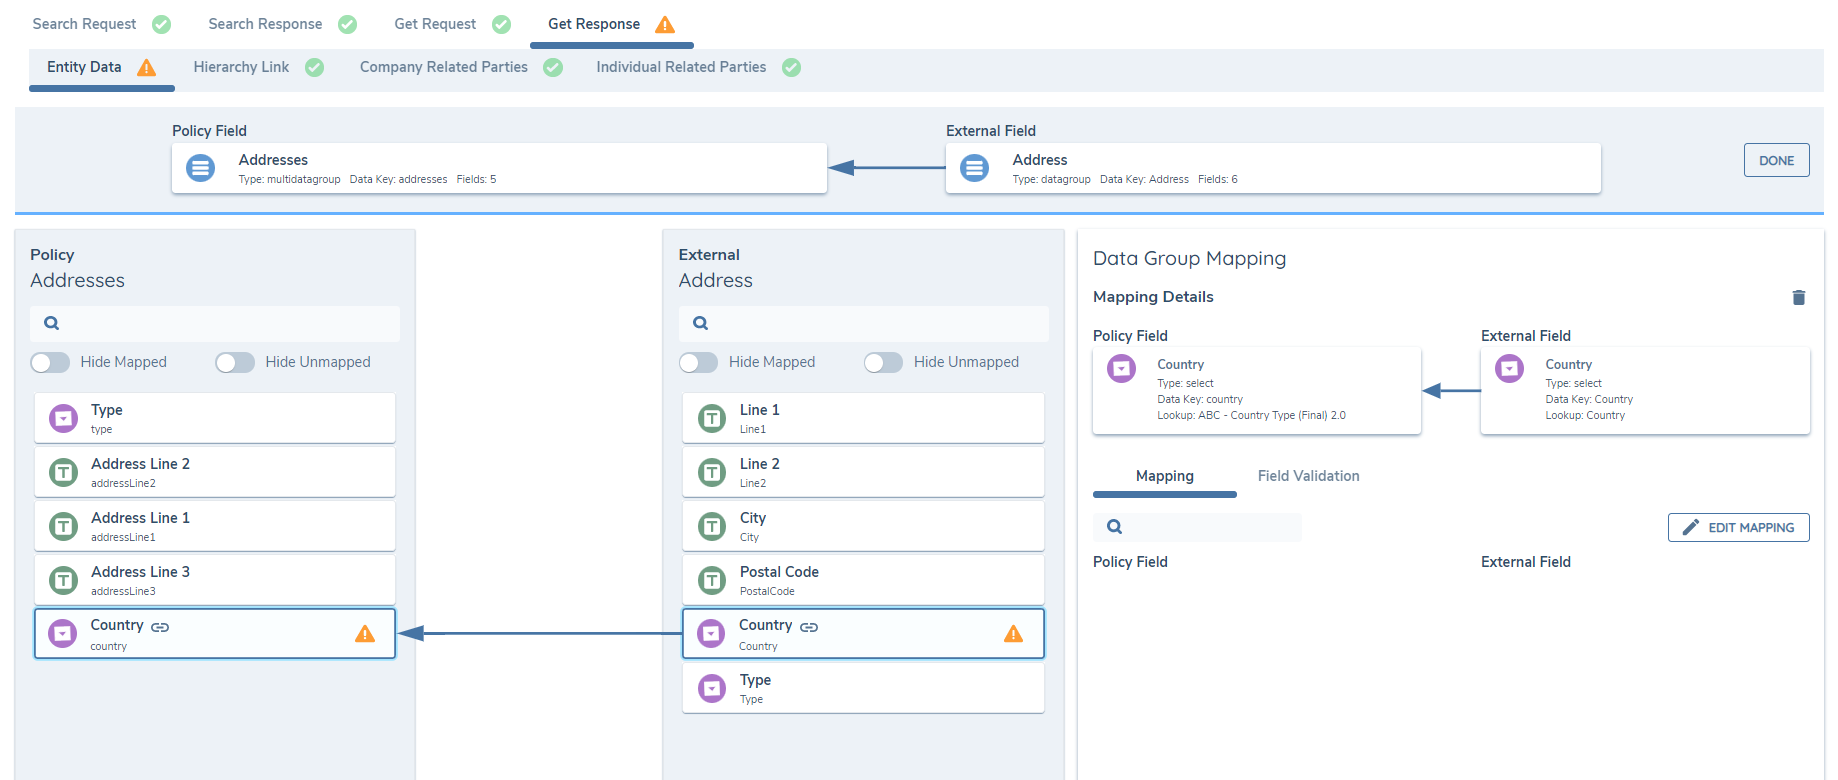
The interaction is completed in a similar way to the previous activity, with matching values being connected by clicking a value on one side followed by a value on the opposite side. To cancel a connection, hit the cancellation icon in the centre of a connector.
If any mapped pairs within the Data Groups are a Select to Select type mapping, the reference data lists must also be mapped. Again, the system will indicate that further mapping is required with the amber 'Unmapped' chip. With two Select fields highlighted in the Data Group Mapping view, the 'Edit Mapping' button should be visible in the Mapping Details panel. Click there to load the Reference Data Mapping view and map the two lists together as described in the 'Select to Select Mapping' section above.
Once the Data Group nested fields have been mapped together and no further activities are outstanding, click 'Done' to complete the activity and return to the primary mapping view.
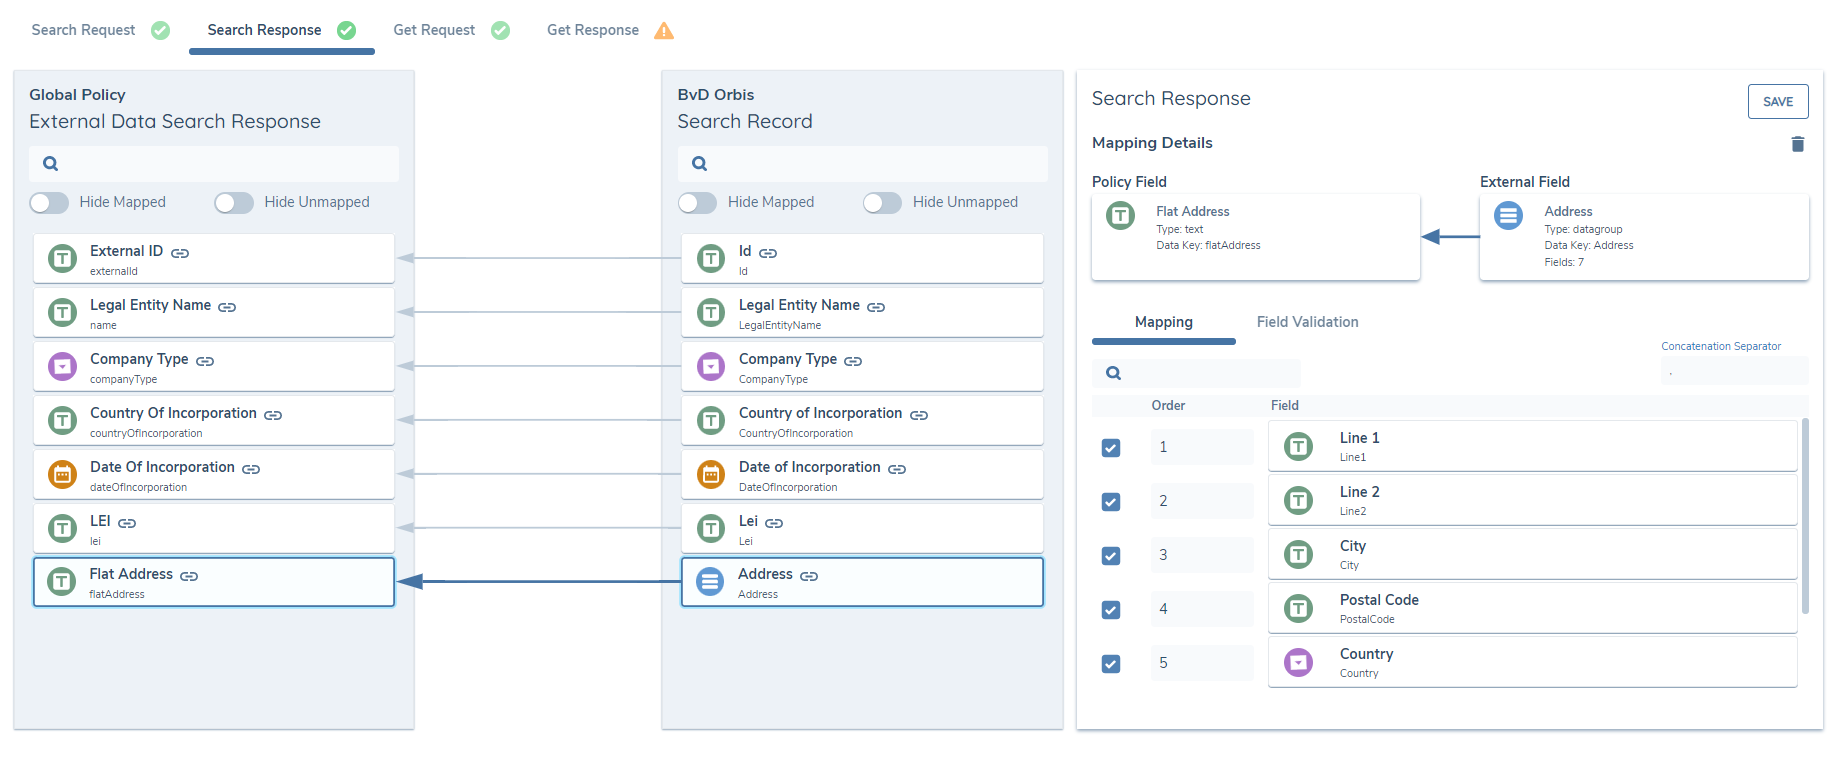
Data Group to Text Mapping
For certain scenarios, for example in order to display an Address in a flat manner in the Search Results grid, it may be necessary to map a Data Group to a text field and instruct the system on how to concatenate the object.
When the mapping tool detects a pairing of Data Group to Text field, the Mapping Details panel will display the ability to define the fields required in the concatenation, the order in which they should be saved and the concatenation separator. Use the checkboxes and number fields to define the above.
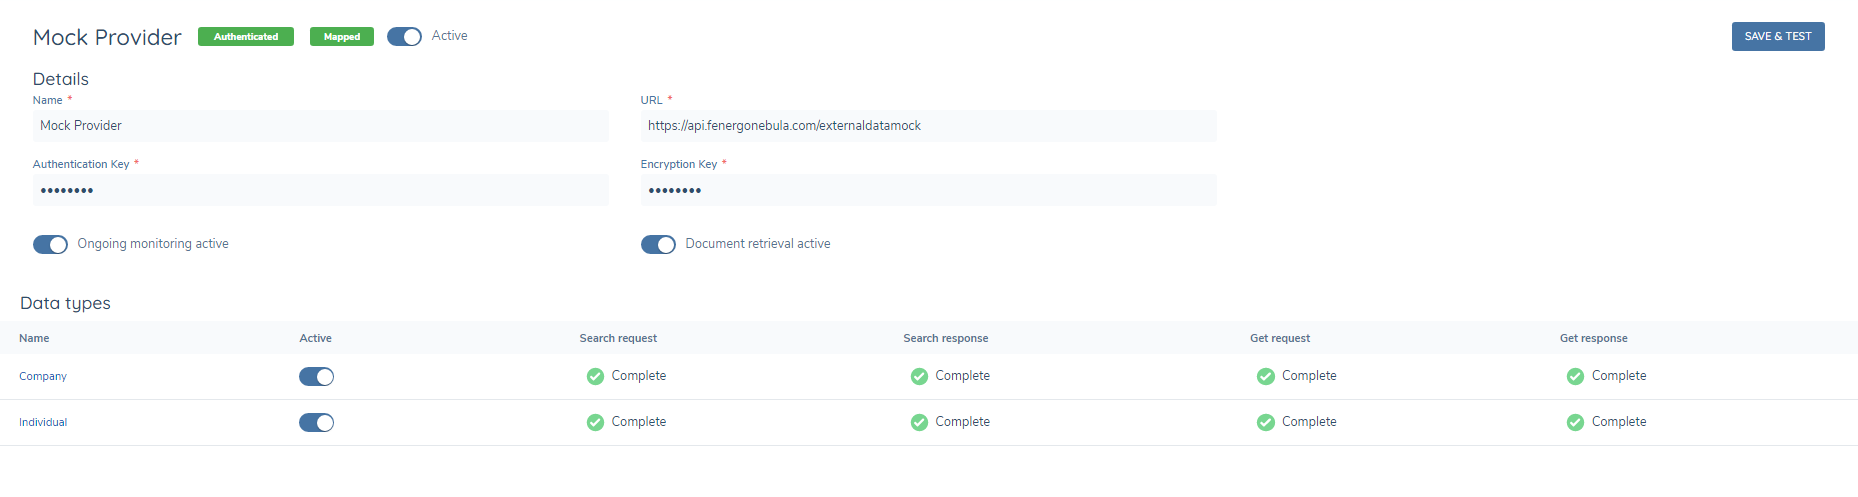
Provider Activation
After completing each of the Mapping steps such that an overall mapping status of 'Mapped' is displayed. The Data Provider is now ready for activation. Navigate to the 'Details' area and action the toggle switch to set the status to 'Active'. The provider configuration has now been completed, and the External Data service for the target provider can now be used within the context of a Journey.
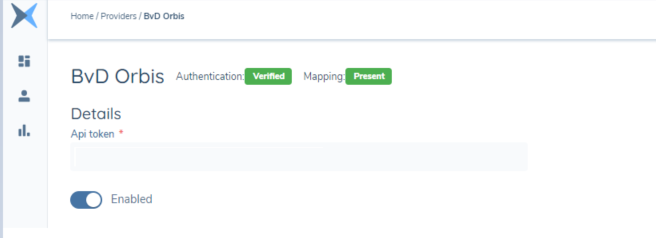
Note: API token in this instance is blank. The API token that should be used is the client specific token for their Orbis instance.
Journey Configuration (Single Provider)
There are two task templates that enable the Data Xchange functionality within a Journey. Using the Journey Builder functionality, these two tasks can be added anywhere within the Journey schema however they must be sequenced correctly:
The below tasks will be deprecated in favour of the 'External Data Combined' Task which has the same functionality as both of those tasks
-
External Data Search -- This is an automatically completed system task that initiates the search request to the enabled external data providers. -- This must be added BEFORE the External Data Results task
-
External Data Results -- This is the task where the user first determines the external data provider record that matches to the customer in Fenergo SaaS and then for the user to manage the Related Parties de-duplication process.

Multi-Provider Support
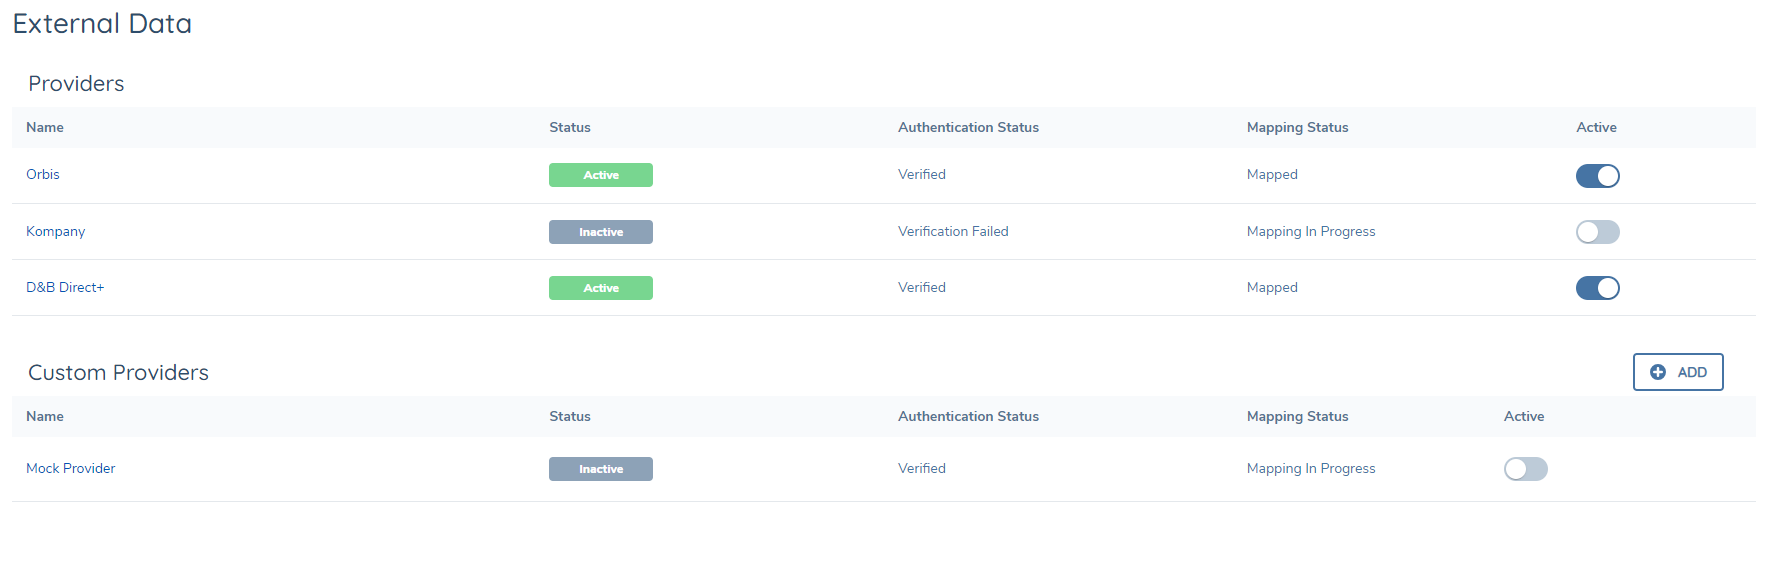
Provider Configuration
The system supports the use of more than one External Data Provider, which allows configuration users select both of the Fenergo supported OOTB providers (Orbis, kompany, Dun & Bradstreet), and any Custom Providers for use within a Journey.
Enabling/Disabling more than one provider can be configured from the main Provider screen by toggling the Active toggle switch. This can also be done from inside any of the Providers Screens through the Active toggle switch.

Journey Configuration (Multi-Provider)
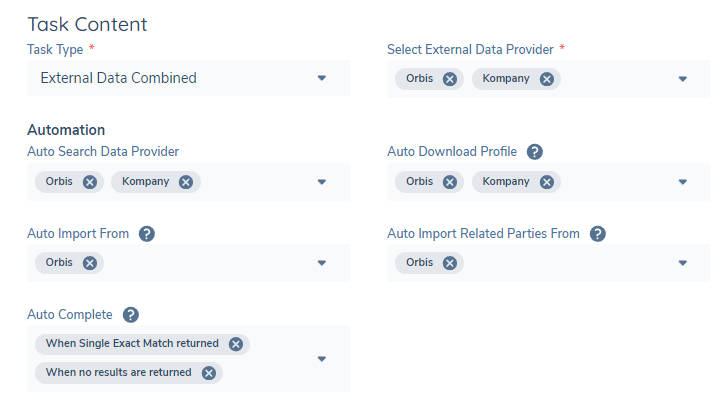
In order to use the Multi-Provider functionality, a new task has been created entitled External Data Combined. This is a single task that can be selected from the Journey builder and can be used instead of the previous External Data Search & External Data Results tasks.
To enable the providers in the journey, the user can select a maximum of two providers from the full list of enabled/active providers (both OOTB & Custom) from the Select External Data Provider multi-select dropdown.

Once the External Data Combined task is added to the Journey and the Provider config settings have been made Active, the Task is now ready to be executed inside the Journey.
Automation
The system supports the automation of some functionality in the External Data Combined journey Task in the Automation section.
Users with configuration permissions can select a provider(s) to enable automatic Search of that provider.
They can also enable automatic Profile retrieval, Client Data & Related Party (Orbis only) Import, and Task Complete, under certain conditions. When the provider has been selected from the Select External Data Provider multi-select field, the following Automation options are available:
-
Auto Search Data Provider : Selects a Provider(s) to search automatically, upon arrival in the External Data Combined Task.
-
Auto Download Profile : Selects a Provider(s) to download the Profile from when a single exact match is returned from the search call, eg LEI, Registration Number.
If a list of results are returned, the automation will cease, regardless of the configured settings, and the actions in the task will be available in manual mode.
-
Auto Import From : Selects a Provider to Import the Client Data only from when the Profile has been returned. Note Only one provider can be selected for Auto Import.
-
Auto Import Related Parties From : When a provider has been selected from the Auto Import From dropdown, it is possible to Auto import Related Parties from that Provider. The user can choose to toggle on the Ignore Duplicates toggle which will ignore any existing entities found in Fenergo, and import the Related Party from the Provider, as a new entity, regardless of the number of duplicates found. With the Ignore Duplicates toggled off, the system will check for duplicates in Fenergo using the following Search Queries.
- Primary Search: (Orbis only) Attempts to exact match on the 'orbisId' field. This field must be mapped and returned from Orbis. The field must also be indexed in policy.
- Secondary Search: If no match is returned for the Primary Search, the system will attempt to exact match on other criteria, depending on the entity type: Individual : 'firstName' & 'lastName'. Company : 'legalEntityName' & 'countryOfIncorporation'.
NOTE: The above field names must exactly match the datakey names in policy
The Exact Match is not case sensitive, therefore, as an example coca-cola will exact match with Coca-Cola.
NOTE: Some providers (kompany) return only an Individual's FullName. In this case the system will attempt to separate the FullName string into a First Name, Middle Name & Last Name.
Example: FullName = James Paul Michael Smith, will be resolved to:
First Name = James
Middle Name = Paul Michael
Last Name = Smith
Best Practice:
For deduplication best results, Orbis will be more reliable due to the matching of the Unique identifier (OrbisId). kompany can only attempt to match on the Secondary identifiers as the provider does not provide a unique id for each Related Party.
In all cases, as the Secondary Search for Individuals Exact Matches on FirstName and LastName only, it cant be 100% accurate that the Exact Match found in Fenergo, is indeed the same entity returned from the Provider, therefore the recommendation from Product is to always capture the OrbisID.
Furthermore, in some cases, kompany does not deduplicate Related Parties that it returns as a Shareholder and Company Official, an example being Shareholder = John Doe, Company Official = DOE, John, which means when automation settings are enabled, both of these RP's could potentially be imported to Fenergo
The following automated process takes place, based on the above search results:
- No matches found from the Primary or Secondary Search queries: The system will classify this entity as a New entity and will automatically prepare it for Import to Fenergo.
- A single exact match is found from either the Primary or Secondary Search queries: The system will classify this as en existing entity in Fenergo and will automatically Link to this entity in Fenergo.
- A multiple match is found from either the Primary or Secondary Search queries: The system will classify this as multiple existing entities, and therefore can not Link to either automatically. Automation will cease and the user must make a decision manually.
-
Auto Complete : The user can select one or two options.
- When Single Exact Match returned : When a single exact match has been returned in the Search Response, the task will auto-complete.
- When no results are returned : When no results are returned from the Search Request, the task will auto-complete.
Non-selection in the Auto Complete dropdown will leave the task in Manual complete mode
Tooltips are included on each of the fields to guide users.
Provider Specific functionality
Orbis
Shareholder Threshold
Users can control the number of Shareholders returned by configuring a value in the Shareholding Threshold field.
Shareholder filtering is evaluated on the Orbis Integrated Percentage field. If it encounters an association below the threshold then all of those associations will be removed and not visible in Fenergo.
It is recommended to set this value greater than zero.
Enabling Preferred Langauge
For some fields, in some jurisdictions, Orbis will return the values in a choice of either Original or Latin characters. Some of these fields iclude:
- First Name
- Last Name
- Full Name
- Legal Entity Name
- Address
Fenergo supports this process by allowing configuration users toggle the Display information in Latin characters switch on the Configuration screen that switches between Original Language and Latin characters.
Note: The user must ensure that the same setting has been configured on the Orbis account. The Orbis account administrator can confirm this.
A tooltip exists on the Display information in Latin characters switch, to prompt the user.

kompany
UBO Discovery
kompany provides support for uncovering UBO's with multiple layers of ownership and across international borders through its UBO Discovery functionality. Fenergo SaaS supports the configuration of this functionality, from within the configuration screen, and also supports the Display, De-duplication and Import of returned Entities. Documents purchased as part of the UBO Discovery crawl, and kompany's UBO Discovery report(pdf), are also returned under the Documents section on the External Data Results screen and can also be imported into Fenergo SaaS.
Configuring UBO Discovery
To configure UBO Discovery, the UBO Discovery toggle switch must be toggled on, on the provider configuration screen.

When the switch is toggled on, a number of parameters become visible. These parameters allow the user to control how the UBO Discovery functionality will behave.
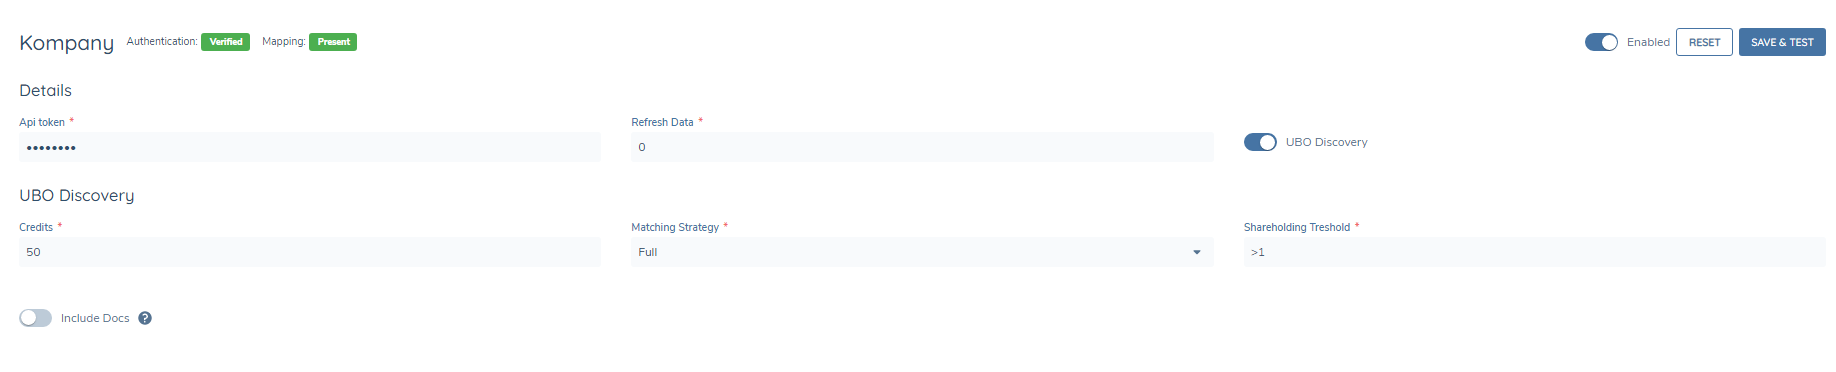
The parameters are:
-
Credits: Allows the user set a number for the maximum amount of credits that should be used in a UBO Discovery crawl. If the credits limit is reached during the crawl, only the nodes and documents retrieved up until that point will be returned.
-
Matching Strategy: Can be set to Full (all nodes in scope) or LEVELS (user defined by entering values in the Shareholding Threshold), and determines how much of the tree is crawled.
-
Shareholding Threshold: Defines a threshold for different levels of crawling. Default is 25,50.
-
Include Docs: Toggling this switch on will include the purchase of documents encountered during the crawl.
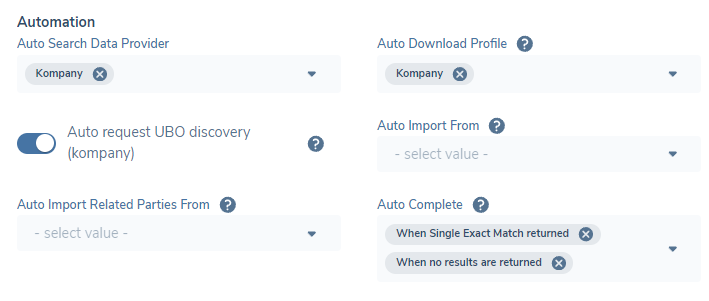
UBO Discovery Automation (kompany)
Configuration users can leverage automation to automatically start the UBO Discovery process at the same time the Profile call is made. This will speed up the process of having to wait for the Profile call to be returned before making the UBO Discovery call.
To enable UBO Discovery automation, kompany must be selected in the Auto Download Profile dropdown, in the Journey Builder task.
When selected, the Auto request UBO discovery (kompany) Toggle will appear, and this can be then toggled on to enable.
Ongoing Monitoring
Ongoing Monitoring of entity profiles for data changes is supported by some External Data Providers. Of the OOTB integrations, Kompany and D&B are currently the only providers that supports Ongoing Monitoring.
- Kompany: Company Data only.
- D&B: Company Data and Related Parties
Ongoing Monitoring is supported for Custom Providers and can be toggled on or off from the Provider Configuration Screen (custom providers only)
Enabling Ongoing Monitoring
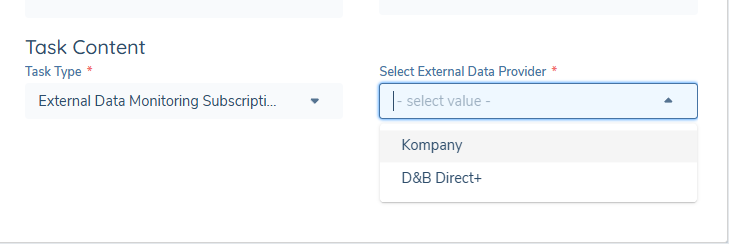
In order to enable Ongoing Monitoring, the External Data Monitoring Subscription service task must be configured in the journey.
This task can be selected from inside the Journey Builder and can be configured after the External Data Combined Task in the journey.
To subscribe to a provider, the provider can be selected from the Select External Data Provider dropdown
Once an entity is enabled for Ongoing Monitoring, the External Data provider will send an alert to Fenergo SaaS when there is an update to the entity data which can then be used to trigger an Ongoing Monitoring journey in Fenergo.
From that journey, the External Data Refresh task can be used to retrieve the updated dataset with the updated changes included.
To Unsubscribe from Ongoing Monitoring, the External Data Monitoring Unsubscription task can be used
Please see the Ongoing Monitoring Data and Screening User Guide for further information on Ongoing Monitoring.
D&B Direct
Unknown Entities
Dun & Bradstreet provides support for including or excluding unknown entity associations in the retrieved profile. An entity that is marked as 'Unknown' is a non-descript data node returned by the D&B Direct+ API to indicate the overall unaccounted-for share ownership of a company. This occurs when the total share ownership percentages for a company do not add up to 100%. To account for this discrepancy, Dun & Bradstreet creates a placeholder entity called "Unknown Entity" within the ownership hierarchy. This pseudo entity is not material and has no data other than an implied share percentage. Its type is defaulted to 'Company' and they are identified by their name (e.g., 'Unknown Entity 1').
The example image below shows how Unknown Entities are displayed:
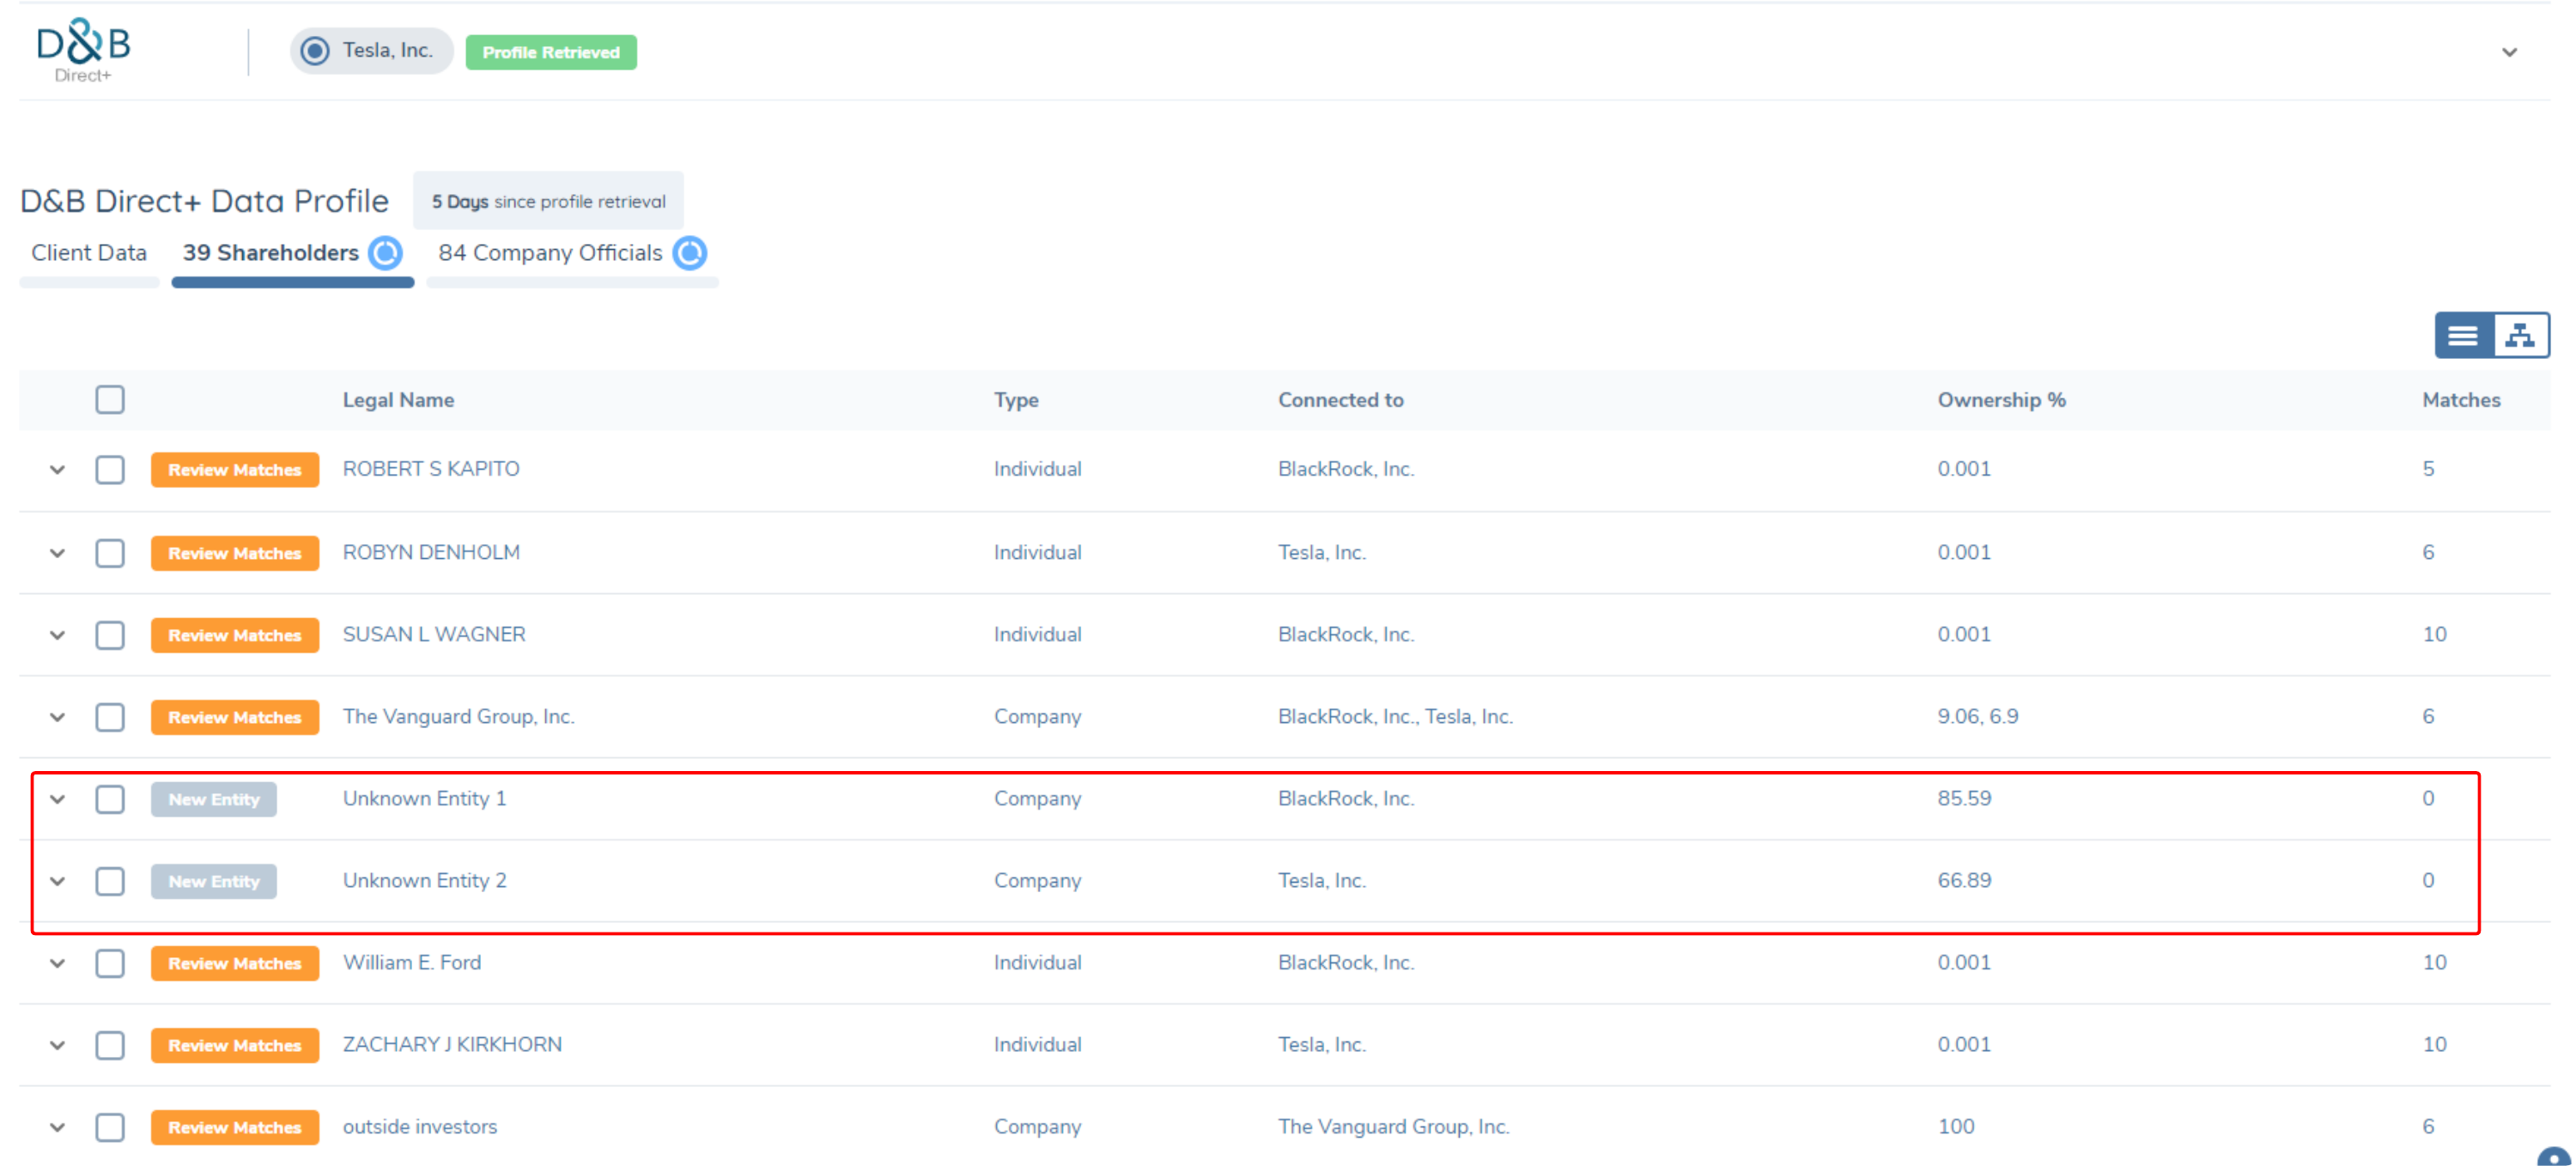
When the switch is toggled on, the retrieved profile in the external data task will include unknown entities. Users will need to manually reject these unknown entities if they do not wish to import them as related parties. When toggled off, unknown entities will be filtered and excluded in the retrieved profile:

Shareholding Threshold
Users can control the number of Shareholders returned by configuring a value in the Shareholding Threshold field.
Shareholder filtering is evaluated at each individual association, ie the direct connection. If it encounters an association below the threshold then all of those associations will be removed and not visible in Fenergo.
Fenergo does not support 'Total Ownership' filtering.

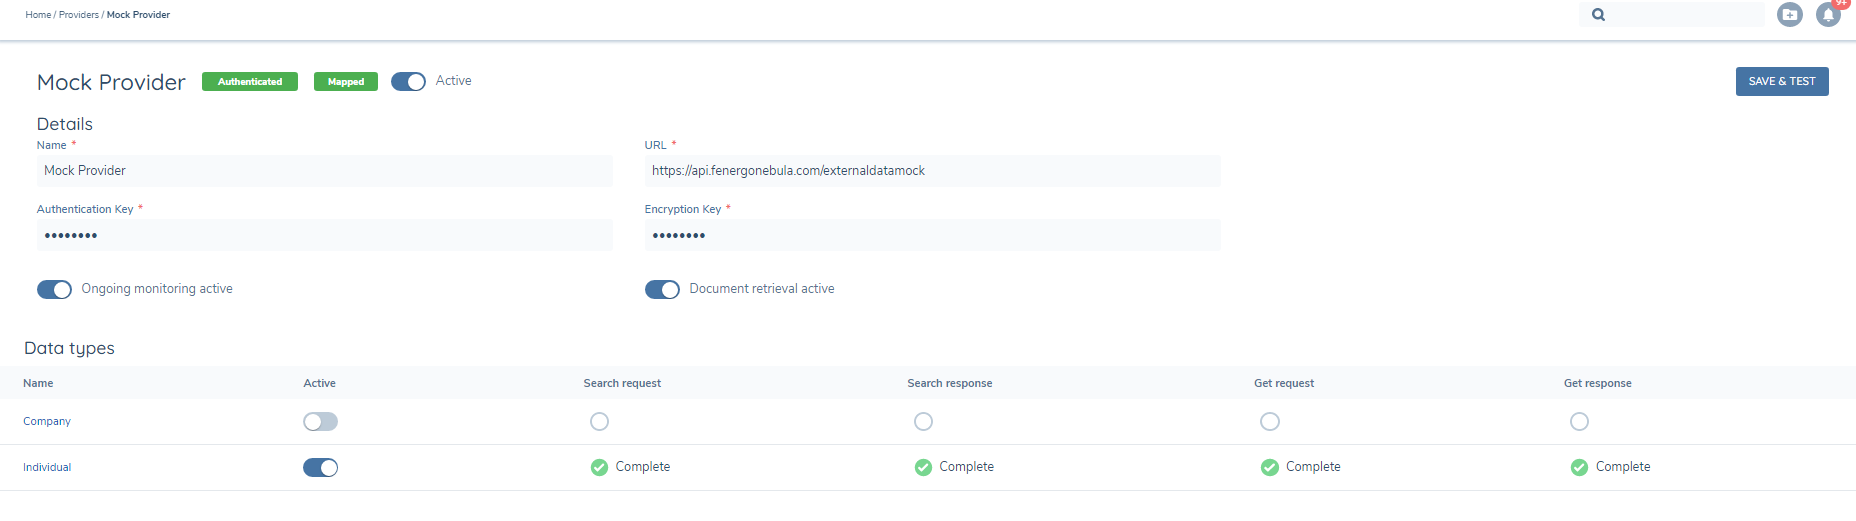
Custom
Searching Custom Providers for Individuals
The system supports the abilty so search a Custom Provider integration for Individuals as well as for Companies.
From the Custom Provider Configuration screen, the user can see the Individual & Company hyperlinks, which when clicked, opens up the mapping tool for that category type.
It is possible to activate either or both types at any time, provided the mappings have been completed successfully.
Mapping for each type can be activated or de-activated by toggling the Active switch.