Getting Started
Key Screens
Below are some key screens in Integration Flows to be familiar with...
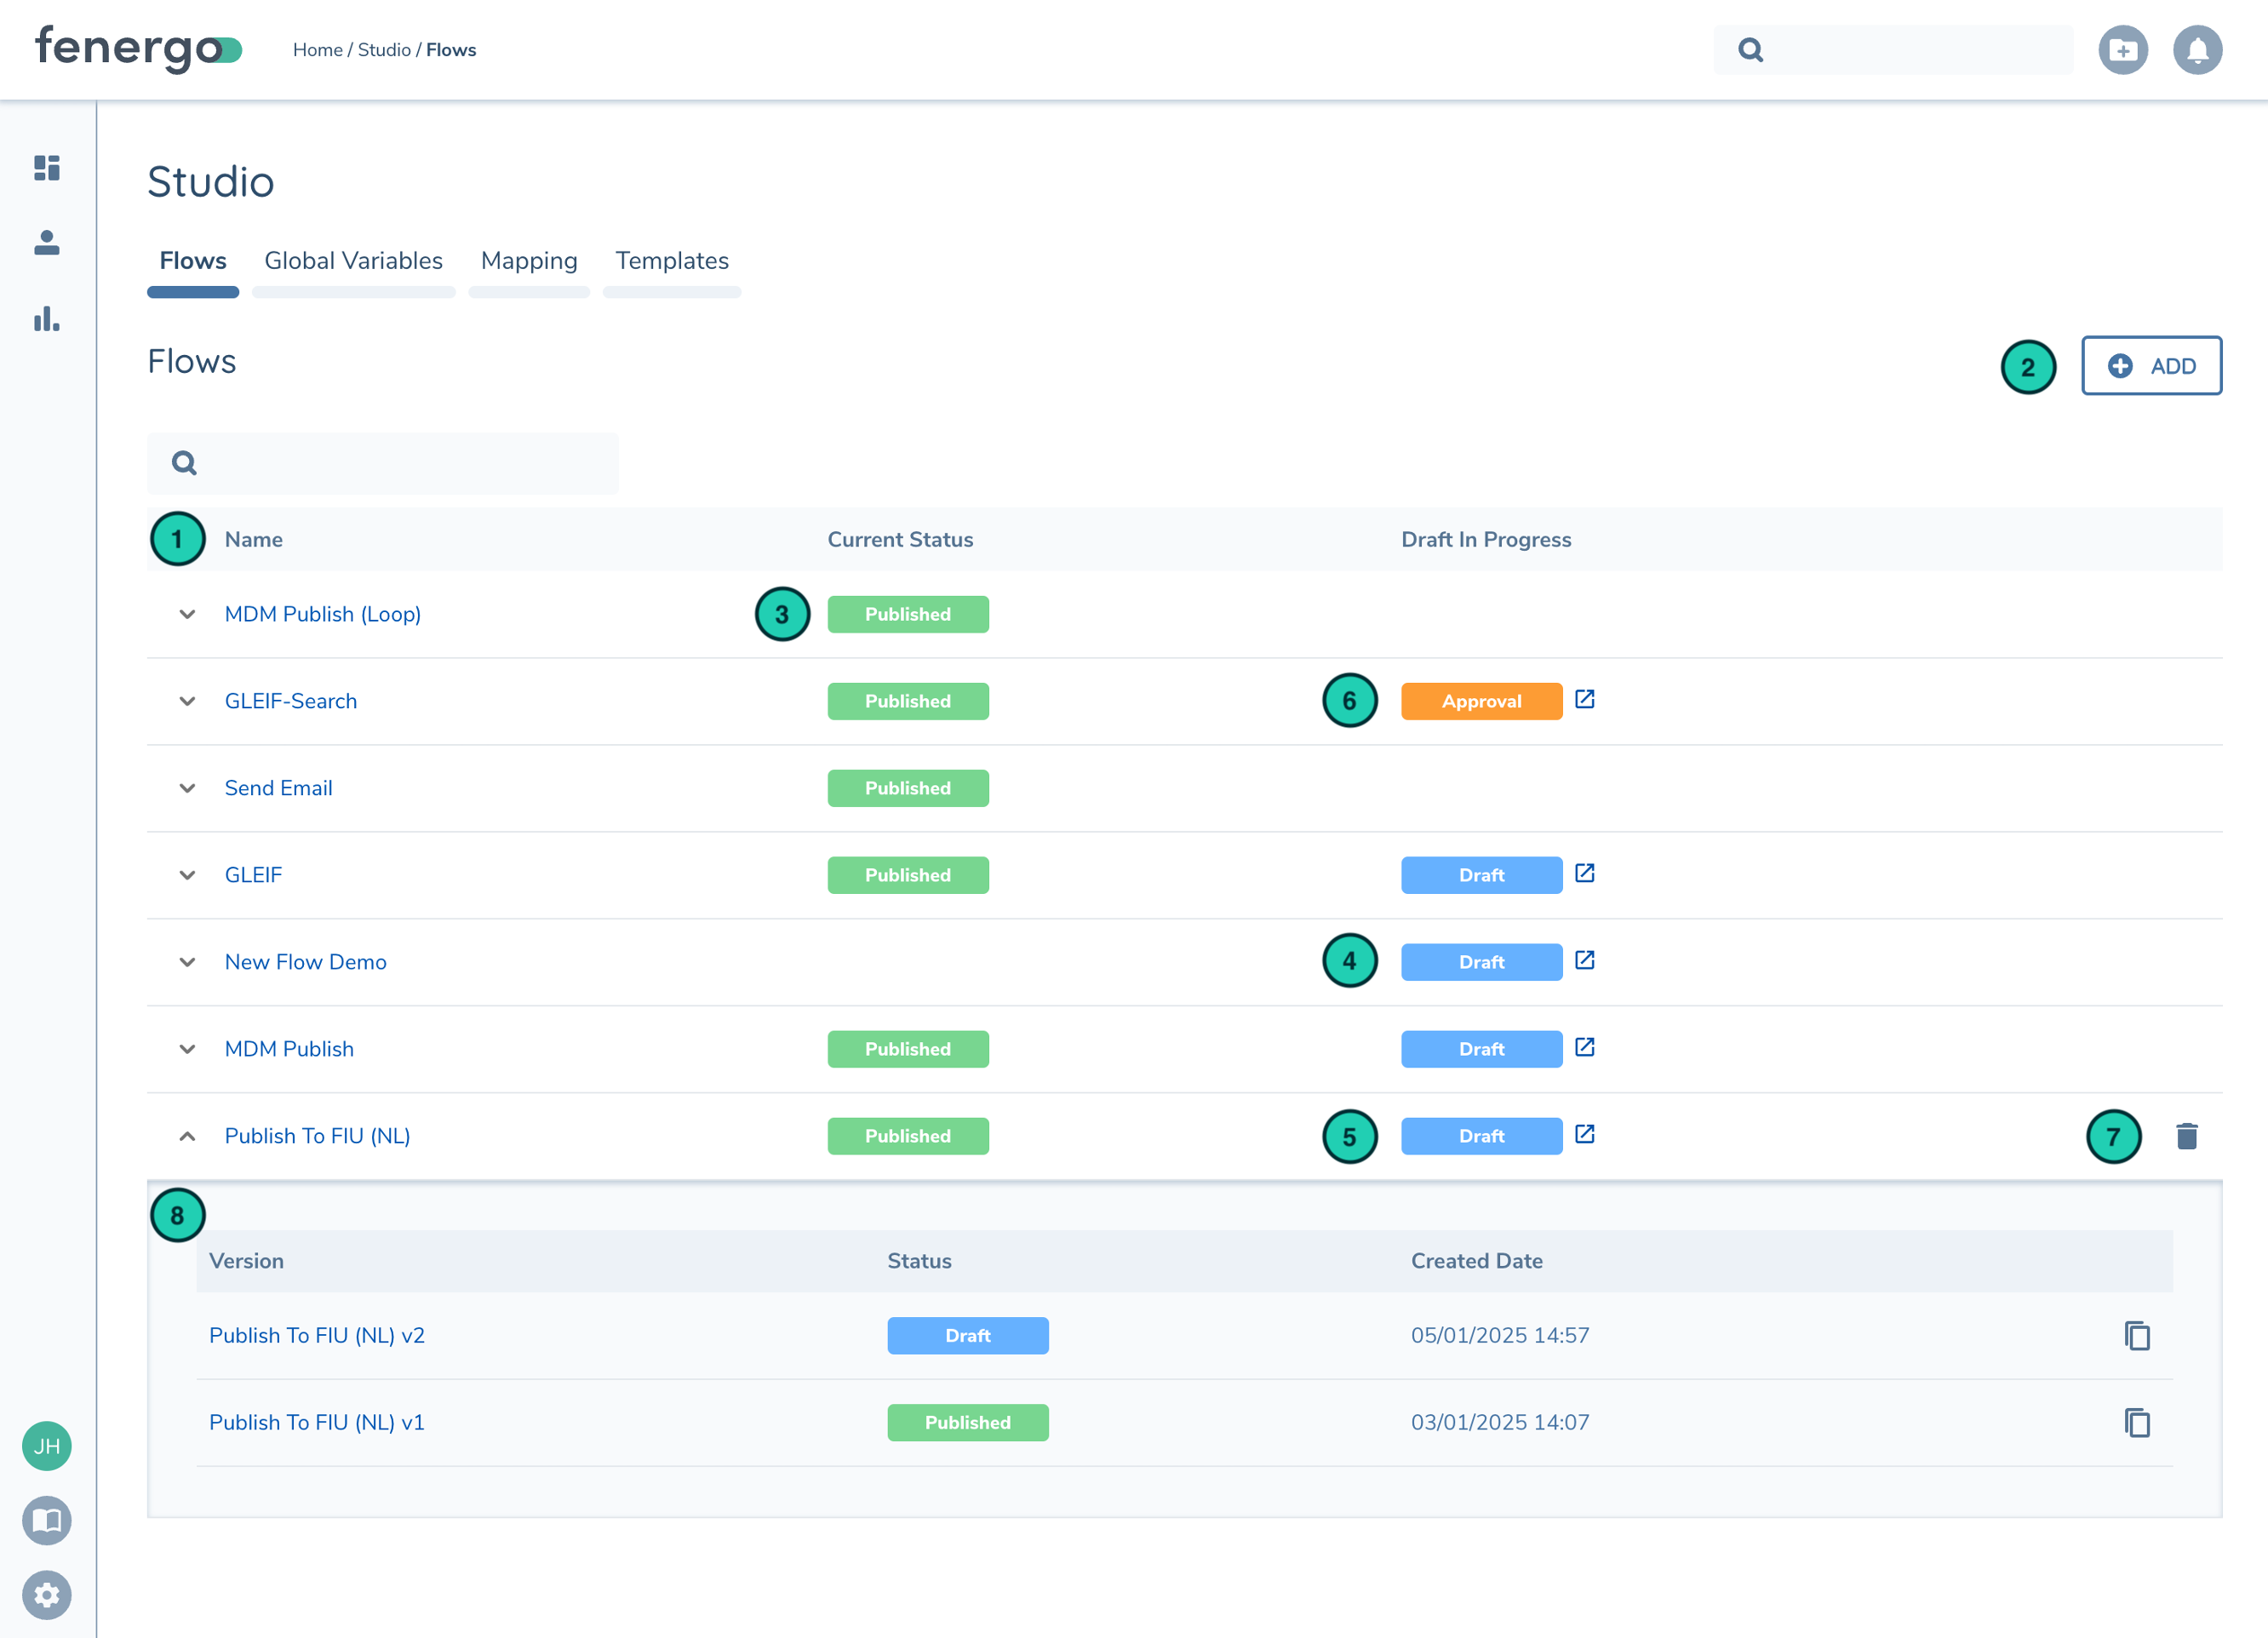
Flow Studio
The Flow Studio is where you design & manage your Flows. From here you can see a list of all the Flows you've built and their status.
| Description | |
|---|---|
| 1 | List of configured Flows |
| 2 | Create new Flow |
| 3 | Publish Status. Flow has been published and is live in the Tenant |
| 4 | Flow has draft version in progress. This flow has never been published before as it doesn't include the "Published" status |
| 5 | Flow has draft version in progress |
| 6 | Flow version is waiting for Approval before it can be Published |
| 7 | Delete Flow |
| 8 | Expand row to see the previous versions. The duplicate button lets you create a new Flow from that versioned configuration |
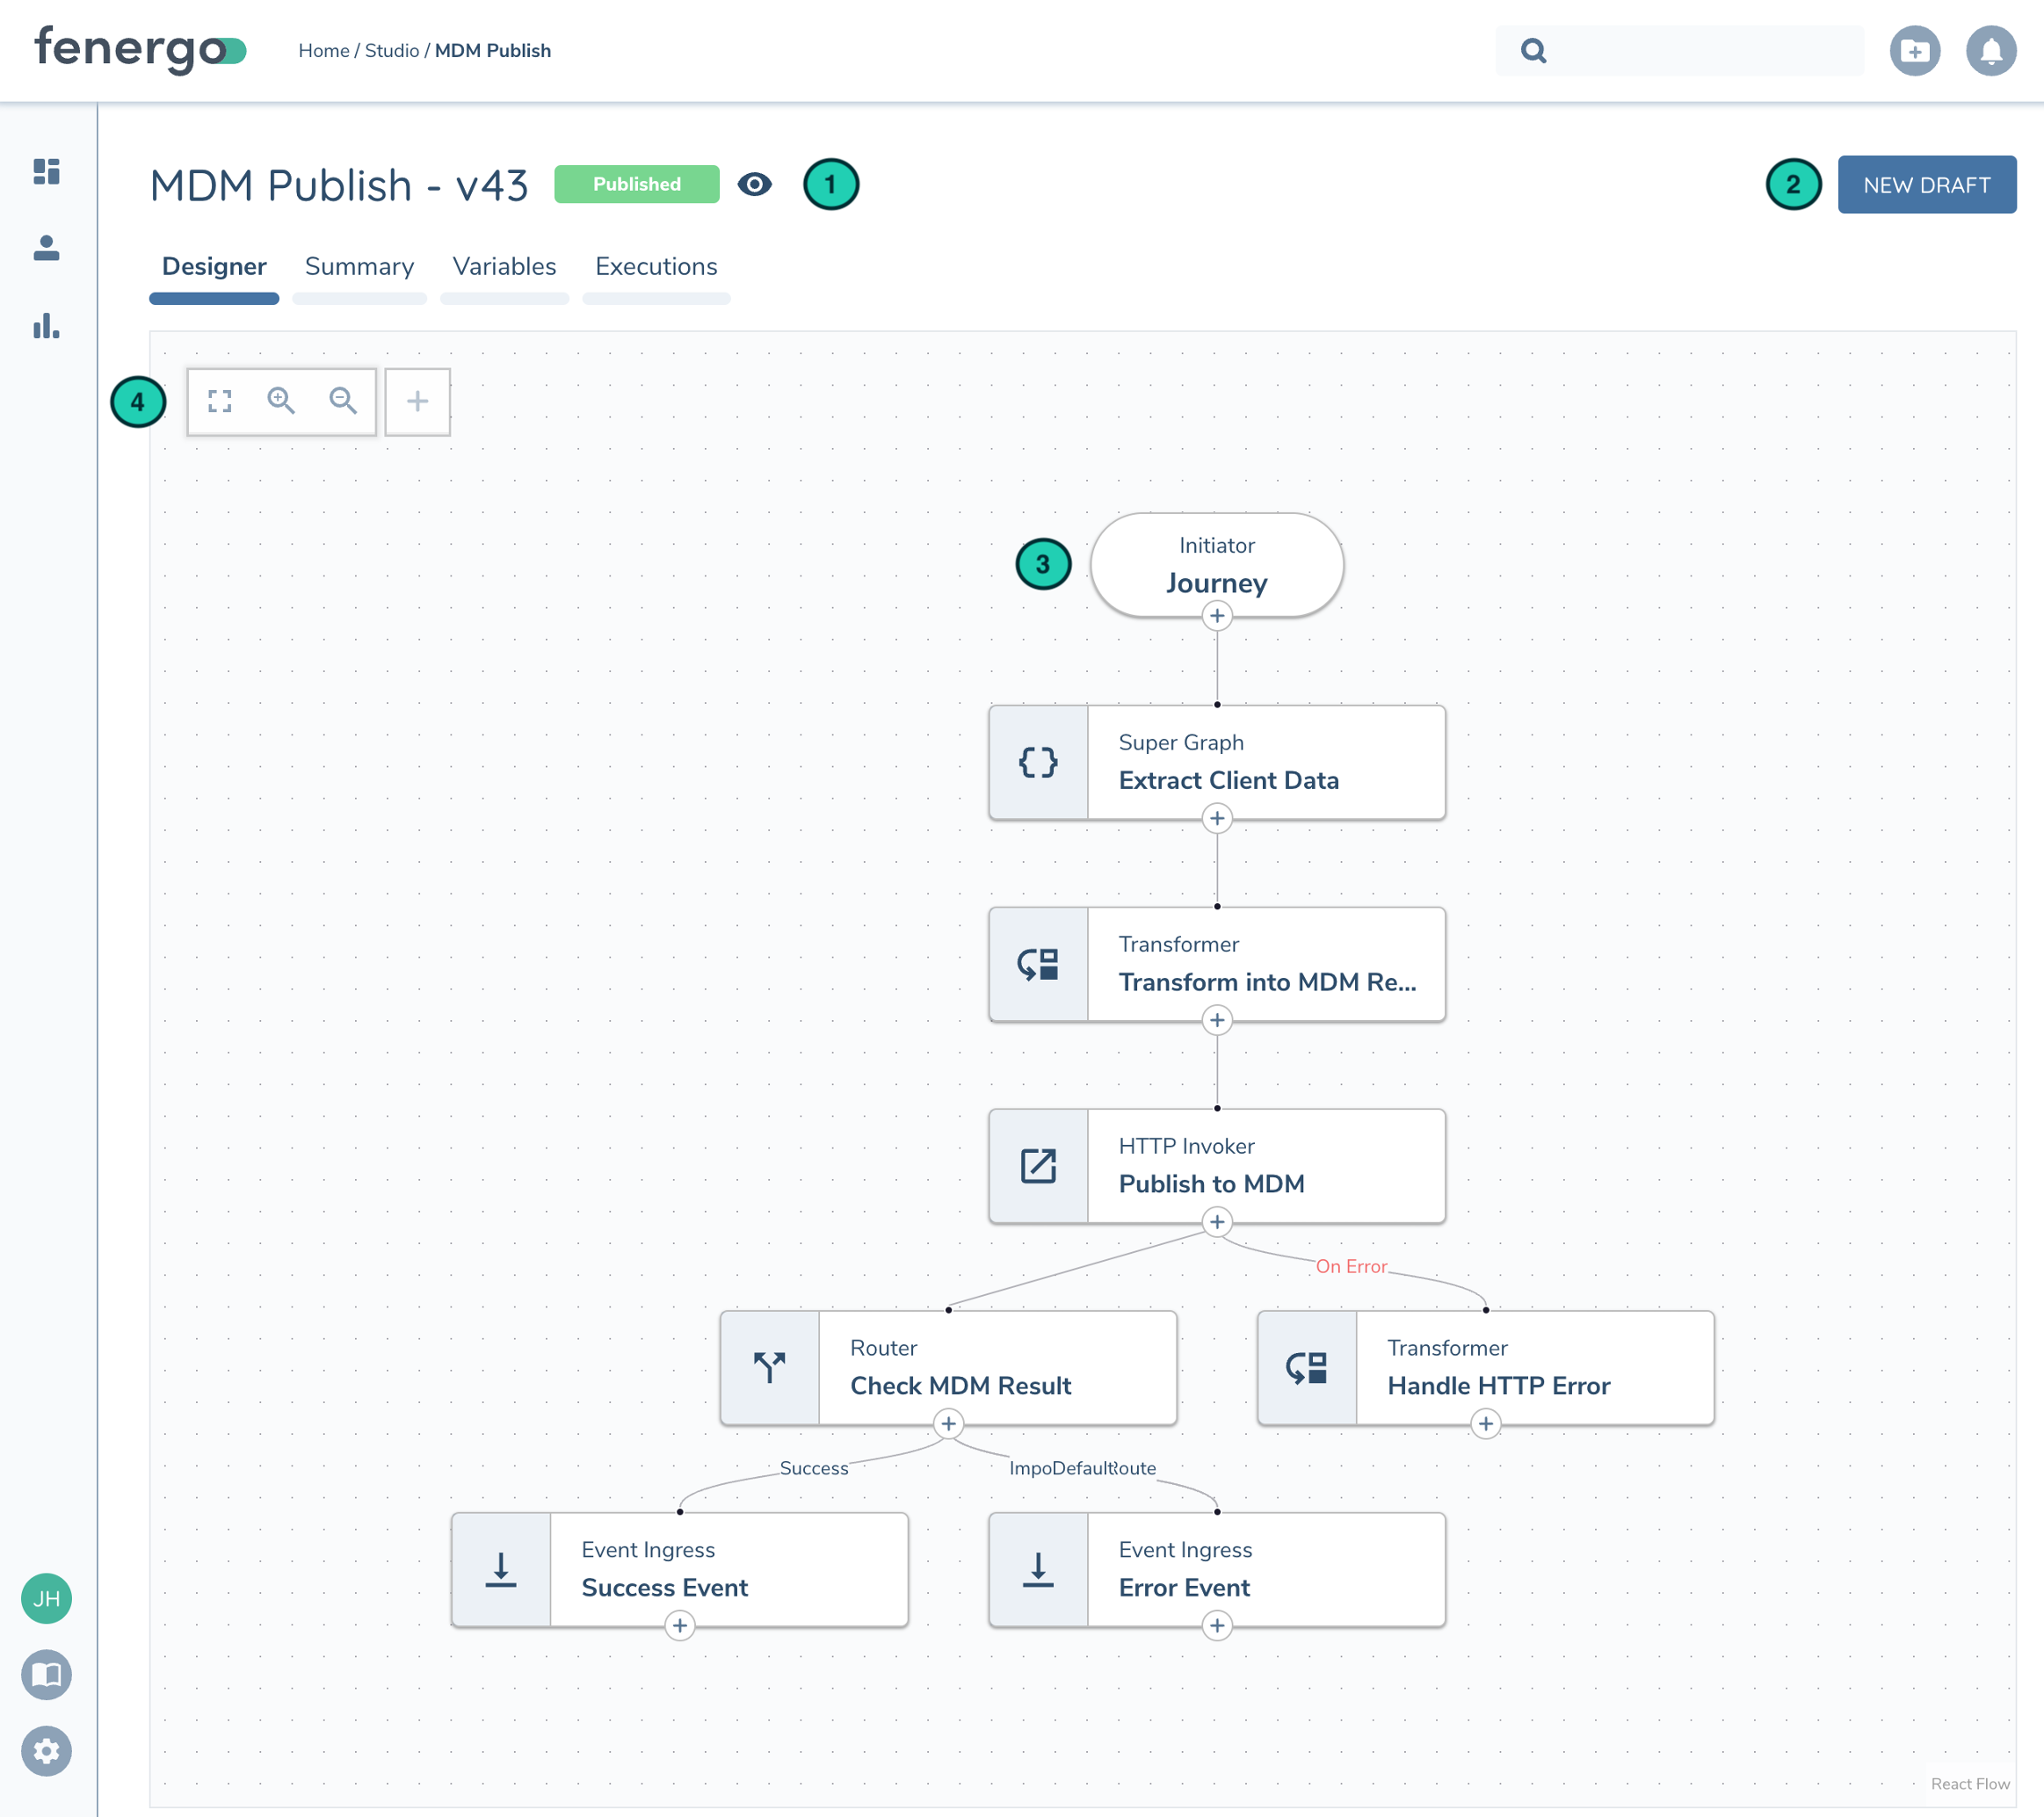
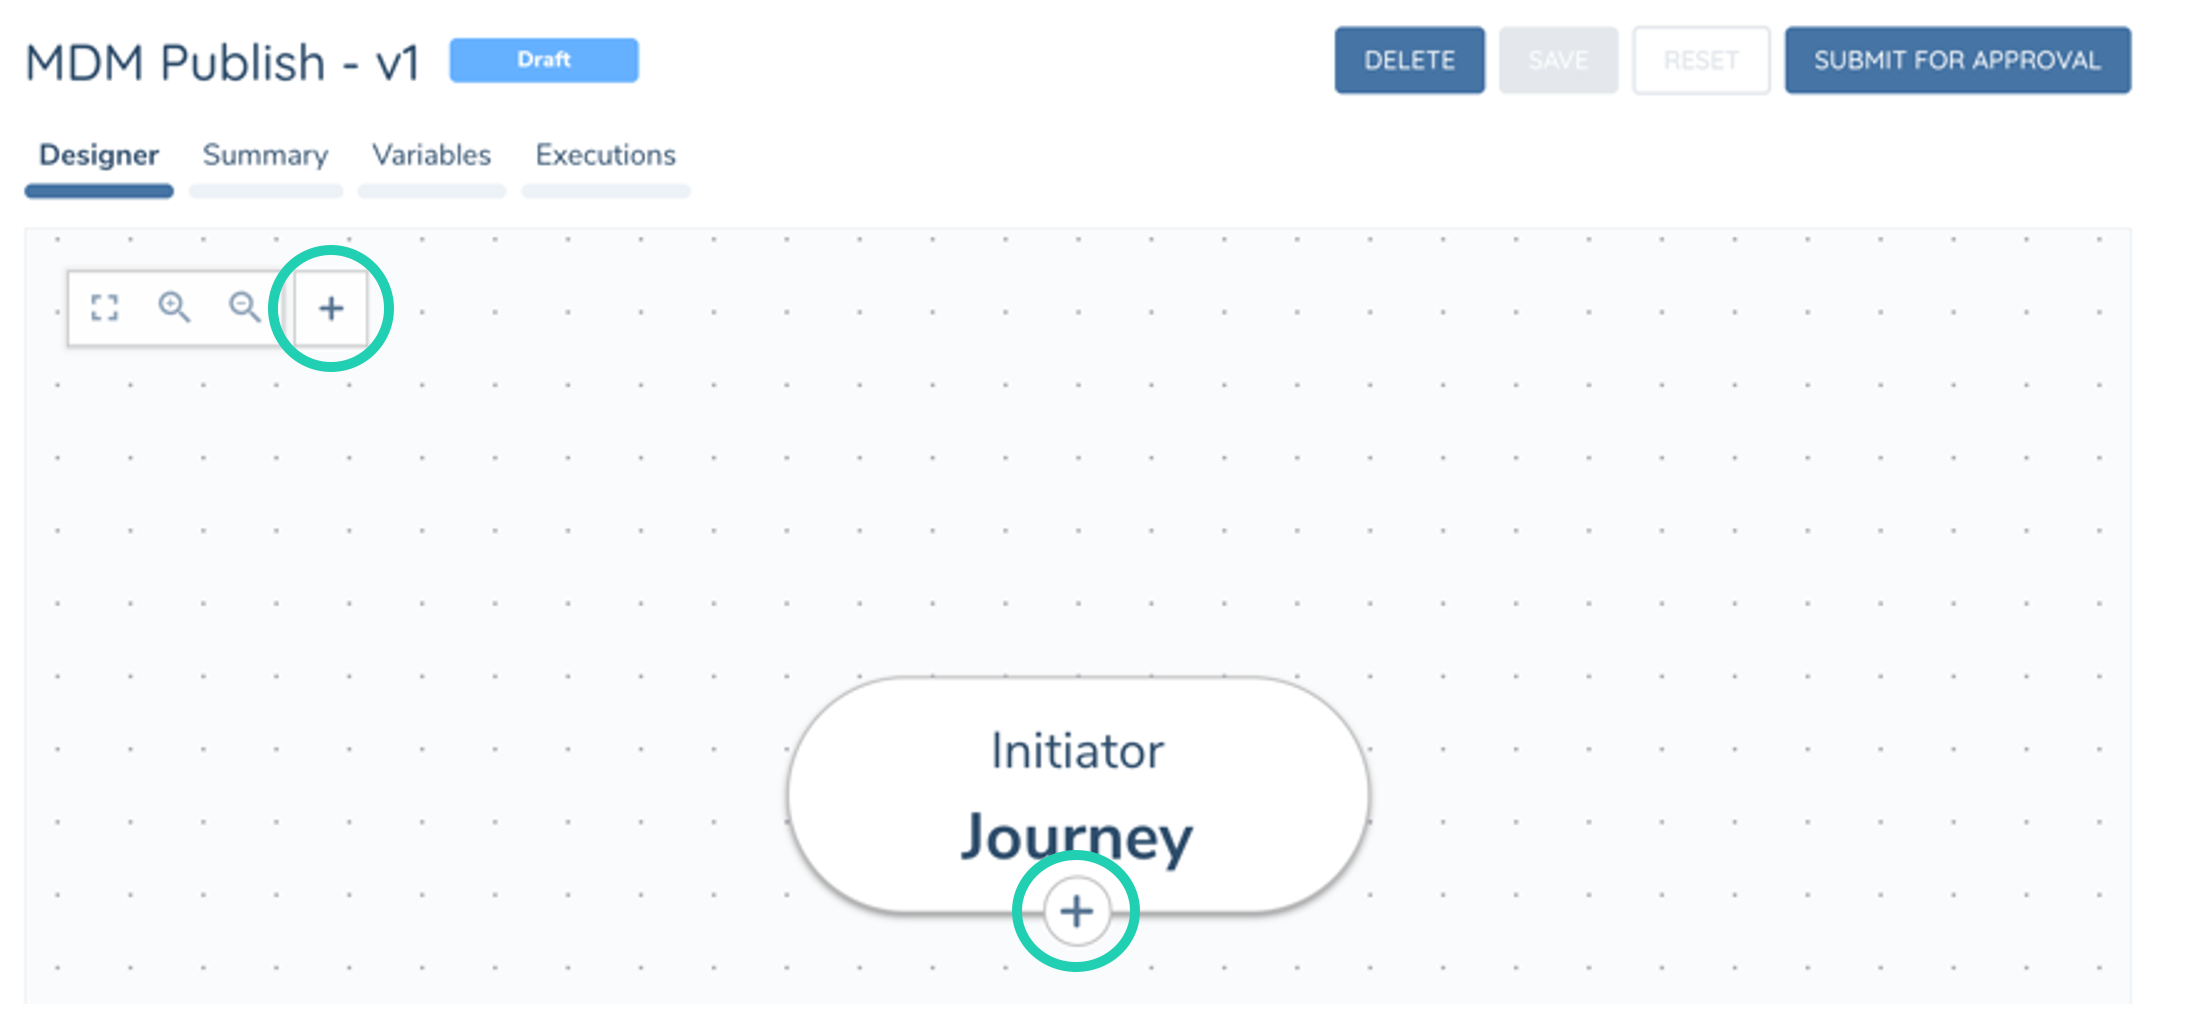
Flow Designer
The Flow Designer is where you design your Flow. In the Designer tab, the Canvas shows a list of all the progressive tasks you've added into your Flow. You can click on each task to configure it, or click the '+' icons to add more tasks. Hover over a task and you'll see the 'trash' icon you can use to delete a task.
| Description | |
|---|---|
| 1 | Flow Name. Identifies current version and status (Published, Draft, etc). If version is not in draft status the designer will be in read-only mode (denoted by the eye icon) to prevent any configuration changes |
| 2 | Create a new version based on the current version. If a draft version is already created it will bring you to that latest draft. |
| 3 | Task Canvas. Shows the tasks configured in the Flow |
| 4 | Quick Action Bar: - Fit to Screen - Zoom In - Zoom Out - Create Task |
From the other tabs in the Flow Designer you can access...
- Summary - Change the Flow Name
- Variables - Manage the Flow Variables within this Flow
- Executions - List past executions of this flow. Executions can be filtered by current version and date range
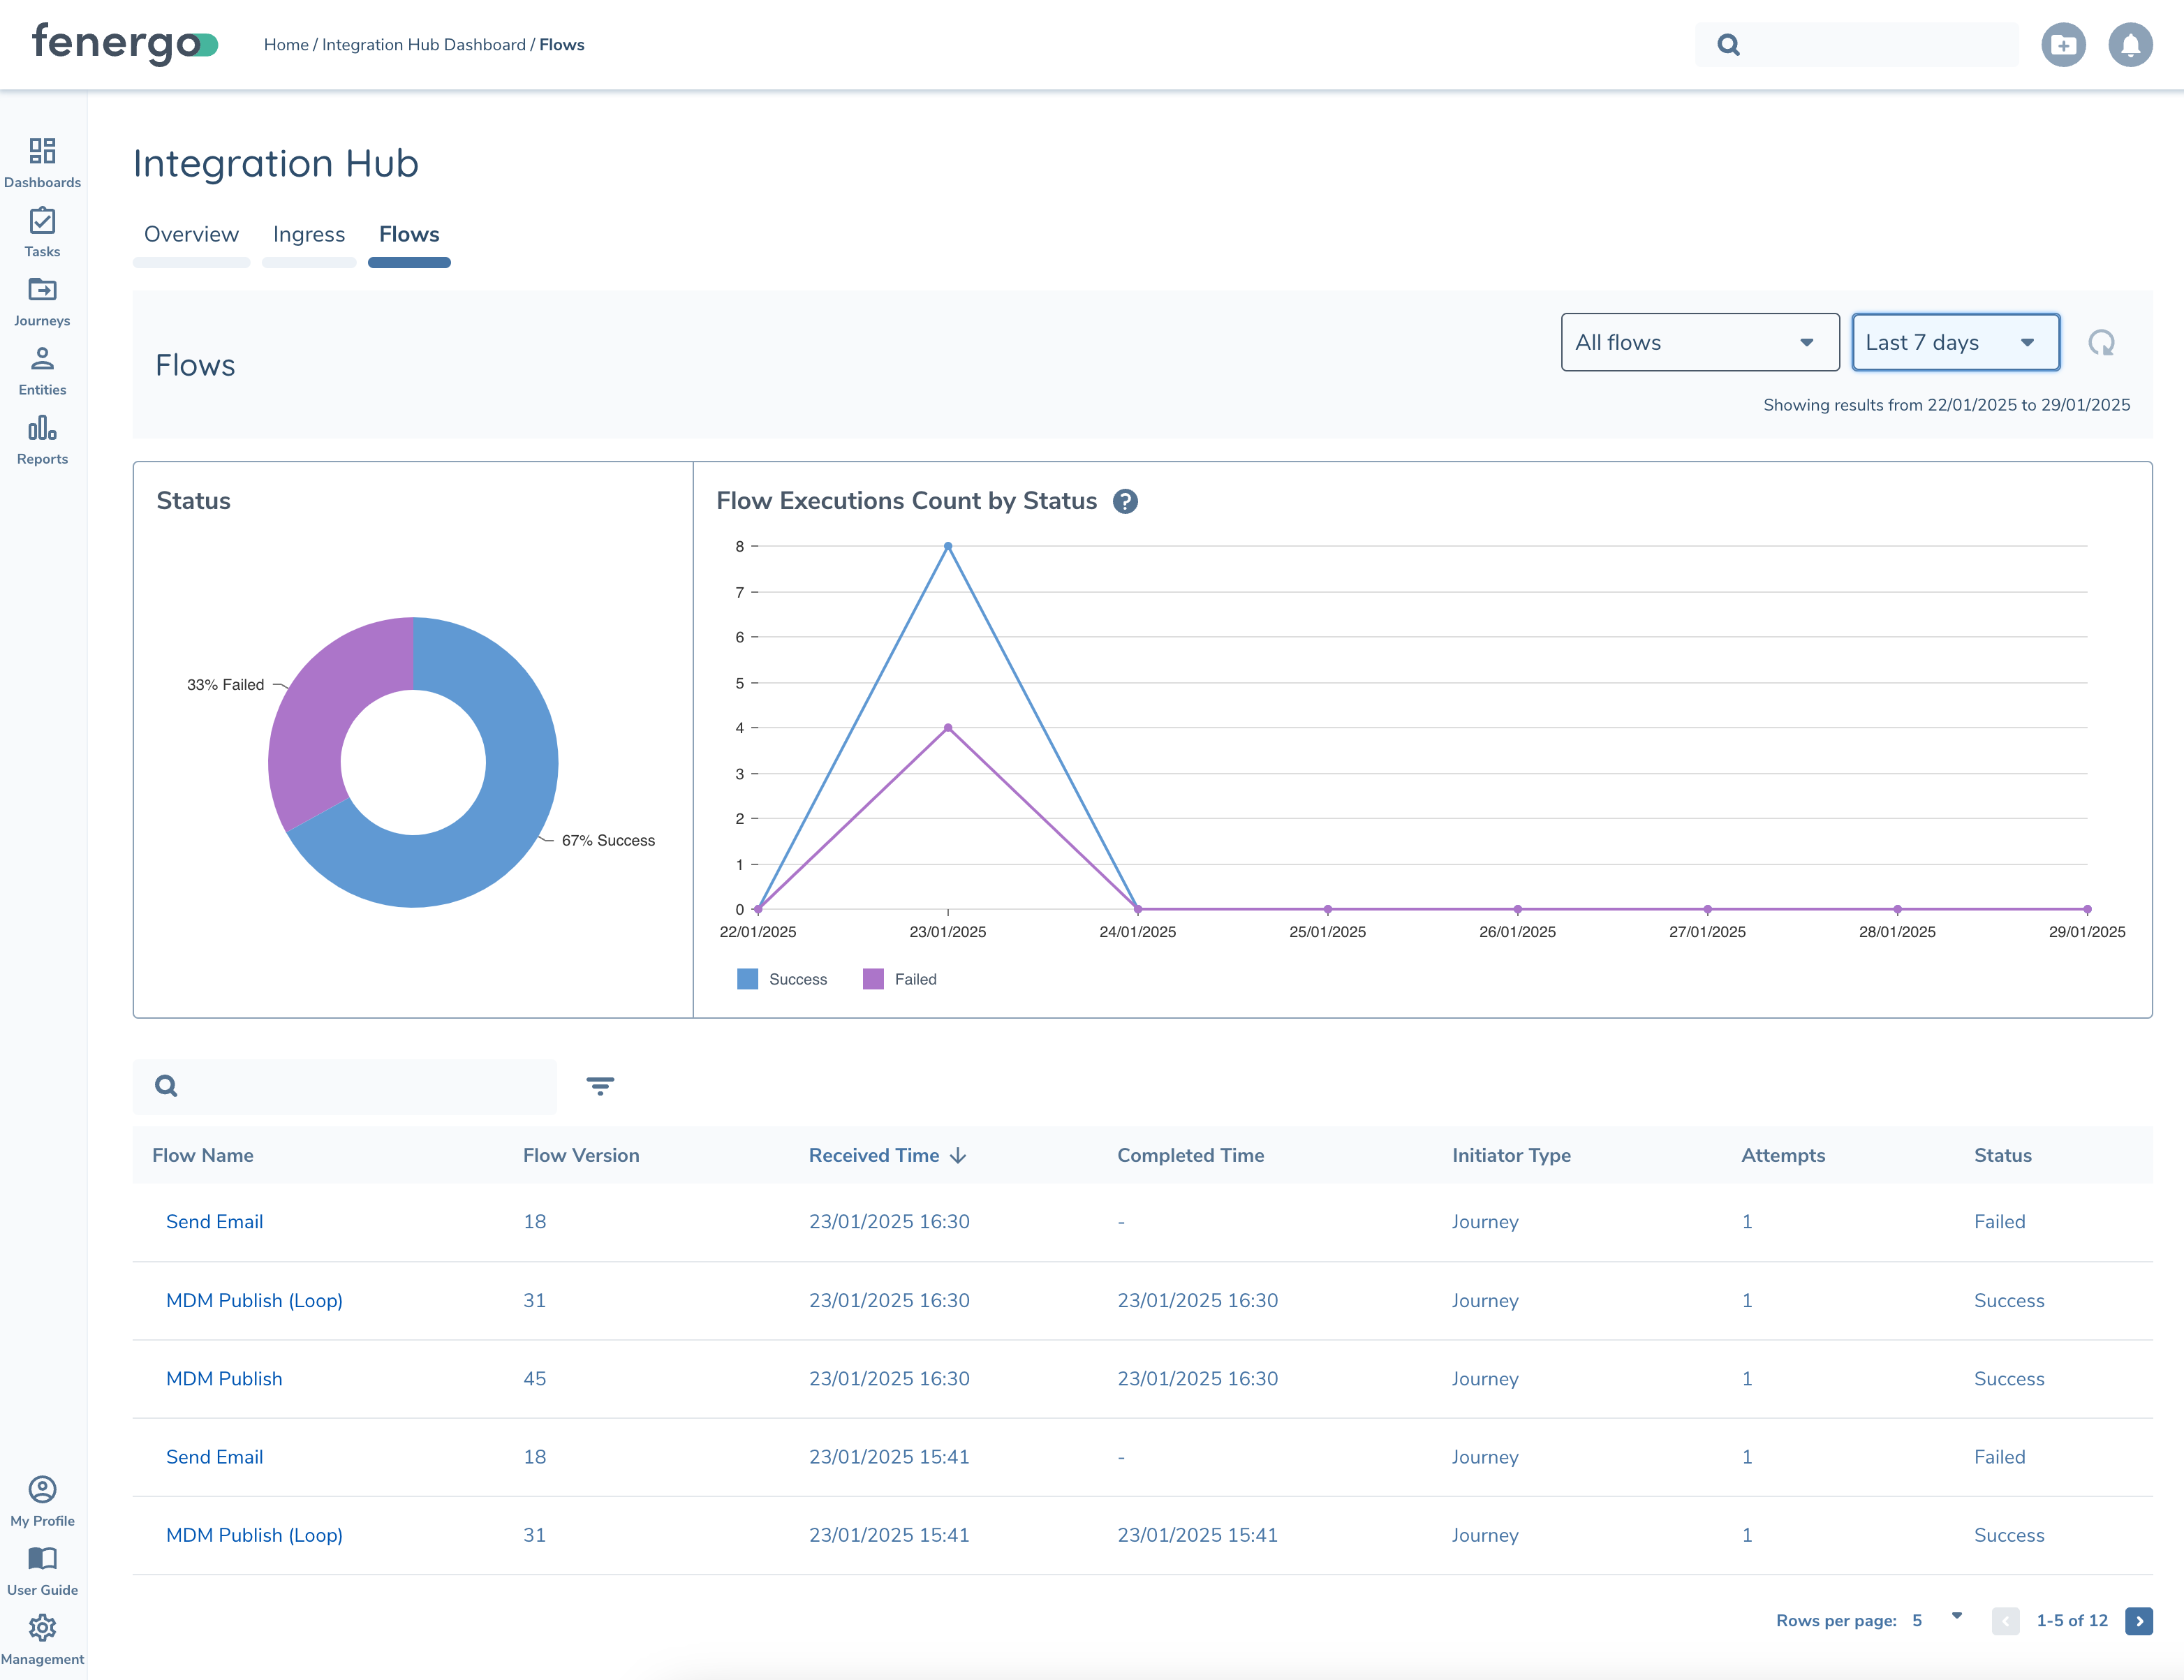
Integration Hub
Flows can be monitored via the Integration Hub. From here you quickly identify failures and dig into more details with the Flow Execution Details page in the next section. The results can be filtered at the top by Flow and Date Range.
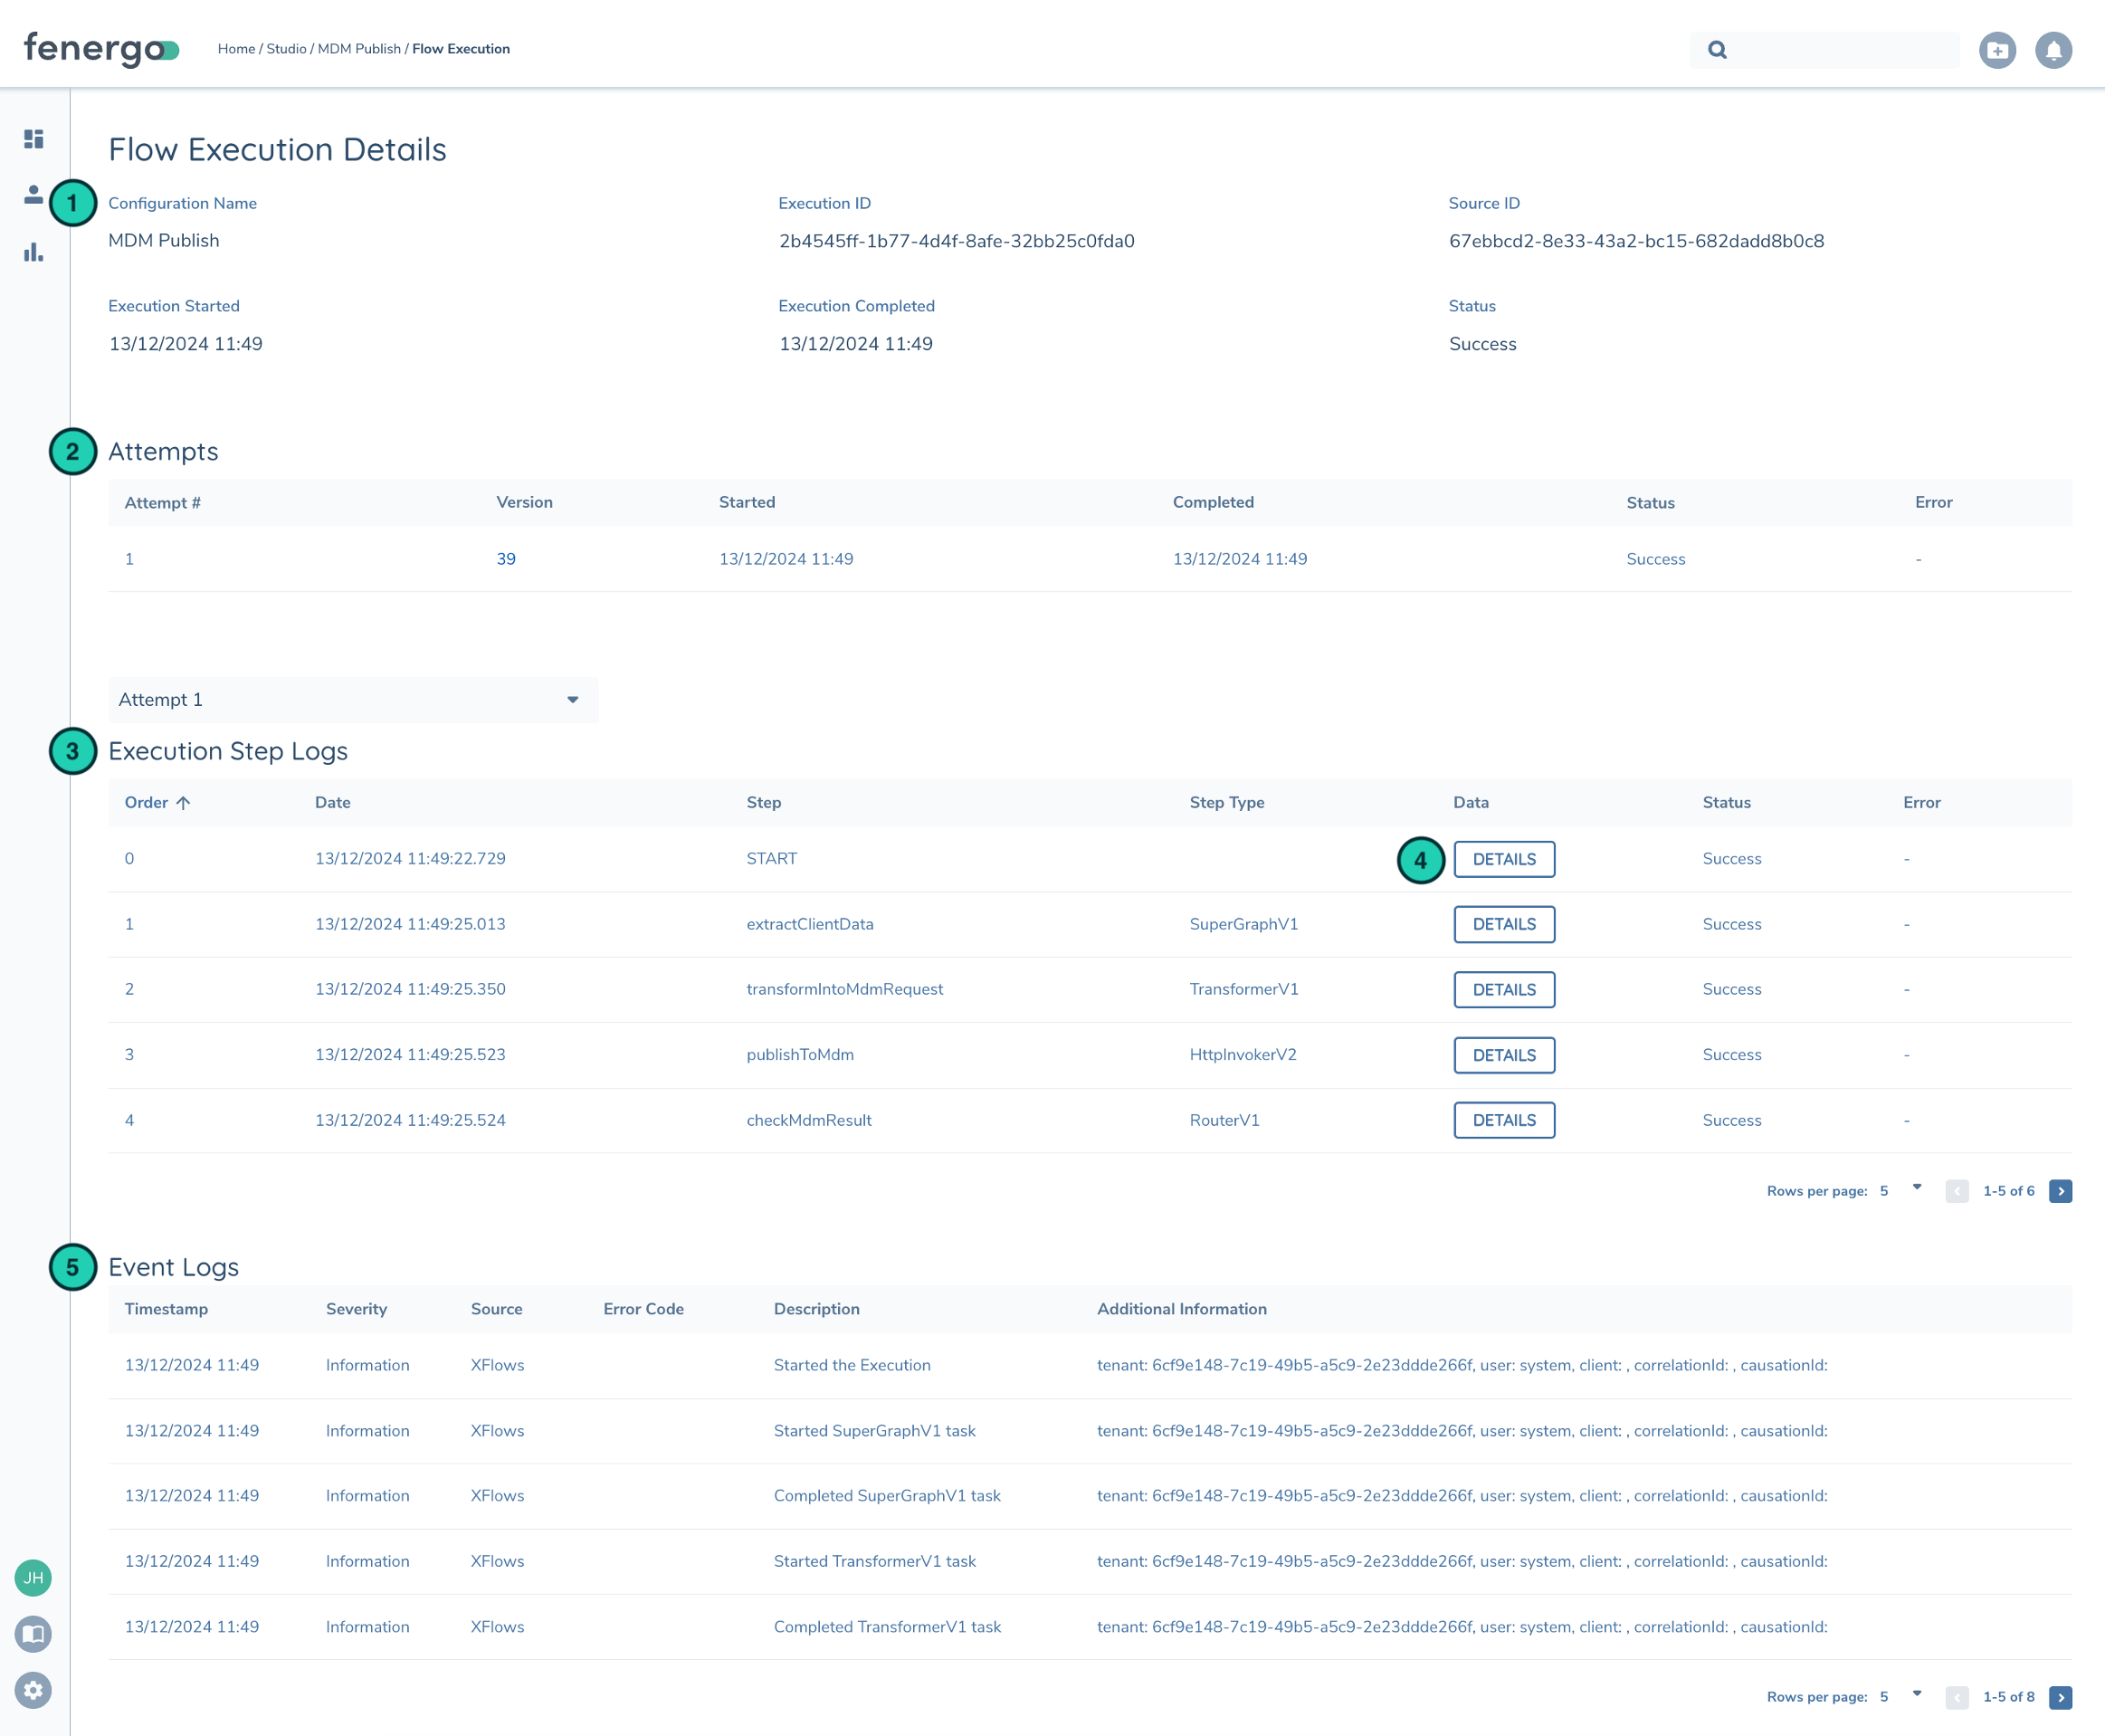
Flow Execution Details
The Execution Details page shows all the relevent information for a past instance of a Flow (Execution) including Execution Attempts, Detailed Step Logs, and general Logs.
| Description | |
|---|---|
| 1 | Flow Execution Details shows when the Execution started / ended and it's current status |
| 2 | Some Flows are rerunnable (Journey) when they fail. Each run is called an Attempt. |
| 3 | Execution Step Logs show the sequence of tasks executed in the Flow Execution. Note: Step Logs are purged after 31 days |
| 4 | Step Log Details shows the inputs / outputs at each task. Useful when troubleshooting an error to see what data looked like at runtime. |
| 5 | Logs generated during executions. Logs are produced by Tasks Failing or custom logs can be raised via Transformation Task using the Context.Log() function. |
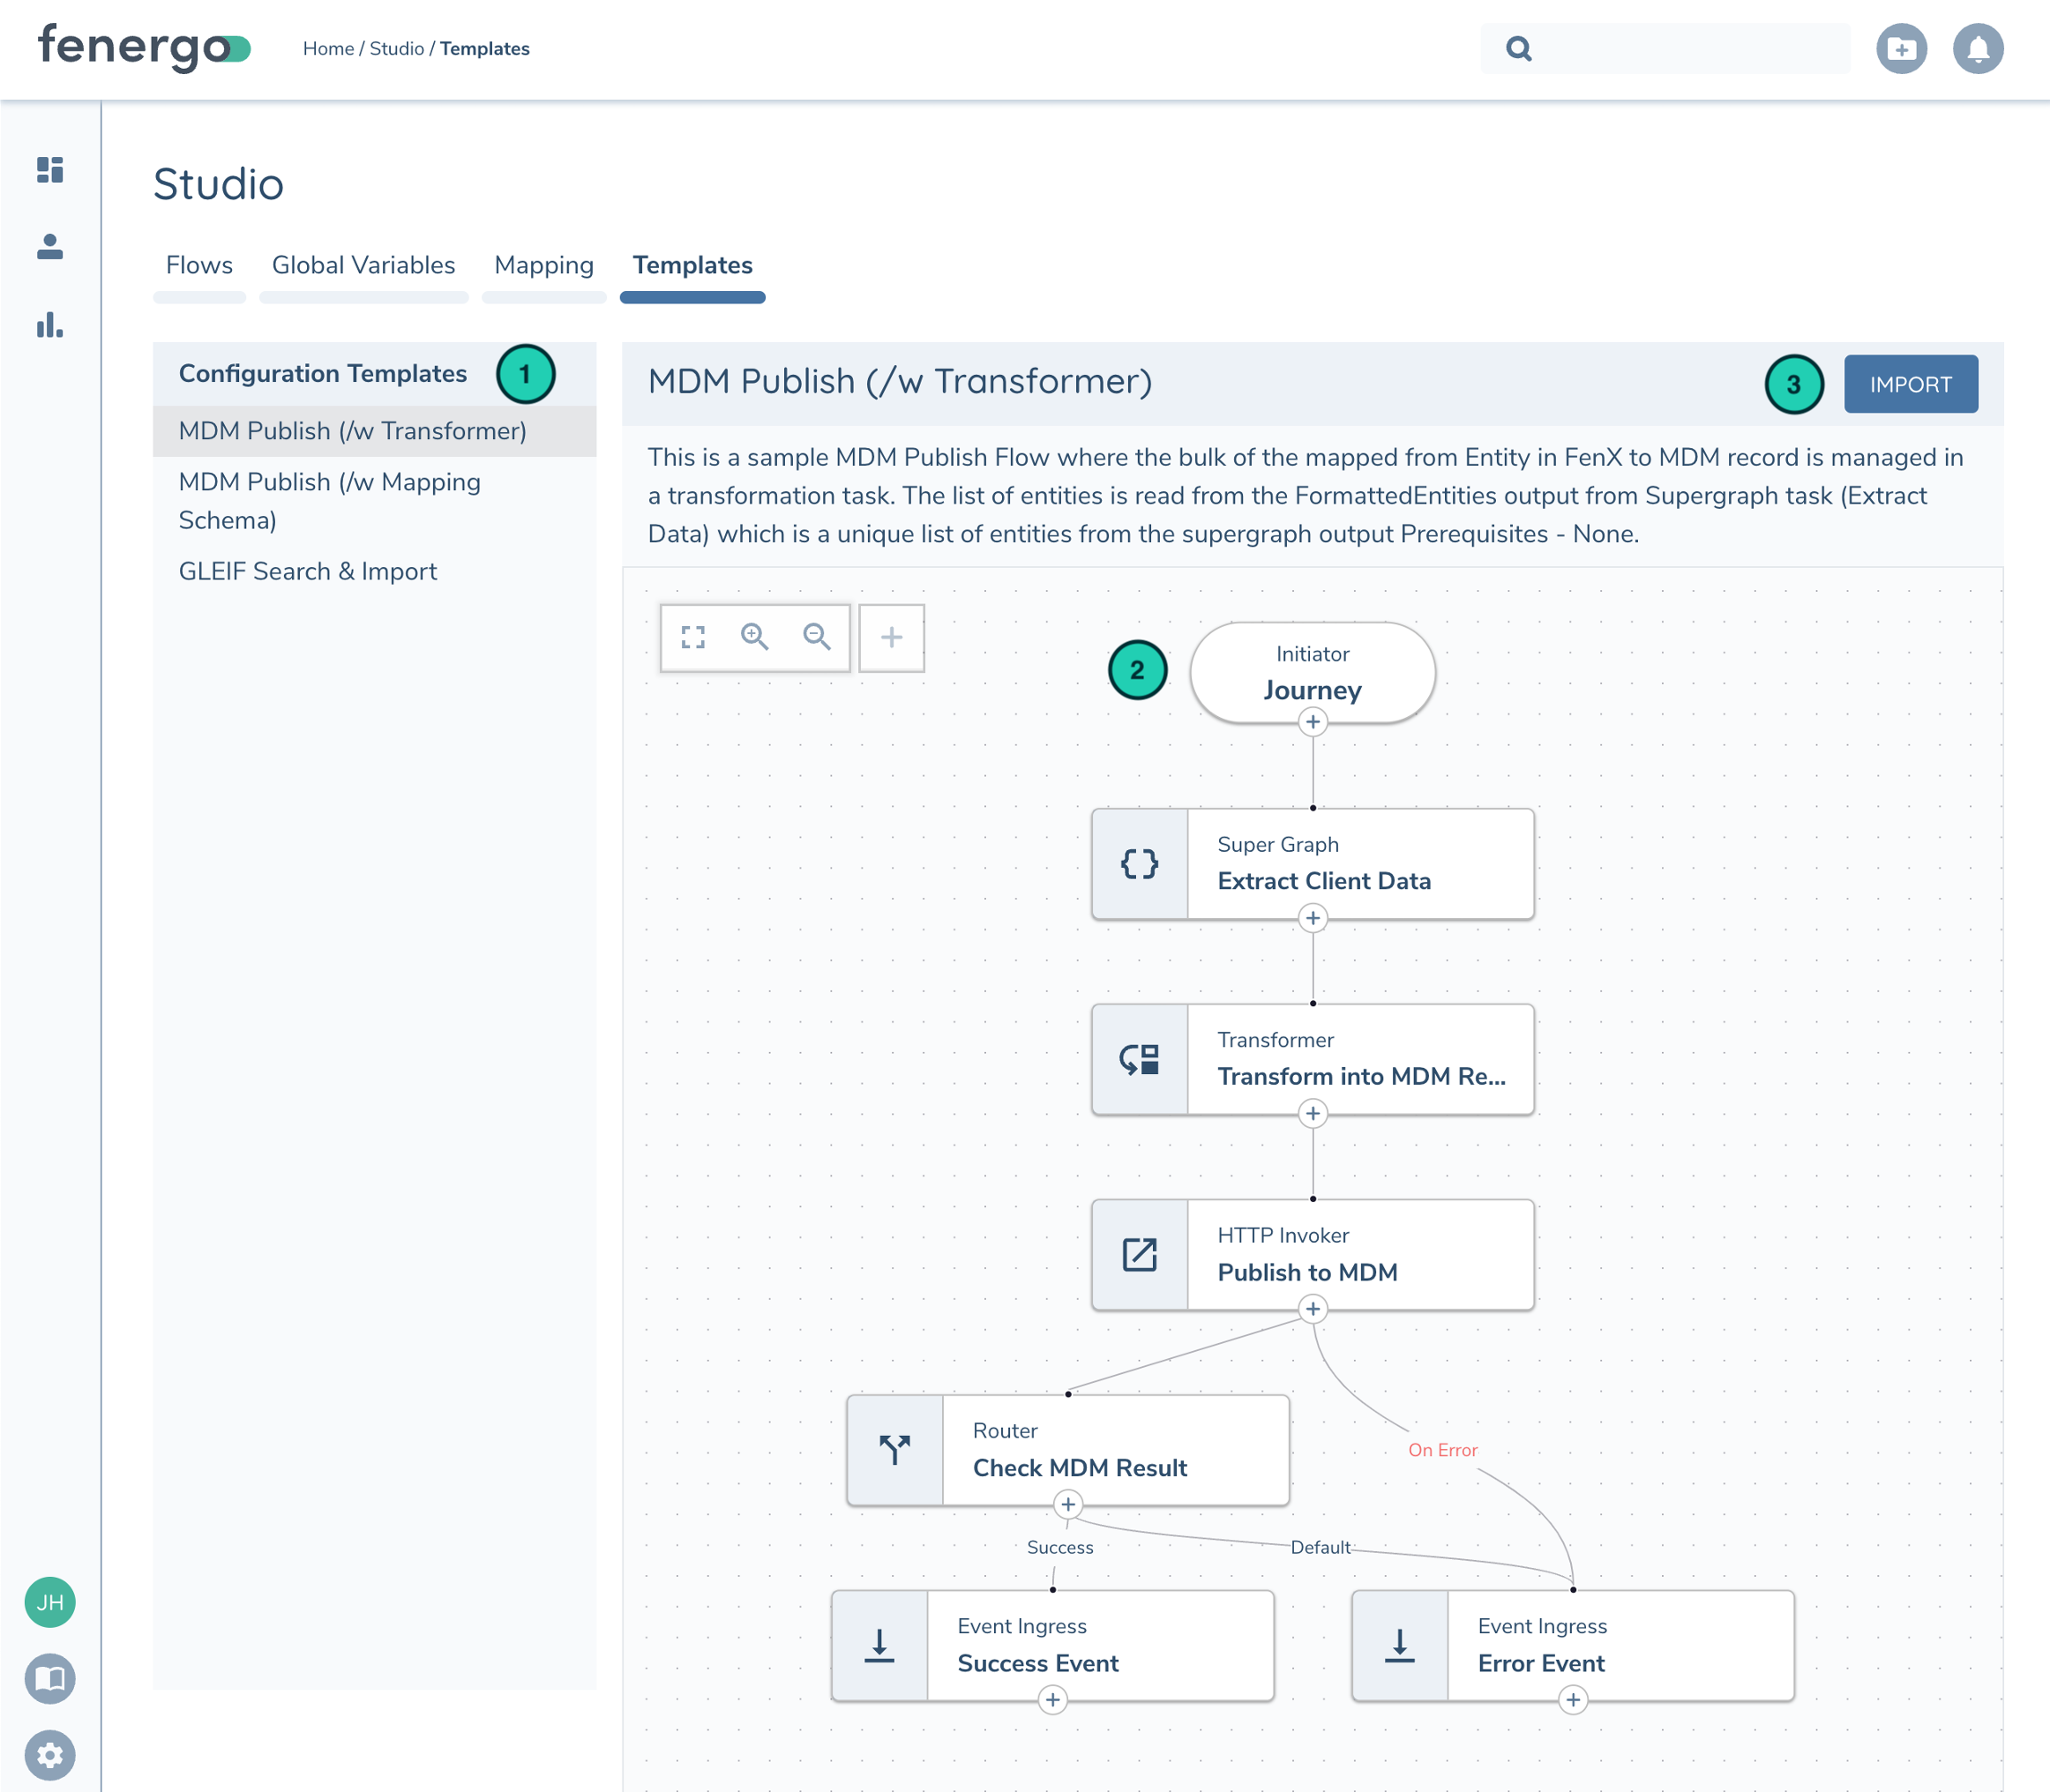
Flow Studio (Templates)
In the Templates Tab on Flow Studio you can see a list of pre-configured Templates to highlight different design patterns or Flow functionality. Feel free to import these templates into your Tenant and customize them to your use case!
| Description | |
|---|---|
| 1 | List available templates |
| 2 | Review Flow Configuration. Canvas is interactive and Configuration can be reviewed by clicking on each task |
| 3 | Import Flow. Before importing you will be prompted to enter Flow Name and confirm Flow Initiator |
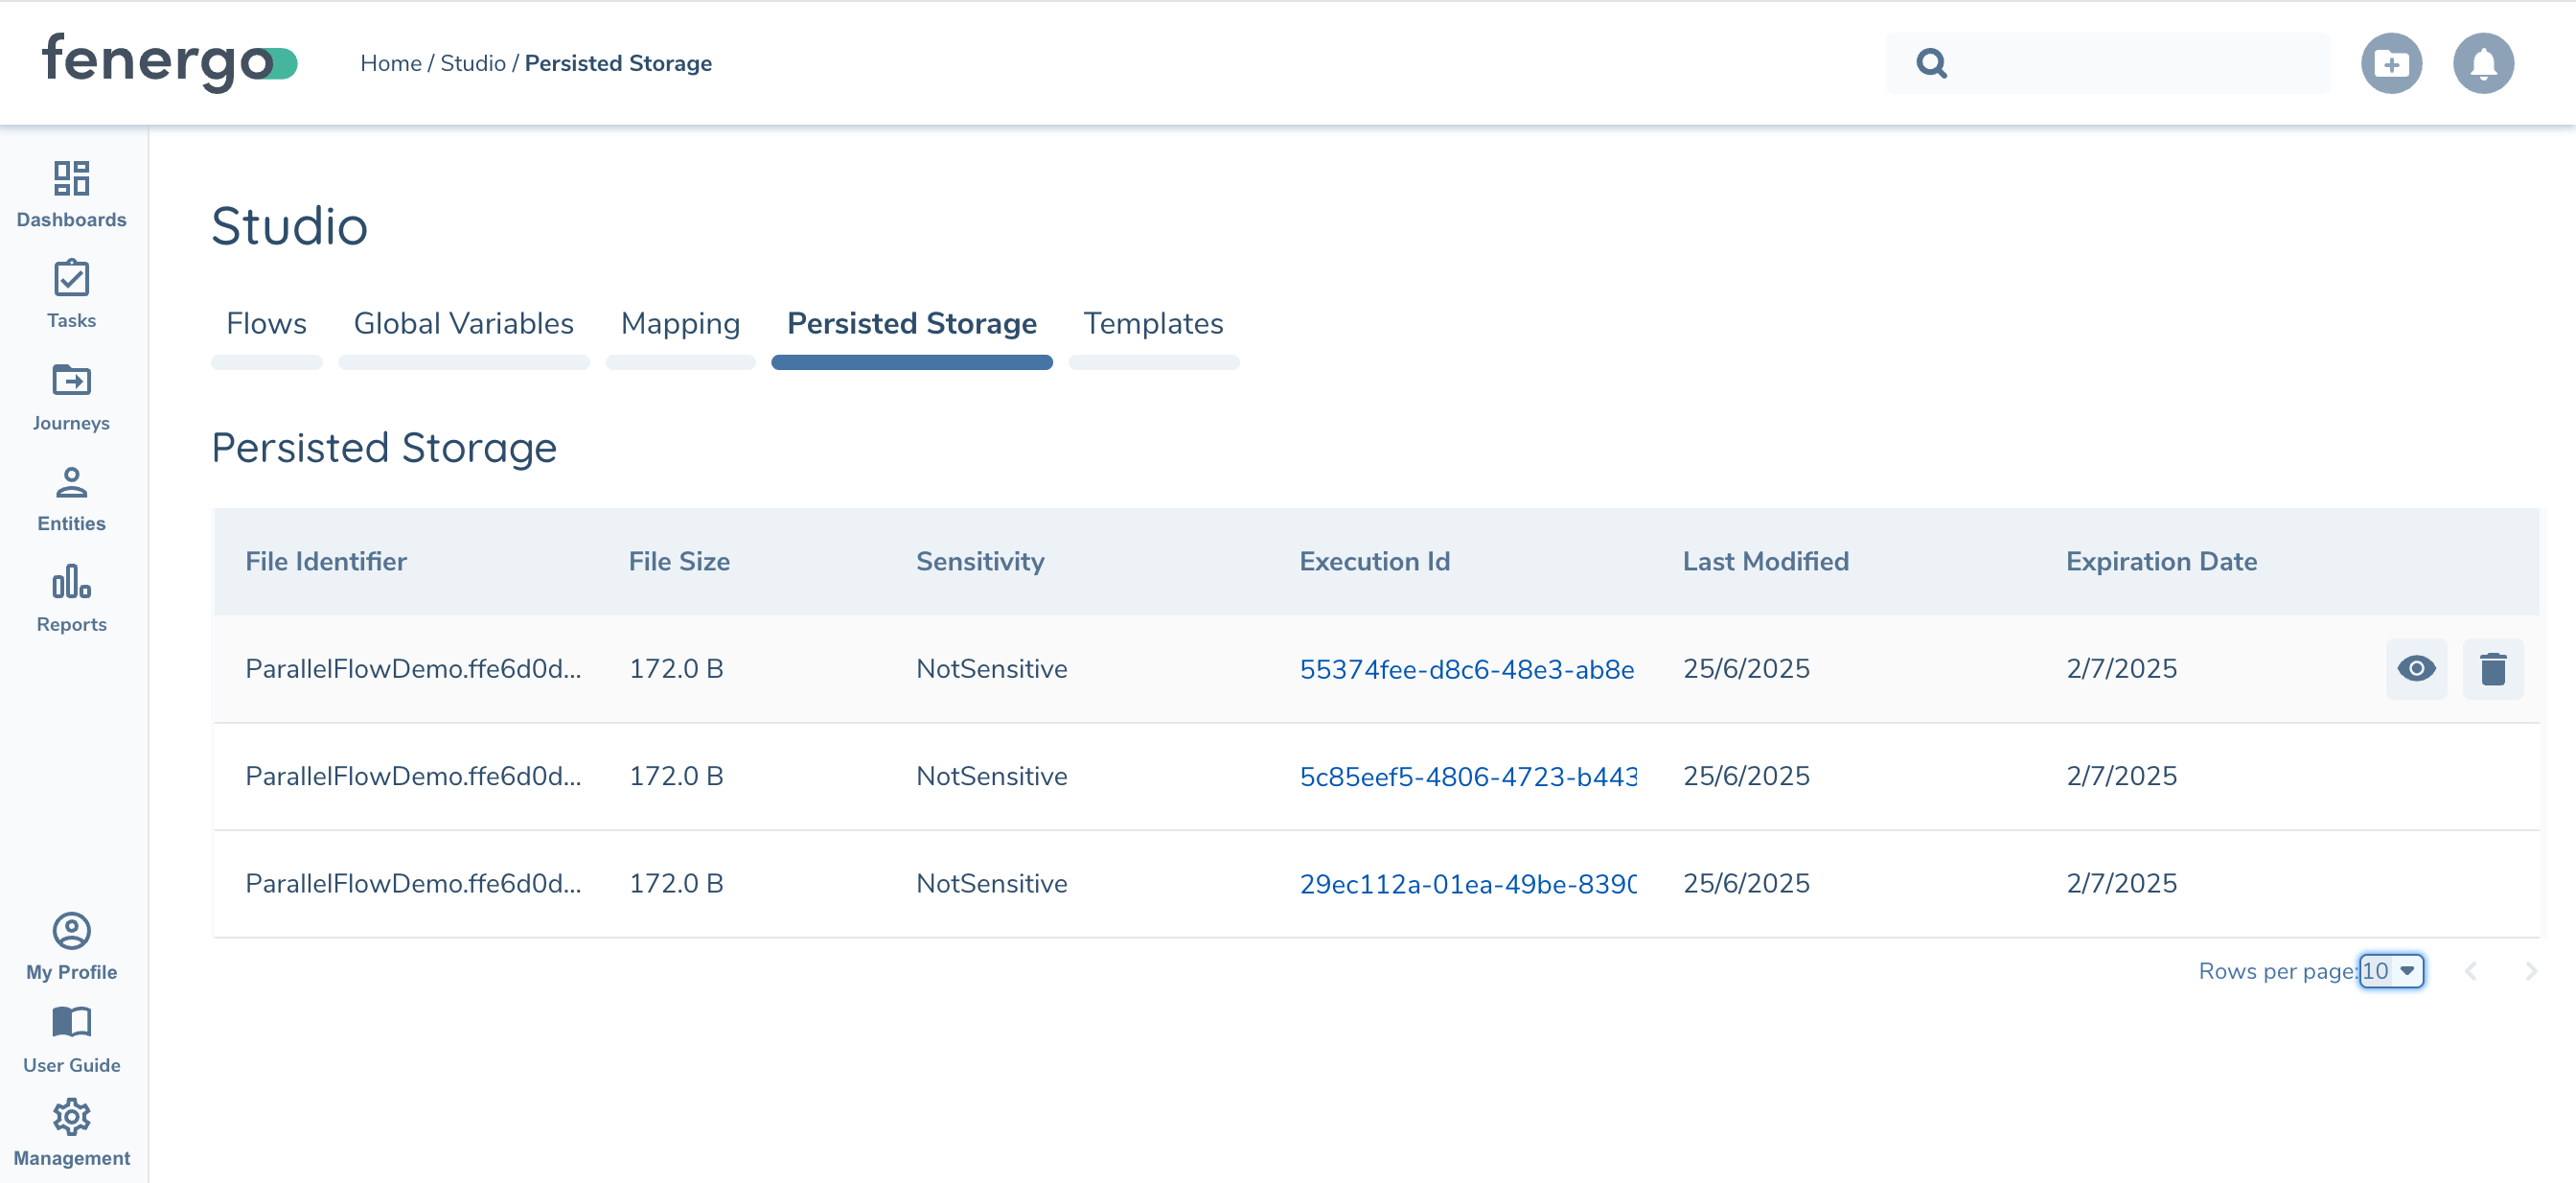
Persisted Storage
Flows can now create files to temporarily store data and access it later. Use this to share data between Flows or store details of a previous execution and access it on subsequent runs (think: Batch Jobs need to store last timestamp ran or last JourneyID processed). See Design Patterns for details on new patterns this feature enables.
All files have a Time To Live (TTL) specified in the Storage task which is used to calculate the document expiry as file is created/updated. When the expiry date is reached the file will be purged.
Files can be reviewed from the Flow Studio in the new Persisted Storage tab:
| Description | |
|---|---|
| 1 | List files in storage as a paginated list. Requires "Persisted Storage Access" permission. Shows list of files, size, Flow Execution that last updated it, the file's sensitivity, and expiration date based on TTL. |
| 2 | View file contents. Requires either "Persisted Storage Get Record" or "Persisted Storage Get Sensitive Record" permissions based on file sensitivity. |
| 3 | Delete File. Requires "Persisted Storage Delete Record" |
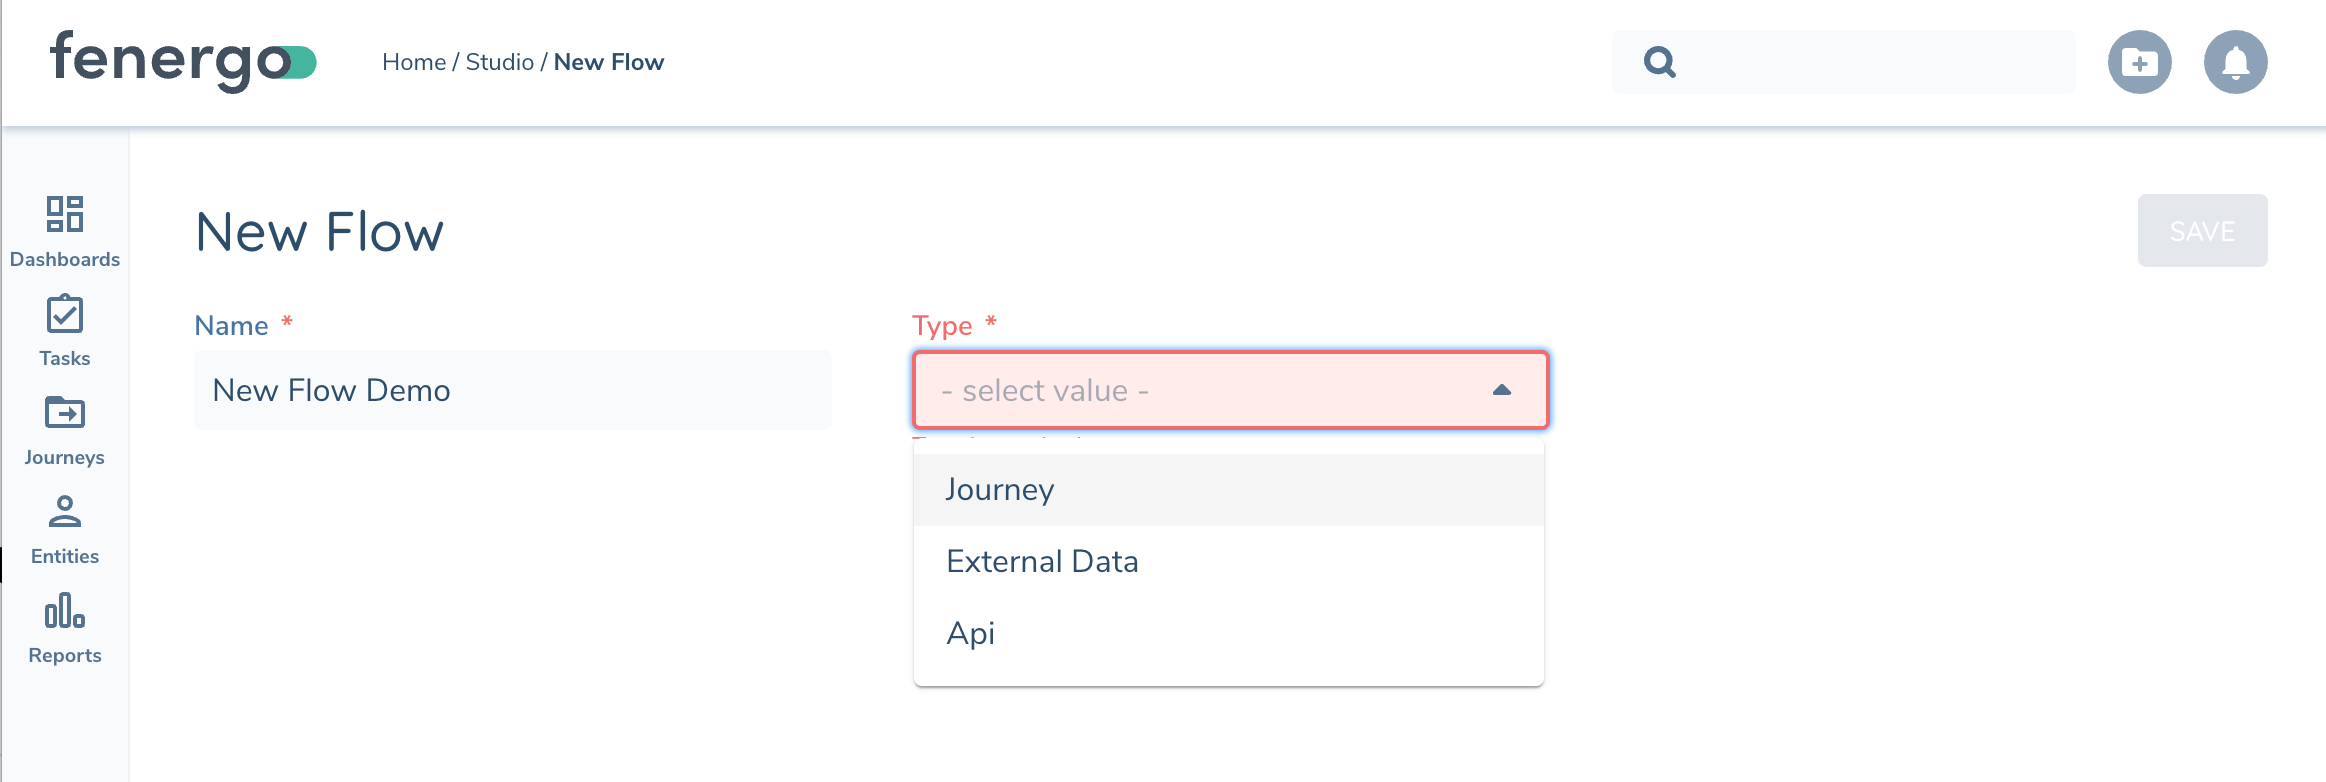
Creating a new Flow
Create a new flow by
- Clicking the "Add" button from Flow Studio page
- Duplicating an existing Flow Version in Flow Studio page
- Importing Flow from Flow Studio / Template tab
You will be prompted to give your flow a Name and specify the type Flow Initiator, this will be how you plan on initiating an instance of your flow.
Version Control
Flows use versioning to manage change/edits like other areas of Fenergo (Policy, Reference Data, etc). A Flow's configuration can only be edited within a draft version. Once the configuration change is ready you can submit the version for Approval. At that point the Flow Version can be Published or Rejected.
Flow Initiators will always launch the latest Published version meaning you can fix a bug and once published, all open Journeys will launch the corrected version.
Participants are tracked with each Flow Version and although not yet visible in UI can be seen in API response. The following actions add the userId as a tracked Participant:
- Create a new Flow or new version
- Contributes (saves) configuration changes to a Flow version
- Submitter - Submits it for approval
- Approver – Approves or Rejects flow version
In the future we will integrate with Audit domain to capture field-level changes within a configuration (e.g. who changed the MDM URL to “invalid-domain.com”)
Version States
The Chip next to the Flow Name tells you the current state of the draft and if it is read-only (eye icon)


Flow Configuration
The primary way of adding a task is to click the '+' icon under the preceding task.
Tasks can also be added via the '+' in Quick Action Bar. This will add a task in the corner of the canvas but won't be connected to the flow of tasks. You can add this task into the flow by using the Next Task configuration, or via the Router Task (see below)
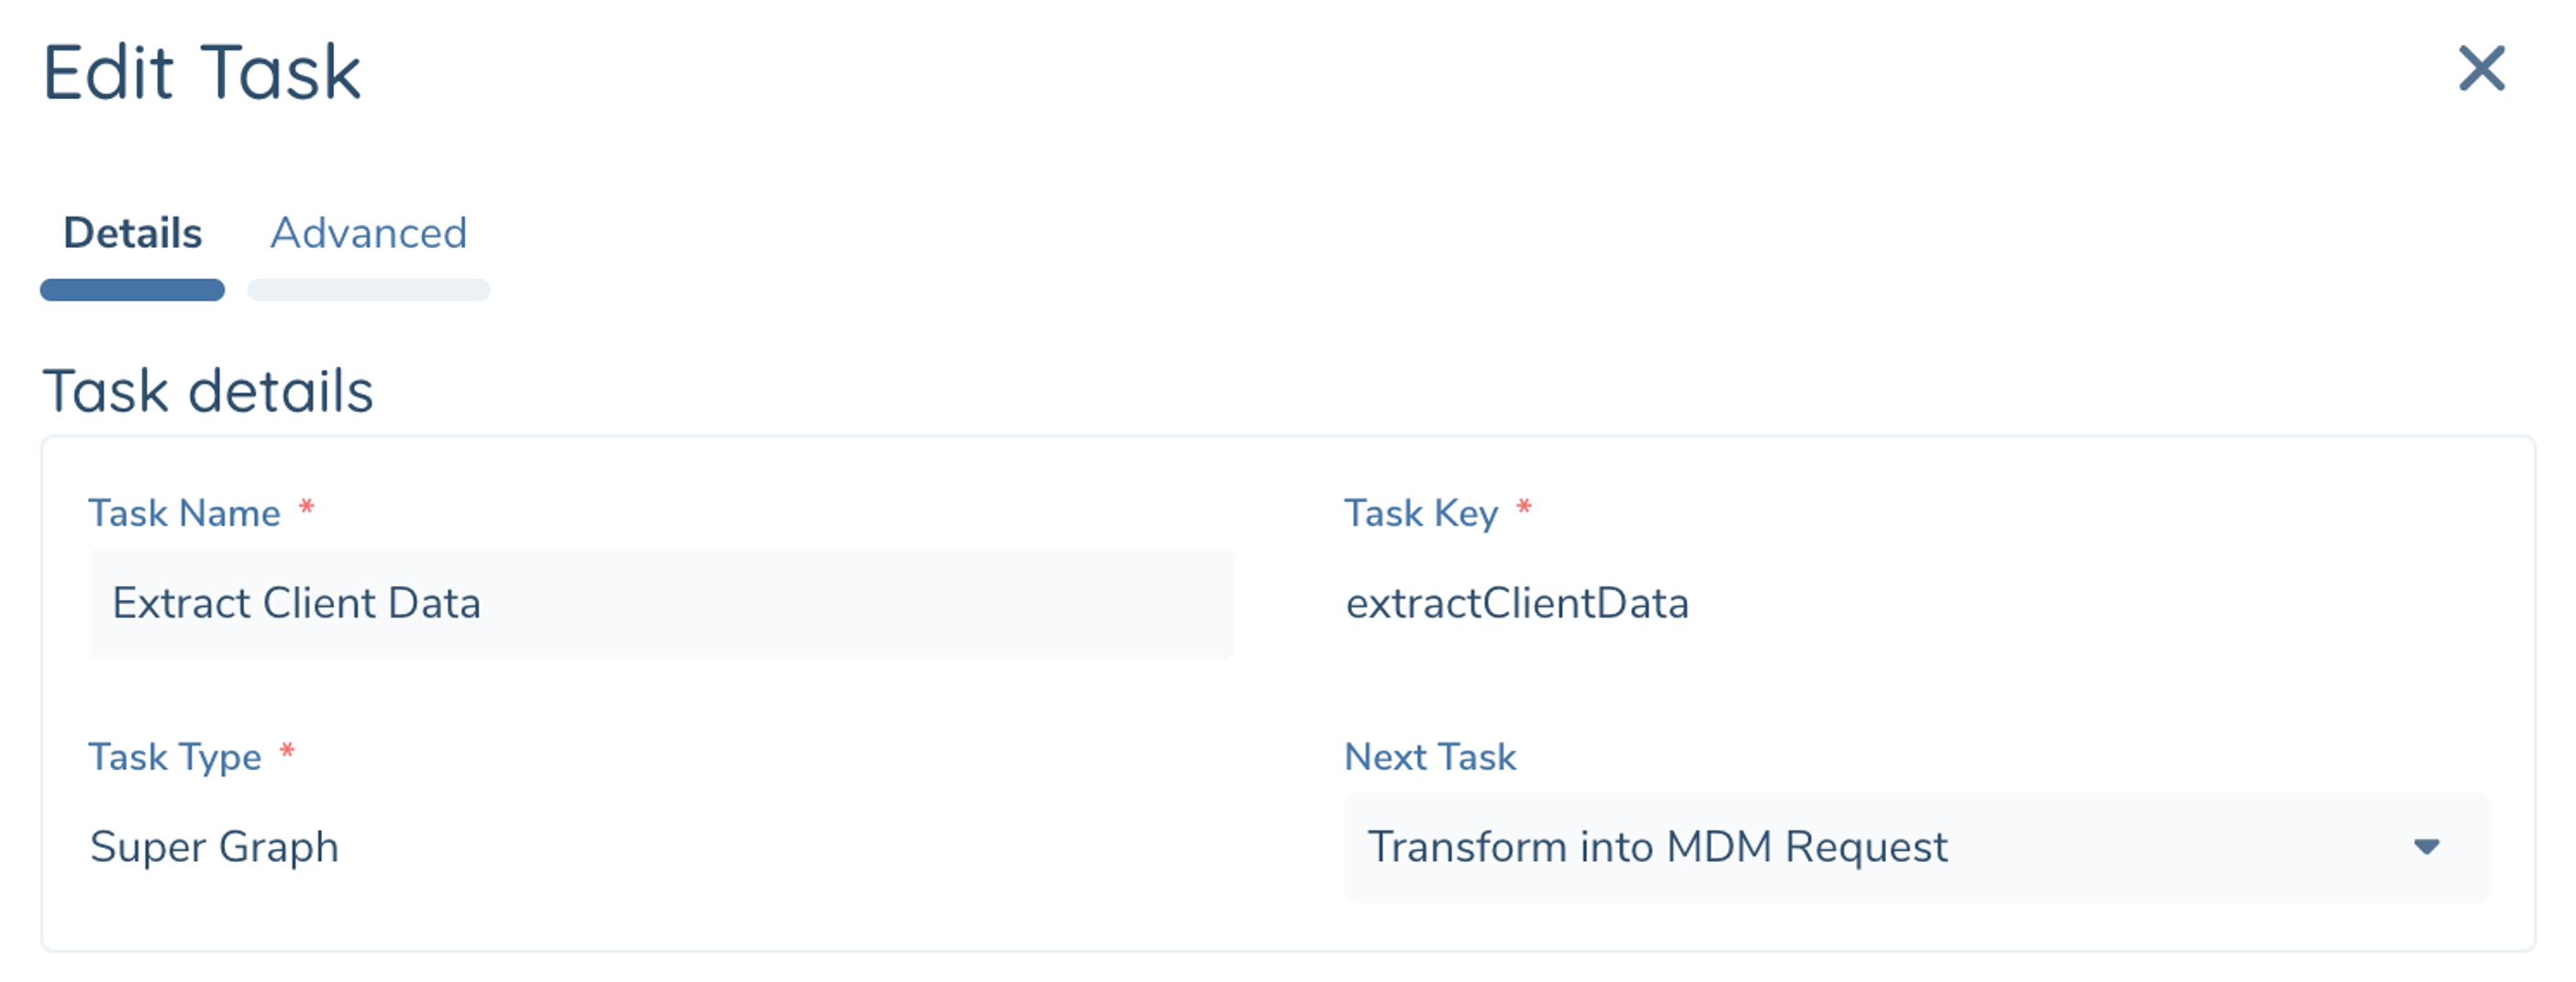
Every Task has a Task Name. This is the friendly name displayed in the Designer
Task Key is autogenerated based on the Name initially, similar to how DataKeys are managed in Policy Configuration. The TaskKey is how this Task is referenced by other task configuration. Once the task is saved the TaskKey cannot be changed but the TaskName can.
Choose a Task Type from available list (e.g. Supergraph, HTTPInvoker, etc). Each different Task Type will have it's own Task Configuraiton. Refer to Task Definitions for a complete list of available Task Types and their configurable options.
Generally you can ignore setting Next Task as this will be automatically populated when you add a task via the '+' of the preceding tasks. Use this field when you are building a loop and you want the task the next point at a task already on the Canvas.
Variables
Flow Variables let you store reusable values like URL or API Key and reference them in multiple places in your Configuration. This way when you need when you need to change them you only have to edit in one place. Flow Variables are created in the 'Variables' tab at the top of the Designer.
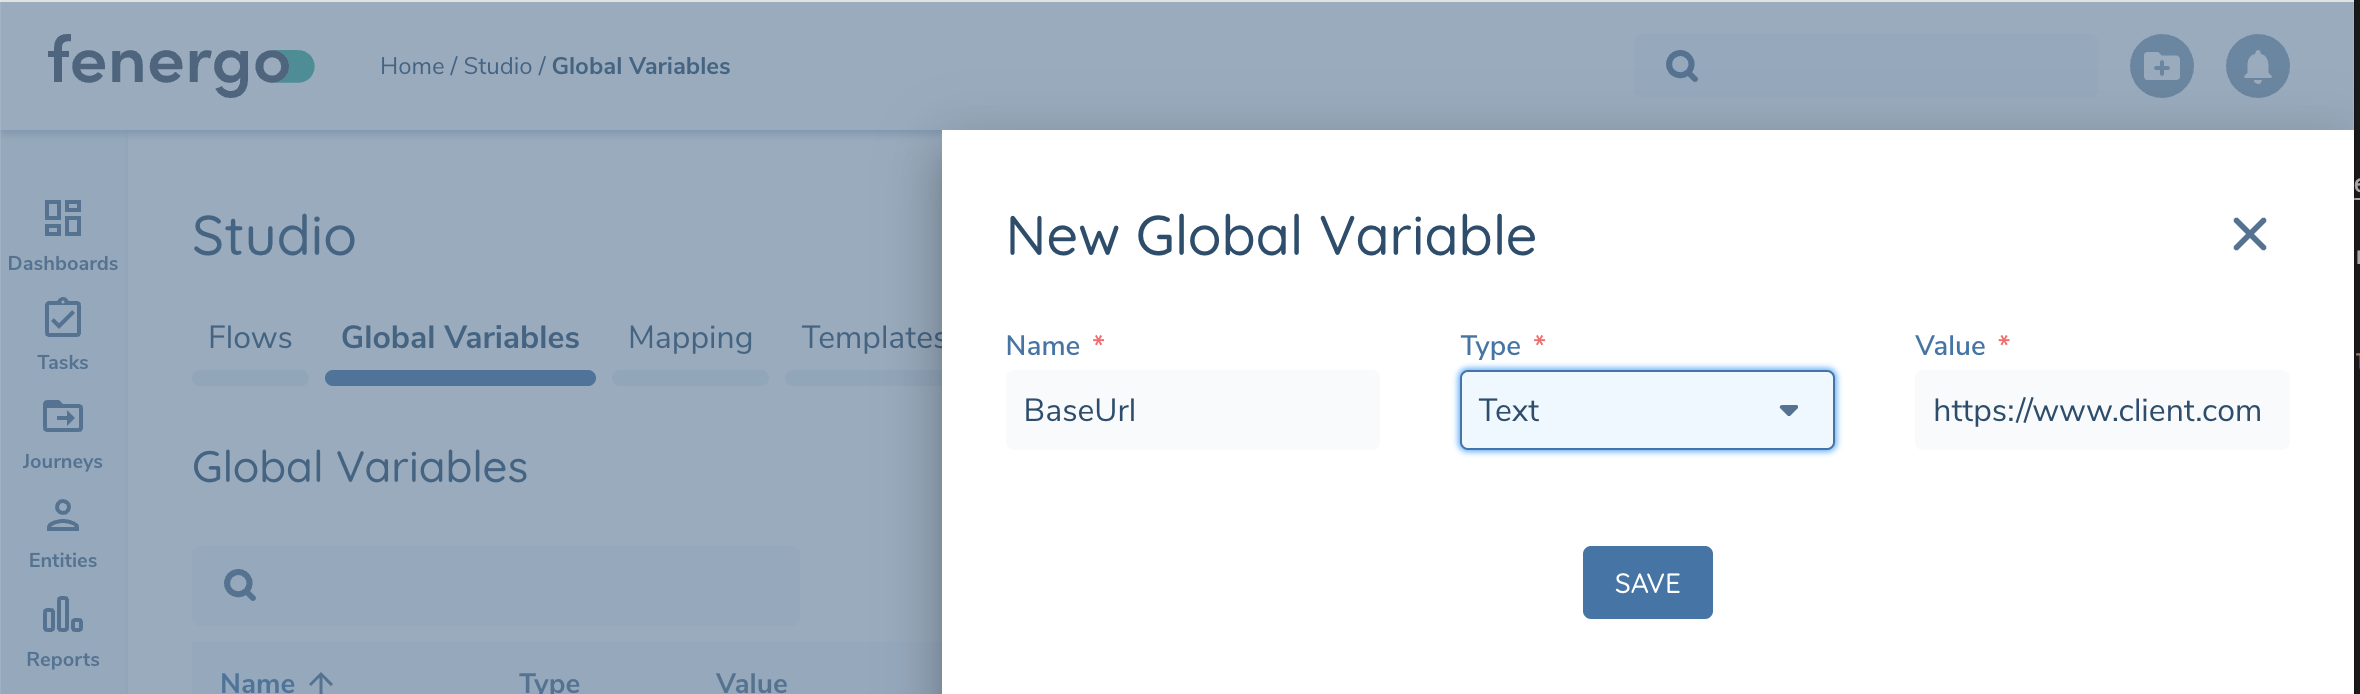
Use Global Variables for values that are shared between multiple Flows or that change between environments. Global Variables can be created from the Flow Studio page.
When creating Flow and Global Variables you must give it a unique Name, Type (Text or Number or Secret), and Value.
Only Global Variables can use Secret type.
Secret Variables are treated as Text but the values are encrypted within your Tenant. They cannot be viewed once created and will not appear in Flow Execution Details. Use this variable type when storing sensitive details like an API Key or Password.
When configuring tasks, variables can be included by wrapping them in double braces "{{variable}}". The Designer will list available variables when you enter {{. Configurable fields can be a combination of Variables and Text

JsonPath
When your variable is a complex type like Json or other Json-based types (e.g. Execution.State, Request, TaskError) you can include a JsonPath Query to select a sub-object or single value within the object.

Templated Input
Some complex Task Configuration allows for Templated Input, such as HTTP Invoker (Body), Transformer (Input), or EventIngress (Payload).
Templated Input allows you to map a Single Variable or create a Custom Definition that merges multiple variables into a template.

When configuring a Custom Definition you must first define the list of variables you want to use in the Template, giving each a friendly name.
Next in the Template field you can define a Json formatted template using static text. The variables defined above can be referenced in your template using '{{' notation. Intellisense dropdowns will list the available variables defined above.

Template Variables support JsonPath queries like regular fields. In the template your variables must always be ebedded using double-quotes but at runtime when the variable/Json-query is evaluated we will merge the result according to the correct datatype (e.g. text, number, object).
In the above example the resulting output would look like the following...
{
  "Entities": [
    {
      "id": "9023c0eb-0d2f-4618-9e74-12e4973219ee",
      "type": "Company",
      "isDraft": true,
      "properties": {
        "eventIngressType": "MDMImport",
        "externalId": "jh-002-20250123",
        "legalEntityName": "LexCorp Global Industries",
        "companyType": "Private Company",
        "addresses": [
          {
            "addressType": "Registered",
            "country": "Canada",
            "addressLine1": "1 FREDERICK ST",
            "addressLine2": "15D"
          }
        ]
      }
    },
    {
      "id": "644f5e81-ff93-43b7-a6e1-ad9ef9c96624",
      "type": "Company",
      "isDraft": false,
      "properties": {
        "externalId": "jh-002-20250123-subsid",
        "legalEntityName": "Lexcorp Subsidiary"
      }
    },
    {
      "id": "12c6295f-325e-46ac-b64e-e880a21c711b",
      "type": "Individual",
      "isDraft": false,
      "properties": {
        "lastName": "Luthor",
        "externalId": "jh-002-20250123-ubo",
        "firstName": "Joseph (Lex)"
      }
    }
  ],
  "FlowSource": {
    "entityDraftId": "3ed12e7e-92c5-46f3-a4bd-f56386fe19e4",
    "entityId": "9023c0eb-0d2f-4618-9e74-12e4973219ee",
    "journeyId": "3fdbc884-fc08-4639-aa79-bebc3e77f9af",
    "serviceName": "integrationsDataPublish",
    "taskId": "482adce2-cefe-48e8-8ffc-7f5fb399f1b4"
  },
  "MDMTaskKey": "mdm_publish_response",
  "JourneyData": {
    "journeyId": "3fdbc884-fc08-4639-aa79-bebc3e77f9af"
  },
  "ExecId": "89df1af9-3f93-4955-9f4c-966df9bba5b7"
}