Data Migration API Overview
The activity to migrate data into the Fenergo SaaS platform can be purely client led using the Data Migration Command / Query APIs. Clients can follow the details in this documentation or other training material available to learn how to execute a Migration.
| APIs Referenced | APIs Capabilities: |
|---|---|
| Data Migration Command (V2) | Create and interact with Data Migrations |
| Data Migration Query | Check the status of migrations and retrieve assets |
Your CSV Files which get uploaded to the data migration must be in UTF-8 format. The classic CSV format will strip away non-ASCII characters and and the naming of your Legal Entity's could be affected.
Sample Use Case
  AS: an API consumer:

      GIVEN: I have Data which I want to Migrate onto the Fenergo SaaS platform.

      AND: I have designed my Policy (Data Model)

      AND:  I have prepared and cleansed my source data

      WHEN: the migration is scheduled to be executed

  THEN: I want to move my data onto the Fenergo SaaS platform.
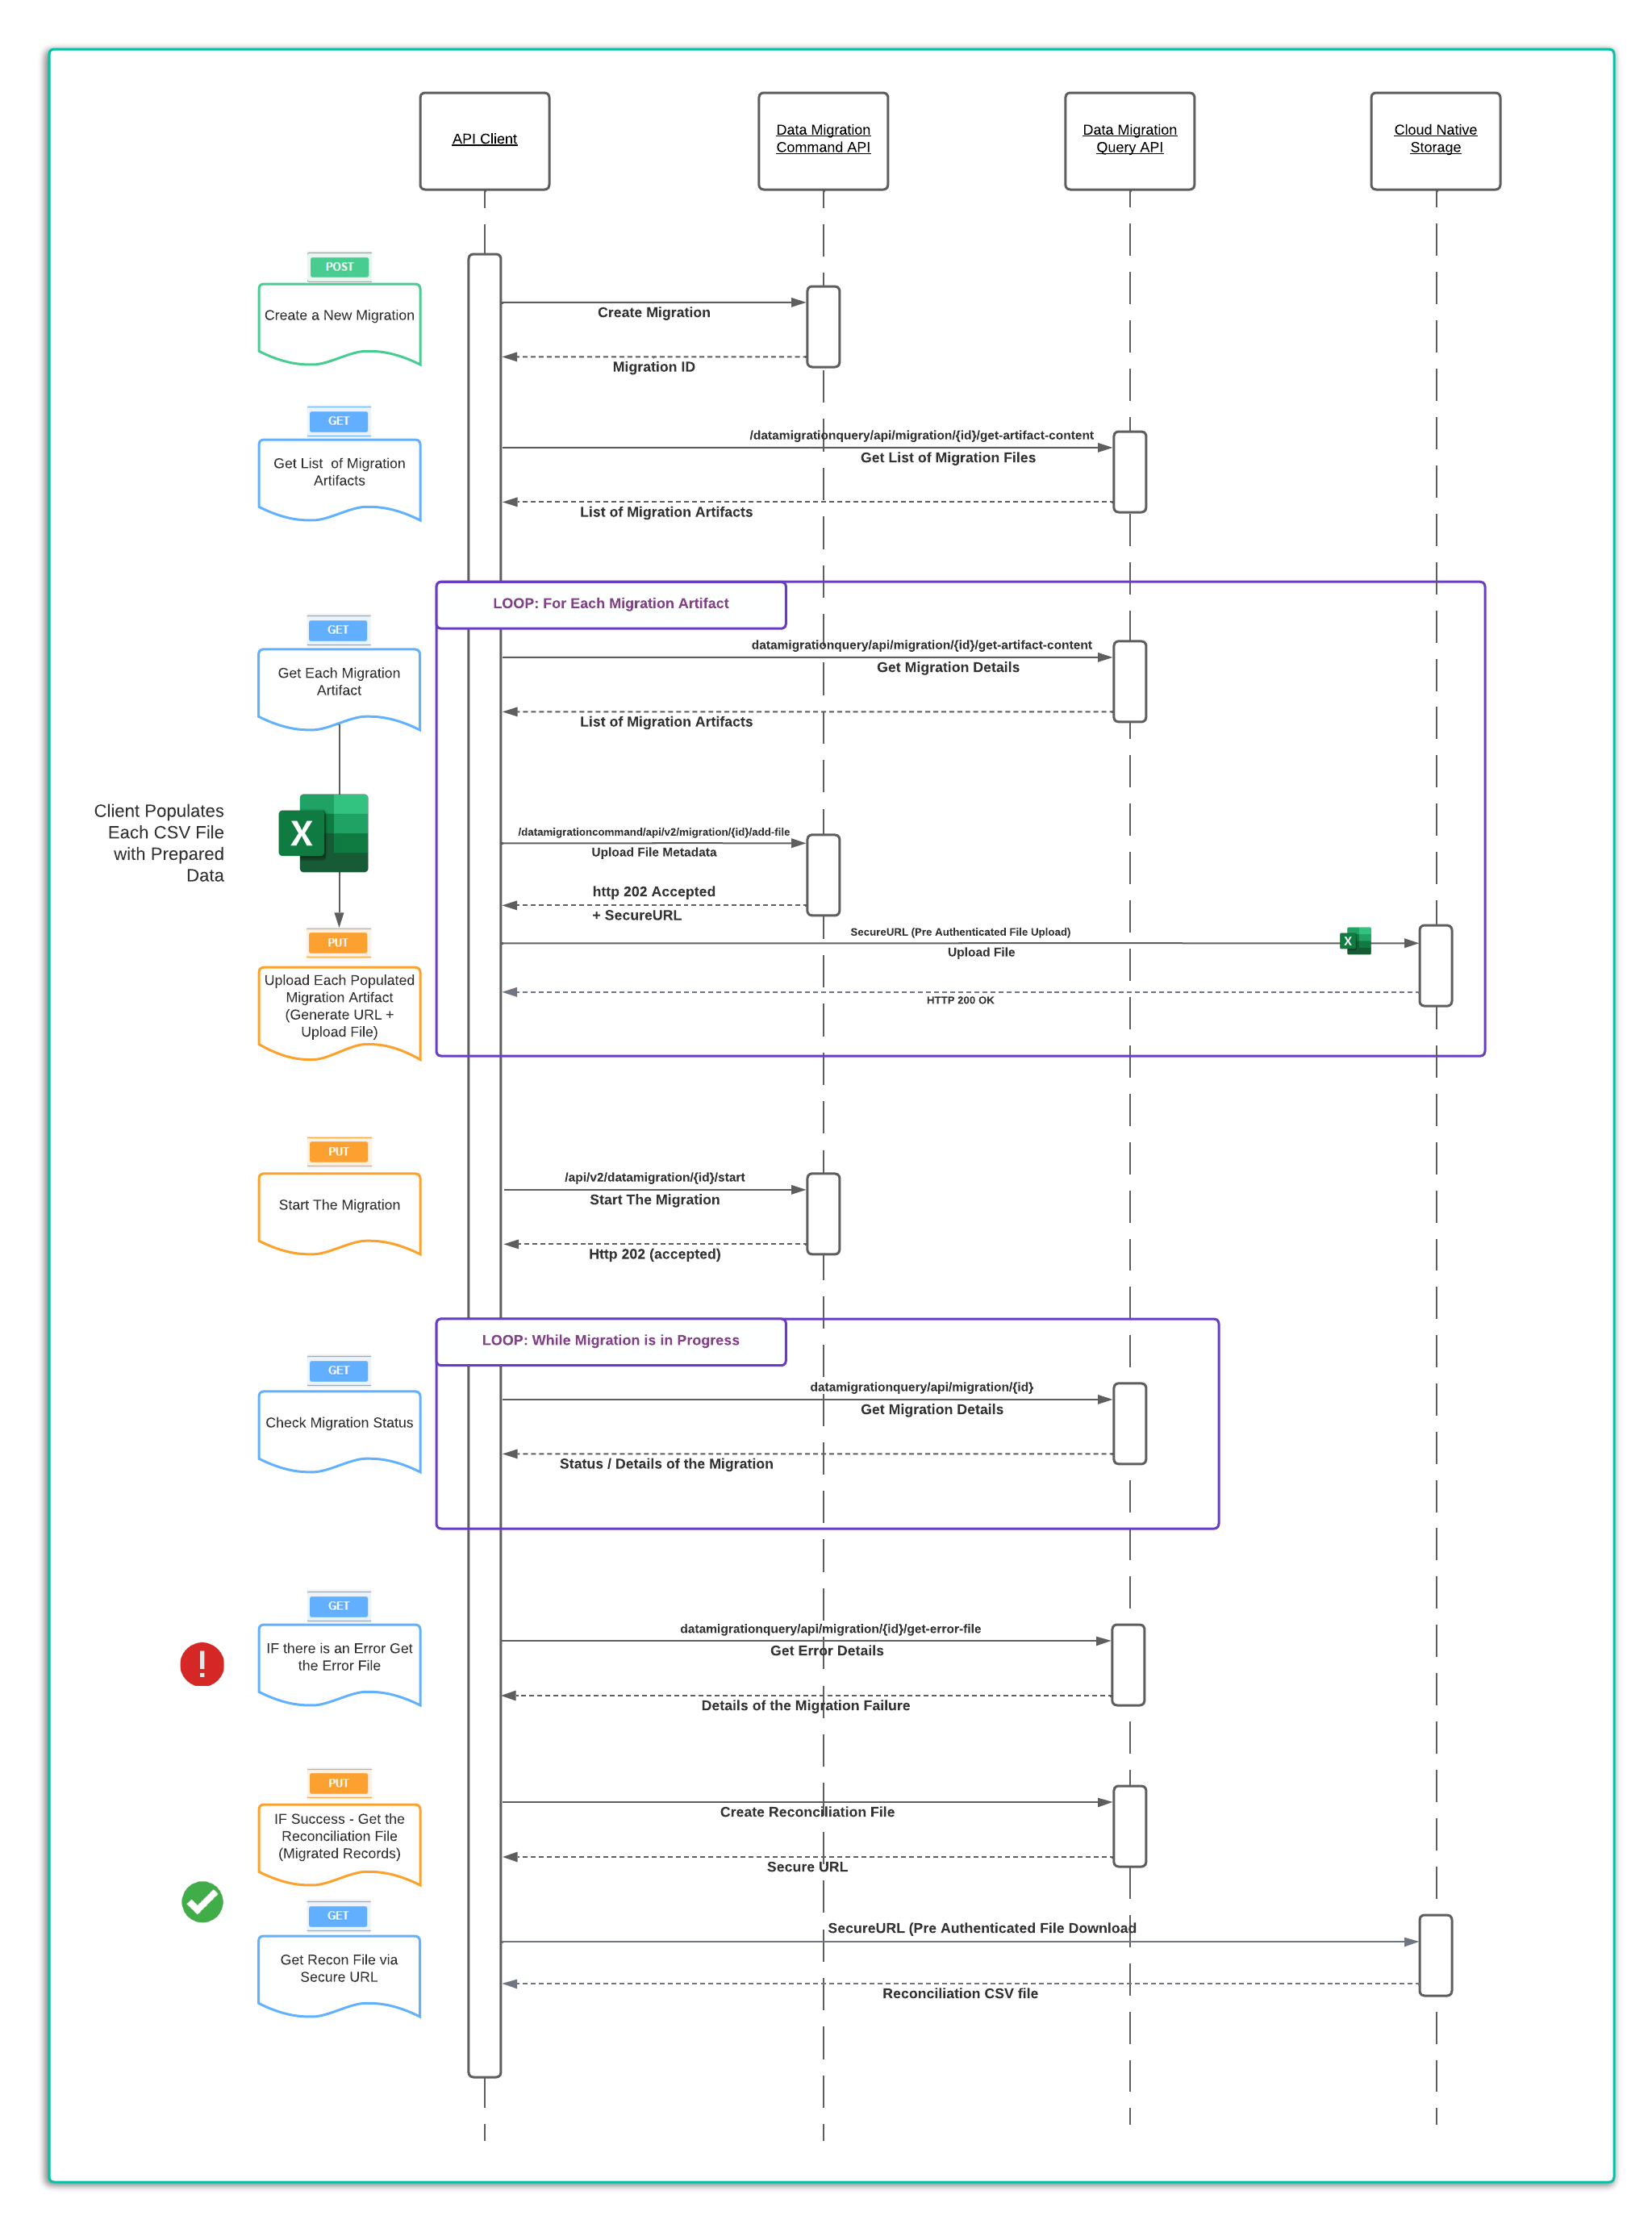
To satisfy this use case, a client will need to chain together some APIs calls. The pattern is illustrated below and will vary only in terms of how much data is being migrated or the number of artifacts generated based on the complexity of the policy's used.
- 1 Create a migration for specified jurisdiction(s).
- 2 Get a list of the generated artifacts for that migration.
- 3 Get each artefact generated, download the file(s).
- 4 Populate these source CSV files with the data to be migrated (saved in UTF-8 format).
- 5 Upload the populated artifacts
- 6 Start the Migration
- 7 Check the Migration Status.
- 8 Get the Error File (if there has been an error)
- 9 Get the Migrated Records file if the migration has been Successful.
These steps are illustrated in the sequence diagram below:
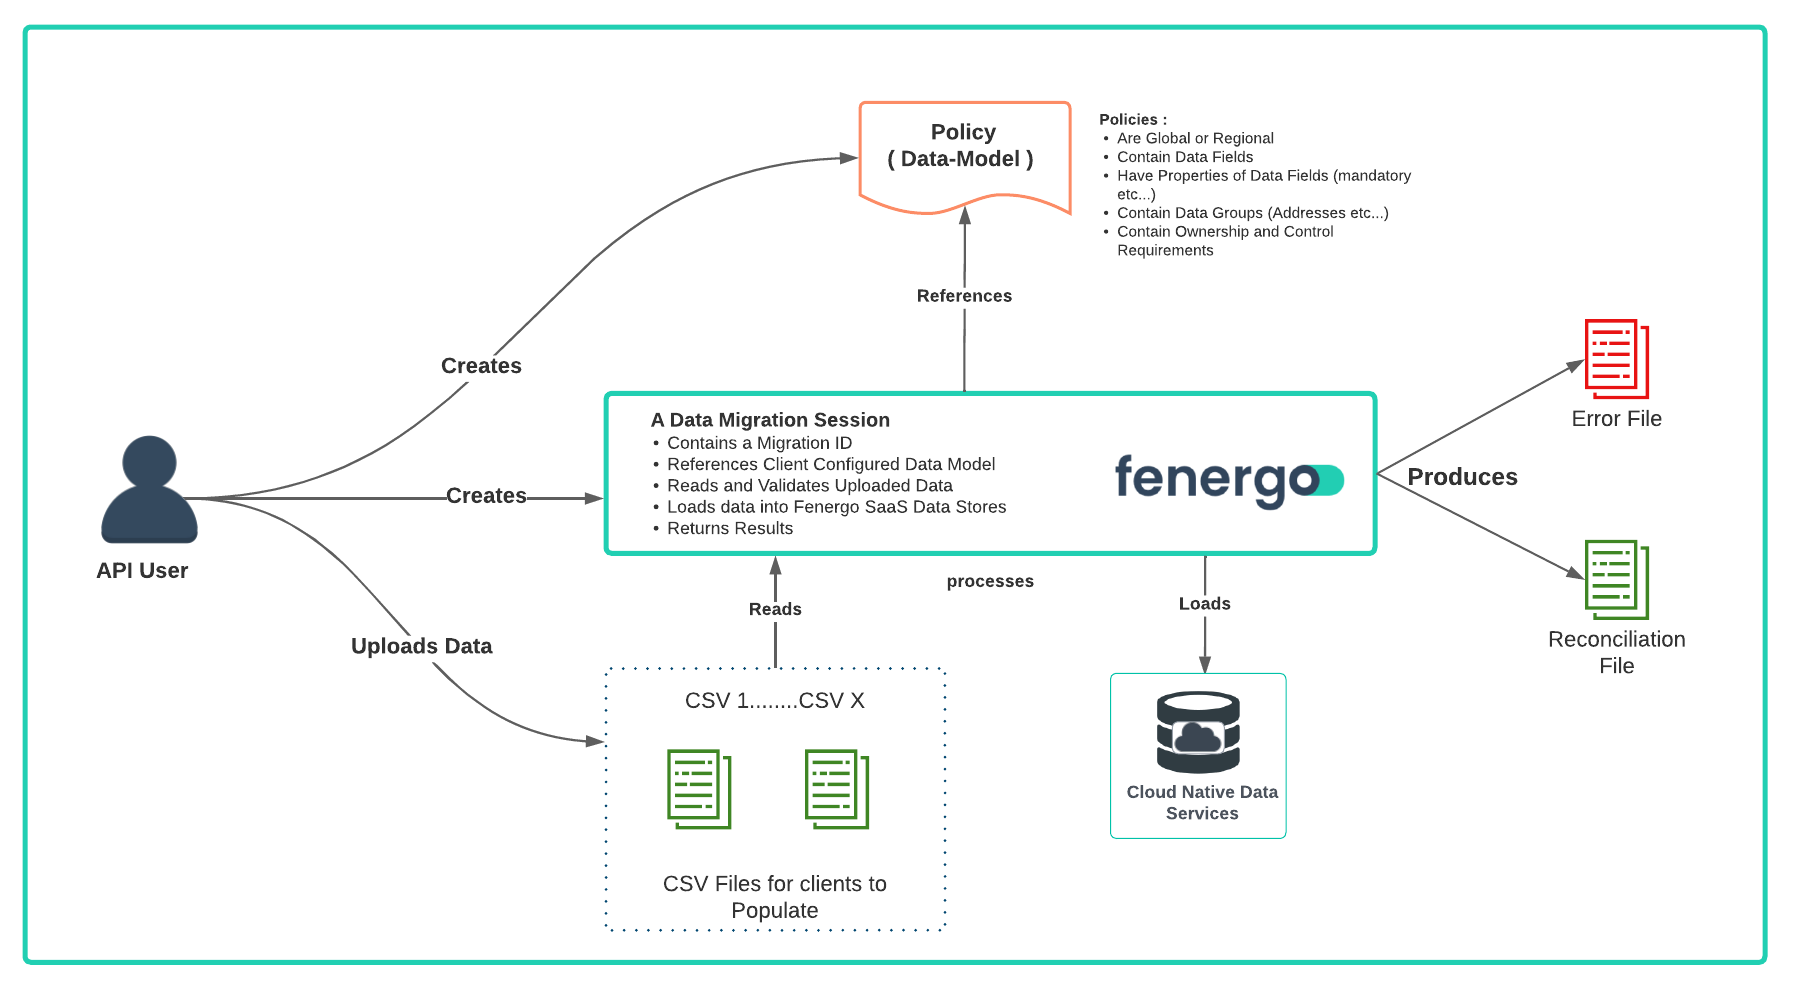
Data Migration - Before You Start
Data Migration has a hard dependency on the Policiescreated by the client. These are the data models into which data is migrated. These policies define the structure and data fields a FenX client uses to capture requirements and each policy is aligned to a geographic jurisdiction.
The Jurisdiction(s) are passed as a list to the Create Migration API Call and this list is used to identify the policies to use for the Migration. The Policy dictates what data the user wants to migrate. The validation which has been specified in the policy is used to validate the data migrated onto the platform. So when transforming and preparing data for migration clients can use the structure of a Policy(s) as a measure of correctness for their prepared data.
A migration schema is also generated and theoretically a user populating data does not need knowledge of the Fenergo Policy, everything required is covered by the CSV files with column headers (What Data) and the Schema (Format of Data).See below for a logical overview of whats involved with a Data Migration.
Create a New Migration
In the below example an approach to Migration has been selected where a new policy was created explicitly for the purpose of doing a migration. We refer to this as a Data Migration Policy. This is not a Policy which will ever be used in a journey and the data elements specified are duplicates of data elements from other existing policies. A Data Migration Policy is a great strategy when a client does not have all the data to meet the policy requirements, may be missing some mandatory fields or simply wants to execute a migration on a smaller sub-set of data.
The Fenergo SaaS platform will NOT have an issue if field names in one policy conflict with fields in another policy. The fields will simply become a property of a JSON document within the NoSQL Database and if they get replaced by the same field from a different policy inside a journey, the system will simply overwrite the original value.
To create a new migration session, send a HTTP POST to {{baseURL}}/datamigrationcommand/api/v2/migration. The body of the API call is listed below and as can be seen lists the jurisdiction required for the migration. This is a string reference to a single policy which will be used to create the migration artifacts. There is also a field called productJurisdiction which a reference to a product requirement set. This will create artifacts to migrate products if required.
{
  "data": {
    "jurisdiction": "Migration",
    "productJurisdiction": "Global"
  }
}
  {
    {
      "data": "a5261b21-2eee-45ce-b629-b53b6b5f1b81",
      "messages": null
    }
  }
Get the Migration Artifacts
When a migration is created, FenX generates all the files needed for clients to understand the data they need to gather and the files into which the migration data is placed. The following API call will list all of the files which have been generated as part of the Migration Session.
The files generated are CSV representations of the policy's that cover the Jurisdictions passed in when the migration is created. This allows clients the freedom to break up their migrations by client jurisdictions if they wish, or potentially do them all collectively.
  HTTP GET FORMAT:
  ==================
  {{baseURL}}/datamigrationquery/api/migration/{migrationID}/get-artifacts

  HTTP GET EXAMPLE:
  ==================
  {{baseURL}}/datamigrationquery/api/migration/a5261b21-2eee-45ce-b629-b53b6b5f1b81/get-artifacts
The response lists all of the files a client can now download. The CSV files are simply "header" files with the column name specified and the Schema file is a detailed excel file describing all the data
{
    "data": [
        {
            "type": "sample-templates",
            "name": "Addresses",
            "format": "csv"
        },
        {
            "type": "sample-templates",
            "name": "AssociationsToCompany",
            "format": "csv"
        },
        {
            "type": "sample-templates",
            "name": "Company",
            "format": "csv"
        },
        {
            "type": "sample-templates",
            "name": "Individual",
            "format": "csv"
        },
        {
            "type": "sample-templates",
            "name": "Unique Identifiers",
            "format": "csv"
        },
        {
            "type": "schema-references",
            "name": "fenx-data-migration-schema",
            "format": "xlsx"
        }
    ],
    "messages": null
}
Get Specific Migration Artefact
For each item in the "Get Artifacts" response, an API call is used to retrieve the file. This can be done in Postman or via a client application. There are 3 elements to each response.
-
"type"of artifact, which can be sample-template (a csv file containing the headers for that item) or a schema-reference (which is the schema file for the migration). -
"name"is the name of the file / table (in migration these files are also referred to as tables) -
"format"of the artifact which will either be a CSV or an xlsx file.
  HTTP GET FORMAT:
  ==================
  {{baseURL}}/datamigrationquery/api/migration/{migrationID}/get-artifact-content?type={company_artifactType}&name={company_artifactName}&format={company_artifactFormat}

  HTTP GET EXAMPLE to READ Company File:
  ==================
  {{baseURL}}/datamigrationquery/api/migration/a5261b21-2eee-45ce-b629-b53b6b5f1b81/get-artifact-content?type=sample-templates&name=Company&format=csv
Once all the files are saved, clients will have all the artifacts required to populate their data into the CSVs and the next step is to upload them. For mode details on understanding and populating the Migration Artifacts themselves, see What are the Data Migration Artifacts.
Upload Migration Artefact - Via API Gateway
Once the data is populated in the CSV files, clients can then upload their files (migration source data) one at a time.
For small data sets where each source file is less than 4Mb, the files can be uploaded through the AWS API Gateway. For larger data sets, clients will be able to use the "Secure URL" upload process. This is an older way of uploading files and clients should move to using the SecureURL upload mechanism outlined below
  HTTP PUT FORMAT (via API Gateway):
  =================================
  {{baseURL}}/datamigrationcommand/api/migration/{migrationID}/add-file

  HTTP PUT EXAMPLE to Upload Company File (via API Gateway):
  ==========================================================
  {{baseURL}}/datamigrationcommand/api/migration/a5261b21-2eee-45ce-b629-b53b6b5f1b81/add-file
Clients can codify their own Migration Orchestration in a way that aligns to their operational requirements. There are three headers which need to be populated:
-
Data.File**Can be selected from a local computer for the purposes of testing.
-
typeshould be set as show to "application/vnd.ms-excel"
-
Data.TableName Is the table which corresponds to the CSV file being uploaded.
-
When the file is uploaded, it returns an identifier to that file which can then be seen in the status of the migration.
  HTTP RESPONSE:
  ==================

  HTTP 202 Accepted

  {
      "data": "6ac92e59-0013-4183-a52f-192d113e9cb7",
      "messages": null
  }
Upload Migration Artefact - Via Secure URL
Fenergo uses AWS S3to store documents that clients upload against Entities. Rather than upload files as binary attachments through he API Gateway (which has a file size limit) the pattern to follow is to call an API which accepts document Metadata and returns a Secure URL. This is a short-lived pre authenticated link to an S3 location which needs to be used within 7 seconds. (intention is that its a system to system interaction).
    {{baseURL}}/documentmanagementcommand/api/v2/documentmanagement

    HTTP PUT Request:
    ==================
    {
     "data": {
       "fileName": "Individual.csv",
       "tableName": "Individual"
     }
    }
-
"fileName"is the filename that you plan to upload. This is just a reference as you are not uploading a physical file. -
"tableName"should match one of the Artifacts from the earlier call to retrieve artifacts.
{
    "data": {
        "id": "7943d6f4-c478-49bd-9152-aa3e9f3f3cc8",
        "documentRequirementIds": null,
        "documentDataKey": null,
        "documentType": "Account Opening Form",
        "status": "Processing",
        **"signedUrlToUpload"**: **"https://xxxxxx-yyyyyy-gggggg-scan-7b5e8cesdsfsdfsdfsdfsX-Amz-Expiraws4_request\u0026X-Amz-Date=20220703T101935Z\u0026X-Amz-SignedHeaders=host\u0026X-Amz-Signature=c511523b6f82bd71e598952210773520b2447e7ec45870540e54029328f7a611"
    },
    "messages": null
}
"signedUrlToUpload"is the Secure URL that can be used to upload a file. This is only valid for a short amount of time, and is intended for system to system interaction.
Check the status of a migration
At any time the status of a migration can be called by sending the following GET command
  HTTP GET FORMAT:
  ==================
  {{baseURL}}/datamigrationquery/api/migration/{{migrationID}}

  HTTP GET EXAMPLE
  ==================
  {{baseURL}}/datamigrationquery/api/migration/a5261b21-2eee-45ce-b629-b53b6b5f1b81
In the response, the uploaded files can be seen listed against the tables. There are three status a migration can be in.
- Failed
- Running
- Completed
{
    "data": {
        "id": "a5261b21-2eee-45ce-b629-b53b6b5f1b81",
        "createdDate": "2021-10-11T16:31:10.434+00:00",
        "completedDate": null,
        "status": "Waiting",
        "entityCount": 0,
        "migratedEntityCount": 0,
        "failedEntityCount": 0,
        "associationCount": 0,
        "migratedAssociationCount": 0,
        "dataMigrationFilesDto": [
            {
                "folderPath": "/BDED51D4-598E-4079-9CF6-43E74144B415/a5261b21-2eee-45ce-b629-b53b6b5f1b81/staging/AssociationsToCompany/",
                "fileName": "AssociationsToCompanyWithData.csv",
                "uploadedDate": "2021-10-11T16:36:11.811+00:00"
            },
            {
                "folderPath": "/BDED51D4-598E-4079-9CF6-43E74144B415/a5261b21-2eee-45ce-b629-b53b6b5f1b81/staging/Unique Identifiers/",
                "fileName": "Unique Identifiers.csv",
                "uploadedDate": "2021-10-11T16:36:43.113+00:00"
            },
            {
                "folderPath": "/BDED51D4-598E-4079-9CF6-43E74144B415/a5261b21-2eee-45ce-b629-b53b6b5f1b81/staging/Company/",
                "fileName": "CompanyWithData.csv",
                "uploadedDate": "2021-10-11T16:37:11.887+00:00"
            },
            {
                "folderPath": "/BDED51D4-598E-4079-9CF6-43E74144B415/a5261b21-2eee-45ce-b629-b53b6b5f1b81/staging/Individual/",
                "fileName": "IndividualWithData.csv",
                "uploadedDate": "2021-10-11T16:37:40.36+00:00"
            },
            {
                "folderPath": "/BDED51D4-598E-4079-9CF6-43E74144B415/a5261b21-2eee-45ce-b629-b53b6b5f1b81/staging/Addresses/",
                "fileName": "AddressesWithData.csv",
                "uploadedDate": "2021-10-11T16:38:02.569+00:00"
            }
        ],
        .
        .
        .
        .
        .
}
Replacing an uploaded file
If an error was made uploading a file, or if the migration has failed and a file needs to be replaced with correct data, the file must first be deleted from the Migration Session and then the original "PUT" can be called again to upload a new file.
  HTTP DELETE FORMAT:
  ==================
  {{baseURL}}/datamigrationcommand/api/v2/migration/{{migrationID}}/{{TableName}}

  HTTP DELETE EXAMPLE
  ==================
  {{baseURL}}/datamigrationcommand/api/v2/migration/a5261b21-2eee-45ce-b629-b53b6b5f1b81/Company
The response from the server when a file has been deleted is
  HTTP RESPONSE:
  ==================

  HTTP 202 Accepted
If the file does not exist the API will return the following error:
  HTTP ERROR RESPONSE:
  ====================

  {
      "data": null,
      "messages": [
          {
              "message": "File for table Company not found in the Migration xxxxxxx-xxxx-xxxx-xxxx-xxxxxxxxxxxxxx ",
              "type": "Error"
          }
      ]
  }